
Trimming a video means cutting out unwanted sections from the start, middle, or end of your footage without changing the video’s frame or dimensions. It’s a simple yet powerful editing step that helps you remove fluff, fix timing, and focus your message. If you’re wondering how to trim a video, the answer usually comes down to dragging in/out handles, setting time markers, or using blade tools in video editing software. Trimmed videos are everywhere starting from social media clips and YouTube tutorials to corporate presentations, e-commerce reels, and event highlights.
You might be a content creator, marketer, editor, or business owner, either way, trimming video content properly makes your videos more polished, professional, and viewer-friendly.
In this guide, you’ll get:
- A clear explanation of what trimming means and how it differs from cutting and cropping.
- Step-by-step tutorials on how to trim using Adobe Premiere Pro, After Effects, DaVinci Resolve, and mobile apps like CapCut.
- Answers to common questions about video quality, file size, supported formats, and how long trimming usually takes.
- A breakdown of tools that let you trim both audio and video together.
- Tips on where to outsource bulk video trimming for high-volume needs.
Whether you’re using a desktop editor or looking for a trim video online free tool, this article will equip you with key editing knowledge that will get your content the attention it deserves.
What you’ll learn in this article
- 1 What Does it Mean to Trim a Video?
- 2 Why is Trimming Videos Important?
- 3 How to Trim a Video Using Adobe Premiere Pro
- 3.1 Step 1: Launch Adobe Premiere Pro and Create a New Project
- 3.2 Step 2: Import the Video Clip
- 3.3 Step 3: Drag the Clip to the Timeline
- 3.4 Step 4: Use the Razor Tool (Optional) or Direct Trim
- 3.5 Step 5: Fine-tune Your Trim
- 3.6 Step 6: Trim Audio Simultaneously (If Needed)
- 3.7 Step 7: Preview Your Trimmed Clip
- 3.8 Step 8: Export the Final Video
- 4 How to Trim Video Using Adobe After Effects
- 5 How to Trim a Video Using DaVinci Resolve
- 6 How to Trim a Video on a Phone
- 7 Can You Trim Both Video and Audio Tracks Simultaneously?
- 7.1 What is the Difference Between Linked and Unlinked Tracks?
- 7.2 When You May Want to Trim Separately?
- 7.3 Does Trimming a Video Reduce File Size?
- 7.4 Does Trimming a Video Affect Quality or Resolution?
- 7.5 What are the Common File Formats Supported When Trimming Videos?
- 7.6 How Much Time Does It Usually Take to Trim a Video?
- 7.7 Is It Possible to Undo a Trim After Saving the Video?
What Does it Mean to Trim a Video?
Trimming a video means cutting out unwanted parts from the beginning, middle, or end, without changing its frame or dimensions. Unlike cutting (which splits a clip) or cropping (which alters the frame), trimming simply shortens the video to keep only the essential parts.
It helps remove awkward pauses, mistakes, or irrelevant moments, keeping your video clean, polished, and engaging. Whether you’re using desktop software, a free online tool, or a mobile app, the goal is the same: deliver a sharper, more focused story.
From Instagram Reels to YouTube videos, trimming is a key step in content creation. Just like photo editing enhances visuals, trimming keeps your video clear and intentional from start to finish.
What is the Difference Between Cutting, Cropping, and Trimming in Video Editing?
The difference between cutting, cropping, and trimming in video editing is based on the type of adjustment made to the video. In video editing, the terms cutting, cropping, and trimming are often used interchangeably, but they refer to very different editing actions. Understanding the distinction between them is key to producing polished, professional-looking content. The key differences between Cutting, Cropping, and Trimming in Video Editing are as follows:
| Action | Changes Video Length? | Changes Frame/Visual Area? | Common Use |
|---|---|---|---|
| Trimming | Yes | No | Shorten a clip by removing beginning/end |
| Cutting | Yes (by segmenting) | No | Reordering or deleting parts of a clip |
| Cropping | No | Yes | Focus on the subject, fit the aspect ratio |
Trimming a Video
Trimming means removing unwanted sections from the beginning, middle, or end of a video clip without altering the frame size or dimensions.
- Example: Removing a 10-second pause at the start of your video.
- Common tools: CapCut, Adobe Premiere Pro, iPhone Photos, and online trim video editors.
- Purpose: Clean up timing, improve pacing, and remove fluff.
Trimming is ideal for tightening your content while keeping the entire visual frame intact.
Cutting a Video
Cutting involves splitting a video into multiple parts. You can then delete or rearrange those segments.
- Example: Cutting a 60-second clip into three 20-second chunks to insert text or transitions between them.
- Common tools: Premiere Pro’s Razor Tool, DaVinci Resolve’s Blade, or any timeline-based editor.
- Purpose: Rearranging scenes, isolating highlights, or creating jump cuts.
Cutting is about dividing a video to give you full control over its structure and flow.
Cropping a Video
Cropping changes the visible frame of a video. It removes portions of the video from the sides, top, or bottom—similar to cropping a photo.
- Example: Cropping out black bars or unwanted background from the edges of the video.
- Common tools: CapCut, iMovie, Premiere Pro, and most online video trimmer tools.
- Purpose: Focus attention on the subject, remove distractions, or fit specific aspect ratios (like 1:1 for Instagram).
Cropping changes the visual area of the frame, not the length of the video.
Why is Trimming Videos Important?
Trimming videos is important because it isn’t just a technical step, it’s a creative and strategic decision that can dramatically improve the quality and impact of your content.
1. Improves Viewer Retention
In an age of short attention spans, the first few seconds of a video can determine whether someone keeps watching or scrolls away. A 2025 report by HubSpot published in its Marketing Trends Report found that 21% of marketers believe short-form video content delivers the highest ROI across all formats. Trimming reinforces this trend by cutting out slow intros, unnecessary pauses, or off-topic segments that can cause viewers to lose interest. A well-trimmed video keeps your message clear and your audience engaged.
2. Creates a More Professional Look
Whether you’re creating videos for social media, a marketing campaign, or a YouTube channel, rough cuts or long, drawn-out clips can look unprofessional. Trimming helps tighten the narrative, smooth transitions, and enhance the overall production quality.
3. Saves Time and Resources
Shorter videos are easier to upload, stream, and share—especially on platforms that favor bite-sized content like TikTok, Instagram, or Twitter. Plus, a trimmed video typically has a smaller file size, which can be faster to export and easier to manage across devices or online platforms.
4. Focuses the Message
Trimming lets you remove anything that doesn’t serve your core message—whether it’s rambling dialogue, bloopers, or off-topic tangents. The result is a more focused and compelling piece of content that resonates better with your audience.
5. Essential for Repurposing Content
Repurposing content for social media, reels, or ads often starts with trimming. By cutting longer videos into smaller, more focused segments, you can adapt a single piece of content for multiple platforms without having to recreate it from scratch. Even one well-shot video can be transformed into several short clips that serve different audiences and formats.
Trimming isn’t just about making videos shorter, it’s about making them more effective. Whether you’re using an online video trimmer, a mobile app, or professional editing software, trimming gives you control over pacing, clarity, and storytelling.
How to Trim a Video Using Adobe Premiere Pro
To trim a video using Adobe Premiere Pro, at first, you’ll have to import your footage and set up your project timeline.
According to a report published by Sendshort 2025 in January, with a market share of 35%, Premiere Pro is one of the most powerful video trimmers available, allowing frame-accurate edits with professional control over both video and audio tracks. Follow these step-by-step instructions to trim your video efficiently:
Step 1: Launch Adobe Premiere Pro and Create a New Project
Open Adobe Premiere Pro and start a new project. Give it a name and choose a save location. Once inside, head to the Media Browser to locate your video file.
Step 2: Import the Video Clip
Right-click in the Project Panel and choose Import, or simply drag and drop your video file into the panel. You can also import multiple files if you’re working on a larger sequence.
Step 3: Drag the Clip to the Timeline
Once imported, drag your video from the Project Panel to the Timeline. This is where you’ll do all your trimming and editing.
Step 4: Use the Razor Tool (Optional) or Direct Trim
There are two primary ways to trim a video in Premiere Pro using direct trim and the razor tool.
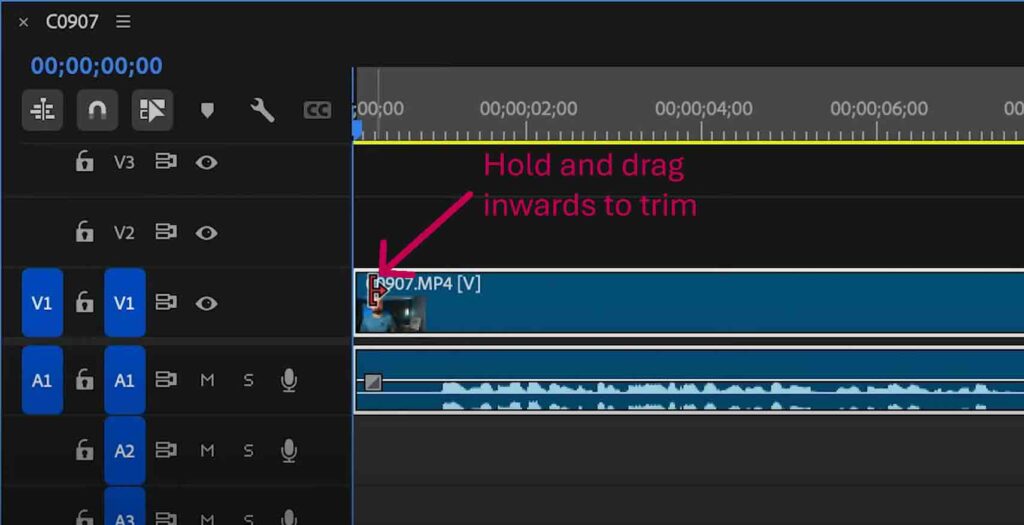
- Direct Trim: Hover over the beginning or end of the video clip on the timeline until you see a red bracket with an arrow. Click and drag inward to trim off unwanted parts from the start or end of the clip.
- Razor Tool: Select the Razor Tool (shortcut: C) from the toolbar and click on the timeline where you want to split the clip. Then switch back to the Selection Tool (V) and either hit delete on your keyboard or right click on the section you want to delete and click ripple delete.

Step 5: Fine-tune Your Trim
For frame-level precision, zoom into the timeline (+ key) and move the playhead to the exact frame you want to trim.
You can also use the Program Monitor to scrub through your footage and mark in/out points (shortcut: I and O) to define the trim boundaries before inserting it into the timeline. This allows you to edit and export a specific section of the clip without affecting the rest of the clip.
Step 6: Trim Audio Simultaneously (If Needed)
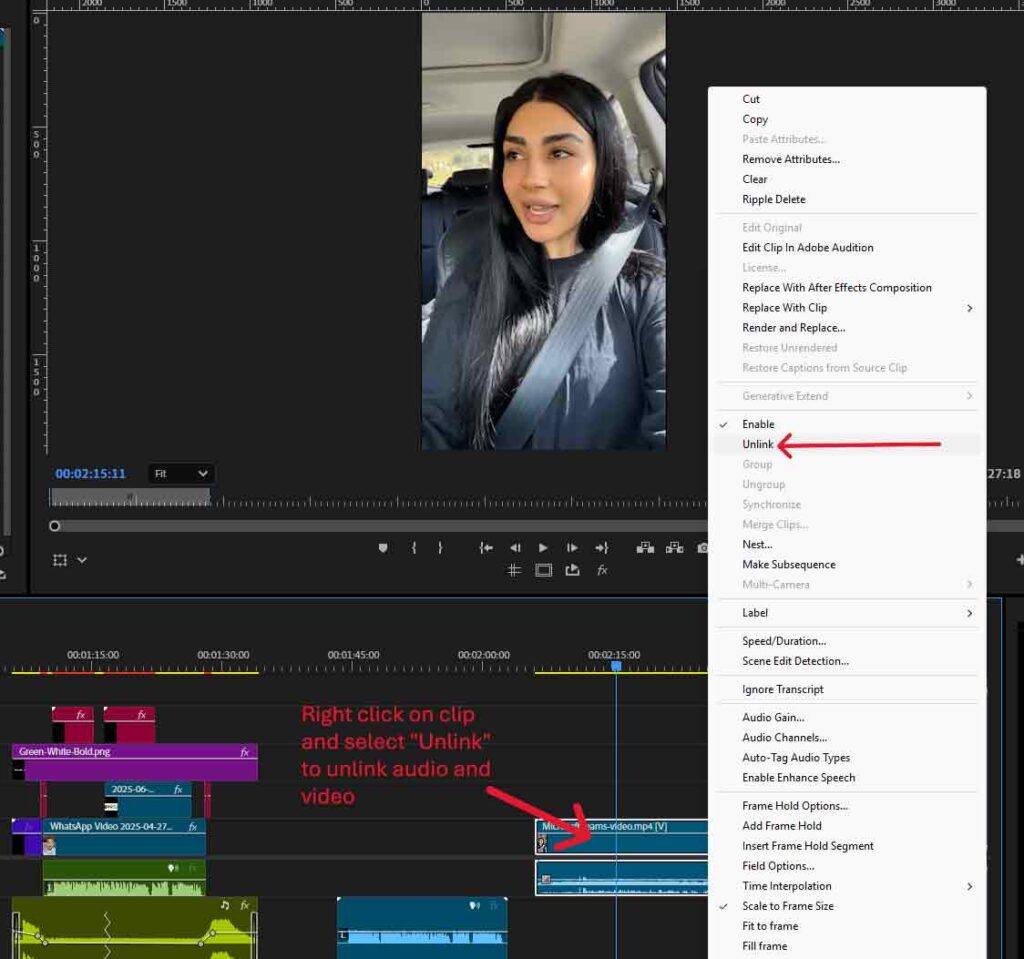
Premiere Pro links audio and video by default. So when you trim the video, the audio is trimmed with it, perfect if you’re looking to trim both video and audio tracks at once. If you need to edit audio separately, right-click and select Unlink.
Step 7: Preview Your Trimmed Clip
Hit the Spacebar to play your trimmed clip and check for flow and continuity. Make additional tweaks if necessary.
Step 8: Export the Final Video
Once satisfied with your trimmed video, go to File > Export > Media. Choose your desired file format (MP4 is widely supported), resolution, and export settings. Hit Export to save your trimmed video. Premiere Pro offers more than just basic trimming, it gives you complete control over transitions, effects, and multi-track edits. Premier Pro lets you cut down a vlog, trim YouTube videos for Shorts, or work on a professional ad. It’s one of the most top tier video trimmer for creators of all levels.
How to Trim Video Using Adobe After Effects
To trim a video using Adobe After Effects, at first, you’ll have to import your footage into a composition and use in/out points or layer trimming to isolate the parts you need. Follow these steps to trim your video clip effectively using Adobe After Effects:
Step 1: Open After Effects and Create a New Project
Launch After Effects and start a new project. Then go to File > Import > File and select the video you want to trim.
Step 2: Create a New Composition
Drag your imported video into the Composition Panel, or create a new composition manually via Composition > New Composition, setting the resolution, frame rate, and duration as needed. Your video will now appear on the timeline.
Step 3: Move the Playhead to Set Trim Points
Scrub through your footage using the Timeline Panel and move the Current Time Indicator (CTI) to the frame where you want to begin the video. Press ‘B’ on your keyboard to set the beginning of the work area.

Then move the CTI to the desired end point and press ‘N’ to set the end of the work area.
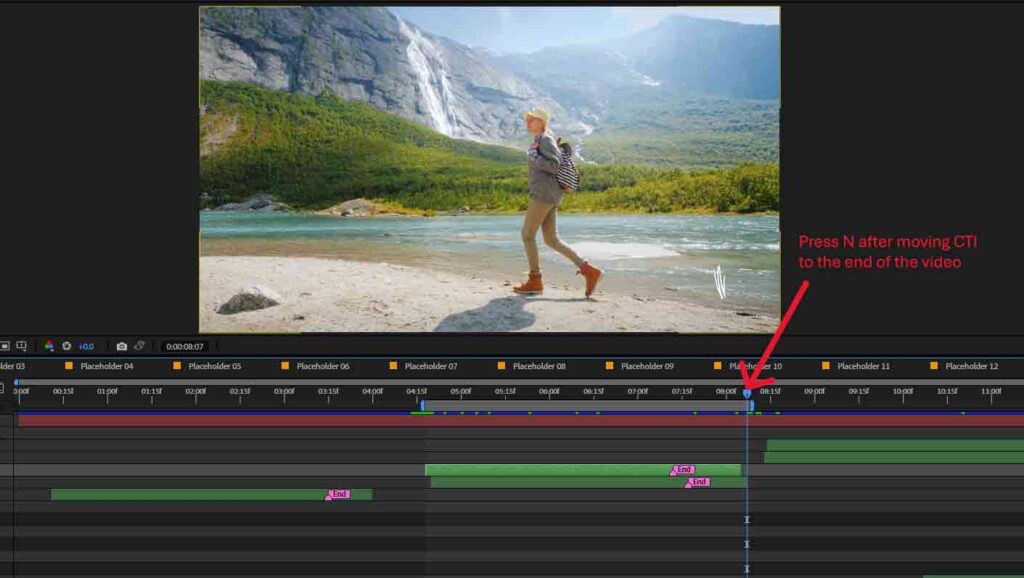
These in and out points define the portion of the video you want to keep.
Step 4: Trim the Composition to Work Area
Right click on the segment and select “Trim comp to work area”. Your work area will show the trimmed composition.

Step 5: Preview Your Trimmed Clip
Hit Spacebar to preview the trimmed portion of your video inside the work area. You can make fine adjustments by dragging the clip edges or moving in/out points.
Step 6: Export the Trimmed Video
To finalize the trimmed video, go to File > Export > Add to Render Queue or File > Export > Add to Adobe Media Encoder Queue. Choose your preferred file format (such as H.264 for MP4 output), set your render area to Work Area Only, and hit Render or Start Queue to export the trimmed video.
How to Trim a Video Using DaVinci Resolve
To trim a video using DaVinci Resolve, at first, you’ll have to import your clip, place it on the timeline, and use the Trim Edit Mode or blade tool to adjust its length. Follow these step-by-step instructions to trim your footage using DaVinci Resolve:
Step 1: Launch DaVinci Resolve and Start a New Project
Open DaVinci Resolve and click New Project on the project manager screen. Give your project a name and hit Create.
Step 2: Import Your Video
Click on the Media tab or go to File > Import > Media. Select your video file and drag it into the Media Pool. Then switch to the Edit workspace.
Step 3: Add the Video to the Timeline
Drag your clip from the Media Pool onto the Timeline. You’ll now see the video and audio tracks ready for trimming.
Step 4: Use the Trim Tools
DaVinci Resolve gives you several powerful ways to trim a video as follows:
- Direct Trim: Hover your cursor at the start or end of the clip in the timeline. When it changes to a bracket icon, click and drag to trim off the unwanted part.
- Trim Edit Mode: Hit T to activate Trim Edit Mode. This allows you to perform ripple trims, roll edits, and slip edits, all crucial for maintaining timing and flow.
- Blade Tool: Press B to activate the Blade Tool, then click on the timeline where you want to split the clip. You can then delete or trim unwanted sections individually.
Step 5: Fine-tune Using the Viewer
Use the Source and Timeline Viewers to preview your clip. Just like Premier Pro you can also set In and Out points using the I and O keys for more controlled trimming before inserting clips into the timeline.
Step 6: Sync Audio and Video
Like Premiere Pro, DaVinci Resolve links audio and video by default. Trimming the video will automatically trim the audio as well, making it easy to manage both tracks together.
Step 7: Export the Trimmed Video
Once your video is trimmed and ready, switch to the Deliver page. Choose your preferred settings—like format, resolution, and location—and click Add to Render Queue, then Start Render. Whether you’re looking to trim a YouTube video, prepare clips for TikTok, or produce a short film, DaVinci Resolve offers advanced video trimming features—without the price tag. It’s a free alternative to paid tools that doesn’t skimp on quality, making it a favorite among content creators and professionals alike.
How to Trim a Video on a Phone
Sometimes, you don’t need a desktop setup or advanced software to trim a video; your phone is more than capable.
Your smartphone is perfectly capable of trimming a video for Instagram Stories, YouTube Shorts, or just posting on your socials. Mobile apps make it incredibly easy to trim video on the go.
There are essentially 2 ways to trim a video on a phone. You can either use whatever default gallery app that comes stock in almost every smartphone or a third-party video trimmer like CapCut.
How to Trim a Video on Android (Stock Gallery App)
Most Android phones come with a built-in gallery or video player that includes a basic trim video function. For example, Samsung phones usually have the Samsung gallery app. Here’s a detailed process to trim a Video on Android:
1. Open the Gallery or Google Photos app.
2. Select the video you want to trim.
3. Tap the Edit icon (usually a pencil or sliders).
4. Tap edit again once inside the editor to get to the trim setting
5. Drag the handles at the start and end of the timeline to choose your desired segment to trim.
6. Preview the trimmed clip.
7. Tap Save or Export to save a copy (Some Android devices just overwrite over the original. Read on to find out what to do in that case).
Great for: Quick edits, trimming TikToks or WhatsApp videos before sending.
Note: The pictures in this section were taken on a Oneplus 7T. The UI will be different for different Android devices.
How to Trim a Video on iPhone (Photos App)
Trimming a video on iPhone (iOS) is super intuitive using the native Photos app. Here’s a detailed process to trim a video on iPhone:
1. Open the Photos app and tap on your video.
2. Tap the Edit icon in the bottom-right corner.
3. At the bottom, you’ll see the timeline with sliders on each end. Drag the left and right edges to trim the beginning or end of the clip.
4. Tap Done.
5. Choose Save Video (overwrites original) or Save as New Clip.
iPhones also allow frame-accurate trimming using the playhead which is the white line that appears in the timeline once you tap “edit” on a video. Long press the playhead for precision editing.
How to Trim a Video Using CapCut (iOS & Android)
To trim a video using CapCut, first install the app, then tap ‘New Project’ and select your video. Once it’s on the timeline, tap the clip to select it. Drag the start or end handles to trim, zoom into the timeline for precision if needed, and finally, export the video. Here’s a detailed process to trim a video using CapCut:
1. Download and install CapCut from the App Store or Google Play Store.
2. Open the app and tap New Project.
3. Select the video you want to trim and add it.
4. Once it’s on the timeline, tap the clip to select it.
5. Drag the start or end handles on the timeline to trim.
6. For precision trimming, you can zoom into the timeline and trim frame by frame.
7. Tap Export in the top-right corner to save or share the trimmed video. You can choose to adjust resolution, frame rate, code rate and even format before exporting.
CapCut also supports cutting, cropping, adding music, and exporting in various aspect ratios—perfect for content creation on the fly.If you’re looking for a trim video online free experience without switching to a PC, mobile apps have you covered.
Can You Trim Both Video and Audio Tracks Simultaneously?
Yes, you can trim both video and audio tracks simultaneously, but it depends on the tool you’re using and how the media is structured.
Most professional and mobile video editing tools link the video and audio tracks together by default, allowing you to trim them at the same time for a smooth editing experience.
What is the Difference Between Linked and Unlinked Tracks?
In most editing software, audio and video are “linked” together when you import a video with sound. This means any trimming action (such as shortening a clip) will apply to both tracks equally.
- In Adobe Premiere Pro, for example, trimming a video clip on the timeline also trims the linked audio.
- In DaVinci Resolve, the video and audio are grouped, so edits apply to both unless you manually unlink them.
- In CapCut, mobile editors can tap a clip and trim both audio and video simultaneously, making it perfect for quick, synced edits.
When You May Want to Trim Separately?
Sometimes, depending on the depth of your editing requirement, you can unlink the video and audio and trim them separately.
Video editors such as After Effects or DaVinci offer some basic audio editing, but to get high-level control over your audio, you might need to look into Digital Audio Workstations(DAWs) such as Audacity.
Tip: Check for Sync After Trimming
If you decide to trim video and audio separately, always double-check that your final edit stays in sync. Misaligned audio can create jarring viewing experiences and reduce the quality of your content.
In most cases, if your goal is to trim video and audio together, such as for social posts, short-form content, or polished YouTube clips, modern video trimmers handle it seamlessly. Just make sure the tracks are linked, and your edits will stay synced by default.
Does Trimming a Video Reduce File Size?
Yes, trimming a video usually reduces file size, especially when you’re removing large chunks of footage. Since file size is directly related to video duration, cutting out unnecessary parts leads to smaller export files, which are quicker to upload and easier to share. However, the degree of file size reduction also depends on:
- The export settings (resolution, bitrate, codec).
- Whether or not the video is re-encoded after trimming.
- The tool you’re using: Some online video trimmer tools reprocess videos, while others only remove segments without changing compression.
If you’re trimming video online free or via mobile apps like CapCut, the file size will usually be optimized for social sharing. However, the file size may not be drastically reduced unless you also downscale the resolution or bitrate.
Does Trimming a Video Affect Quality or Resolution?
Trimming a video does not affect the original quality or resolution as long as you don’t change the export settings. Trimming simply cuts out time-based portions of the video. It doesn’t alter:
- Frame rate
- Resolution (e.g., 1080p or 4K)
- Visual fidelity
However, if you’re using a tool that automatically compresses the video during export (common with free cut and trim video online tools), then you might notice some reduction in quality. To preserve original quality:
- Choose “Same as Source” during export.
- Avoid re-compression unless necessary.
- Use professional software like Premiere Pro or DaVinci Resolve for higher control.
What are the Common File Formats Supported When Trimming Videos?
Most video trimming tools—both offline and online video trimmer apps—support a wide range of formats as follows:
- MP4 (H.264): Most widely supported across platforms and devices.
- MOV: Popular for iOS and QuickTime users.
- AVI: Less compressed but large in size.
- MKV: Great for high-quality media with multiple audio tracks.
- WMV: Common in older Windows systems.
- WebM: Optimized for web use.
Tools like CapCut, Photos (iOS), and even trim video online platforms typically auto-convert to MP4 during export, which is ideal for compatibility and compression. When working with professional editors like After Effects or Resolve, you’ll also encounter formats like ProRes, DNxHD, or CineForm for high-end workflows.
How Much Time Does It Usually Take to Trim a Video?
The time it takes to trim a video depends on factors such as video length, tool used, and rendering time:
1. Video Length: Longer clips take more time to scrub through and process.
2. Tool Used: Trimming a clip on a phone or using an online video trimmer is usually faster than in a pro-grade editor.
3. Export/rendering Time: Tools like Premiere Pro and Resolve may take longer to render, depending on resolution and effects.
- Quick Trims (Less than 2 mins)
Using apps like iPhone Photos, Android Gallery, or CapCut.
- Intermediate Trims (5–15 mins)
Involve fine-tuning with frame-level precision, syncing audio, or trimming multiple clips.
- Professional Trims (15+ mins)
Include trimming as part of a larger edit (color grading, transitions, titles), often in tools like DaVinci Resolve or Premiere Pro.
Is It Possible to Undo a Trim After Saving the Video?
Once you save and export a trimmed video, the removed parts are permanently gone, unless:
- You kept the original unedited file.
- The tool allows non-destructive editing (e.g., saving projects with full timelines in Premiere Pro or Resolve).
- You used version history or auto-backup options.
If you’re trimming a video on iPhone or Android and choose “Save as New Clip,” the original remains intact, allowing you to return to it if needed.
Pro Tip: Always save a copy of the original before trimming, especially if you’re working with client content or can’t easily re-record.
