
UV unwrapping refers to the technique of converting XYZ coordinates of the mesh into UV coordinates. UV unwrap flattens a 3D model’s surface into a 2D image to apply textures and materials. It ensures accurate texture appearance and wrapping around a model and avoids misalignment.
Blender is a powerful 3D modeling software that offers a full toolbox to handle UV unwrap, from fast workflows to fine-tuned edits and all powered by a surprisingly intuitive system. Some features of Blender include Smart UV project, Seams, Live Unwrap, UV editor to ease up the UV unwrapping process. UV unwrapping process in 3D allows accurate control over texture placement and photorealistic rendering.
What you’ll learn in this article
What is UV Unwrapping?
UV Unwrapping is the process of projecting a 3D model’s surface onto a 2D plane so textures can be applied accurately.
Think of it like unfolding a cardboard box into a flat template, each face of the model is laid out as a “UV map” that tells Blender exactly where to place the image textures. In Blender and other 3D tools, the term “UV” refers to the 2D coordinates (U and V) used for mapping textures, similar to X and Y in 2D space. By unwrapping a model, you create a bridge between the 3D geometry and 2D texture files, allowing for precise control over how colors, materials, and patterns appear on your mesh.
UV unwrapping is a foundational step in 3D modeling pipelines, especially for texturing characters, props, and environments with realism and accuracy.
What are Seams in UV Unwrapping?
Seams in UV Unwrapping are the edges of a 3D model that you manually mark to tell Blender where to “cut” the mesh before unfolding it into a 2D UV map. Think of them like the edges of a paper model that need to be sliced so the shape can be laid flat without distortion.
Marking seams is a critical part of getting a clean and usable UV layout. They help define how the model will be unwrapped, affecting both the ease of texture painting and how well the texture fits the geometry. A well-placed seam reduces stretching, keeps important details intact, and makes texturing far more predictable.
In Blender, you can mark seams by selecting edges in Edit Mode and pressing Ctrl + E > Mark Seam. Once the seams are set, pressing U will bring up the unwrap menu for generating the UV layout based on those cuts.
What Does Smart UV Unwrap Do?
Smart UV Unwrap in Blender is an automatic unwrapping method that creates seams and unwraps your 3D model for you, without the need to manually mark edges.
It analyzes the geometry and intelligently splits the mesh into logical UV islands to reduce stretching and overlap. This method is especially useful for models with complex shapes like hard-surface objects, architectural assets, or mechanical parts where manual seam placement would be time-consuming or difficult. It’s a fast and reliable option for getting a workable UV layout with minimal effort. You can access Smart UV Project by selecting your mesh in Edit Mode, pressing U, and choosing Smart UV Project.
Blender will then ask for settings like island margin and angle limits, giving you control over how precise and spaced out the UVs should be. Smart UV Unwrap is perfect when you need quick results or a clean starting point for more detailed texture work. It offers a quick solution, but you might wonder why unwrapping is necessary at all.
Why Do You Need to UV Unwrap in 3D Modeling?
You need to UV unwrap in 3D modeling to accurately apply textures, images, and materials onto your 3D objects.
Without proper UV unwrapping, your textures may appear stretched, misaligned, or distorted, ruining the visual quality of your model. UV unwrapping ensures that every part of the 3D surface is mapped to a specific area on a 2D image. This is essential for:
- Painting detailed textures by hand or in programs like Substance Painter
- Baking high-resolution details from sculpted models onto low-poly meshes
- Applying image-based materials, such as wood grain, metal scratches, or character skins
Whether you’re creating 3D models from photos, assets for games, films, or 3D printing, UV unwrapping gives you full control over how your model looks once textured.
For complex projects requiring professional-grade texturing and post-production work, many creators collaborate with specialized editing services to achieve studio-quality results.
Is UV Unwrapping Necessary for Every 3D Model?
No, UV unwrapping is not necessary for every 3D model but it depends on how the model will be used. If you’re applying image textures, painting custom materials, or baking maps (like normal or ambient occlusion), UV unwrapping is essential.
However, if your model uses only procedural materials or will never be textured, unwrapping might not be required.
Procedural materials are textures generated by mathematical formulas rather than image files. Examples include Blender’s built-in noise, wave, or brick patterns that can create infinite detail without requiring UV coordinates.
For example:
- Needed: Characters, game assets, props with image textures, and models for animation or film.
- Not always needed: Background geometry using simple colors or procedural shaders, boolean-based modeling, or temporary placeholders.
Even when it’s not strictly required, unwrapping can still improve flexibility and give you more control over how materials are applied. So while not every 3D model must be unwrapped, skipping it limits your texturing and shading options significantly.
Is Blender Good for UV Unwrapping?
Yes, Blender is good for UV unwrapping and is widely used by professionals and hobbyists alike for this task. Compared to other 3D modeling software options, Blender’s UV tools stand out for their comprehensive feature set at no cost.
Blender includes:
- Manual unwrapping tools like seam marking and angle-based unwrapping
- Automatic methods such as Smart UV Project for quick, hassle-free layouts
- Live previews in the UV Editor to visualize and adjust your UV maps in real time
- Support for addons like UV Packmaster for even more control and optimization
Whether you’re working with organic models like characters or hard-surface assets like machines or buildings, Blender gives you everything you need to create efficient, clean UV maps ready for texturing. With Blender’s capabilities established, let’s dive into the practical workflow you’ll use most often.
How to UV Unwrap in Blender?
To UV unwrap in Blender, follow these steps:
1. Select Scale
2. Find UV Editing
3. Enter Edge Selection Mode
4. Select Edges
5. Mark Seam
6. Select Mesh
7. Generate UV Map
Here’s a simple, step-by-step guide to help you unwrap any 3D model properly using Blender’s built-in tools.
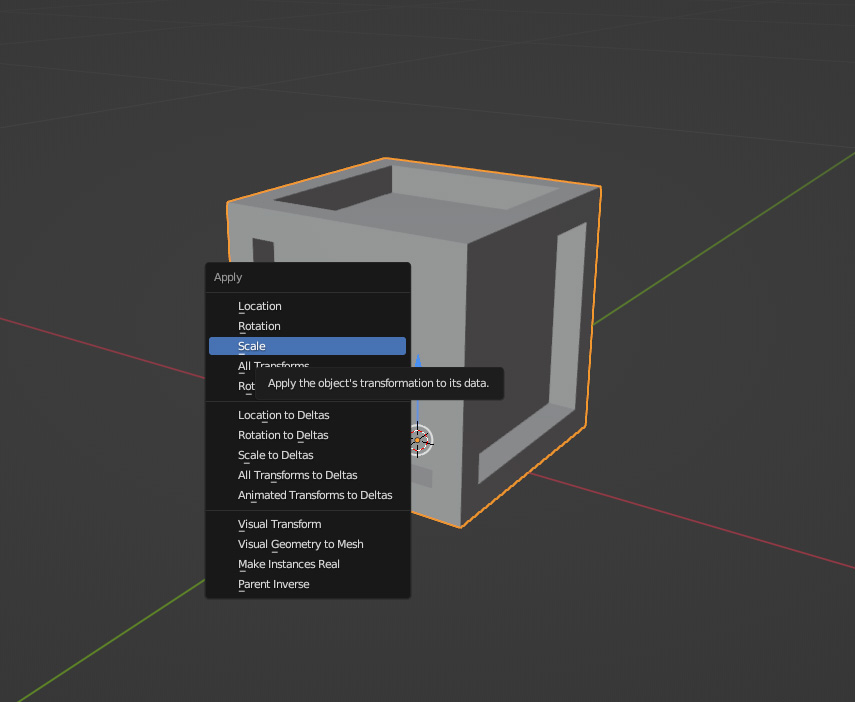
Step 1: Select Scale
First, we need to apply the scale of the model to avoid distortion during unwrapping. Select the object > Press Ctrl + A > Choose “Scale.
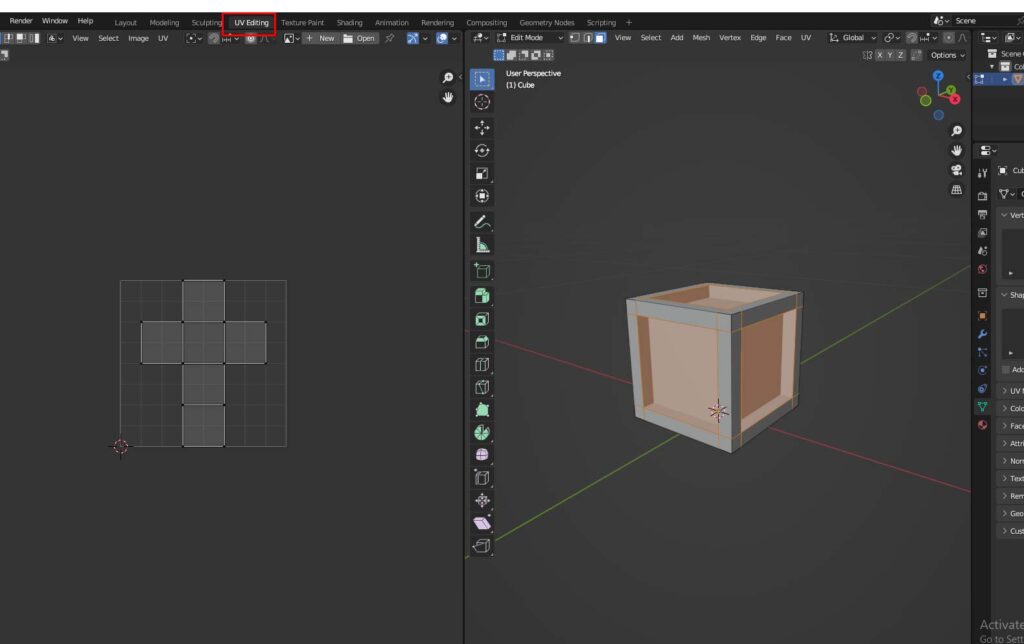
Step 2: Find UV Editing
Switch to the UV Editing workspace at the top of Blender.
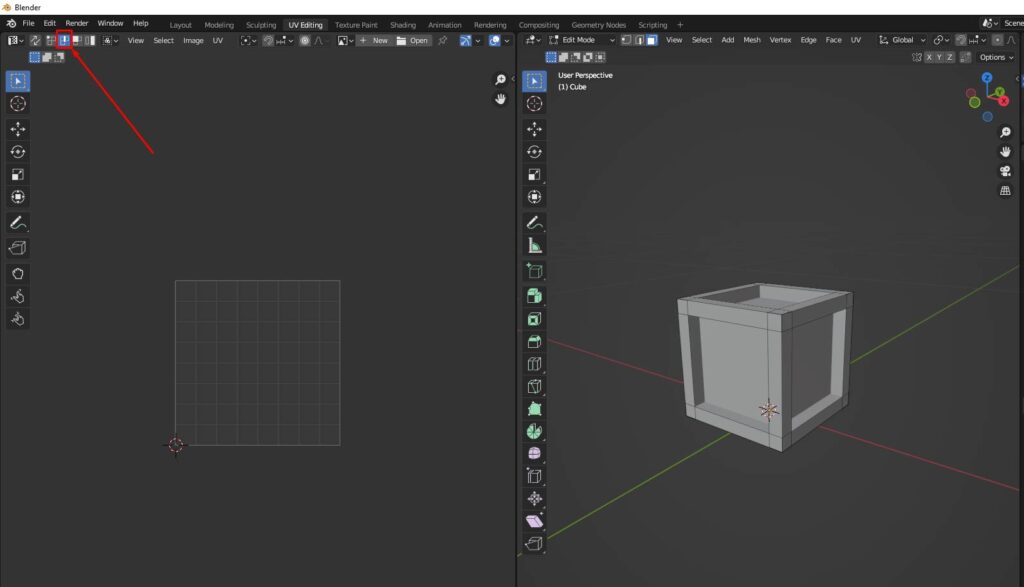
Step 3: Enter Edge Selection Mode
Enter Edge Selection Mode (press 2 or click the edge icon in the toolbar).
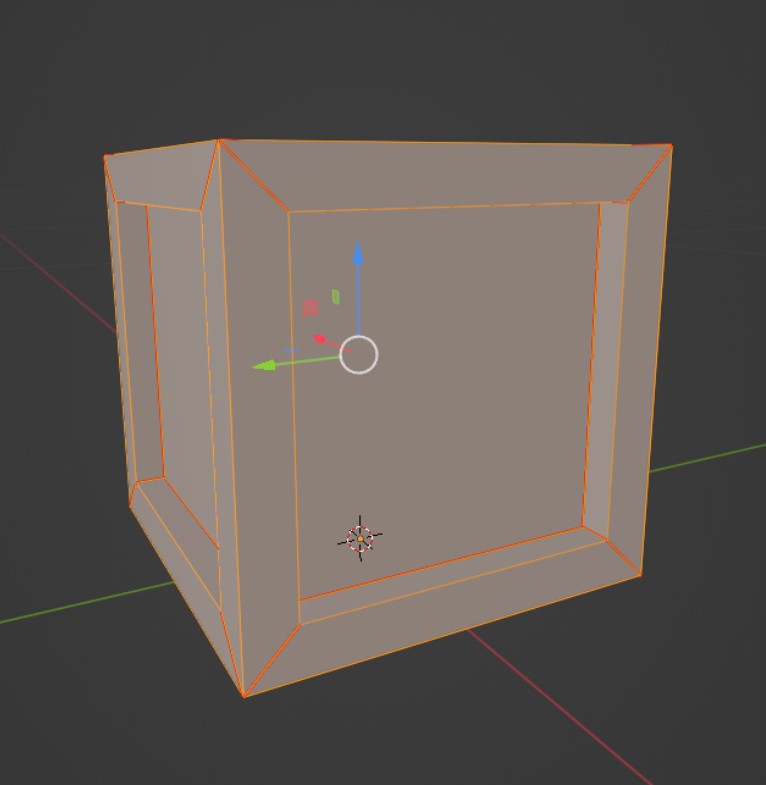
Step 4: Select Edges
Select the edges where you want to cut the mesh (these will act as seams).
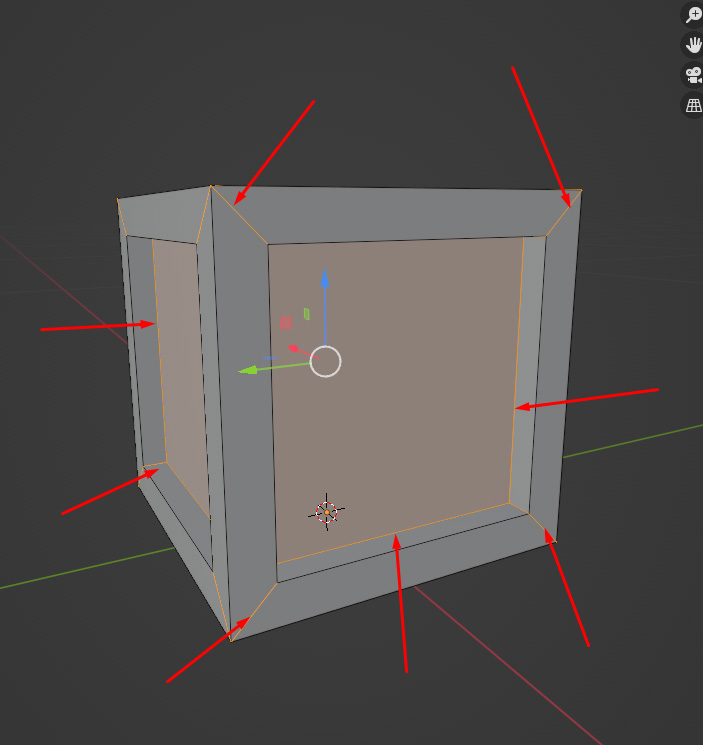
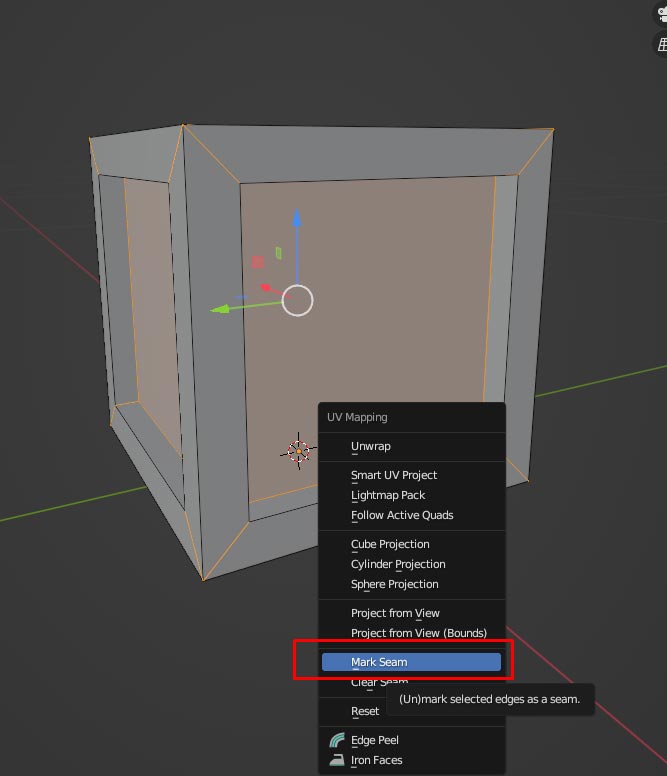
Step 5: Mark Seam
Press U and choose Mark Seam. This tells Blender where to cut the model during unwrapping.
Step 6: Select Mesh
Now press CTR + A to select the entire mesh.
Step 7: Generate UV Map
Press U again and choose Unwrap to generate the UV map based on your marked seams.

By following these steps, you can UV unwrap any model in Blender efficiently.
Once you’ve completed the basic unwrapping process, it’s crucial to verify the quality of your UV layout before moving to texturing.
With your UV map complete, you’re ready to apply textures to your 3D model and bring your creation to life.
To get a more comprehensive understanding of the UV unwrapping process you can also check out Blenders official documentation.
How Do You Check Texel Density Using a Checker Pattern?
To check texel density using a checker pattern, follow these steps:
1. Create a New Checker Pattern
2. Generate the Checker Image
3. Assign the Checker Pattern to the Model’s Base Color
4. Select the Checker Pattern
5. Preview the Model with the Checker Pattern Applied
6. Inspect the UV Layout for Distortion
It’s essential to check texel density to ensure your texture looks consistent across the model. Here’s how to do that using a checker pattern:
Texel density refers to how much texture detail (pixels) covers each unit of your 3D model’s surface. Consistent texel density ensures that textures appear at the same resolution across your entire model, preventing some areas from looking blurry while others appear overly sharp.
Step 1: Create a New Checker Pattern
In the UV Editor, press “New”, choose the Checker Pattern, and give it a descriptive name.
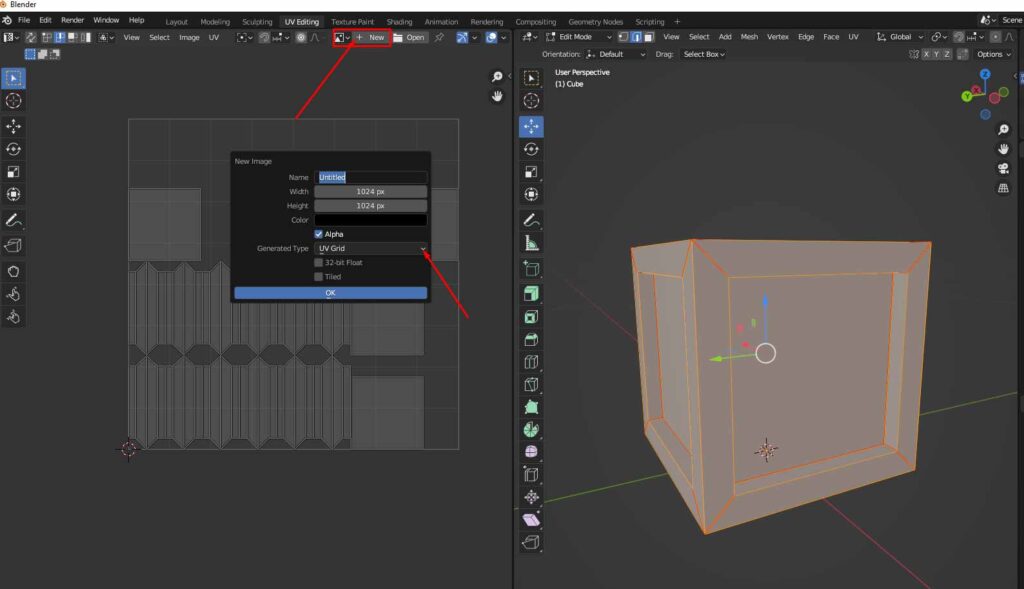
Step 2: Generate the Checker Image
Click OK—this will generate a checker image. Now we need to assign this checker pattern into our model.
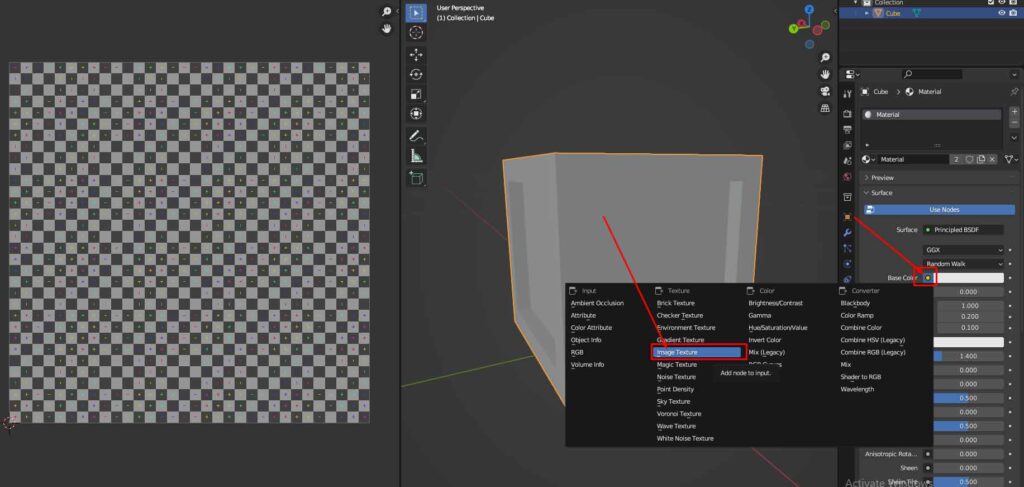
Step 3: Assign the Checker Pattern to the Model’s Base Color
Go to the Object Mode > Open the Materials Tab > Press the dot in base color section > Select image texture.
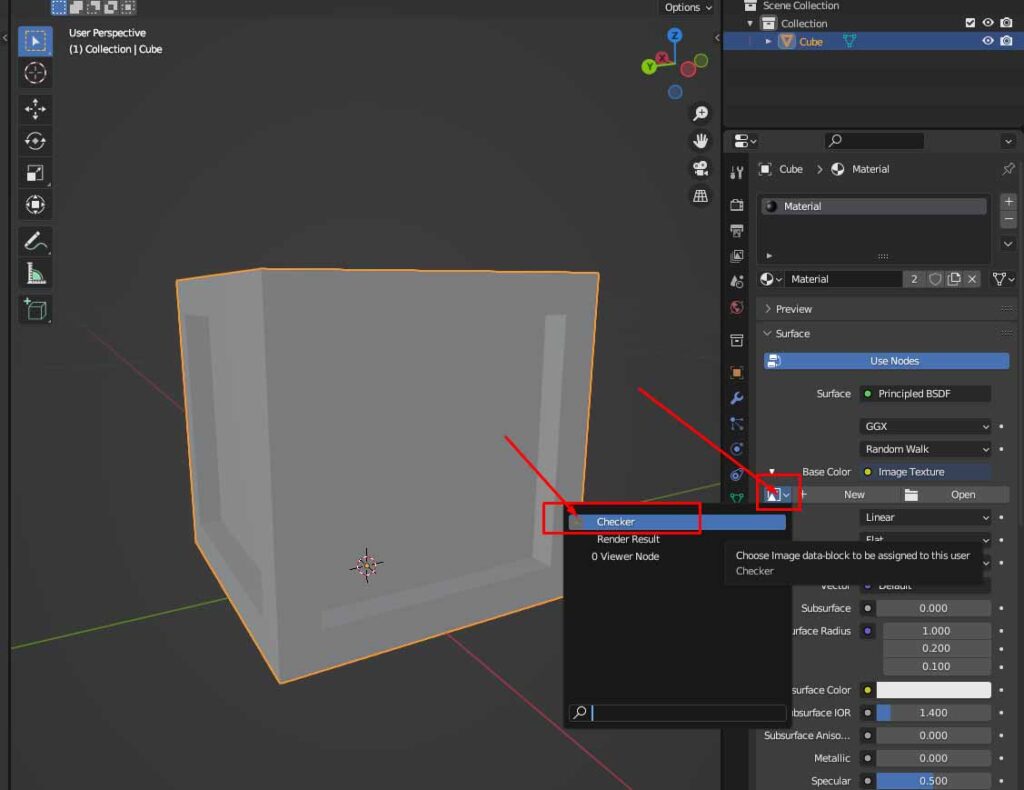
Step 4: Select the Checker Pattern
From the dropdown, choose the checker pattern you just created.
Step 5: Preview the Model with the Checker Pattern Applied
Switch to Material Preview Mode—you’ll see the checker pattern applied to your model.
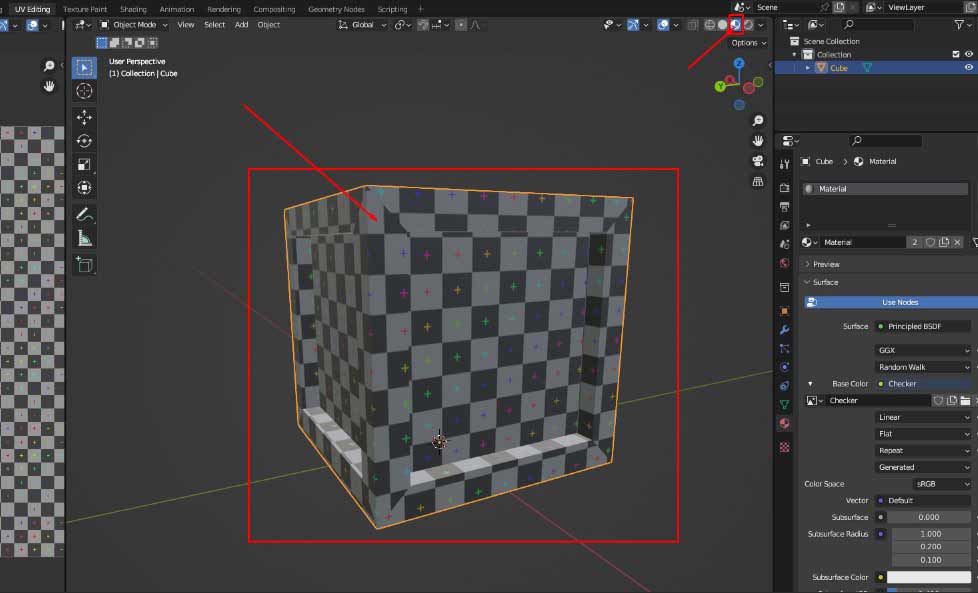
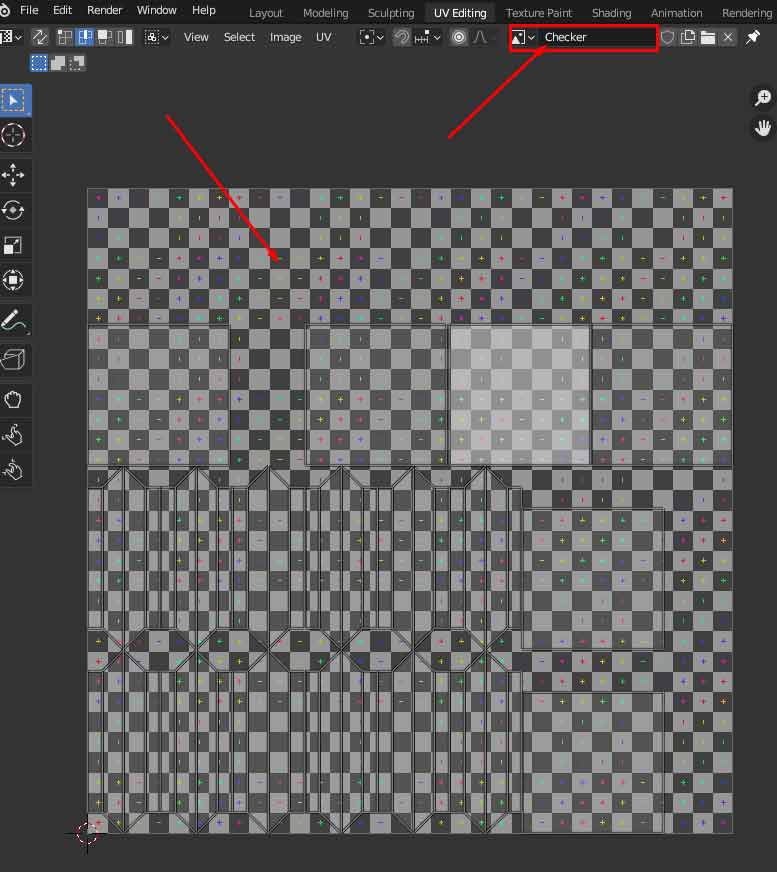
Step 6: Inspect the UV Layout for Distortion
Now inspect the UV layout on your model. If you notice any stretching, squashing, or distortion in the checker pattern, you’ll need to adjust the UV islands or seams.
UV islands are the separate pieces of your unwrapped model in the UV editor. Think of them as puzzle pieces, each island represents a continuous section of your 3D model’s surface that has been flattened without cuts.
In this example, the model shows no visible distortion—so it’s ready for texturing.
What is the Shortcut for UV Unwrap in Blender?
The shortcut for UV Unwrap in Blender is U. When you’re in Edit Mode and have your mesh or edges selected, pressing U opens the UV Mapping menu, which offers several unwrapping options.
Common choices include:
- Unwrap – Uses marked seams to unwrap the model
- Smart UV Project – Automatically creates seams and unwraps
- Project From View – Unwraps based on the current viewport angle
- Lightmap Pack – Packs UVs for use in baking lightmaps
Baking is the process of transferring detail from high-resolution models onto lower-resolution versions by generating texture maps.
Before using the U key, make sure you’re in Edit Mode and have properly marked seams if you’re using the manual unwrap method. You can do this by selecting edges and pressing Ctrl + E > Mark Seam.
This shortcut makes the unwrapping workflow fast and accessible, especially when working with multiple objects or iterating UV layouts.
How Can You Do Auto Unwrap UVs in Blender?
You can auto unwrap UVs in Blender by following these steps:
1. Select your object and enter Edit Mode (Tab).
2. Press A to select the entire mesh.
3. Press U to open the UV Mapping menu.
4. Choose Smart UV Project from the list.
5. A popup will appear—adjust settings like:
- Angle Limit: Controls how sharp angles must be to generate a seam.
- Island Margin: Sets spacing between UV islands to prevent overlap.
6. Click OK, and Blender will generate the UV map automatically.
This method is great for mechanical models, architectural assets, and any situation where speed and simplicity are priorities. While it might not offer perfect results for organic shapes, it’s a reliable way to get started fast.
What is UV Mapping?
UV Mapping is the process of assigning 2D texture coordinates (called UVs) to a 3D model so that textures can be applied accurately. Each point on the 3D surface is mapped to a corresponding point on a 2D image, allowing the texture to wrap around the model in a controlled and predictable way.
In 3D terminology:
- U and V represent the horizontal and vertical axes of a 2D image (just like X, Y, and Z do in 3D space).
- The UV map is the flattened version of your model that tells Blender how to place the texture across its surface.
Without UV mapping, Blender wouldn’t know where or how to project an image onto a model, resulting in stretched, skewed, or misplaced textures. UV mapping is essential for detailed texture painting, image-based materials, and efficient use of texture space.
What is the Difference Between UV Mapping and Unwrapping?
The difference between UV mapping and unwrapping is that UV unwrapping is the process of creating the 2D layout (UV map), while UV mapping refers to the overall concept of how 2D textures are applied to 3D surfaces. To break it down:
- UV Unwrapping: The technical step where the 3D model is “cut” along seams and unfolded into a flat 2D representation. This step defines how your model will be mapped.
- UV Mapping: The broader process that includes unwrapping, organizing UV islands, scaling, packing, and assigning textures, essentially everything that controls what texture appears where on your model.
In other words, unwrapping is a part of UV mapping. Once you unwrap the model, you still need to map and fine-tune it to make the textures look right.
