The 3D model has become an integral part of development and manufacturing. To make the 3D model creation process optimal for the modelers, every software upgrades its features.
3D model design software, Blender is open-source, and reputed for its functionality, ease of use, and features. So, it has become a popular choice from beginner to advanced users.
In this article, we will describe how to add texture to a 3D model in Blender. You will learn tips to enhance the appearance with depth and realism to your models.
What you’ll learn in this article
- 1 Understanding the Basics of Texturing in Blender
- 2 How to Add Texture to a 3D Model in Blender – Step by Step
- 3 10 Tips for Creating Realistic Textures in Blender
- 3.1 1. Use High-Quality Texture Maps
- 3.2 2. Take Advantage of Procedural Texturing
- 3.3 2. Combine Multiple Texture Maps for Depth
- 3.4 4. Master UV Unwrapping
- 3.5 5. Use Subsurface Scattering (SSS) for Translucent Materials
- 3.6 6. Add Detail with Micro Displacement
- 3.7 7. Optimize Your Roughness Map
- 3.8 8. Use Ambient Occlusion (AO) for Depth
- 3.9 9. Experiment with Fresnel Effects
- 3.10 10. Add Surface Imperfections
- 3.11 FAQs on Adding Textures in Blender
- 4 Bring Your 3D Model Vision to Life – Personalized Solution from Our Expert Team
- 5 Final Thought
Understanding the Basics of Texturing in Blender
The texture is like the skin of a 3D model, showing appearance, consistency, feel, and light interactions. By applying 2D images, known as texture maps onto a 3D model, you can create a surface. Photorealistic texture displays depth and complexity, making it appear similar to a real-world look.
By using Blender’s Shader Node system, you can combine complicated properties and create custom textures. The core components of texturing in Blender are –
- Shader nodes: Blender’s function ‘Shader Editor‘ controls texture’s interaction with the model by using nodes.
- UV Mapping: The method to unwrap a 3D model on a 2D plane.
- Texture types: Image, Procedural, Ambient Occlusion, etc.
- Texture maps: Color maps, normal maps, roughness maps, etc.
How to Add Texture to a 3D Model in Blender – Step by Step
In this tutorial, we are adding textures to a bottle in Blender. Use these steps on any of your preferred objects to create texture.
Step 1: Texturing the Bottle and Label
First, we need to do the UVW for the label part. The glass part doesn’t require UVW, so we will use a transparent material for texturing.
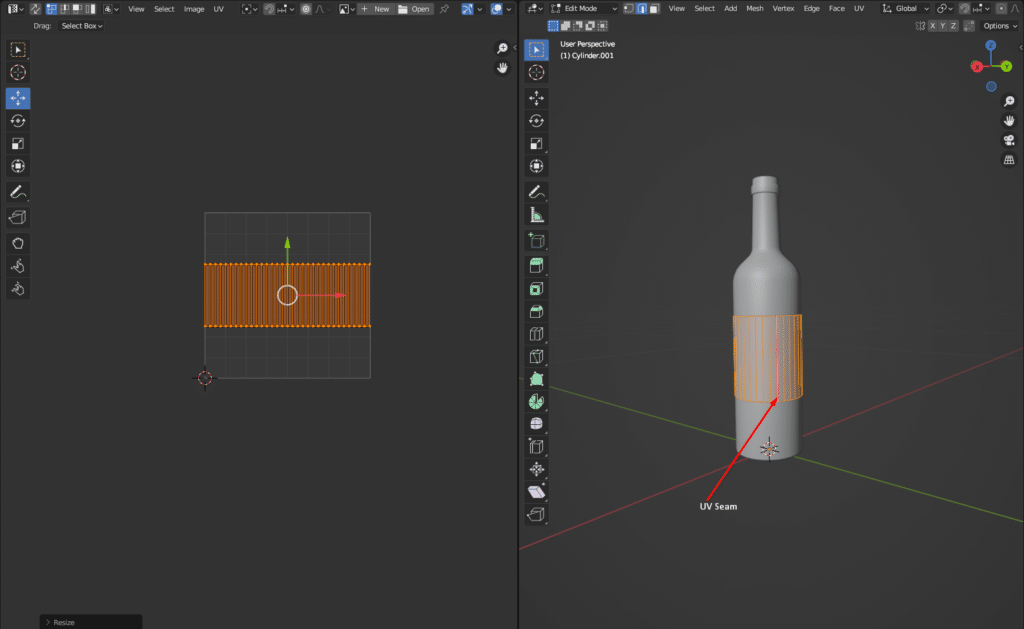
Step 2: Material to Object
Now we’ll assign material to the objects.
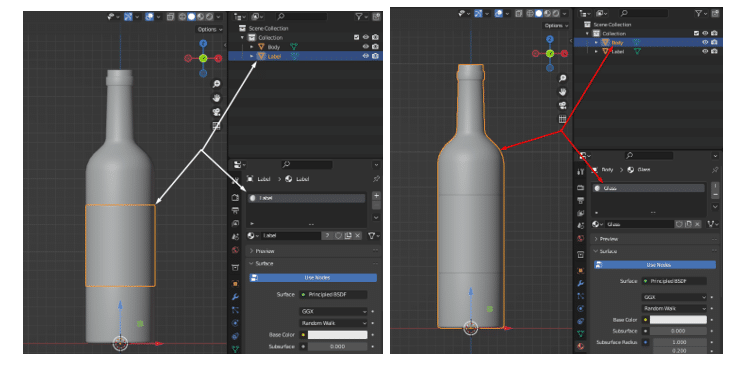
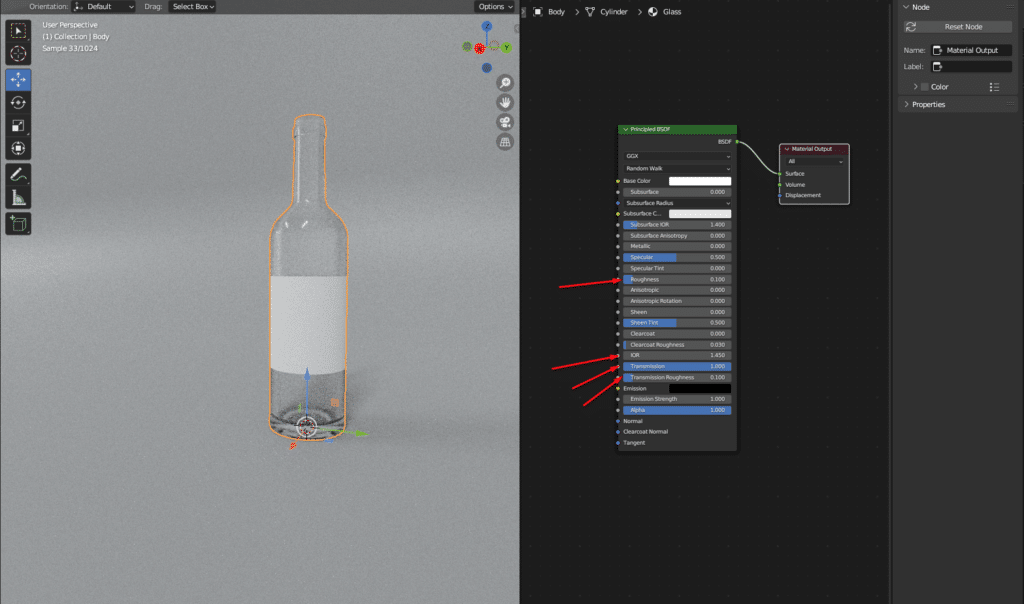
We will proceed with the glass material first.
- Go to the shading tab
- Select the glass object
- Set the transmission value to 1 and adjust the marked area according to our requirements.
Step 3: Add Texture Maps
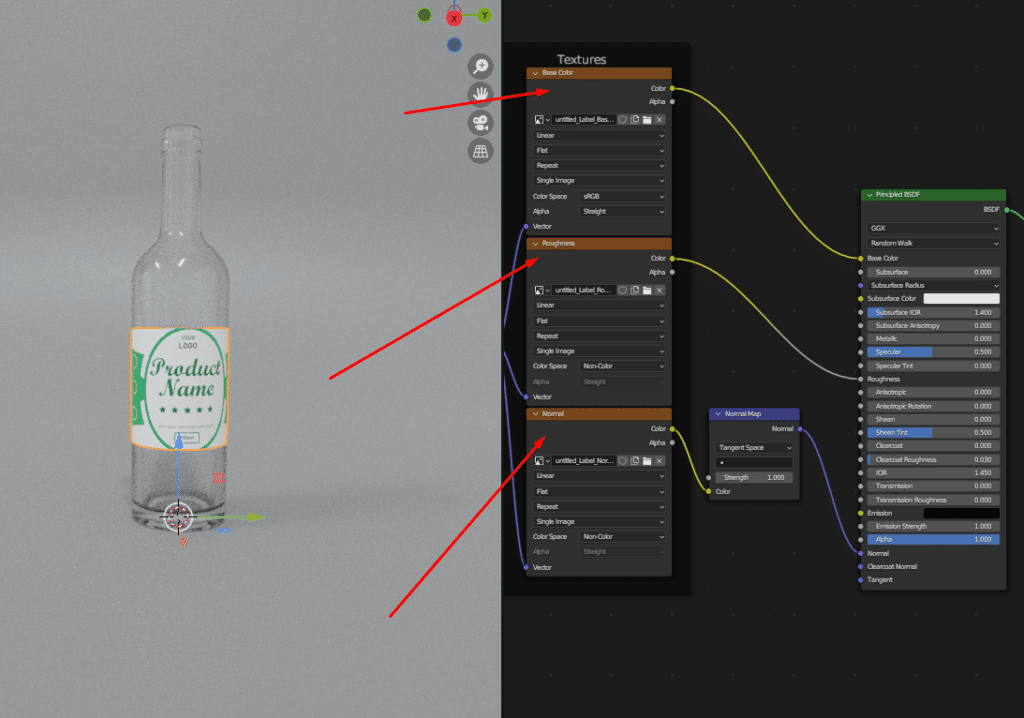
Now we will add texture maps created by Adobe Substance Painter 3D in Blender.
Step 4: Finish the Process
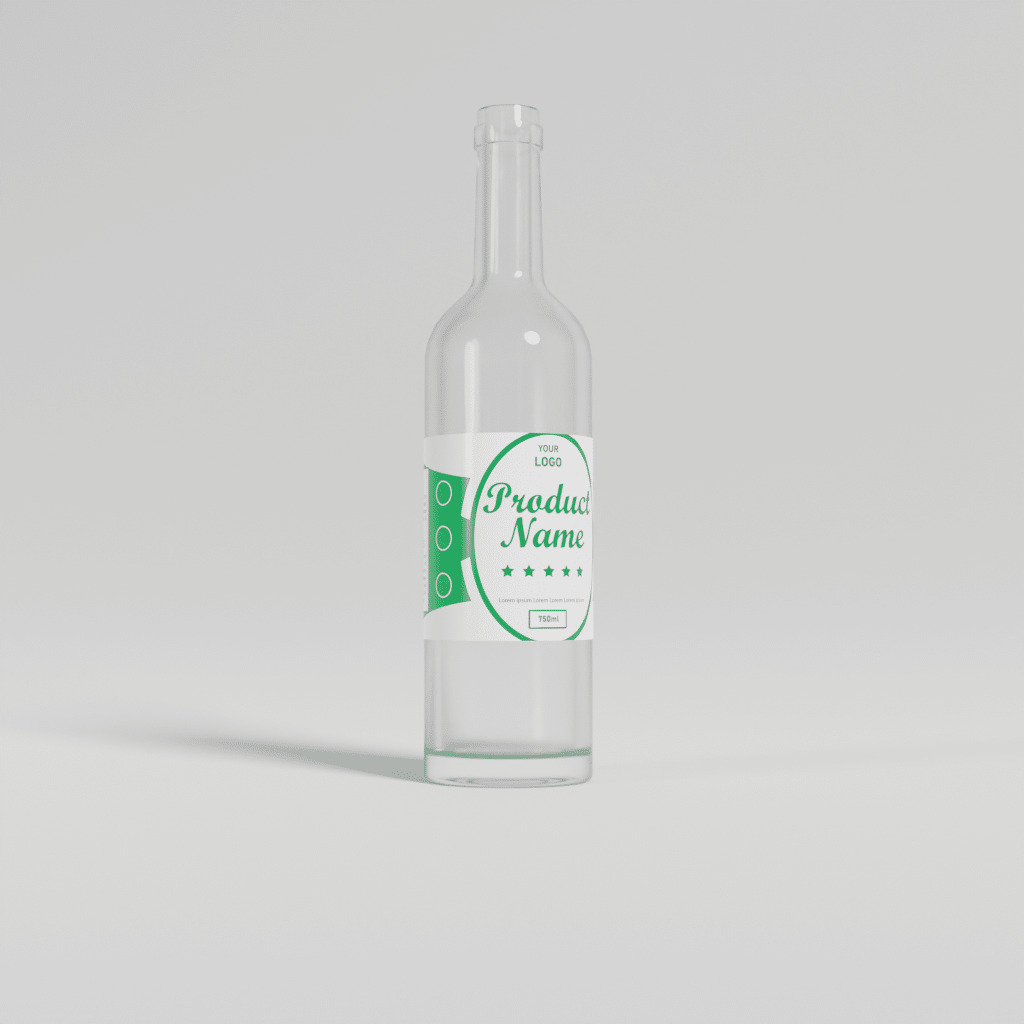
Our process is finalized. Here is the final output.
10 Tips for Creating Realistic Textures in Blender

Using realistic texture for 3D modeling significantly enhances object visuals with detailed data, depth, and realism. So the final result looks similar to the daily-life object. Check out these 10 tips for making your texture realistic in Blender.
1. Use High-Quality Texture Maps
The high-quality image is the most important aspect of photorealistic rendering and close-view. It benefits from clarity, sharp detail, and in-depth images without pixelation or blur.
Get high-quality texture maps from
- Designated websites, Polygon, Textures.com, etc offering free and paid resources.
- Creating custom textures from photographs or using photo editing software.
2. Take Advantage of Procedural Texturing
Procedural texture is used for adding infinite details and customization. It is the technique of mathematical algorithms instead of images. By using procedural texture, you get flexibility and control in adjusting colors, patterns, and other details directly, similar to wood grain, rust, organic details, abstract patterns, marble, etc. Blender has a node-based system for this work.
- Noise and Musgrave Textures: For creating surface irregularities.
- Voronoi Texture: To create simulating cells, veins, or crystalline structures.
- Mixing Procedural and Image Textures: For adding inaccuracies, and variations.
What is the Difference Between Procedural Texture and Image Texture?
The difference between the procedural texture and the image texture is the customization level.
A procedural texture is mathematically generated, resolution can be scaled up without losing quality, and modifiable based on effects. On the other hand, image textures are created through image files, and have limited resolution.
Both are essential based on purpose, procedural textures are ideal for scalable materials, whereas image textures are effective for photorealistic details.
2. Combine Multiple Texture Maps for Depth
By merging multiple texture maps, such as color, roughness, etc, you create rich, lifelike, and professional visual details. When texturing, these maps work together to create a realistic surface with added depth and complexity.
A few examples of texture maps are:
- Color map: Defines the basic look of the surface.
- Roughness map: Controls the appearance of shine.
- Normal map: Adds fine details like bumps, scratches, etc.
- Displacement maps: Alters geometrical shapes.
- Metallic map: Differentiates the metal and non-metal parts.
4. Master UV Unwrapping
UV unwrapping is the system of mapping 2D images on a 3D model. Master this system to make the texture look authentic and natural, without any flaws. To do this technique in Blender,
- Go to the ‘UV Editor’.
- Select the model and switch to Edit Mode.
- Mark seams where the mesh should be “cut” to lay flat.
- Use Unwrap to generate the UV map.
- Adjust the UV islands in the UV Editor.
5. Use Subsurface Scattering (SSS) for Translucent Materials
Subsurface scattering (SSS) is the transmission mechanism of light penetrating translucent surfaces and scattering internally in multiple directions.
For example, if you put your fingers on top of a torch light, the light passes through the skin, scatters, and shows a reddish and glowing finger structure. Using SSS gives your object a soft and glowing look with a life-like translucent look.
6. Add Detail with Micro Displacement
Micro displacement is the technique to add intricate and fine details to the 3D model without increasing the polygons number. Microdisplacement map is used with adaptive subdivisions. So, when you use high-quality displacement maps, you can create a highly detailed model with added realism and details.
7. Optimize Your Roughness Map
Roughness maps are the technique that controls the surface interaction with light. Based on its optimization, you can change the look of the surface to shiny, matte, dull, or light, such that the illuminated area will look smooth and have reflections, whereas the darker areas will appear rough.
8. Use Ambient Occlusion (AO) for Depth
Ambient occlusion (AO) is a method by which an object’s exposure to light is calculated based on its surroundings. It makes the fine details prominent with the use of additional shadings. By using this rendering method, you can highlight details, accentuate textures, and enhance an object’s appearance for improved visual display.
To put it simply, the light source is the major reason for creating shadows. However, in the ambient occlusion technique, the shadows can also be generated by the change in the model’s shape. This subtle but impactful visionary difference is enough to bring out naturalistic detail.
9. Experiment with Fresnel Effects
The fresnel effect is the change in a surface’s light reflection based on the viewing angle. By using this effect, you can create a realistic view of 3D modeling, differentiate materials, accentuate how the subject looks in the real world, and enhance trust.
10. Add Surface Imperfections
Mimicking to the real world, imperfection adds an authentic look. Instead of smooth, use scratch, dirt, and uneven surfaces for your texture. These imperfections or flaws will add depth and authenticity, and give a life-like and natural elemental look.
FAQs on Adding Textures in Blender
What is UV mapping, and why is it necessary for texturing?
UV mapping bridges 2d textures with 3D objects. It is the process of converting a 3D model into a 2d coordinate system, turning XYZ into UV. UV mapping is necessary for creating a detailed and customized texture, adding images, painting, and drawing within the precise size and shape of the model.
How do I apply a texture to only part of my model?
First, select the face of the mesh, then apply the UV-mapped material to that part. The model’s texture map would fit without any distortion.
How do I import a texture into Blender?
You can import the texture into Blender primarily using Shader Editor, and other options include UV Editors, Material Properties Panel, and Texturing Paint Workshops based on your workflow.
- Shader Editor:
- Go to the Shader Editor.
- Click ‘Add’ on the header, or type ‘Shift+A’.
- Navigate to ‘Texture’, and then ‘Image Texture‘ to add a node.
- Drag it to the ‘Image Texture‘ node and connect it to the material.
- Click ‘Open‘ on the texture node. Browse your computer, select the texture image file and click ‘Open Image‘ and it will load.
- UV Editors:
- Go to the header section and switch to the ‘UV Editing‘ workspace.
- Use ‘Image‘ and then ‘Open‘ menu and the texture will load.
- Material Properties Panel:
- Go to the ‘Material Properties‘ tab.
- Use the ‘Base Color‘ slot, and click the yellow dot.
- Then select ‘Image Texture‘ to load the image.
- Texturing Paint Workshops:
- Go to the 3D viewport and switch to ‘Texture Paint’ mode.
- Access the ‘Image’ menu and browse the external image.
What image file type is best for Blender?
The best file types or file formats for textures in Blender are PNG, JPEG, EXR, BMP, TIFF, TGA, etc.
- PNG: Effective for normal, diffuse, and masking texture.
- JPEG: Works well on diffuse textures and offers efficient compression.
- 32-bit EXR: Ideal for HDR environment, normal maps, and displacement textures.
- BMP: Used for basic texturing without needing compression or transparency.
- TIFF: Suitable for high-quality texture maps with depth and precision.
- TGA: Best for gaming asset developments supporting Alpha Channels.
How do I make a texture look realistic in Blender?
You can make the texture appear real-life-like by using high-quality texture maps, merging multiple maps, using subsurface scattering (SSS) techniques, using ambient occlusion, and mastering UV mapping and fresnel effects.
How can I fix stretching or distortion in my texture?
To fix stretching or distortion in the texture, adjust the UV mapping of your model. Check these following techniques for that:
- UV island properties: Adjust the proportion of UV islands in the UV Editor.
- Adjust texture scale: Use Material settings or Mapping Nodes to adjust texture scale.
- Relax UVs: Reduce stretch by relaxing the UV layout in the UV Editor.
- Add geometry: Enhance the mesh detail for improved texture mapping.
- Texturing filtering: Smooth out the distorted area by applying texture filtering.
- Normal maps: Minimize stretching or distorted parts by adding surface details with normal maps.
How do I adjust the scale of a texture on my model?
To adjust the scale of a texture on your model,
- Go to your 3D software’s Material Settings.
- Find the ‘Texture Coordinates‘ or ‘Tiling‘ option. This is the place to directly adjust the scale values (U and V) for the texture size based on the model surface.
In Blender, you can adjust the scale of a texture on your model through Shader Editor, UV Editor, and Material Properties.
Bring Your 3D Model Vision to Life – Personalized Solution from Our Expert Team
High-quality 3D modeling is now a necessity for any industry. It helps visualize and create real-life representations of an object, structure, or scene in a virtual space.
Clipping Path Studio offers custom 3D modeling services. Capturing intricate details with a realistic appearance, we enhance your target object’s visual look, which is ready and easy to use for any project.
We worked with businesses from architecture and real estate, product design and manufacturing, engineering, entertainment and gaming, healthcare and medicine, AR & VR, science, and technology industries.
Optimize your business digital assets by accessing our
- Knowledgeable and expert team
- Resource-effective solutions
- Scalable and flexible results
- Fastest turnaround
- Creative modeling outputs
Final Thought
The realistic texture is a prerequisite to creating photorealistic 3D models. Make sure to apply the tips while creating high-quality texture to ensure the realism and depth of the object. With mindful learning, attention to detail, and following the tips, you can create real texture in your 3D models. Also, feel free to experiment with different textures and unbox your creativity.
Keep an eye on the CPS Blog for more 3D modeling-related tutorials.
