Blender is a free and open-source tool for 3D production. Its ease of use is a good ground for new learners. Similarly, its vast array of toolsets and features provide comprehensive functions for advanced 3D artists.
Considering Blender’s global demands and its endless capabilities, we will cover the software’s use cases, benefits, how to use Blender for 3D modeling, how to download and install it, where to find free models for Blender, and platforms to learn using the software. Let’s dive in.
What you’ll learn in this article
- 1 What is Blender Used for?
- 2 What are the Benefits of Using Blender for 3D Modeling?
- 3 How to Use Blender for 3D Modeling Step by Step?
- 4 How Long Does it Take to Make a 3D Model in Blender?
- 5 How Do You Download and Install Blender on a Desktop and A Laptop for Free?
- 6 Where to Find Blender 3D Models for Free?
- 7 Where to Learn Using Blender for 3D Modeling?
- 8 Is Hiring a 3D Modeling Service Worth it?
- 9 Conclusion
What is Blender Used for?
Blender is used for finalizing 3D pipeline- modeling, sculpting, retopology, UV unwrapping, texturing, rigging, simulation, animation, rendering, and more. Manufacturing, engineering, automotive, e-commerce products, gaming and media, architecture and interior design, education and healthcare, and many other industries are using Blender for the following purposes.
- Designing: Creating non-destructive 3d objects, characters, environments, industrial products, architecture, automotive, etc.
- Animation: Keyframe animation, enabling rigging, character motion, VFX, etc.
- Rendering: Photorealistic images, animations, advertising, architecture, construction projects, etc.
- Simulation: Real-world physics, water, and other fluid, cloth, smoke, and explosion, etc.
- 3d Printing: Optimize mesh to prepare models, prototype machine parts, anatomical models, etc.
- VFX: Live action footage, GCI, etc.
- Gaming asset creation and 2D animations within 3d environments etc.
What are the Benefits of Using Blender for 3D Modeling?
The benefits of using Blender for 3D modeling are that it is free to use, feature-rich, and has different file exporting formats. You can personalize the software as per your requirements. Blender is good not only for 3d modeling but also for organizing the entire 3d production workflow.
Access for Free
Blender is an open-source software to assist you in learning 3D modeling, mastering the skill, or finalizing a client’s project. With its well-functional and intuitive toolset, you can learn and create 3D models for free.
Customize Your 3D Workflows
It’s easy to create a systematic and personal workflow in Blender. The software allows you to modify the interface, and use shortcuts and add-ons to fulfill your requirements.
Take Control of the Whole 3D Pipeline
You can design detailed, intricating organic models, sculpt those, animate, simulate, and rig the desired model, precisely edit UV maps and create a photorealistic render with real-time preview, make changes in real-time, and finalize models for 3D printing. Enveloping the whole 3D production, Blender has organized the creation process.
Work on Diverse File Formats
Export 3D-rendered files in any industrial format. Blender supports a wide range of file formats such as .obj, .fbx, and .abc. .ply, .stl, .3Ds, .png. Either you can choose from Blender’s format or you can use ad-ons for external file format. Also, you can collaborate by using .blend-like files.
Acquire Knowledge From Professionals
New learners may find Blender overwhelming at first glance. That’s why advanced users of Blender’s community, forums, tutorials, and platform’s own resources across the globe are always actively providing solutions. It has facilitated the users in their proceeding with 3D model creation with Blender.
Execute Industrial Requirements
Blender updates every 3 months, introducing users with new features.
Rigging, physics simulation, motion tracking, prototyping, photorealistic and real-time rendering with Eevee and Cycles, real-time visualization, collaboration through integrating with OpenEXR, Alembic, etc— have made the software a comprehensive and cost-effective tool.
How to Use Blender for 3D Modeling Step by Step?
Blender is one of the most popular and powerful software for 3D work. It’s open source, so anyone can start learning and working on it without any licensing requirements.
Today we will see how to model a 3D coffee cup in the Blender. For better understanding, I’ve segmented the tasks into 4 parts:
- Collecting references and other information like dimension, radius, etc.
- Making the base shape
- Adding details
- Final output
Step 1: Collecting Reference
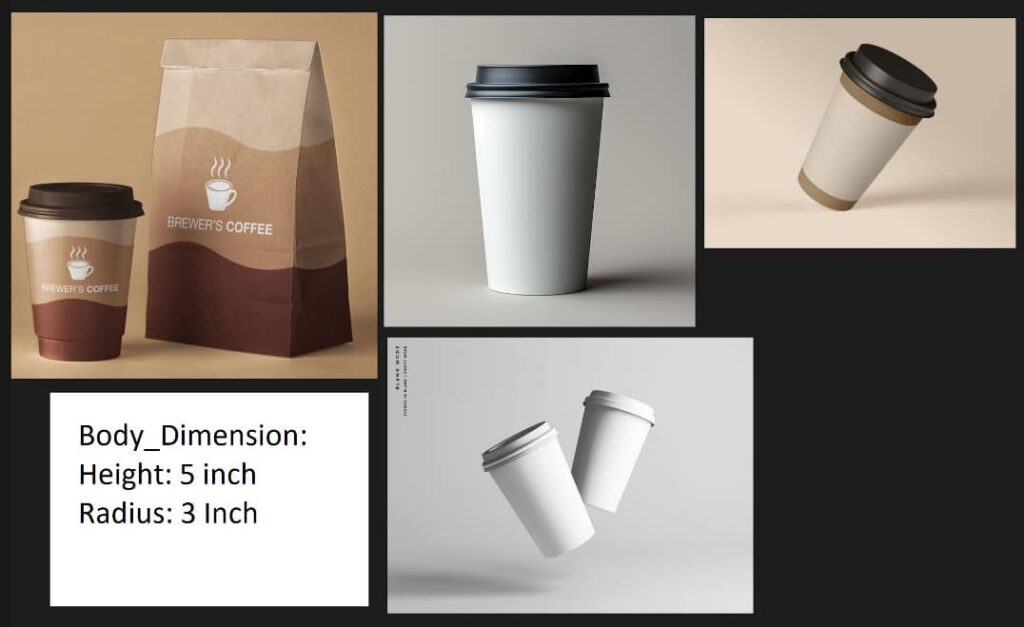
First of all, we will collect reference images. This time, we collected the images from Pinterest and used PureRef for better visualization.
Step 2: Making the Base Shape
Here is our journey starting with Blender. Open the software. In general, the Blender unit measurement system is in “Meter” but our dimension is in inches. So at first, we have to change the unit system meter to inch.
Go to the scene properties section
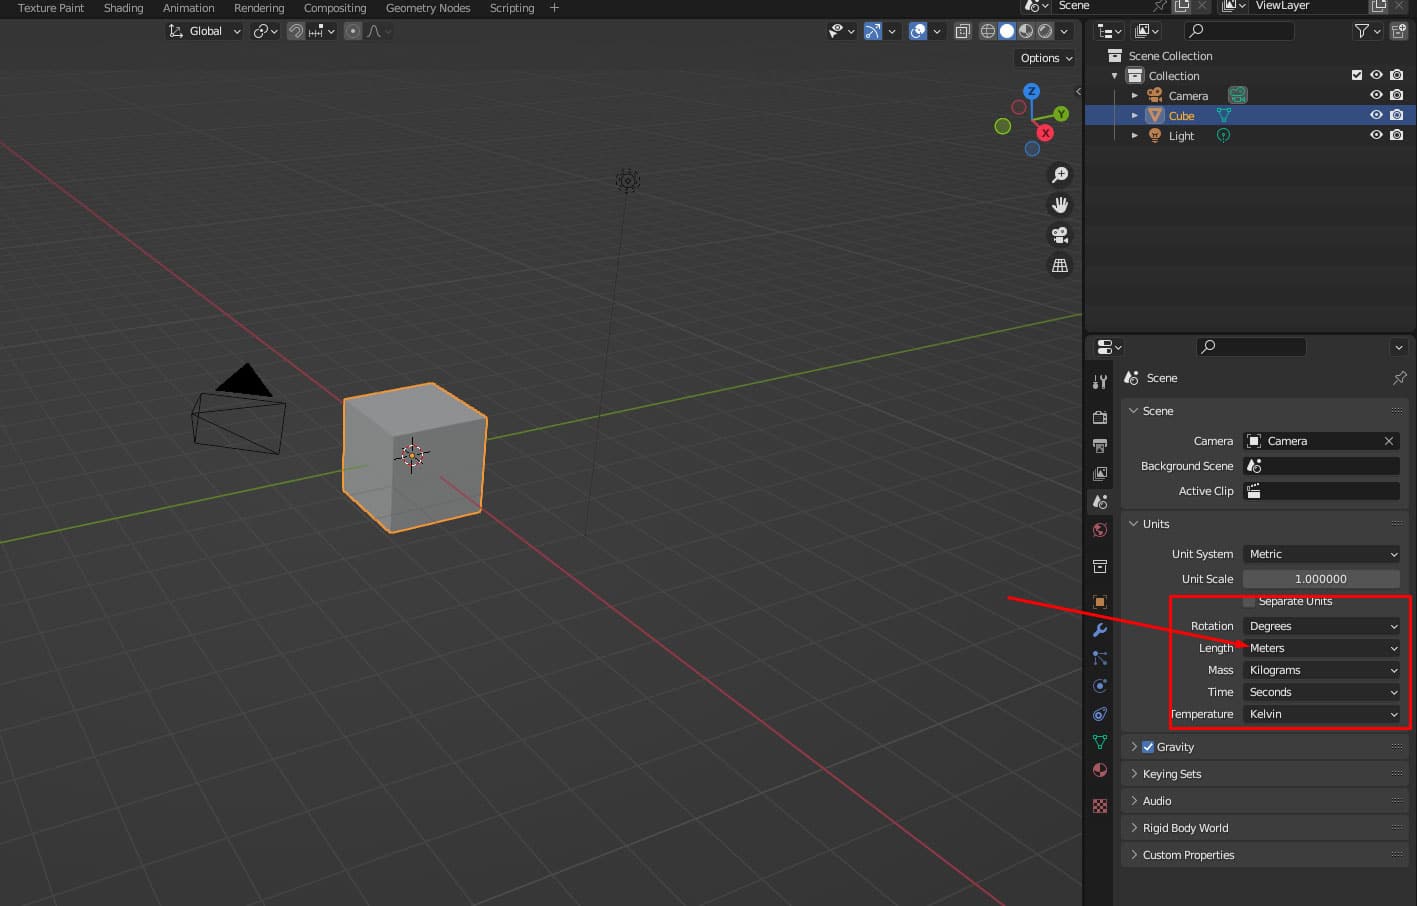
Change the unit system metric to imperial and then, lengths to inch.

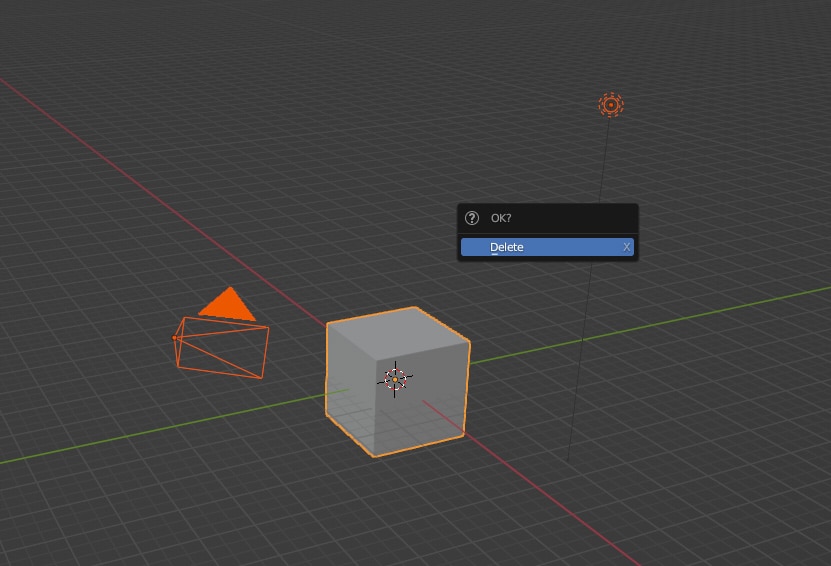
Now we will delete all objects into the scene. First, select all by pressing A and pressing X to delete.
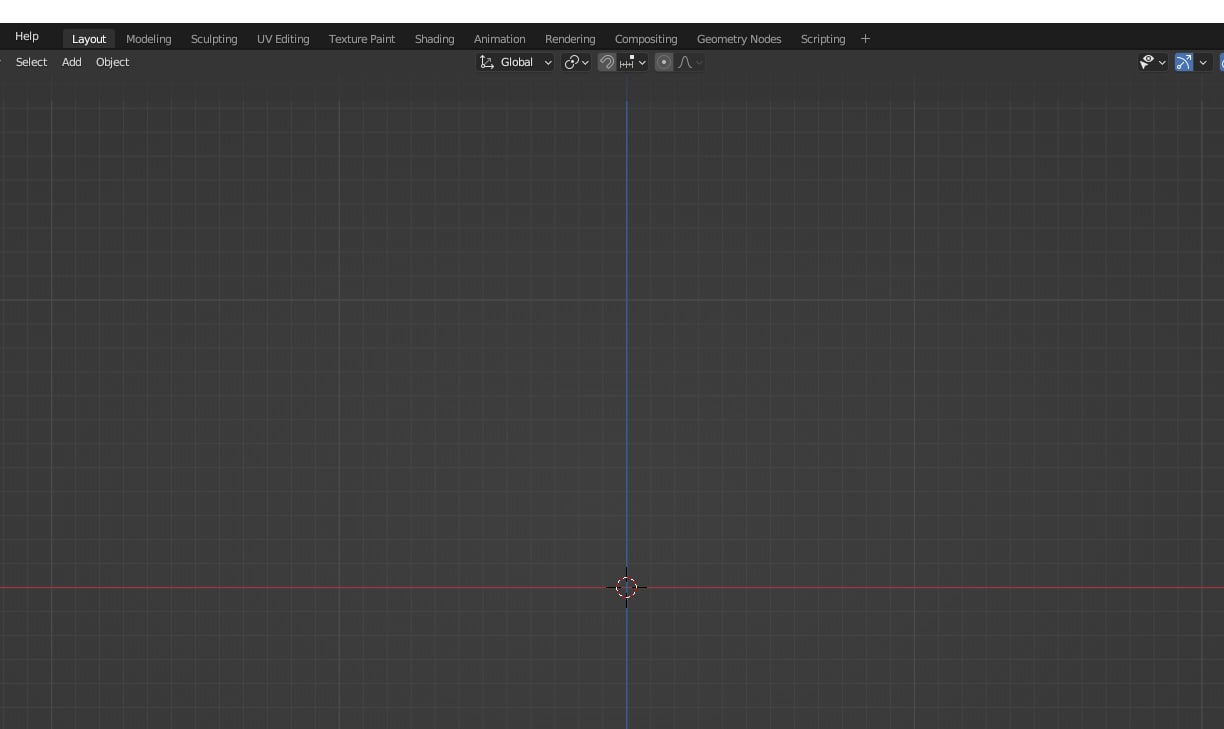
Press 1 for the front orthographic view.
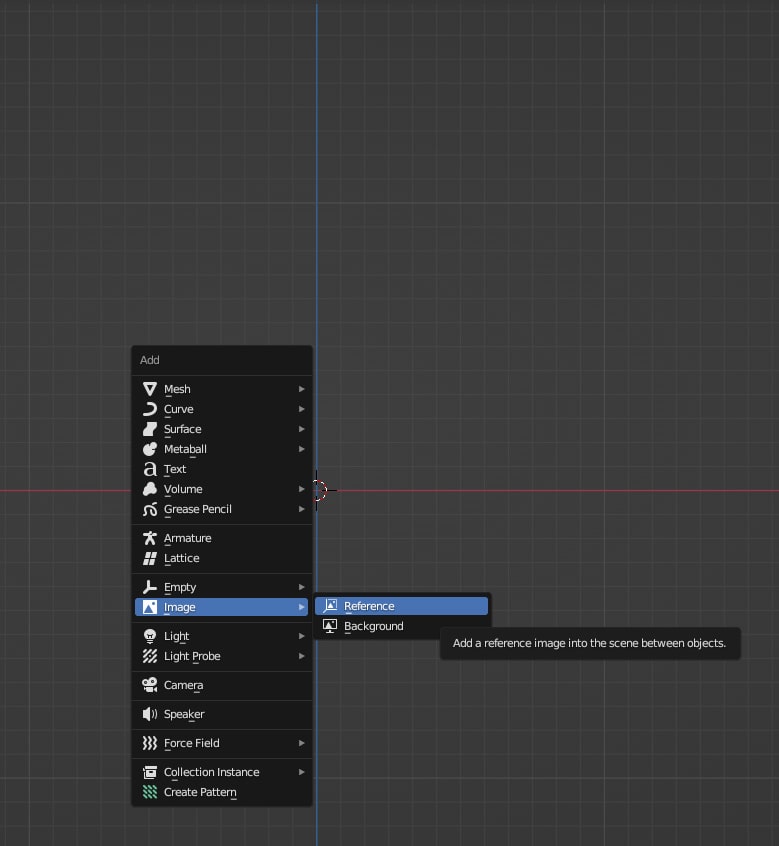
Add background image. Press, shift A > image > Reference.
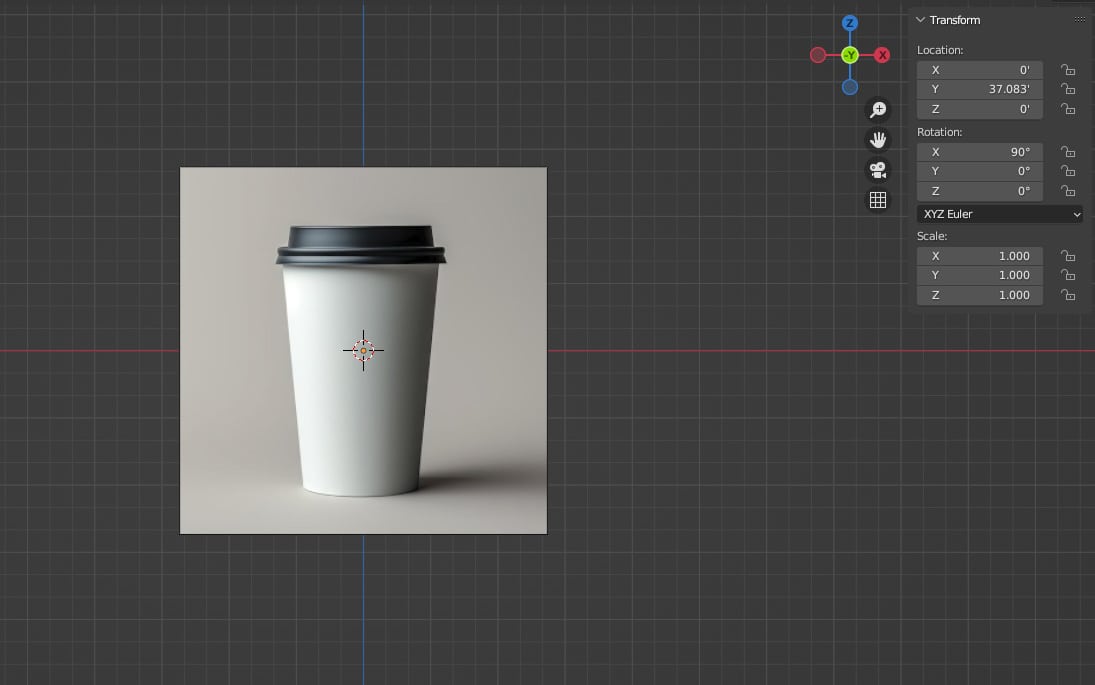
Now, we have to adjust the image to make the model accurate with the expected dimensions. We will do it by adding a cylinder with our expected dimension. This time our requirement is 5 inches in height and the radius is 3 inches.
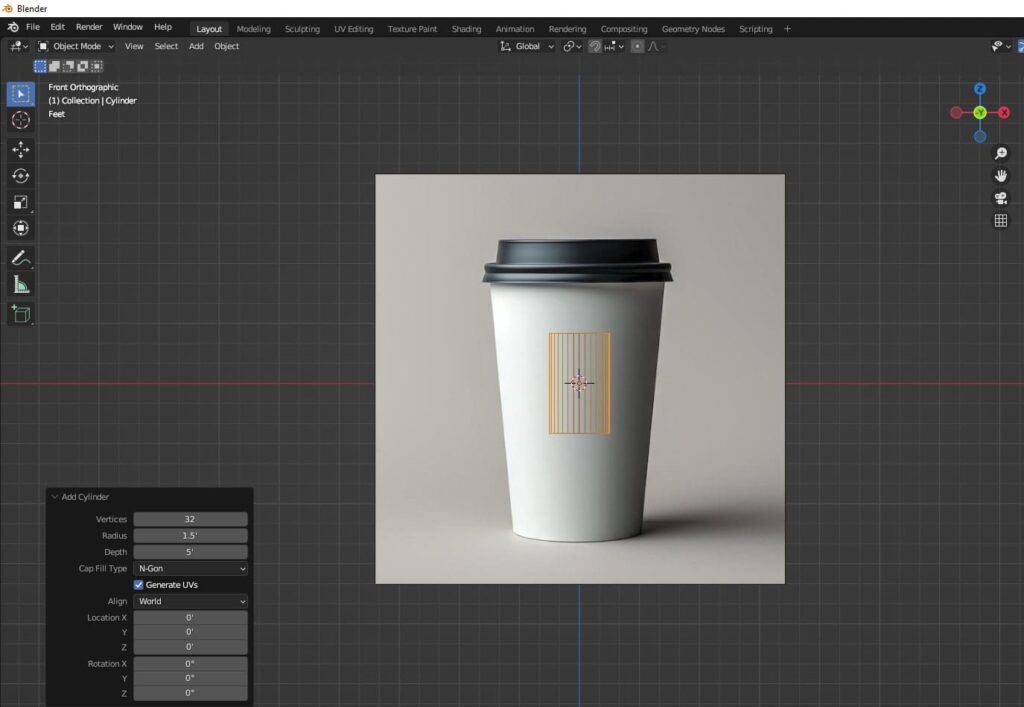
Select the image, scale it down, and match it with the cylinder.
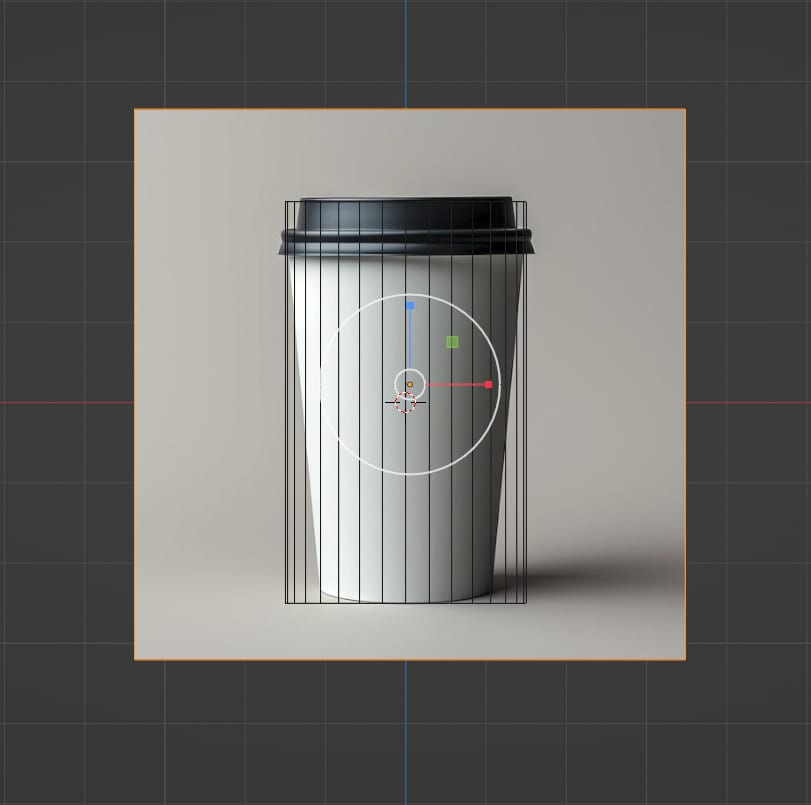
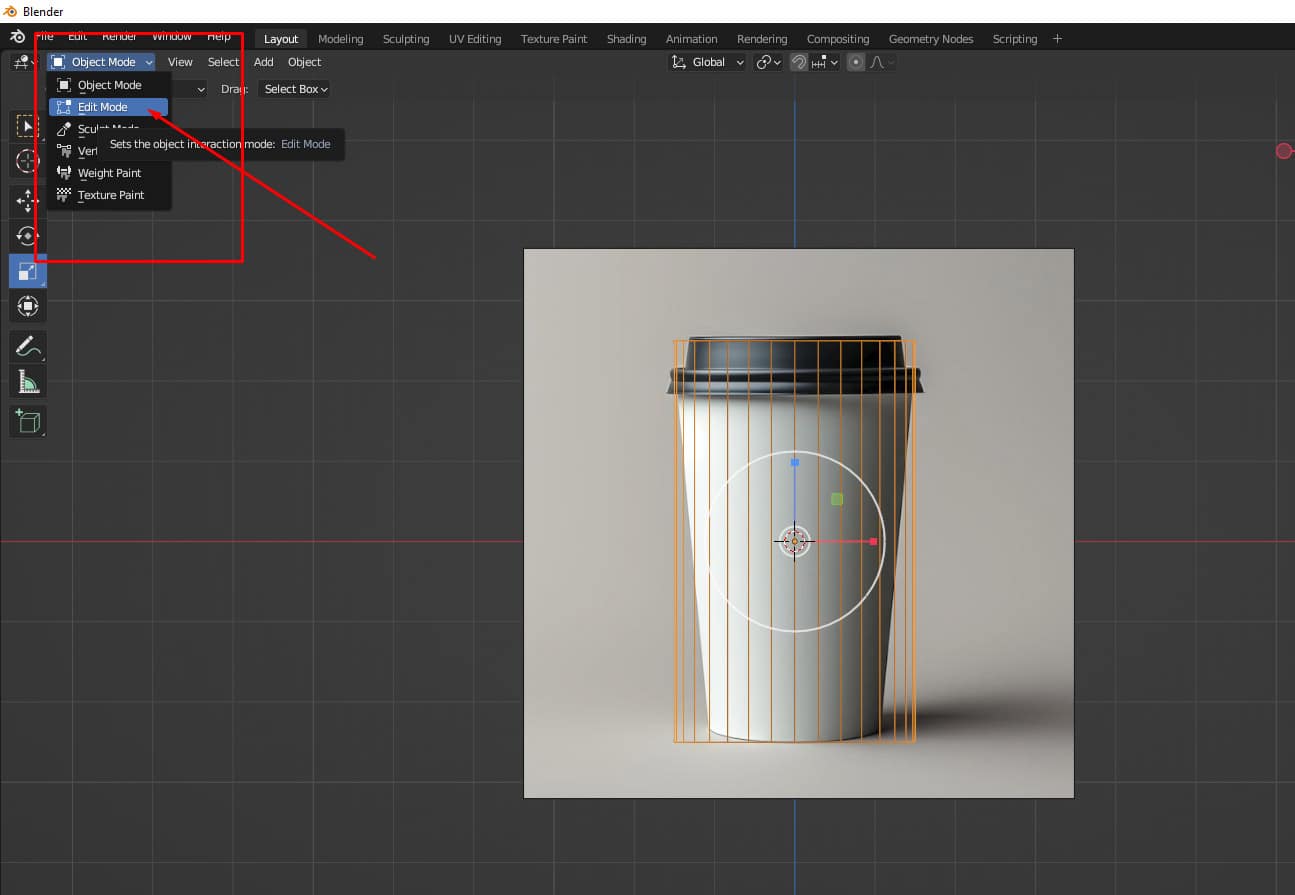
Now our modeling task will start. First, go to edit mode.
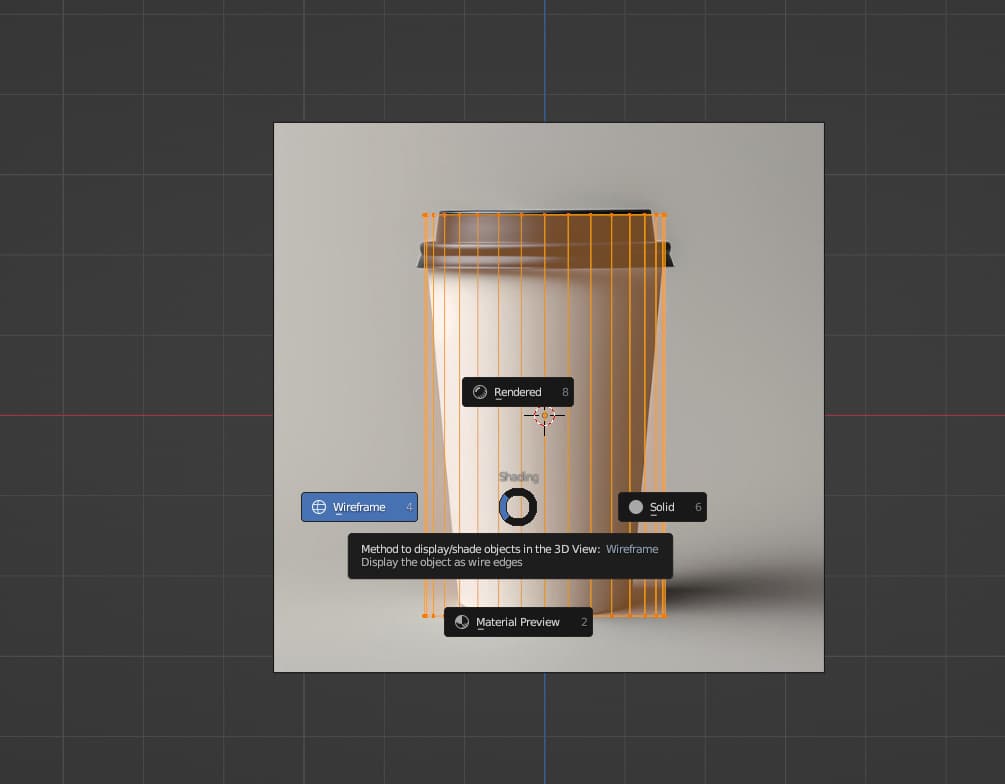
Note: By the way we can change our shading view by pressing and holding “Z” for the shading view options menu and selecting wireframe.
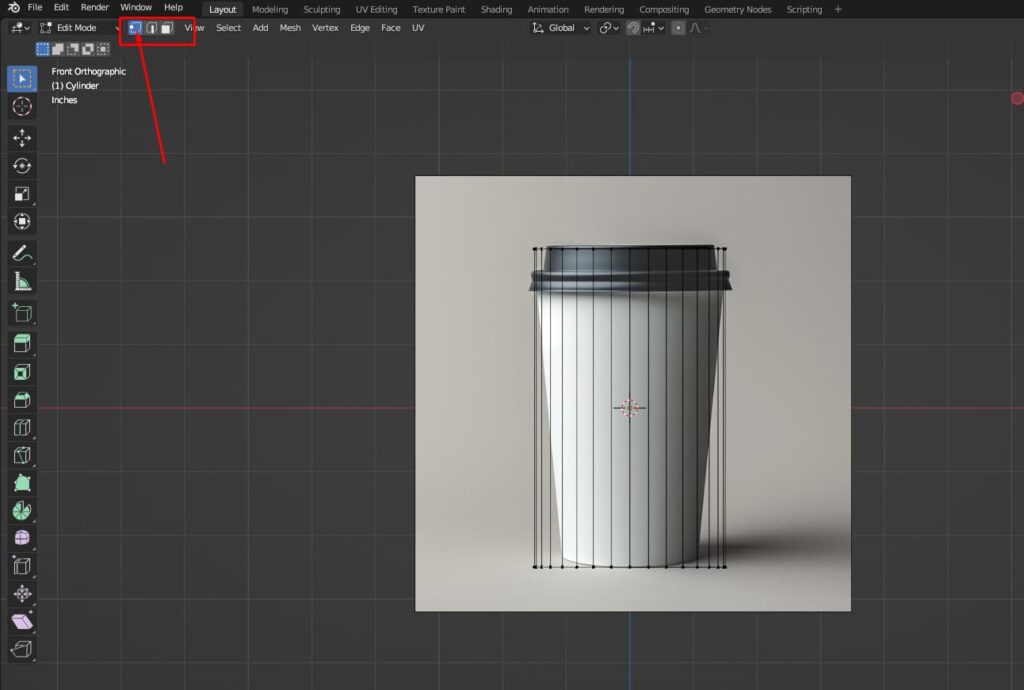
In the edit mode, we select vertex selection mode. By pressing “1” or, from the top left menu in the 3d viewport.
Select the bottom vertex’s by pressing the left mouse button and drag.
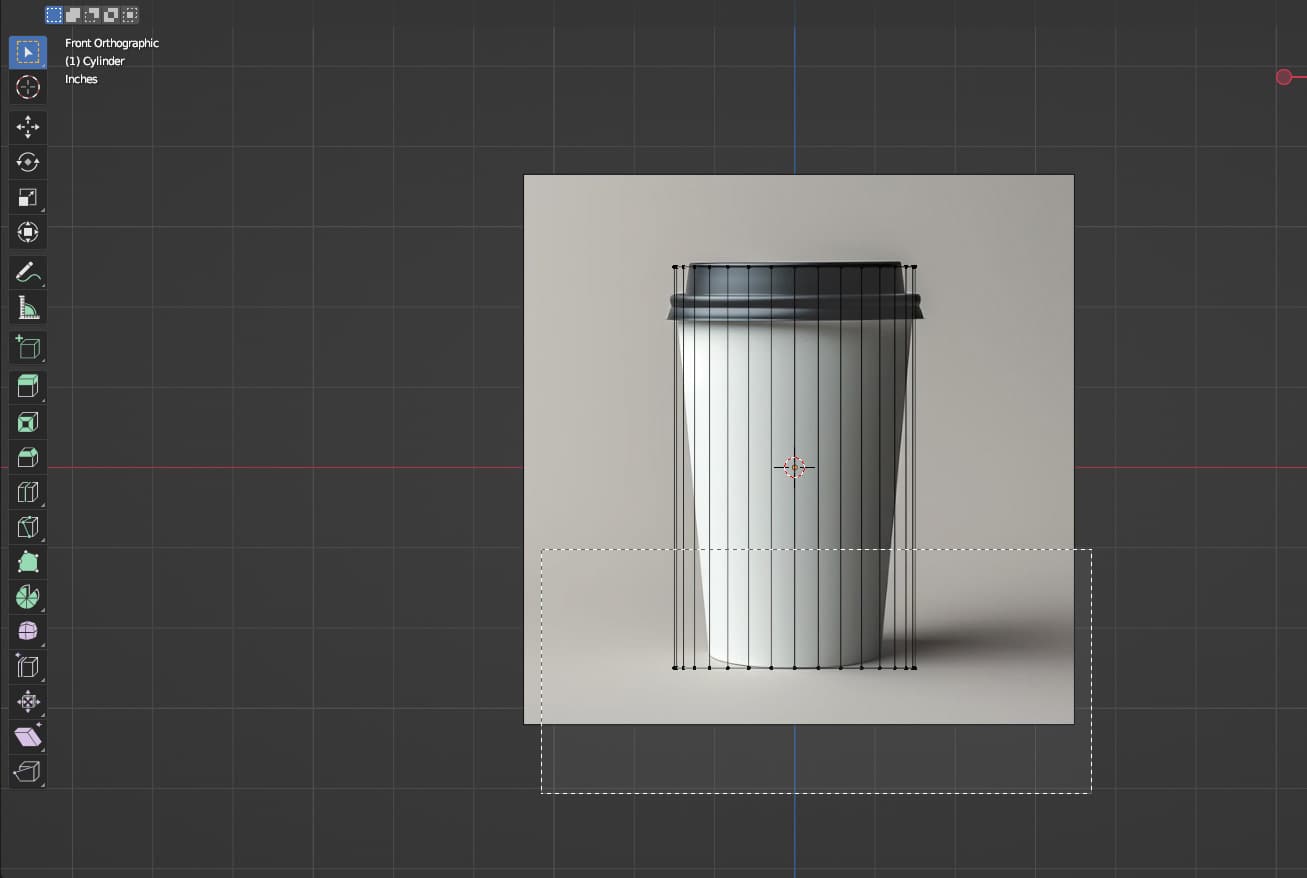
Scale down the vertex and match it with the reference image.
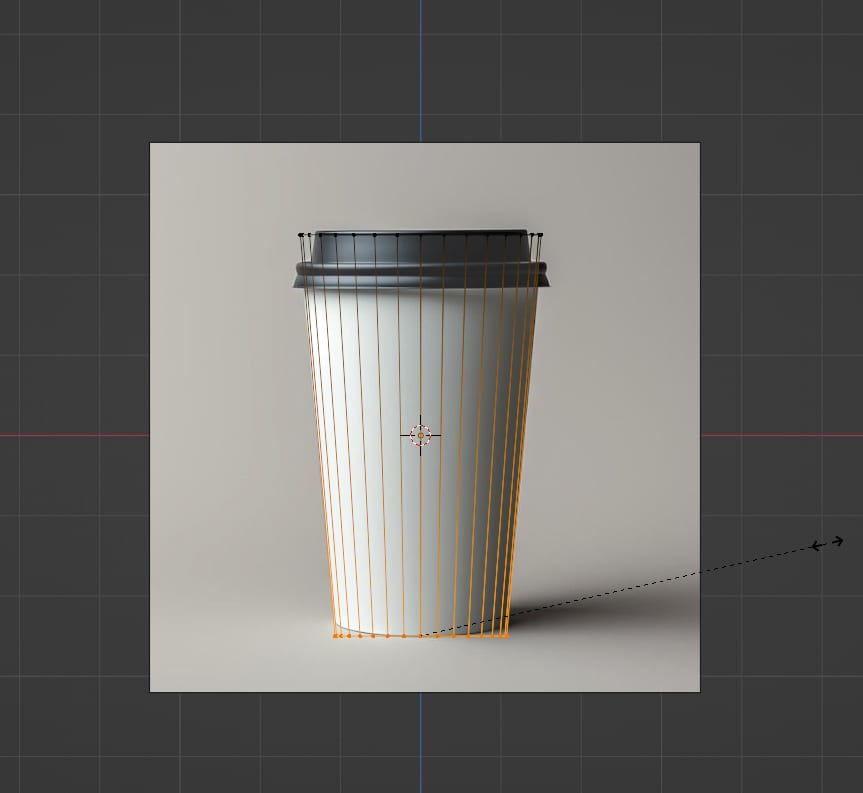
Now select the top vertices.
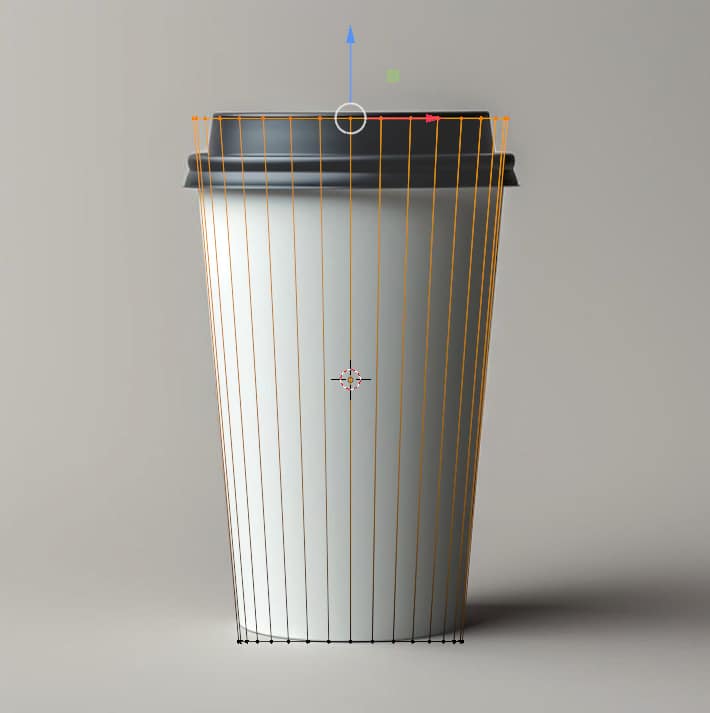
Now adjust the position and match it with the reference.
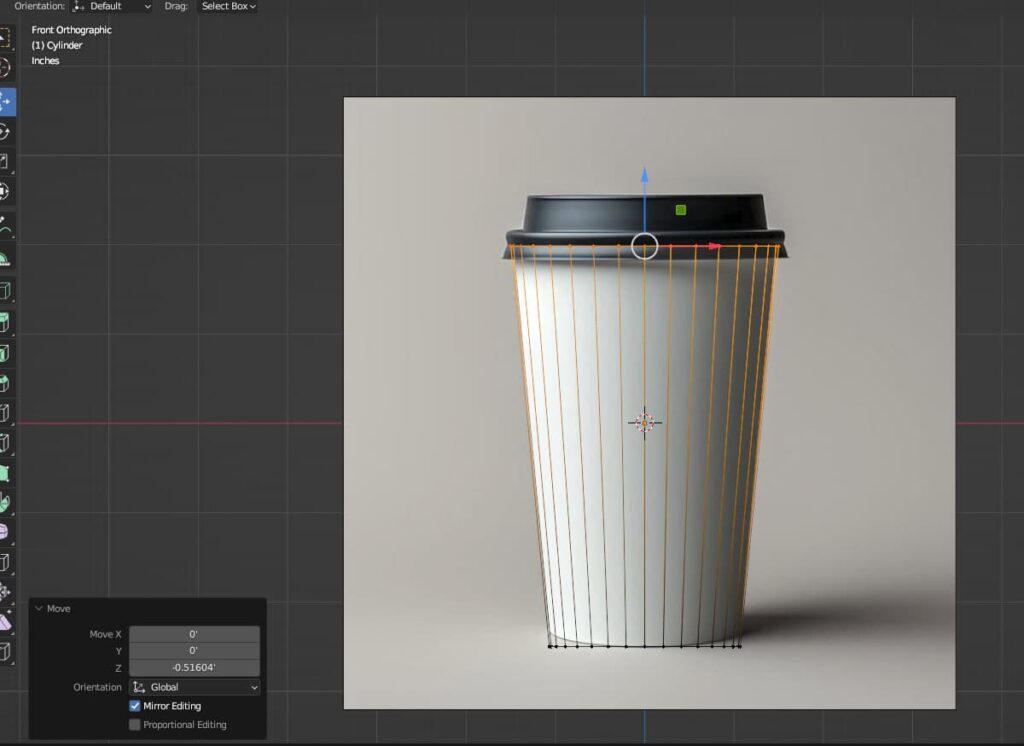
Now go to the orthographic view right right-click over the object and select Shade Smooth.
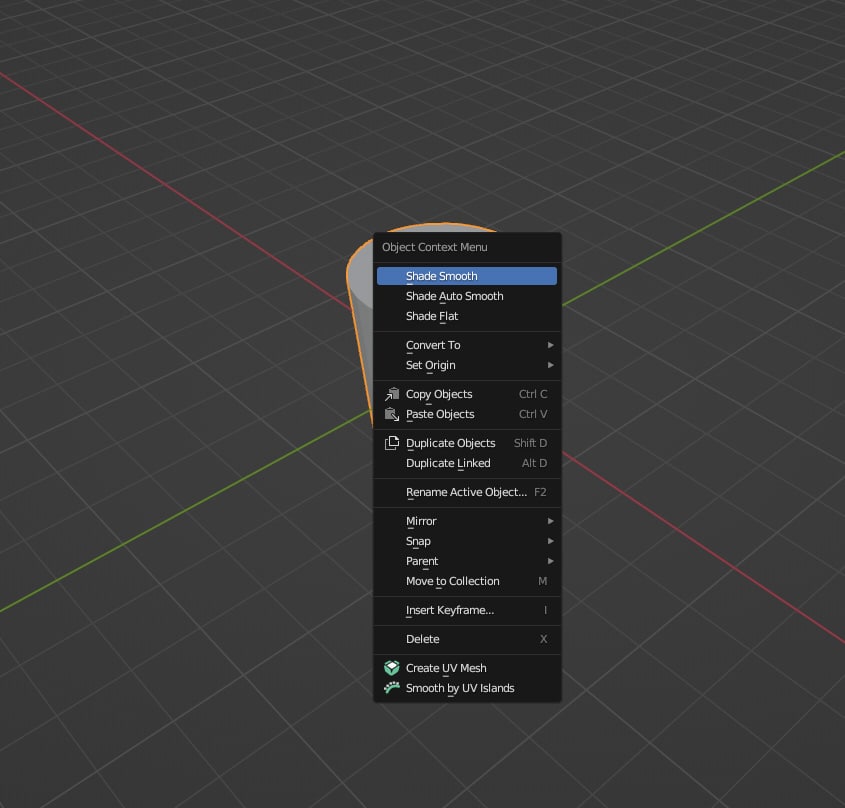
Now, go to face selection mode and select the top and bottom faces.
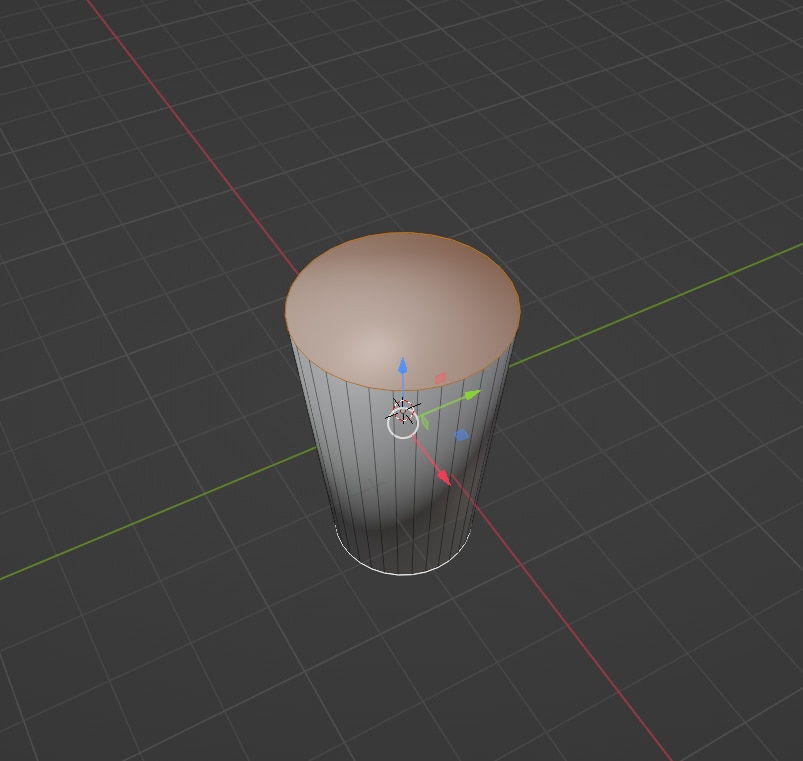
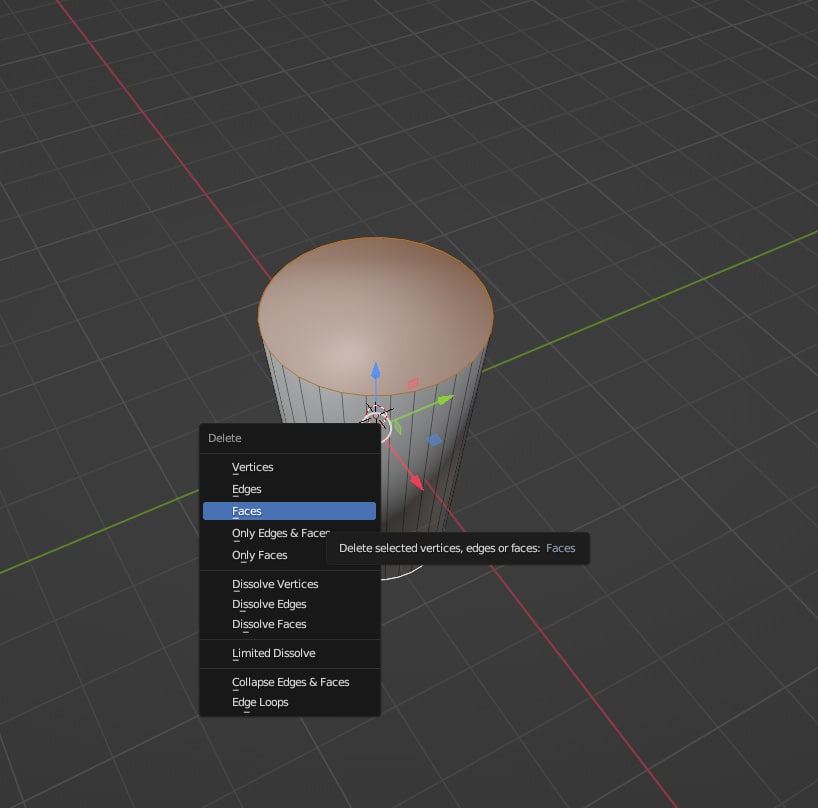
Delete them by pressing “X”.
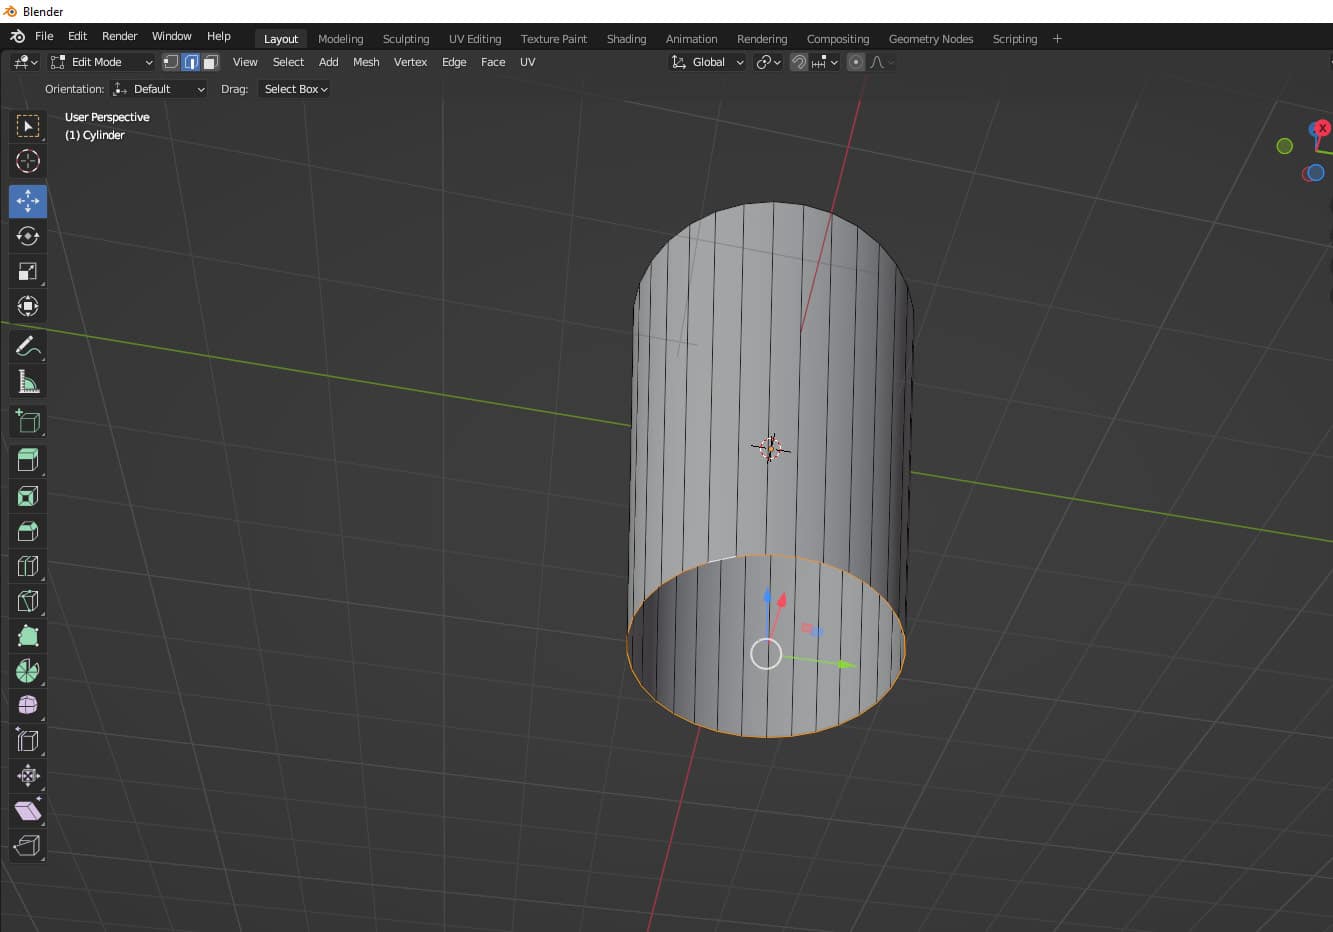
Now go to edge selection mode and select the bottom edge row by holding “Alt” & left mouse click.
Now extrude and scale down the edges. First press “E” and then, “S”.
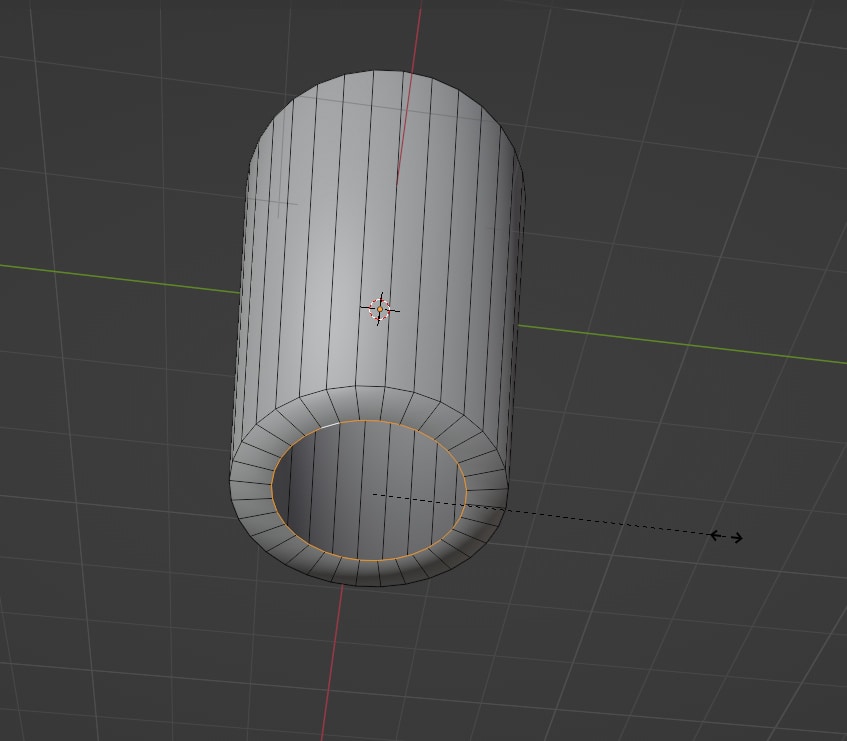
Now do this action again and match it with the reference. Merge the vertices in the center by pressing “M”.
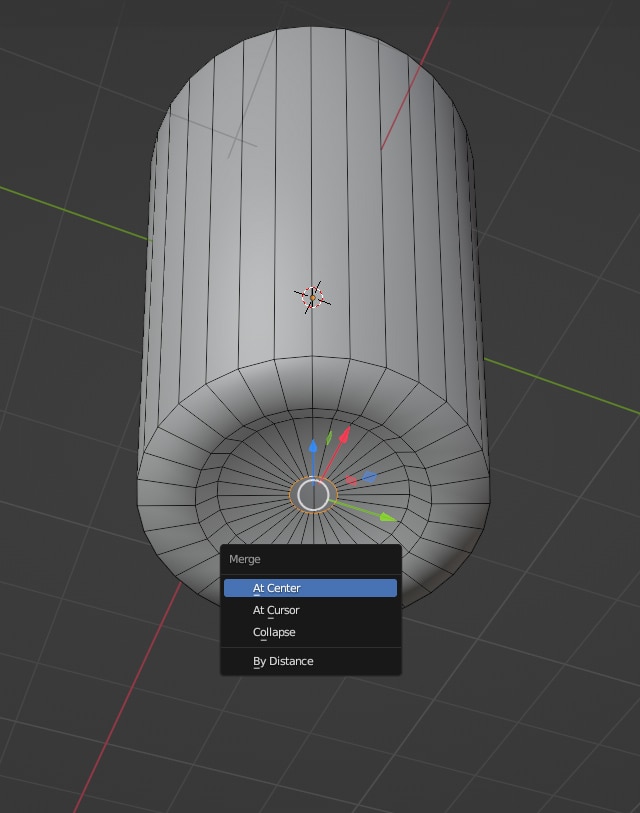
Here is our basic shape. Now we will start working on adding details.
Step 3: Adding Details
Now we will add a loop cut in the head of the cup to add some more details. To add a “Loop cut” press “ctrl+R” and drag the mouse to move the line at your desired space.
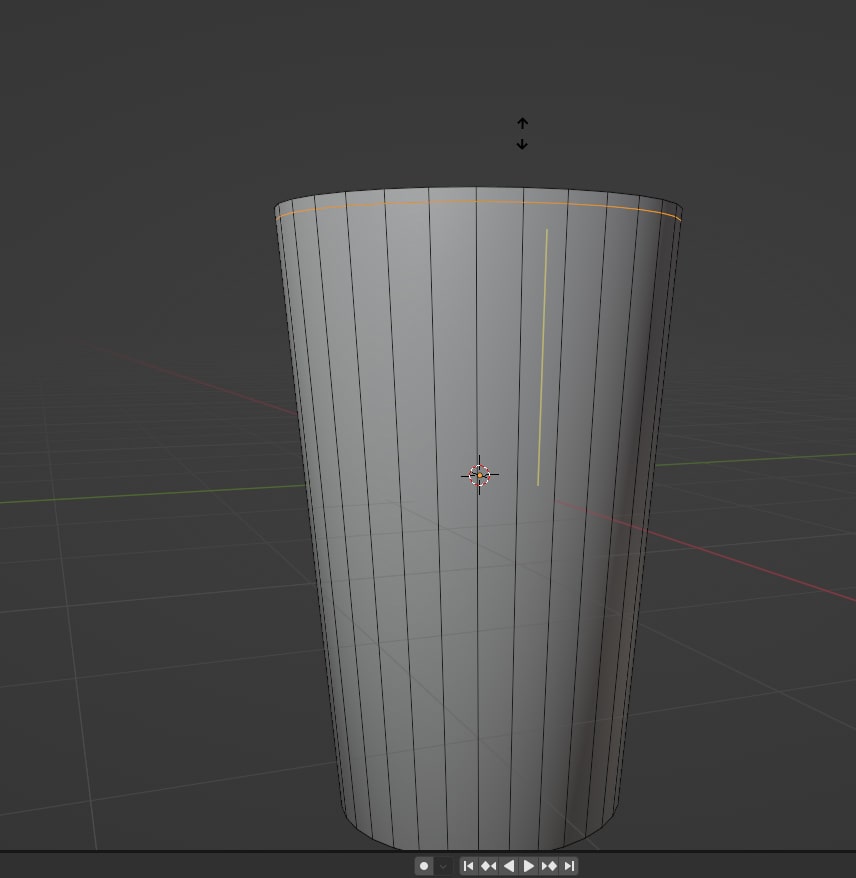
Now we will extrude the top faces. For this go to face selection mode. Press and hold “Alt” + left mouse click on the face for once.
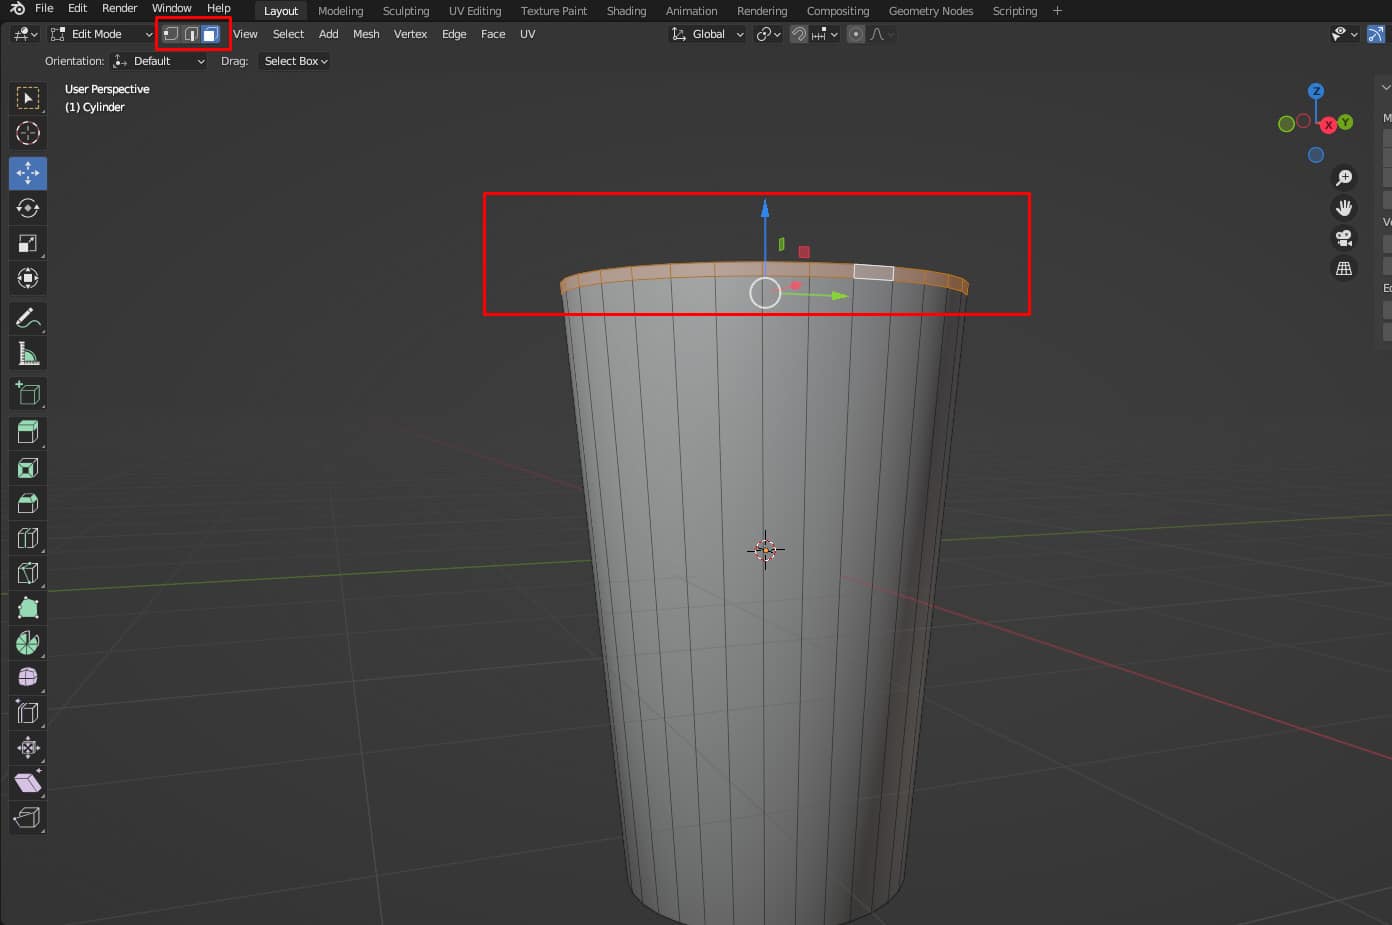
Now, “E” for extrude and “S” for scale.
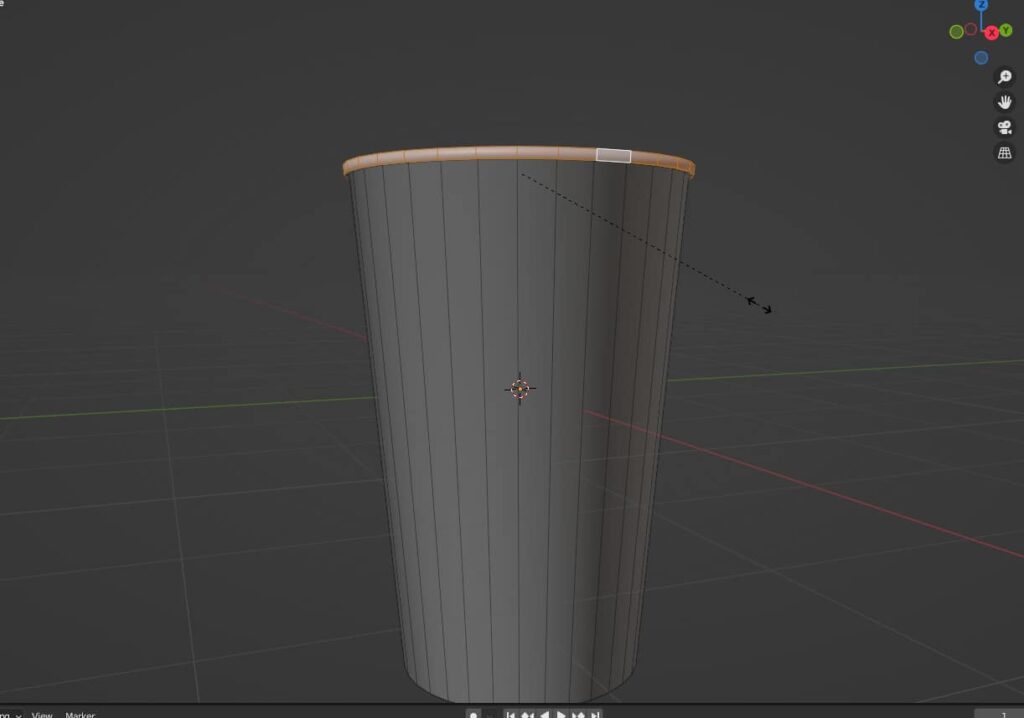
Now we will add bevels to the object. Select the rows we want to bevel and then, press “ctrl + B” for bevel. Move the mouse for bevel strength.
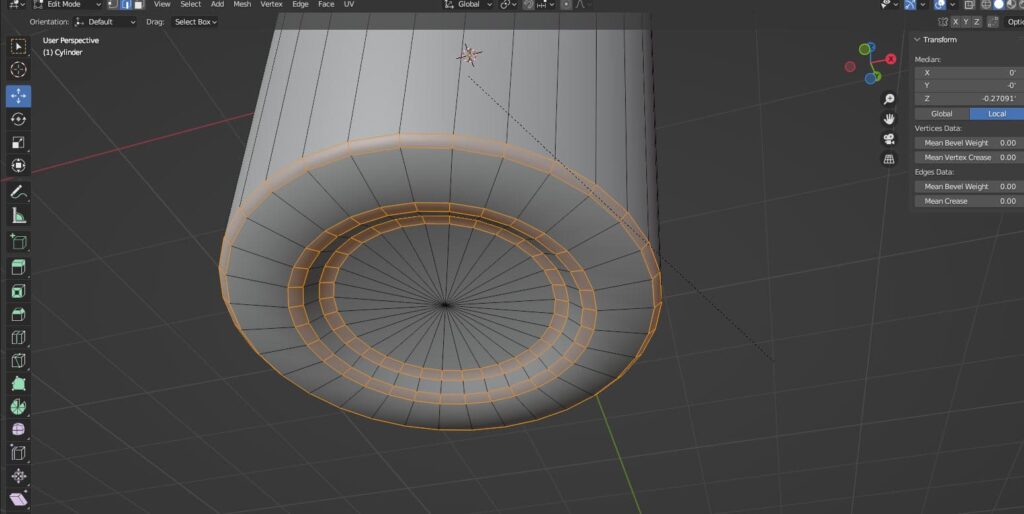
Also, you can scroll to add more loops.
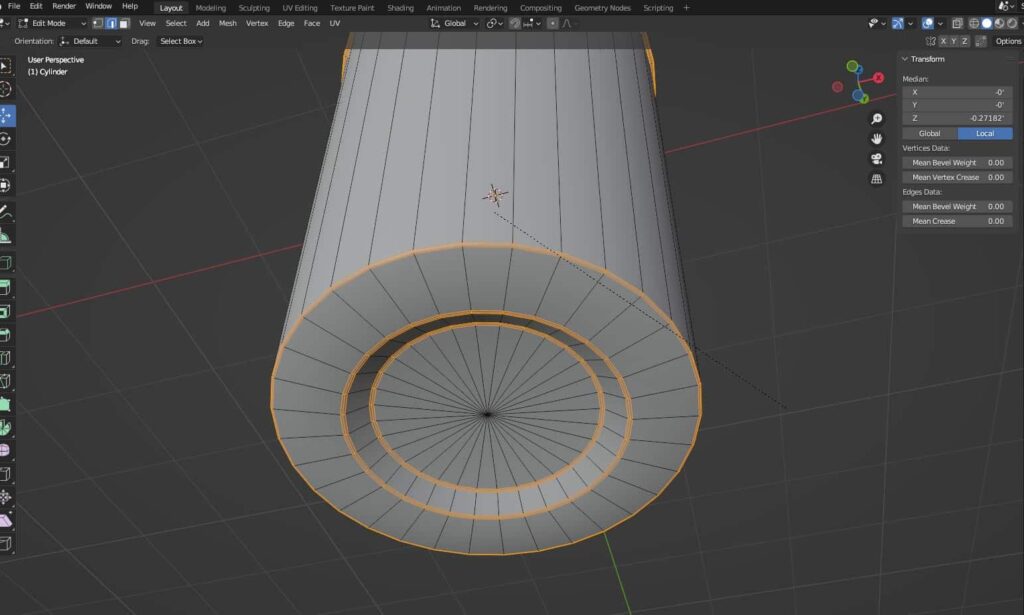
Now our cup modeling is done.
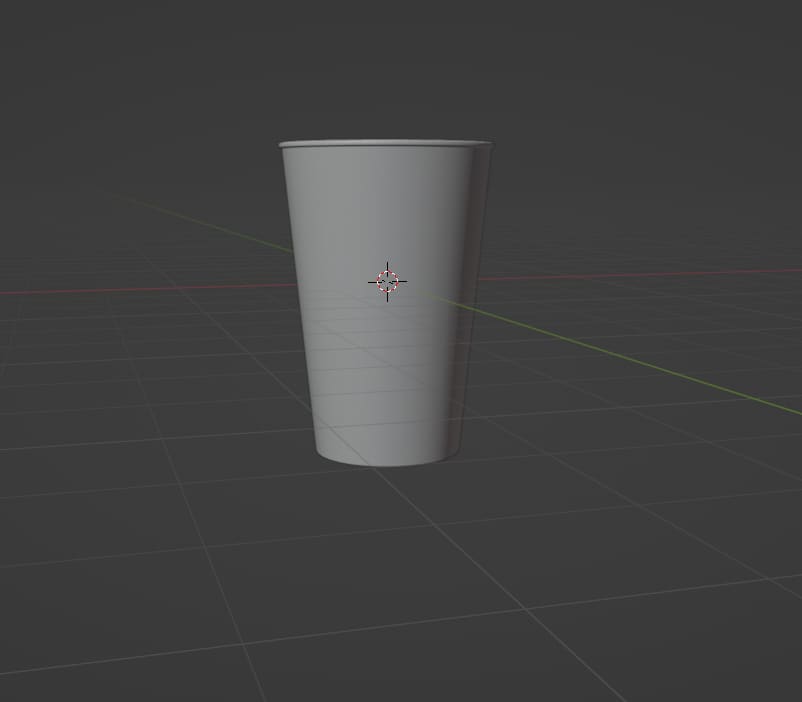
We can also add a subdivision surface modifier to make it more smooth.
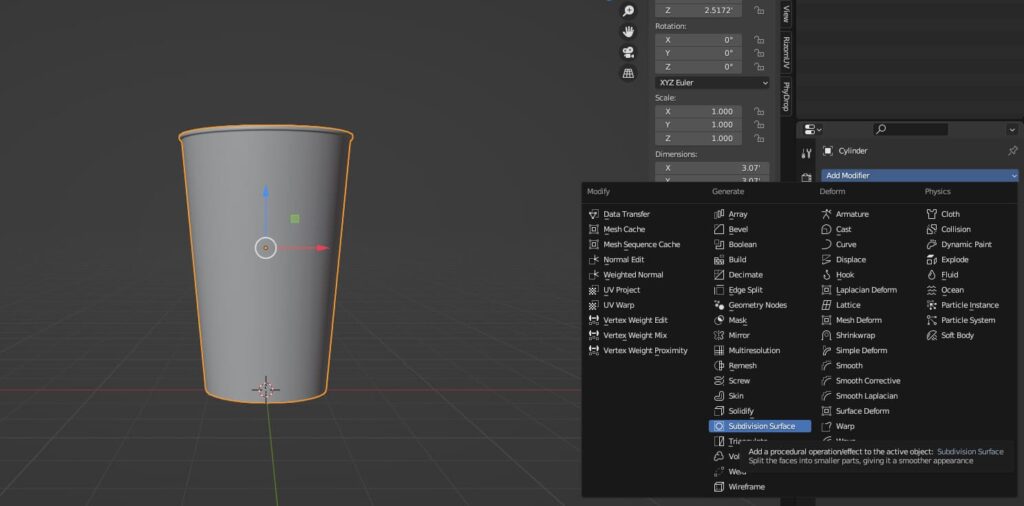
Here are adding detailed parts that have been done for this coffee cup model. Now the final part “Output”.
Step 4: Final Output
- Select the model
- Go to the file menu
- Export
- Select your required output format (in this case we are using FBX)
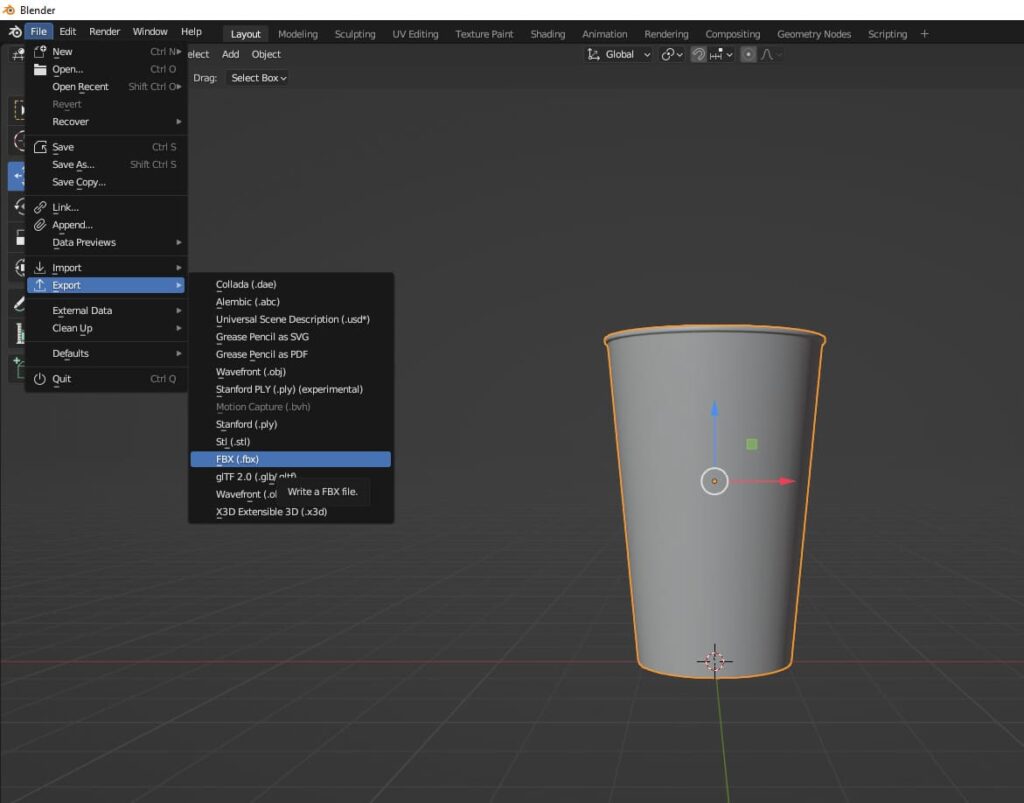
- or, simply just press F4
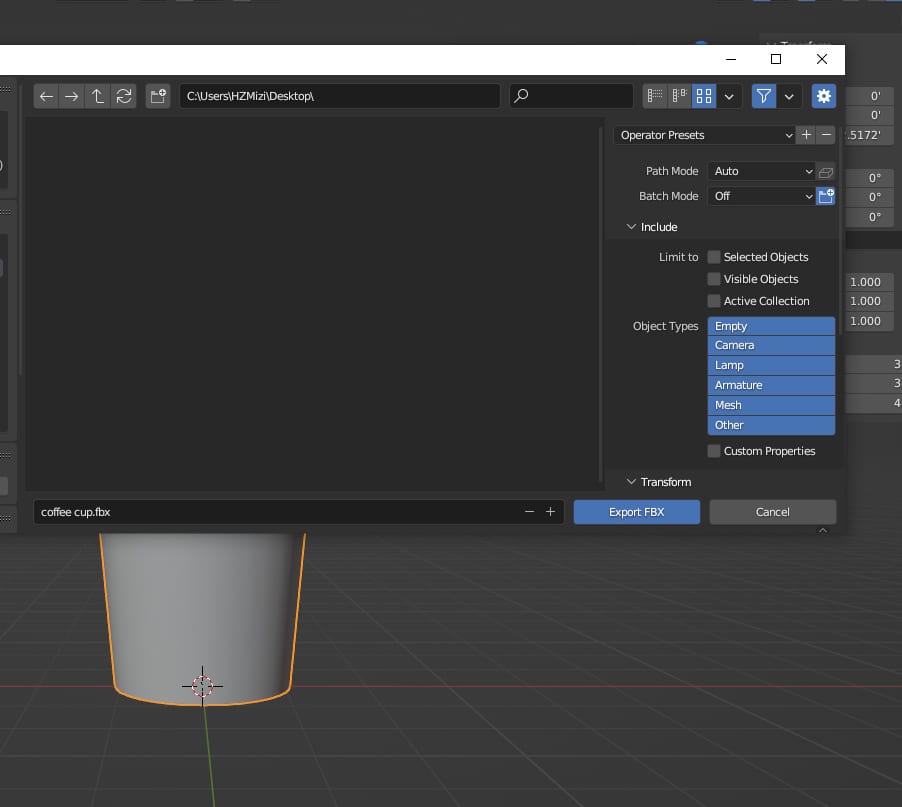
Give a name and select the location then, hit export. This is how we can use Blender for 3D modeling.
How Long Does it Take to Make a 3D Model in Blender?
3D modeling in Blender may take 1 hour to more than 1 week factoring in project complexity, requirements, level of detail, and 3D artists’ expertise.
| Model Level | Examples | Time |
|---|---|---|
| Basic | Low poly assets, Simple shapes, Minimum details objects, etc. | More or less than 1 hour. |
| Intermediate | UV unwrapping, Moderate topology, Characters, Vehicles etc. | Less than a week. |
| Complex | High-poly sculpting, detailed rigging, realistic environment, advanced textured and highly detailed subject, etc. | Over 1 week. |
How Do You Download and Install Blender on a Desktop and A Laptop for Free?
First visit www.blender.org website. Then, check the Requirements if your laptop or desktop has the right configuration and compatibility to run the software. Once you have confirmed, click Download. Blender runs on Windows, Linux, and macOS. When the Blender file is downloaded, open the file, follow the on-screen prompt, and install it.
Having an already existing version of Blender installed on your PC won’t cause any trouble, because the new version will ask permission from you to Uninstall or Overwrite the existing ones.
Also remember, that Blender has different versions available in the software. such as
- Stable- Fully tested with latest features, minimum bugs, mostly usable for production works.
- LTS- Long-Term Support, satisfying the demand for long-lasting projects. It is available every year.
- Beta/ Alpha- Not thoroughly tested as the ‘Stable version’ and can crash.
It’s recommended to use the Stable one for learning purposes.
Where to Find Blender 3D Models for Free?
You can find 3D models for Blender free of cost from BlenderKit, CGTrader, Turbosquid, Polycam, and All3DP among many other websites. Working on an existing model saves time, and cost, and accelerates learning, concept development, creativity, and productivity of the core skills.
1. BlenderKit
BlenderKit is an add-on facilitating users by offering Blender models, textures, UV unwrapping and mapping, brushes, and items that are time-consuming to create, complicated, and in detail. It’s the fastest, resource-saving option, and mostly offers materials for free.
Features
- Huge library of high-quality materials
- One-click downloadable assets
- Custom tags and filters
- Accessible inside Blender
How to Download 3D Models From BlenderKit?
First, open Blender. Click Preferences. Go to the Add-ons tab and click Add Mesh. Then access to BlenderKit Asset Library to enable it.
Once you have installed the BlenderKit, drag and drop the models you need directly on your project.
2. CGTrader
CGTrader is a 3D model offering platform for Blender both in free and premium versions. Once you filter the criteria, you are good at finding your required models. The platform also allows 3D artists to sell their creations.
Features
- A library with millions of free assets
- Models with in-detail previews
- Real-time 3D assets
How to Download 3D Models from CGTrader?
First, create a free account. Then, select your required model and click the ‘Download Free’ button. Once it is downloaded, import it to Blender.
3. TurboSquid
TurboSquid is a trustworthy platform for Blender-compatible 3D models. It provides professional, high-quality models, also artist recommendations and connects users with custom works.
Features
- Millions of high-quality models for different industries
- Models availability in various Blender-compatible file formats
- Advanced filtering, search options
How to Download 3D Models from Turbosquid?
Register with TurboSquid from its official website to access models. Then select the ones you need and check their specifications. Then click download. Once downloaded, import it to Blender.
4. Polycam
Polycam is a community-driven free library that offers 3D projects for Blender. It’s more of a photogrammetry app for users to create 3D scans.
Features
- Users created and shared 3D scans
- Assets created from real-world objects
- Offered models with original textures and details
- App available for users to share their work
How to Download 3D Models from Polycam?
Create an account with Polycam, download models, and then import them to Blender to start working.
5. All3DP
All3DP is also a resourceful platform with plenty of 3D models for Blender. Rather than randomly search for models, you can access any categories to find your designated objects.
Features
- A curated list of free models with variations for Blender
- Category-based model serialized including objects, architecture, nature, etc
- Beginners-friendly offers tutorials, guides, etc
How to Download 3D Models from All3DP?
Click on your desired models, download them to your preferred platform, and import them into Blender to use.
Where to Learn Using Blender for 3D Modeling?
You can learn how to use Blender for creating 3d modeling from Blender’s resources, and tutorials on YouTube, Udemy, SkillShare, and Coursera, among many platforms.
1. Resources by Blender Studio
The official website of Blender is a great resource to learn the software firsthand. You will find step-by-step tutorials, how-to guides, and documentation that Blender Studio offers through Training, Blender Manual. Also, join the Community and experts with different skill sets to help you out.
2. Designated Platforms
You can learn Blender from specialized 3D learning platforms like Polycount, and ArtStation. By joining these platforms, learn from expert 3D modelers directly along with displaying your artwork. You will
- Receive feedback for improvements
- Get noticed by skilled professionals
- Opportunity to collaborate, and
- Build portfolio
3. All-Skill Learning Platform
Premium courses are worth it, however, we recommend you access those once you have learned the ropes about Blender. Experienced 3D artists educate learners to master Blender skills by creating courses for platforms like Udemy, SkillShare, Coursera, and more. You get
- Access to structured teaching
- Lifelong accessibility of the resources
- Professionals and community assistance
Is Hiring a 3D Modeling Service Worth it?
Yes, hiring professional 3D product modeling services worth it as it offers working flexibility, cost reduction, and accessibility to expertise. Outsourcing 3D modeling cost is more effective in terms of expense, knowledge, and working diversity than recruiting a house modeler. Those professionals hold specialized skills to craft in-detail & realistic models cutting down the complexity of physical prototyping. Thus, it offers scalable results within budget and deadline for businesses.
FAQs About Using Blender for 3D Modeling
Is Blender Good for Beginners?
Blender is an intuitive, and felicitous software for beginners due to being free of cost, accessible from any device, has diverse toolsets for 3D art creation, and ease of use. Though the learning curve seems steep at first glance, it gets better as you practice.
Does Blender require art skills?
Blender doesn’t require any art skills and it is one of the easy to learn 3D modeling software. New learners can start with tutorials. However, having prior knowledge of composition, drawing, and lighting will give an upper hand in the 3D learning process with Blender.
Who uses Blender software professionally?
Animators, video game developers, architects, product designers, graphic designers, visual effects artists, automotive engineers, medical device engineers, and biomedical researchers need to use Blender for their 3D modeling.
What 3D model format does Blender use?
Blender uses versatile file formats to adjust professional needs to import, store, and export data, such as
- Natively supported format: .blend, .dae, .abc, .svg. stl etc. Immediately available upon installation.
- Add-Ons: both official and community-based, .mdd, .py, .xyz, .pdf, .svg, etc.Image, Video, and 3D formats: JPEG, PNG, DPX, AVI, MPEG, 3DS, DFX, OBJ, VRML, etc.
Conclusion
Learning to use Blender is a skillful art, but knowing how to start matters.
- Start with beginner tutorials to learn the simple navigation controls so know what to ask.
- Track your progress by making something with each learned tutorial.
- Doodle every day in Blender, it’s fun and worth it.
- Ask communities where you are stuck.
Keep practicing and soon you will find yourself creating objects without a hitch.
