
Drop Shadows in Photoshop indicate an artificial shadow effect on objects and people. This creative design element helps your pictures stand ouA Drop Shadow in Photoshop refers to a visual effect that creates the illusion of a shadow cast by an object onto a background, adding depth and dimension. You can use drop shadow to product, people, and text to give the impression that your image exists in 3D space. From creating a convincing photo composite to adding realistic lighting or making your layout more legible, a drop shadow effect is necessary.
These are 4 easy & general ways to use drop shadows in Photoshop.
- Select the layer where you want to add a drop shadow.
- Click the FX icon at the bottom of the Layers panel and select “Drop Shadow.”
- Customize it to get your preferred shadow effect.
- Click “OK” to apply your changes.
By utilizing different types of drop shadow effects like opacity, angle, distance, spread, size, blending mode, contour, and noise, you can add drop shadows to products, people, and texts. For more in-depth detail, let’s dive into the process of how to add a drop shadow for product photos first.
What you’ll learn in this article
- 1 How to Add a Drop Shadow in Photoshop for Product Photos
- 1.1 Step 1: Open Your Photo in Photoshop
- 1.2 Step 2: Select the Subject
- 1.3 Step 3: Create a Layer Mask
- 1.4 Step 4: Remove Unnecessary Objects
- 1.5 Step 5: Apply Your Mask Selection
- 1.6 Step 6: Create a Layer Lask
- 1.7 Step 7: Apply the Layer Lask
- 1.8 Step 8: Create a Background Layer
- 1.9 Step 9: Select the Background Color
- 1.10 Step 10: Create a Duplicate Subject Layer
- 1.11 Step 11: Create a Drop Shadow
- 1.12 Step 12: Adjust the Settings
- 1.13 Step 13: Apply the Drop Shadow
- 1.14 Step 14: Clean Up the Shadow Effect
- 1.15 Step 15: Clean Up the Drop Shadow
- 1.16 Step 16: Add a Definition to the Background
- 2 How to Make a Shadow of a Person in Photoshop
- 3 How to Add a Drop Shadow to Text in Photoshop
- 4 What is a Drop Shadow?
- 5 What are the Different Styles of Drop Shadow Effects?
- 5.1 1. Standard Drop Shadow
- 5.2 2. Inner Drop Shadow
- 5.3 3. Soft Drop Shadow
- 5.4 4. Hard Drop Shadow
- 5.5 5. Long Drop Shadow
- 5.6 6. Cast Drop Shadow
- 5.7 7. Radial Drop Shadow
- 5.8 8. Angled Drop Shadow
- 5.9 9. Directional Blur Drop Shadow
- 5.10 10. Realistic Ground Drop Shadow
- 5.11 11. Floating Drop Shadow
- 5.12 12. Layered Drop Shadow
- 5.13 13. Colorful or Gradient Drop Shadow
- 5.14 14. 3D Drop Shadow
- 5.15 15. Multiple Drop Shadow
- 6 When to Use a Drop Shadow Effect on E-commerce Images?
How to Add a Drop Shadow in Photoshop for Product Photos
To add a drop shadow in Photoshop for product photos.
- Open Your Photo in Photoshop
- Select the Subject
- Create a Layer Mask
- Remove Unnecessary Objects
- Apply Your Mask Selection
- Create a Layer Lask
- Apply the Layer Lask
- Create a Background Layer
- Select the Background Color
- Create a Duplicate Subject Layer
- Create a Drop Shadow
- Adjust the Settings
- Apply the Drop Shadow
- Clean Up the Shadow Effect
- Clean Up the Drop Shadow
- Add a Definition to the Background
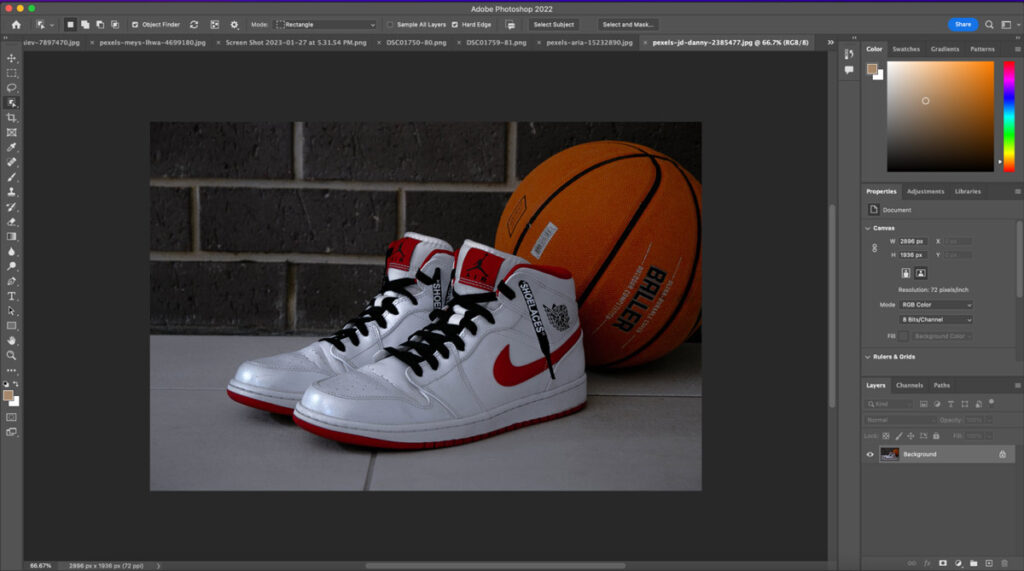
Step 1: Open Your Photo in Photoshop
Go to “File” and select the intended image.
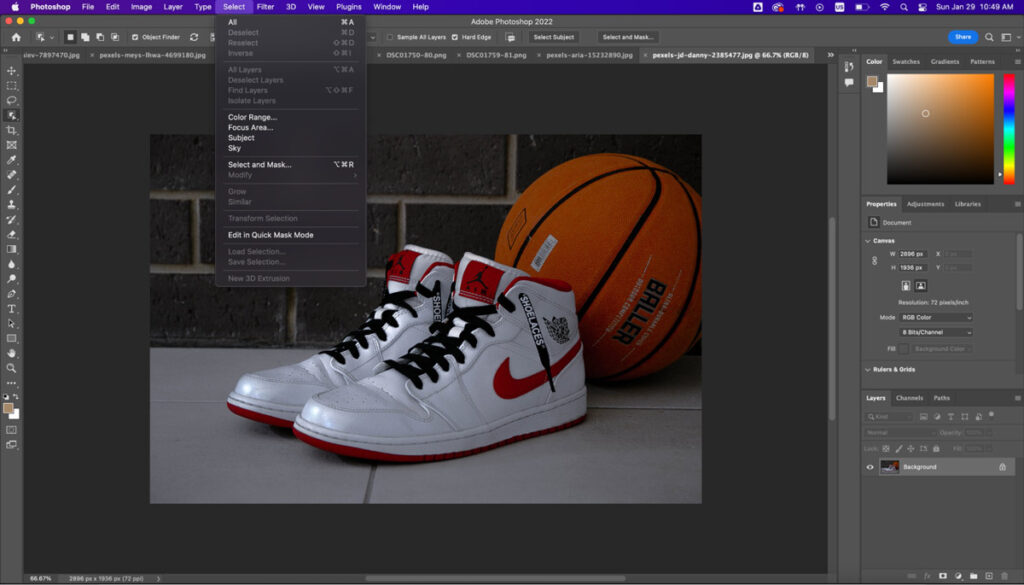
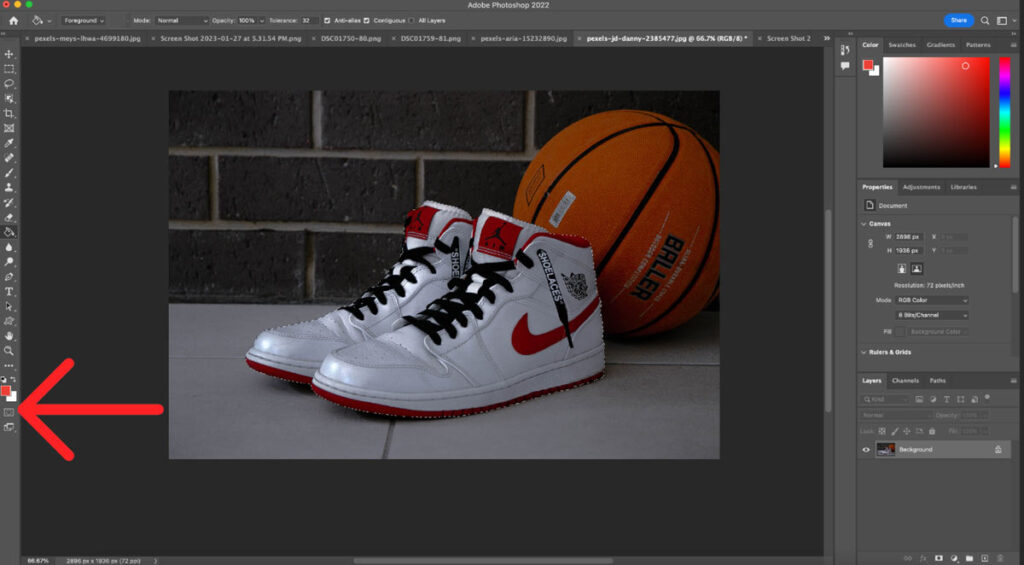
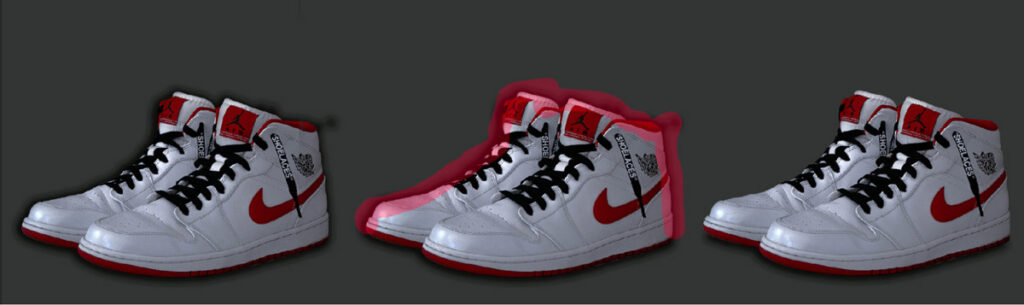
Step 2: Select the Subject
Once your file has been opened, select the subject. You can do this by clicking Select > Subject.
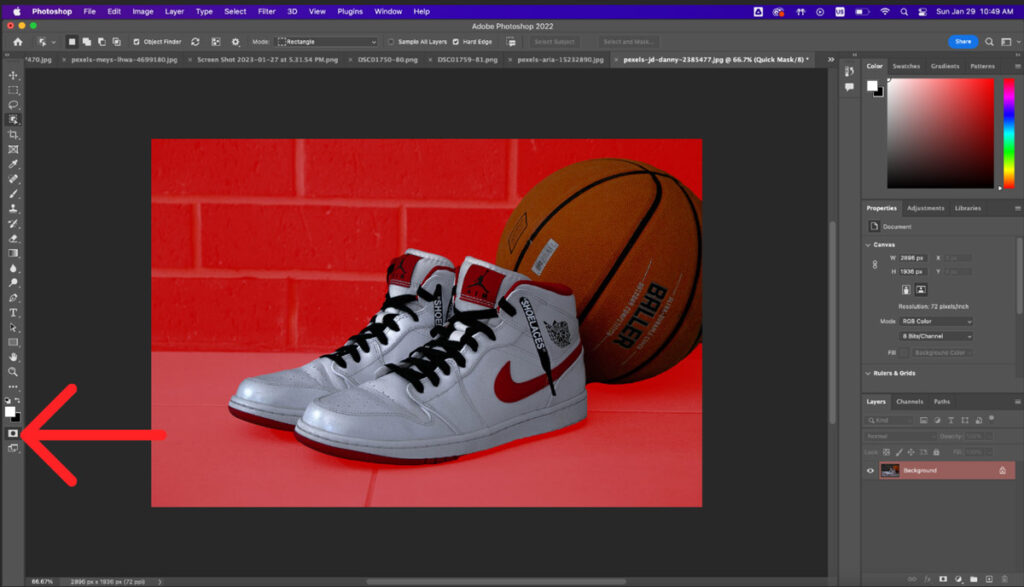
Step 3: Create a Layer Mask
Select the mask button, so your image shows up red. This is located on your toolbar.
Step 4: Remove Unnecessary Objects
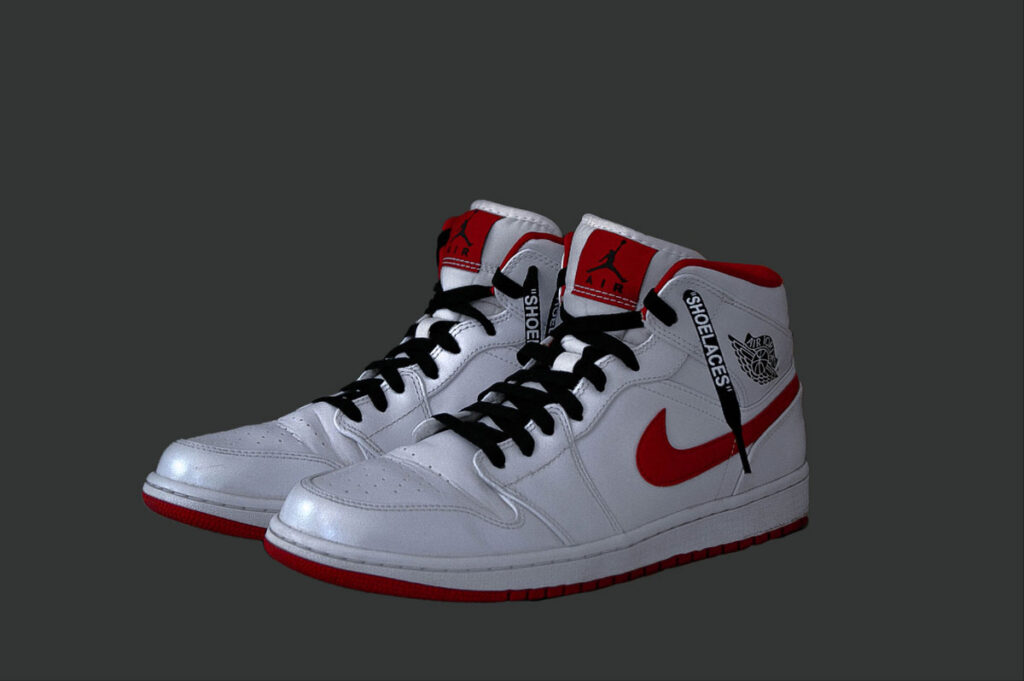
Clean up the selection. Click the brush tool (B) with a completely black brush, and brush around the subject’s edges. If you need to add more to the selection, use a completely white brush. Make sure anything you want to be removed from the image is completely red, like the image below.
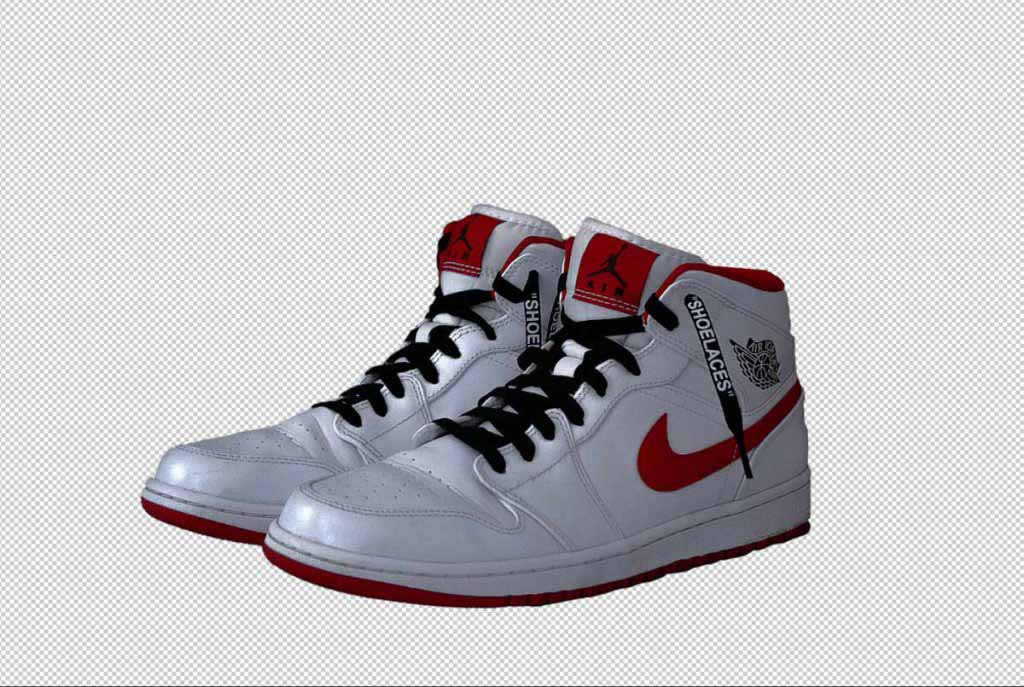
It should look like this when you are complete. Just select the subject of the photo.
Step 5: Apply Your Mask Selection
Reselect the mask tool, so the red disappears, leaving you with a line surrounding your subject.
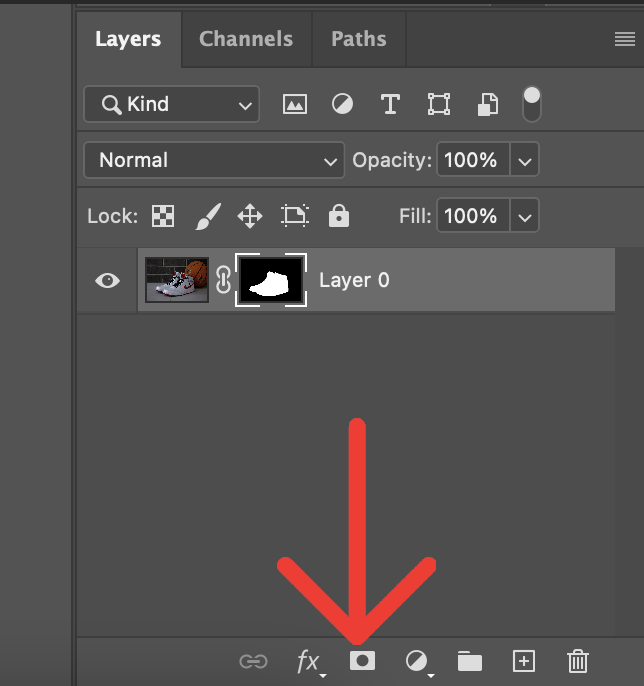
Step 6: Create a Layer Lask
Click the mask tool at the bottom of your layers section.
Step 7: Apply the Layer Lask
When you are happy with your subject, apply the mask to the image. Do this by right-clicking the layer mask and selecting “apply layer mask”.
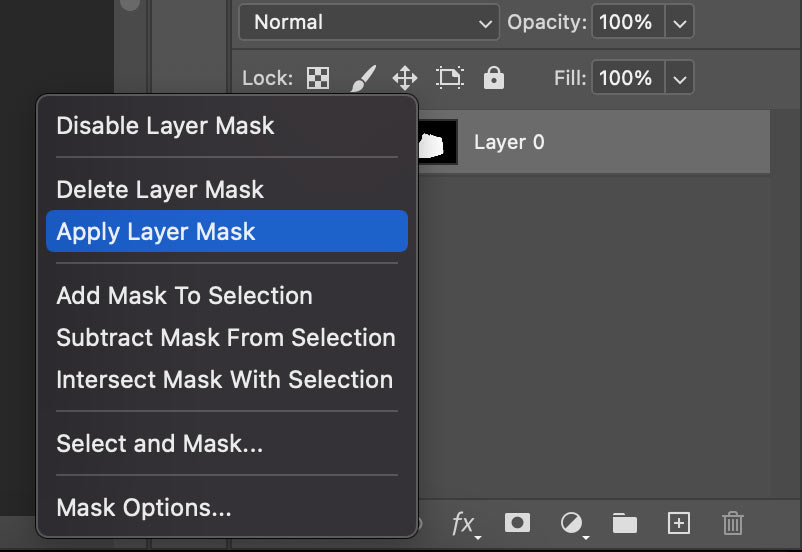
This will leave you with a transparent layer with only your subject.
Need a transparent background for your product images? Check out our background removal service.
Step 8: Create a Background Layer
Create a new empty layer and drag it below your subject layer.

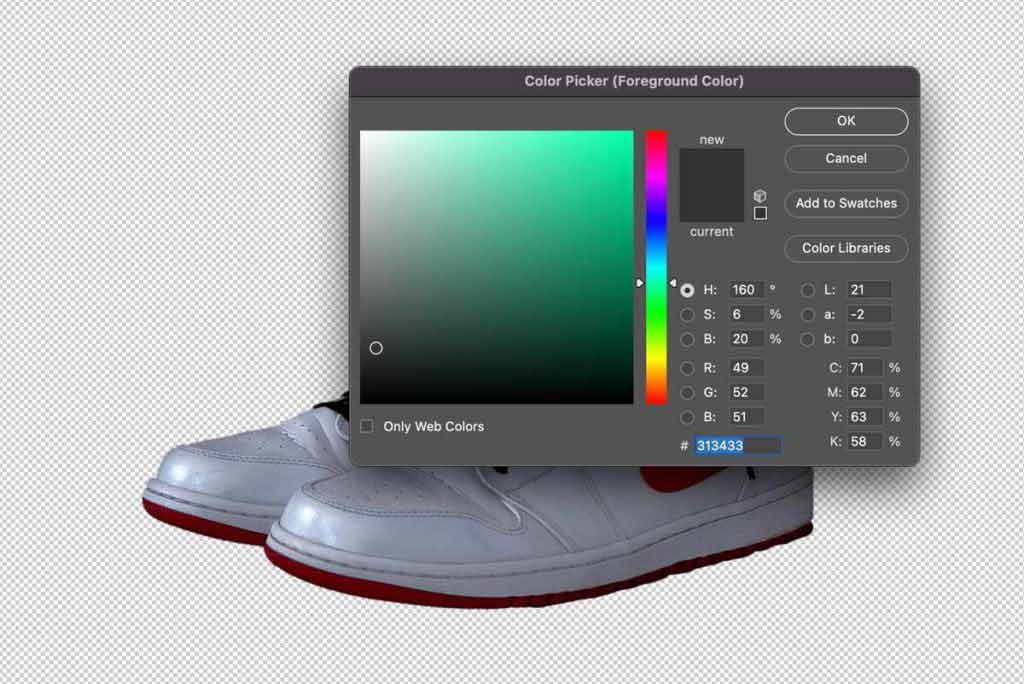
Step 9: Select the Background Color
Pick a color you’d like for the background to be, and color the new layer with the bucket (G).
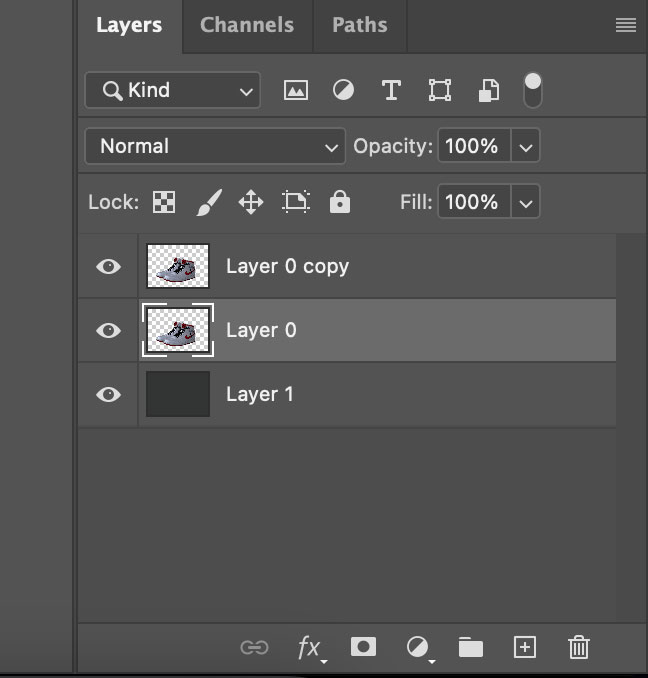
Step 10: Create a Duplicate Subject Layer
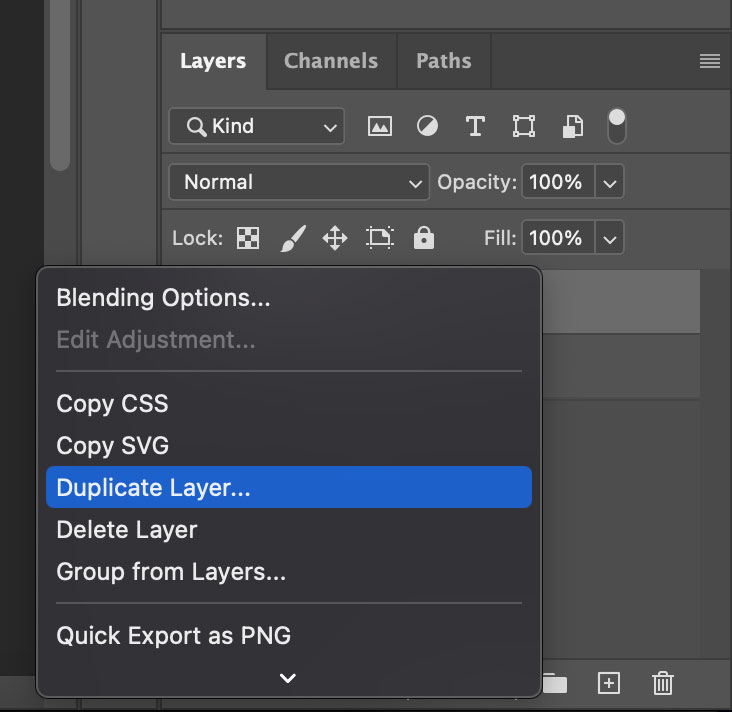
Duplicate your subject layer by right-clicking the layer and selecting Duplicate Layer.
Step 11: Create a Drop Shadow
Select the bottom layer of your subject. In this demonstration, it is “layer 0”. Then, go to your Photoshop bar and select Layer > Layer Style > Drop Shadow.
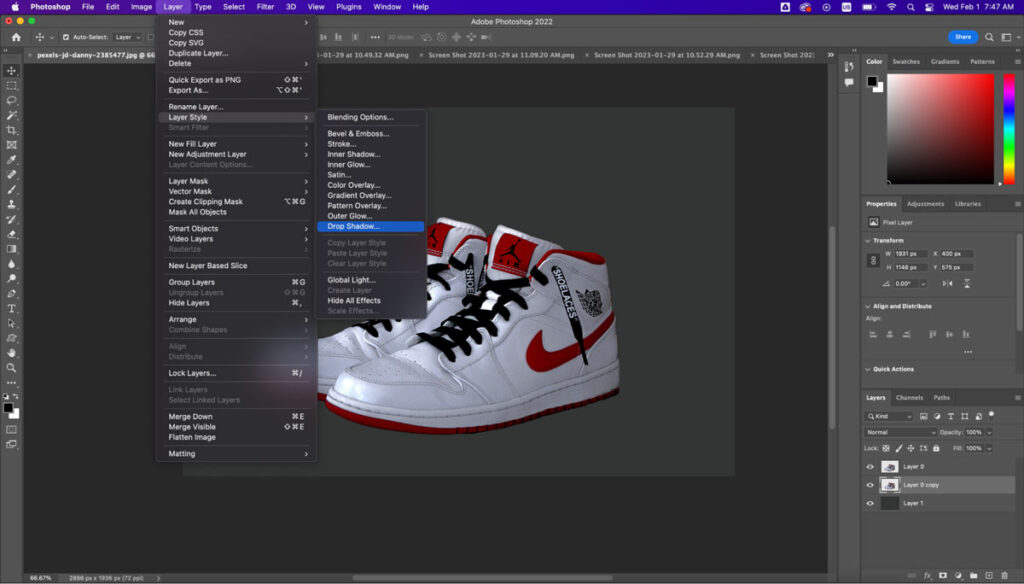
Select “Drop Shadow” and it will open the menu.
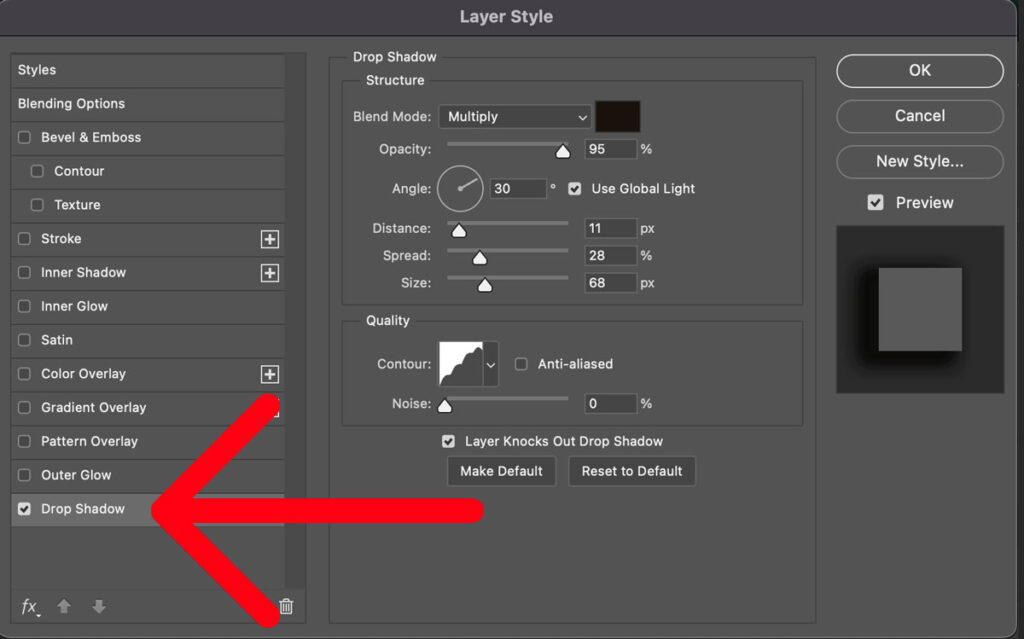

Step 12: Adjust the Settings
Now you can get creative and adjust the style to fit your preferences. You can adjust the angle, opacity, spread, and more.
Step 13: Apply the Drop Shadow
Once you are happy with the drop shadow settings, click “OK” to apply the drop shadow to your photo. The photo will now have a drop shadow that adds depth and dimension.
Step 14: Clean Up the Shadow Effect
Create a new layer mask to the layer with the drop shadow applied.
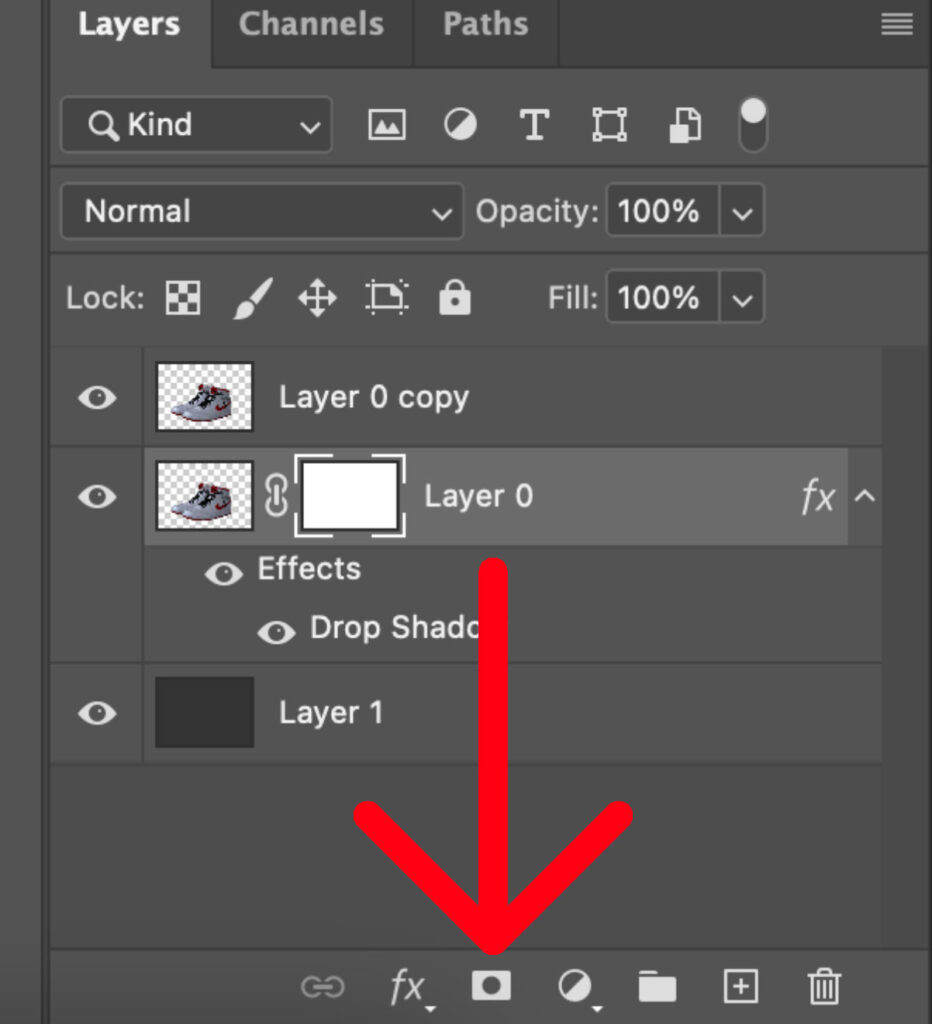
Mask out the unnecessary shadow with the brush (B). Make sure you’re using a completely black brush and are drawing over the area you want to remove from the image.
Step 15: Clean Up the Drop Shadow
Add some basic editing to your image to clean it up and make it look like it was taken in a studio by adjusting the levels.
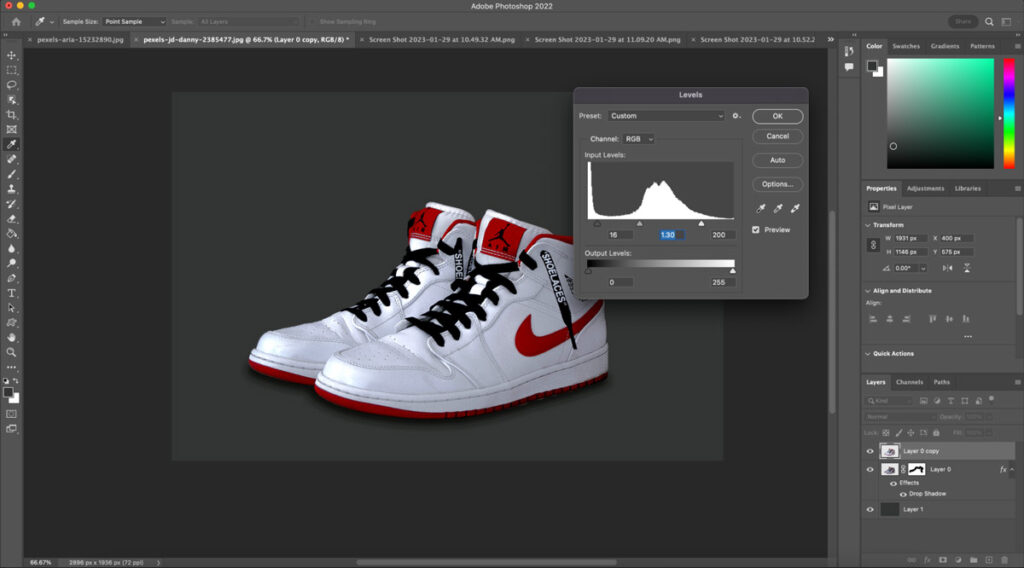
Make these adjustments to the subject layer at the top of your Photoshop project.
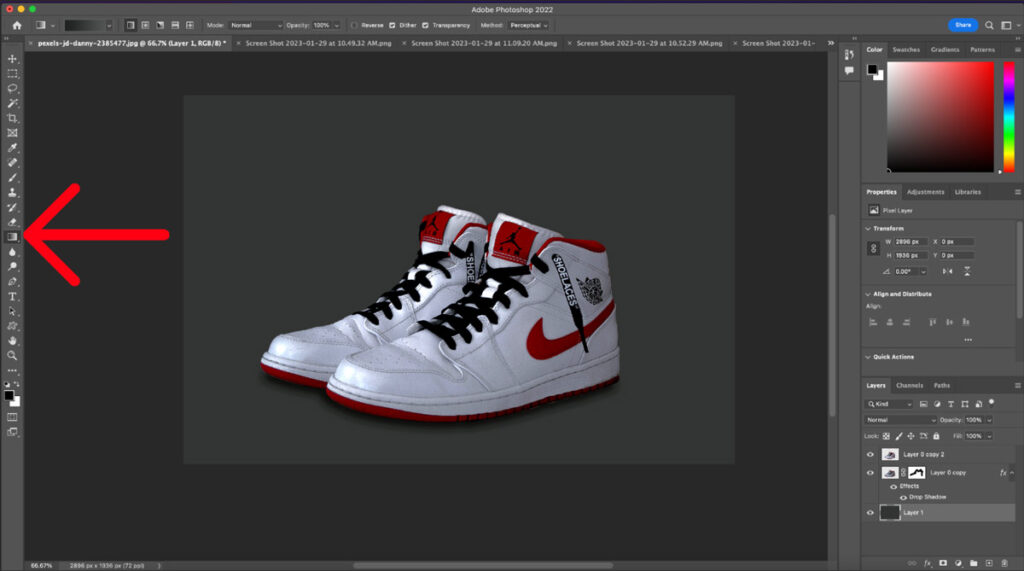
Step 16: Add a Definition to the Background
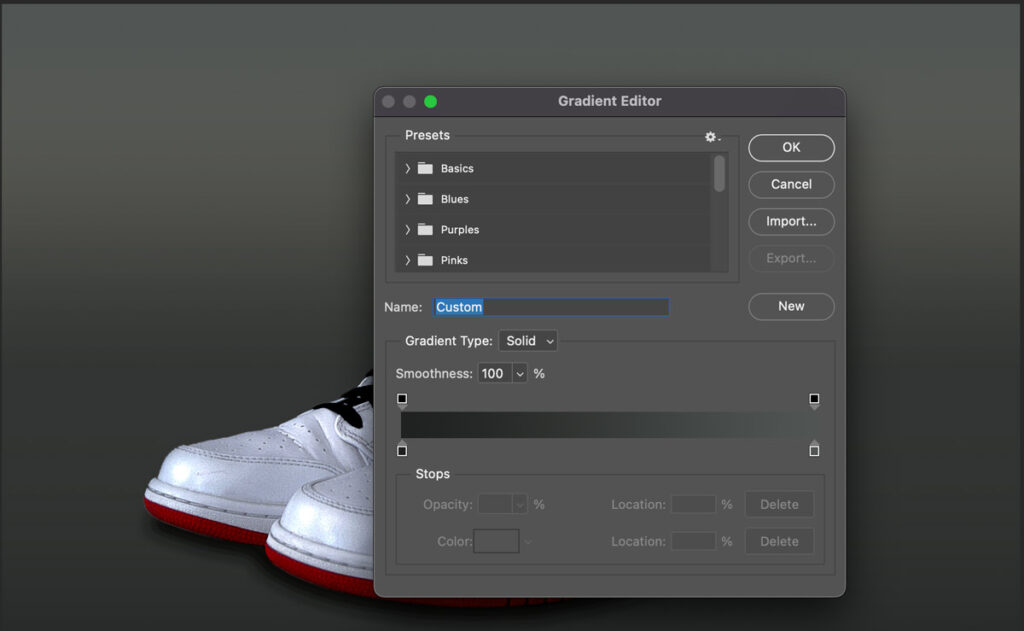
Add a quick gradient map to the image to give the background more depth, and you’re done! You can do this by creating a gradient layer. Select the gradient map tool on your toolbar.
Select your preferred colors on the gradient as well as the opacity.
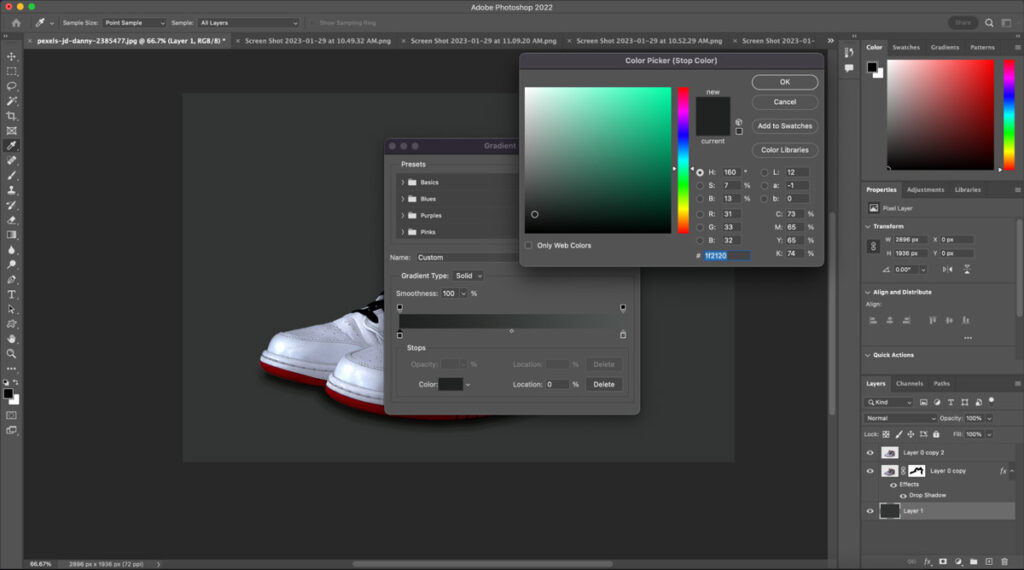
Once you’re happy with the gradient map, press OK. Then select the background layer. In this demonstration, that layer name is “Layer 1.” Once selected, drag your gradient map across the screen and let go.
Make sure you start from the bottom of the image and drag it to the top. That way, your gradient goes from darkest to lightest.
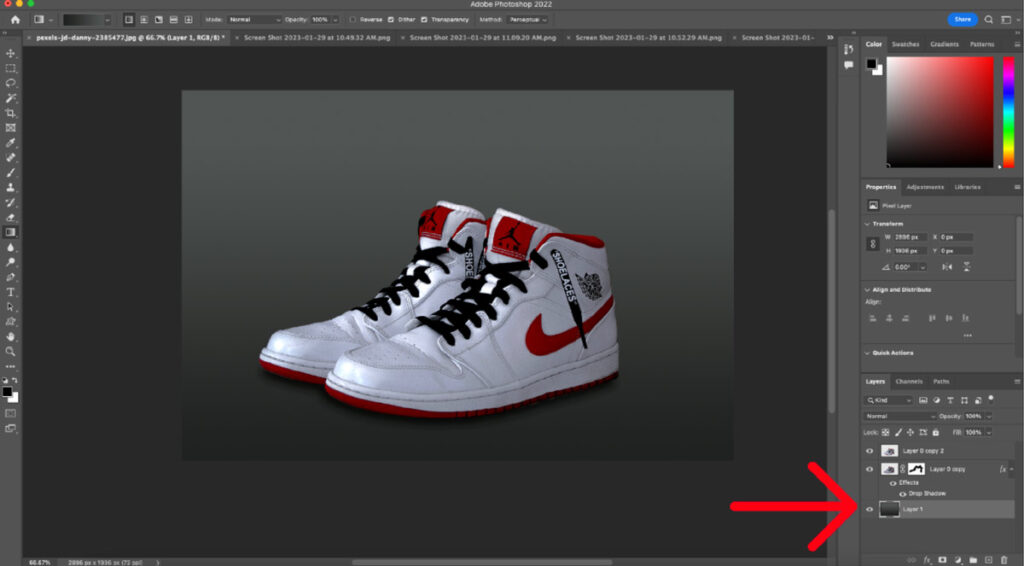
Once you release your mouse, you’ll get a smooth gradient with the shades you selected.
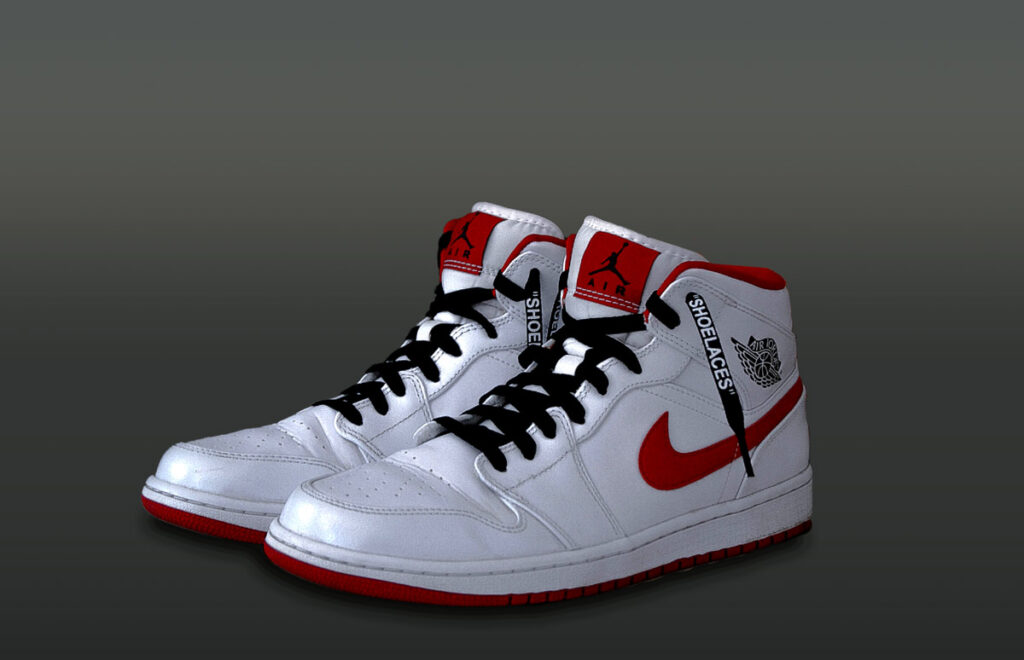
When you’re happy with the shadow, you’re finished! You’ve successfully learned how to add a drop shadow in Photoshop.
Remember, you can play around with the different drop shadow settings to give the exact drop shadow effect you want.
Watch the Video Tutorial on Drop Shadow in Photoshop –
How to Make a Shadow of a Person in Photoshop
To make a shadow of a person in Photoshop, follow these steps.
- Open your Edited Image in Photoshop
- Duplicate the Person’s Layer
- Create the Shadow layer
- Convert the Shadow
- Adjust the Shadow
Step 1: Open your Edited Image in Photoshop
Open the image of the person in Photoshop (ensure they are on a separate layer from the background).
Step 2: Duplicate the Person’s Layer
Right-click the layer and select Duplicate Layer (use duplicate layers’ shortcut key: Ctrl + J / Cmd + J (Mac) to make a copy of the layer below. After that, flip this so that it’s around the same size and on the bottom, ensuring a realistic shadow.
Step 3: Create the Shadow layer
On the duplicate layer, right-click and choose “Rasterize Layer” (if it’s a smart object). Otherwise, go to Image > Adjustments > Hue/Saturation and drag Lightness to -100 to make it black. Or, use Image > Adjustments > Levels to darken it completely, ensuring a realistic shadow.
Step 4: Convert the Shadow
With the duplicate layer selected, press Ctrl / Cmd + T to enter “Free Transform.” Right-click and choose Flip Vertical (if the shadow should be on the ground), Skew, Distort, or Perspective to angle the shadow as a light source creates it. Now, move the flipped layer below the original person.
Step 5: Adjust the Shadow
Lower the opacity level to around 30-60% and adjust the shadow by considering the sun’s light from where it comes and how far the shadow goes. In this case, the sun is coming behind the person, so the shadow will appear just in front of the model.
Tips:
- Apply Gaussian Blur (go to Filter > Blur > Gaussian Blur) to soften the edges.
- Refine the shadow by adding a Layer Mask and using a Gradient tool (black-to-transparent) to fade the shadow naturally.
How to Add a Drop Shadow to Text in Photoshop
To add a Drop Shadow to text in Photoshop, follow these steps.
- Create a Transparent or Solid Background
- Type your text
- Add a drop shadow to the Text
- Make adjustments to the Drop Shadow
Step 1: Create a Transparent or Solid Background
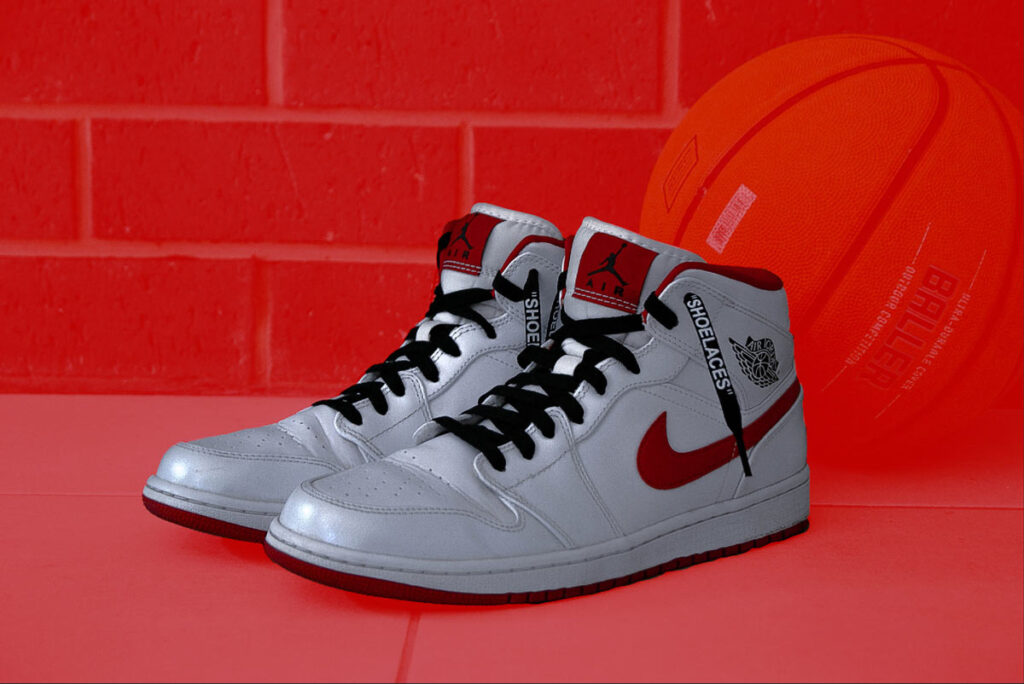
To get started, create a new document in Photoshop by selecting File > New and clicking Create. Or, you can choose a product image like ours.

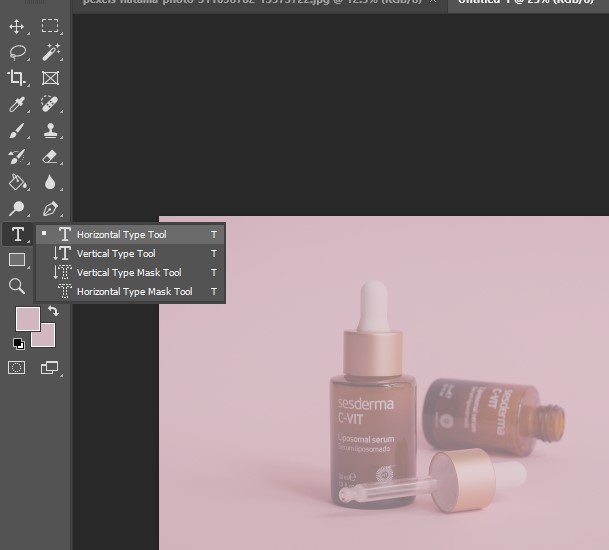
Step 2: Type Your Text
Before adding text, we lower the opacity of the product image so that we can highlight the text shadow properly. Now, click the shortcut key T and choose the “Horizontal Type tool” or others to create the text.
Step 3: Add a Drop Shadow to the Text
By selecting the Layer, click the “fx” icon below and choose the “drop shadow.” Or, you can double-click the Layer and select the “drop shadow” option.

Step 4: Make Adjustments to the Drop Shadow
Once you’ve chosen Drop Shadow in Blending Options, a new window will open where you can adjust the drop shadow’s settings, just as shown in the picture below. You can change opacity, blend mode, size, spread, and distance to create a drop shadow on text.

Also, adjust the angle; you can use the Conversion Ratio. Try 45 to 150 degrees, as they work well with simple text. Once you’re happy with your final result, click OK to exit the Drop Shadow window, and that’s it!

What is a Drop Shadow?
A drop shadow is a visual effect used in graphic design and image editing that creates the illusion of depth by adding a shadow behind an object, text, or shape. This effect is commonly used in commercial photography to create a professional and realistic image. In Photoshop, drop shadows refer to a layer style that simulates a shadow effect on an object, adding depth and making it appear floating and three-dimensional. Key benefits of drop shadow are:
- Add product depth and dimension.
- Create a sense of hierarchy in an image.
- Add visual interest and make the product realistic.
- Draws attention to text or objects
The basic components of the drop shadow in Photoshop are:
- Angle
This determines where the light comes from and where the Photoshop shadow effect goes. Shadows usually fall at a 90-degree angle to the light source, but this can be changed to make the effect more or less dramatic.
- Distance
This determines how far away the object’s shadow is. If the distance is bigger, the shadow will be softer and less defined, while if the distance is smaller, the shadow will be sharper and more defined.
- Spread
This changes how big and round the shadow is. A larger spread will make a wider and less clear shadow, while a smaller one will make a shadow narrower and clearer.
- Size
This controls how big the shadow is as a whole. A larger size will make a more dramatic and noticeable shadow, while a smaller one will make a shadow that is not as noticeable.
- Opacity
This controls how see-through the shadow is. A shadow with a higher opacity will be more noticeable and stand out, while a shadow with a lower opacity will be softer and less noticeable.
You can make many different drop shadow effects in Photoshop by changing these different parts. Adding a drop shadow to an image can be a powerful way to get the effect you want, whether it’s to give an image more depth and dimension or to make it look more real.
- Blending Mode
You can adjust your shadow by using different modes. This can help make your shadow appear more realistic. Along with the lay mode, you can also change the color. You can adjust the color selector if your shadow appears colder or warmer.
- Noise
To add more realism to your shadow, you can increase the noise. If an image was shot in darker lighting, the subject might have more noise. By adding this to the drop shadow, you’re solidifying the realness.
- Contour
It allows you to adjust the shape and intensity of the drop shadow’s edge, creating more realistic or stylized effects. By using this option, you can go beyond simple, even-edged shadows and create more dynamic and visually interesting effects.
How Can You Apply the Same Drop Shadow Settings to Multiple Layers?
To apply the same drop shadow to multiple layers, you can use Smart Objects or copy-paste layer styles in Photoshop. Also, you can group layers and apply the drop shadow to the group, then apply it to all layers within the group.
Which Photoshop Feature Primarily Adds a Drop Shadow Effect to a Layer?
The primary feature of Photoshop used to add a drop shadow effect to a layer in Photoshop is Layer Styles. Access this option by selecting the Layer in the Layers panel, choosing Layer> Layer Style > Drop Shadow from the menu, or clicking the “fx” icon at the bottom of the Layers panel and selecting the “Drop Shadow” option.
Is it Possible to Animate a Drop Shadow in Photoshop?
Yes, it is possible to animate a drop shadow in Photoshop using the video timeline and keyframe animation. By animating the drop shadow’s properties, like opacity, distance, spread, and size, you can easily create dynamic effects.
Where is the Drop Shadow Option in Photoshop?
In Photoshop, you can find the Drop Shadow option within the Layer Styles panel. Access the Layer where you want to add Shadow and double-click the Layer or click the “fx” icon at the bottom of the Layers panel, and choose “Drop Shadow.”
What are the Different Styles of Drop Shadow Effects?
There are 15 different styles of drop shadow effects in Photoshop, including:
1. Standard Drop Shadow
A single shadow that gives the illusion of depth. The customizable parameters are distance, spread, size, opacity, angle, and color. It is used for a naturally lifted look and is suitable for buttons, text, or photos.
2. Inner Drop Shadow
It is applied inside the edges of a shape (like an inset effect). It is used to create depth within an element, like pressed buttons or embossed text.
3. Soft Drop Shadow
A soft drop shadow is a gently blurred, subtle shadow with low opacity. It is used for delicate or elegant designs (e.g., wedding invites, beauty products, etc.).
4. Hard Drop Shadow
It is a sharp-edged shadow with little to no blur. The hard drop shadow is used for bold graphic effects, like comic books or retro designs.
5. Long Drop Shadow
It is an exaggerated, extended shadow that follows the shape of the object and is used mostly for dramatic emphasis in posters, ads, or stylized typography.
6. Cast Drop Shadow
The cast drop shadow is a shadow that appears cast onto a background surface with perspective. It is used for realistic product mockups or 3D objects on a ground plane.
7. Radial Drop Shadow
The radial drop shadow is a shadow that radiates evenly in all directions, creating a “halo” shadow. It is used for circular objects, logos, or glowing effects.
8. Angled Drop Shadow
The angled drop shadow is cast at a consistent angle, typically for directional lighting effects. You can use this shadow to mimic a specific light source for realism or stylization.
9. Directional Blur Drop Shadow
It is a shadow with a motion-like blur in a specific direction. This directional blur drop shadow is used to simulate motion, speed, or soft directional light.
10. Realistic Ground Drop Shadow
This shadow appears directly beneath the object, slightly stretched and blurred. It is used to place objects realistically on a surface.
11. Floating Drop Shadow
This floating drop shadow is a light shadow with a vertical distance, simulating a floating object. It is used for UI/UX elements or modern web design cards.
12. Layered Drop Shadow
The layered drop shadow is a multiple-stacked shadow for extra dimension or drama. It is used for bold typographic posters or surreal compositions.
13. Colorful or Gradient Drop Shadow
The colorful or gradient drop shadow adds creativity and playful, vibrant, or abstract designs to your image.
14. 3D Drop Shadow
The 3D drop shadow simulates real 3D depth, often with complex light falloff. It is used in 3D typography, UI mockups, or rendered scenes.
15. Multiple Drop Shadow
The multiple drop shadow indicates several drop shadows layered together with different properties. It is used to create complex lighting or stylized effects.
When to Use a Drop Shadow Effect on E-commerce Images?
When you want to add depth, dimension, and a sense of realism to your e-commerce product photos, then use a realistic drop shadow effect. Photoshop shadow under the object is useful when you’re dealing with flat-lay products on plain backgrounds or want to enhance contrast and make your product stand out. You can add realistic product shadows all by yourself by following our step-by-step guide or outsourcing a Photoshop drop shadow service from a renowned image post-processing agency.
There are several reasons behind outsourcing drop shadow services, including:
1. To Add Depth and Dimension: Drop shadows create the illusion that the product is raised above the background rather than flat, helping it stand out. For example, a pair of shoes on a white background looks more tangible and three-dimensional with a soft drop shadow beneath it.
- How we do it: Apply a shadow offset at a natural angle (usually 30-45 degrees) opposite the light source to simulate real-world lighting.
2. To Enhance Visual Appeal and Focus: Shadows help draw the viewer’s eye to the product by separating it from the background, improving overall aesthetics and user experience. For example, furniture images with drop shadows appear more polished and “pop” off the page, attracting more clicks and engagement.
- How we do it: Use a subtle, soft shadow with moderate opacity (30%-70%) to avoid harshness while maintaining focus on the product.
3. To Create Realistic Context or Surface Information: Shadows can indicate the surface on which the product rests, giving customers spatial cues about size and form. For example, electronics or home decor items with natural-looking shadows help viewers understand how the product sits on a table or shelf.
- How we do it: Match the shadow’s angle, softness, and distance to the product’s lighting and placement to maintain realism.
4. To Add Drama or Contrast: For dramatic product shots or to emphasize contrast, stronger or harder-edged drop shadows can create a bold, eye-catching effect. For example, a luxury watch photographed with a sharp drop shadow can evoke a sense of sophistication and highlight details.
- How we do it: Reduce blur and increase opacity or spread in the drop shadow settings for a more pronounced effect.
5. When the Background is Plain or White: Products on plain or white backgrounds can appear to “float” unnaturally; drop shadows ground them visually. For example, cosmetics or small gadgets on white backgrounds benefit from soft drop shadows to avoid a floating effect.
- How we do it: Reduce blur and increase opacity or spread in the drop shadow settings for a more pronounced effect.
6. To Improve Flat Lay and 2D Product Images: Flat lay images often look too flat; adding drop shadows can simulate depth and make images more engaging. Suppose an apparel or accessory flat lays with subtle shadows that appear more natural and less “cut out.”
- How we do it: Place the light source at an angle to your flat lay to create natural shadows. We also use masks in Photoshop to create more precise and controlled drop shadows for complex shapes or objects.
Why Do You Need a Realistic Shadow on Your E-commerce Product Photos?
Realistic Shadow on Your E-commerce Product Photos drives sales, reduces returns, and builds online buyers’ trust that boosts your e-commerce business’s success. Clutter-free and professionally represented product photos guide consumers to focus on key features, help them visualize, and encourage them to make a purchase decision. Other benefits are:
- Increase conversion rates, allowing consumers to see what they’re buying. For example, a fashion site shows multiple angles of a dress (close-ups of fabric texture and stitching).
- Supports branding and storytelling that reinforce your brand’s identity and help communicate a lifestyle or aesthetic. For example, a skincare brand using soft, pastel-toned product photos with natural props (like stones and leaves) can reinforce a clean, eco-friendly vibe.
- Boosts performance on marketplaces like Amazon, eBay, Etsy, and other store product listings. Suppose a jewelry seller on Etsy who uses close-up macro photography to show stone cuts and design details provides better results than competitors with wide shots.
- Creates an emotional connection with shoppers, triggering a desire to buy. For example, a camping gear brand using clean and polished photos of their tent in a scenic forest at sunrise can spark emotion.
- Build trust and credibility in which product photos look professional. For example, Amazon sellers’ use of consistent and clean product photos often outperforms those with inconsistent or low-quality images because shoppers feel they can trust them.
What Type of Images Benefit Most from Drop Shadows?
Images with a solid or uniform background benefit most from drop shadows for adding depth and making the object appear more three-dimensional. Drop shadows can also be beneficial for icons, buttons, and interface elements.
