
Real estate video captures the realistic visual of the properties, helping buyers experience spaces remotely. Types like walkthroughs, drone footage, and virtual tours highlight unique features and layouts. Benefits include faster sales, stronger engagement, and enhanced branding. Courses teach filming, editing, and promotion skills, while pricing varies based on length, style, production quality, and post-production requirements.
What you’ll learn in this article
- 1 What is a Real Estate Video?
- 2 15 Real Estate Videography Ideas
- 3 Where to Find a Real Estate Videography Course?
- 4 What Equipment is Needed to Create a Real Estate Video?
- 5 How Do You Shoot a Real Estate Video
- 6 How Do You Edit Real Estate Videos?
- 6.1 Step 1: Organize Your Footage
- 6.2 Step 2: Create a Rough Sequence
- 6.3 Step 3: Trim Aggressively
- 6.4 Step 4: Smooth the Pacing
- 6.5 Step 5: Apply Basic Color Correction
- 6.6 Step 6: Add Music
- 6.7 Step 7: Add Simple Transitions
- 6.8 Step 8: Insert Text and Branding
- 6.9 Step 9: Review with Fresh Eyes
- 6.10 Step 10: Export Correctly
- 7 How Long Should a Real Estate Video Be?
- 8 How Much Does Professional Real Estate Video Production Cost?
- 9 FAQ’s
What is a Real Estate Video?
A real estate video is a visual way to showcase an entire property and its surroundings in just a few minutes. It’s an effective tool to tell the property’s story, engage viewers, and attract potential buyers by telling a realistic visual of the layout and features in the video.
Real estate videos can include walkthroughs, drone footage, agent-led explanations, and lifestyle scenes. The goal is simple: help viewers understand the property quickly and confidently take the next step.
Is Real Estate Video Worth It?
Yes, real estate video is totally worth it. According to the National Association of Realtors and MLS analytics data reported in 2025, listings that include real estate video receive up to four times more inquiries than standard listings. While 73 percent of buyers say they are more likely to hire an agent who uses video. And brands like Century 21 have reported a 20 percent increase in sales after implementing video in their property listings.
Videos give buyers a real sense of the home, showing space, light, and flow in ways photos can’t, while helping your listing stand out, attract serious buyers, and sell faster.
Why Are Real Estate Videos Important?
Real estate videos matter because they’re the fastest way to show a full property in just a few minutes. They help buyers feel the space before they ever walk through the door. That feeling builds trust, holds attention longer, and makes a listing feel real, not staged.
A good real estate video shows the flow of the home, its true size, and the small details that photos often miss. It turns a listing into an experience, not just a set of images.
- Show the full property: Video reveals how rooms flow and how the space truly feels.
- Video grabs attention fast: Moving visuals make people stop scrolling instantly.
- Help to build trust: Buyers see the property honestly, reducing surprises later.
- Help buyers imagine living there: A walkthrough makes it easier to picture daily life in the home.
- Get more views online: Listings with video are clicked and shared far more than photos alone.
- Video saves time: Only serious buyers attend viewings, eliminating wasted effort.
- Real estate videos make agents look professional: High-quality video reflects skill, care, and credibility.
- They stand out from other listings: Most listings are photos-only, so video makes yours memorable.
- Video helps homes sell faster: More engagement leads to quicker interest and offers.
How Event Video Supports Real Estate Marketing?
Event video supports real estate marketing because it boosts sales as a video showcases the entire property in action. Open houses, launch parties, or community events captured on video make listings feel lively and real. They let potential buyers experience the energy, see people enjoying the space, and imagine themselves there.
Event videos also build credibility for agents, showcase neighborhoods, and give content you can share across social media and email campaigns.
15 Real Estate Videography Ideas
Real estate videography ideas include showcasing the entire property in different video styles to create awareness and also create excitement among buyers. There are different types of real estate videography ideas, such as walkthrough, drone shots, neighbourhood tour, agent branding video, virtual tour, and many more. Below, you’ll find the 15 proven real estate videography ideas to promote your real estate property:
1. Traditional Walkthrough: A complete video tour that shows the home in a logical order, usually starting at the entrance and moving room by room. The focus is on layout, space, and flow so buyers clearly understand how the home works.
2. Coming Soon Teaser: A short promotional video is released before the listing goes live. It focuses on atmosphere, design, and standout features to create curiosity and early interest without revealing the full home.
3. 360-Degree or Virtual Reality Tour: An interactive experience where viewers control what they see in each room. This allows buyers to explore at their own pace and get a true sense of size, layout, and spatial relationships.
4. Drone Overview: Aerial footage that shows the property from above, including the lot, roof, landscaping, and surroundings. It helps buyers understand location, privacy, and proximity to nearby features.
5. Highlight Reel: A fast-paced video showcasing only the most attractive features of the home. Designed to grab attention quickly and work as a strong first impression across websites and social platforms.
6. Short Vertical Tour for Socials: A condensed version of the listing video formatted for mobile viewing. It uses vertical framing, quick edits, and on-screen text to perform well on Instagram, TikTok, and Shorts.
7. Lifestyle Focused Listing: A story-driven video that shows how it feels to live in the home. It focuses on everyday moments and emotional appeal rather than technical details.
8. Agent Led Walkthrough: A guided tour where the agent appears on camera, explaining features and benefits. This adds a human element, builds trust, and helps viewers connect with both the home and the agent.
9. Before and After Transformation: A comparison video that shows the home before and after renovations, staging, or upgrades. It clearly demonstrates added value and visual improvement.
10. Night Time Ambience Tour: A tour filmed in the evening to highlight lighting, mood, and outdoor features. Often used for luxury properties to create a calm, high-end feel.
11. Neighborhood Tour: A video showcasing the surrounding area, including streets, parks, shops, and amenities. It helps buyers understand the lifestyle and convenience of the location.
12. Seasonal Community Events: Footage of local events or seasonal activities near the property. This shows community involvement and adds emotional value beyond the home itself.
13. Top Five Reasons to Live Here: A structured video listing the strongest reasons to choose the property. Clear visuals and simple explanations make it easy for buyers to remember key benefits.
14. Future Development Sneak Peek: A video highlighting planned developments or improvements in the area. It positions the home as a smart long-term investment.
15. Resident Interviews: Short interviews with current residents sharing real experiences. These add authenticity, credibility, and a personal perspective that marketing alone can’t provide.
Where to Find a Real Estate Videography Course?
The best places to find a solid real estate videography course include online learning platforms, independent educator websites, YouTube, local workshops, and niche-focused coaching programs. Among these, online platforms tend to offer the most budget-friendly options, ranging from basic introductions to in-depth professional training. Whatever you choose, make sure the course covers the essentials: equipment selection, filming techniques, property staging, drone footage, and post-production editing. Let’s break it down where to look, you can save time and avoid beginner fluff.
Search Reputable Online Learning Platforms
Sites like Udemy, Skillshare, and Coursera host courses that teach real estate videography fundamentals, from camera operation to editing walkthroughs. Filter for recent content, high ratings, and courses that specifically focus on property videos, not just general filmmaking.
Look for Instructor-Led Programs by Working Pros
Many successful real estate videographers sell their own courses through Teachable, Kajabi, or their personal websites. These tend to be practical, up-to-date, and focused on real client work. They often include modules on storytelling, shot lists, lighting, and dealing with agents.
Use YouTube Strategically
Some creators break down real estate video shoots, gear choices, editing techniques, and business tips. It’s free and great for filling gaps or testing whether you’re ready for a paid course.
Explore Workshops and Local Training
Check local film schools, photography clubs, or real estate associations. They sometimes offer short workshops or weekend intensives that combine hands-on shooting with feedback.
Check Niche Coaching Communities
Online groups for videographers and real estate marketers often share recommendations and exclusive training. Join a few on Facebook, Reddit, or Discord, and ask for the best course people have taken.
What Equipment is Needed to Create a Real Estate Video?
The equipment needed to create a real estate video is a professional camera, a tripod or gimbal, a strong microphone, lighting, multiple wide-angle lenses, a drone, and advanced editing software. A good real estate video isn’t about having the most expensive gear. It’s about using the right tools to make a property feel inviting, clear, and easy to imagine living in. Let’s break down the equipment that actually matters.
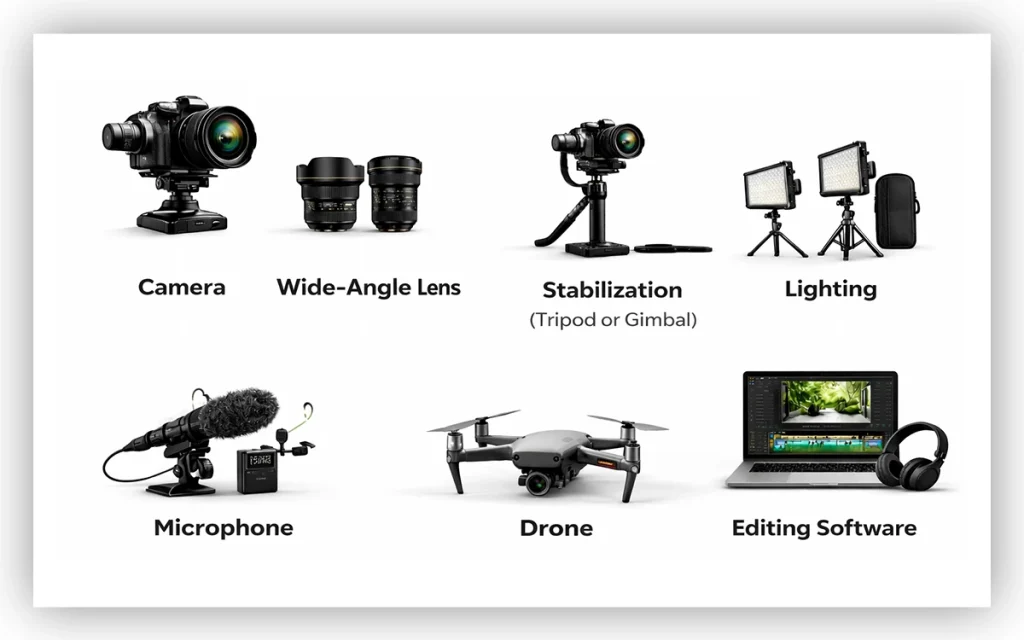
Camera
You need a camera that shoots clean, stable video. A modern smartphone can work if it records in 4K and performs well in low light. If you want more control and a more polished look, a mirrorless or DSLR camera is a solid step up. The key is sharp footage and accurate color, not brand names.
Wide-Angle Lens
Real estate is all about space. A wide-angle lens helps rooms feel open without distorting them. For most cameras, something in the 14–24mm range is ideal. Too wide, and the room looks fake. Just wide enough, and it feels spacious and honest.
Stabilization (Tripod or Gimbal)
Shaky footage kills trust fast. A sturdy tripod is essential for static shots and smooth pans. If you’re walking through the home, a gimbal keeps movement fluid and professional. This one piece of gear alone can dramatically upgrade your video.
Lighting
Natural light is your best friend, but you can’t always rely on it. A couple of portable LED lights help balance dark corners and keep the space looking warm and clean. Look for lights with adjustable brightness and color temperature so the room doesn’t feel harsh or artificial.
Microphone
If your video includes voiceover or on-camera talking, don’t use the camera’s built-in mic. A lavalier or shotgun microphone gives you clear, focused audio. Clean sound makes your video feel intentional and trustworthy, even more than perfect visuals.
Drone (Optional but Powerful)
A drone adds instant context. Aerial shots show the neighborhood, lot size, and surrounding views in a way ground footage can’t. It’s not required for every listing, but for larger or higher-end properties, it can make a big difference.
Editing Software
Shooting is only half the job. Editing software lets you tighten the story, correct colors, and add subtle music. The goal isn’t flashy effects. It’s pacing, clarity, and flow. Simple, clean edits always win.
How Do You Shoot a Real Estate Video
The best way to shoot a real estate video is to use a wide-angle lens to get a broader view and make the room appear larger. Usually 16 mm to 35 mm wide lens is best to capture the full interior shots in a single frame. Here are some points to cross-check before you start shooting:
- Start with a Clean, Staged Property: Open curtains, remove clutter, and let natural light do the work. Shoot in the morning or late afternoon for softer light.
- Use Stable Equipment: A tripod or gimbal is essential. Shaky footage instantly lowers perceived value.
- Choose the Right Lens: Wide enough to show space, not so wide that walls bend and rooms feel fake.
- Move the Camera Slowly and Intentionally: smooth walking shots, gentle pans, and brief pauses create a sense of calm and high-end elegance in the home.
- Follow a Logical Flow: Exterior first, then interior. Living spaces, kitchen, bedrooms, bathrooms, and finish strong with outdoor areas.
- Frame for Depth and Balance: Shoot through doorways and around corners. Keep vertical lines straight for a professional look.
- Control Your Shot Length: Let each shot breathe. Three to five seconds per movement is a good baseline.
- Be Smart About Audio: Silence is often better than poor sound quality. If speaking on camera, use a lav mic and keep it natural.
- Shoot with The Edit in Mind: Match exposure, angles, and movement so everything cuts together smoothly.
- Focus on The Feeling, Not Just the Layout: The goal isn’t to show every corner. It’s to help viewers imagine living there.
How Do You Edit Real Estate Videos?
To edit real estate videos, you can start by choosing your best shot, applying different transitions, color correction, and adding text or music, to maintain the smooth consistency. And all this editing can only be possible with software like Adobe Premiere Pro, CapCut, or Animoto. Let’s break it down step by step, the way it actually happens in a real edit.
Step 1: Organize Your Footage
Import everything and sort it immediately. Group clips by room or area: exterior, living spaces, kitchen, bedrooms, bathrooms, details. Rename files if needed. A clean timeline starts with clean organization. And all this is only possible using Adobe Premiere Pro, CapCut, Animoto, aihomedesign.com.
Step 2: Create a Rough Sequence
Drop your best wide shots first. This sets the flow of the house. Move logically, outside to inside, room to room. Don’t worry about timing yet. You’re building the story of the space.
Step 3: Trim Aggressively
Now tighten everything. Cut out shaky moments, long pans, and repeated angles. Most shots should be 2 to 4 seconds long. If a clip doesn’t add value, remove it. Shorter usually looks more professional.
Step 4: Smooth the Pacing
Play the video all the way through. Adjust clip lengths so the motion feels natural. Slower for luxury homes, slightly faster for modern or entry-level listings. The viewer should feel guided, not rushed.
Step 5: Apply Basic Color Correction
Fix exposure first, then white balance. Make sure whites are actually white, and shadows aren’t crushed. After that, lightly enhance contrast and warmth. The goal is bright and inviting, not over-processed.
Step 6: Add Music
Choose one track that matches the property’s vibe. Drop it under the entire edit and cut your visuals to the beat when possible. Lower the volume so it supports the video instead of stealing attention.
Step 7: Add Simple Transitions
Stick to clean cuts or subtle crossfades. Avoid flashy transitions. If the movement between shots feels awkward, adjust timing instead of adding effects.
Step 8: Insert Text and Branding
Add text only where it helps. Property address, key features, or a short call to action at the end. Keep fonts clean and easy to read. Place logos at the start or end, never all over the video.
Step 9: Review with Fresh Eyes
Watch the video without stopping. Look for awkward pauses, color shifts, or clips that feel out of place. Fix anything that pulls attention away from the home.
Step 10: Export Correctly
Export based on where the video will be used. Horizontal for listings and YouTube. Vertical or square for social media. Use high-quality settings so the video stays sharp after upload.
How Long Should a Real Estate Video Be?
A real estate video should typically run between 1 and 3 minutes long to keep the viewers engaged. For social media promotions, around 2 minutes is the sweet spot. If you’re doing a more detailed property tour and want to showcase features thoroughly, a longer format of up to 5 minutes works well. Here is a short table for better understanding:
| Video Type | Ideal Length | Best Platforms | Primary Goal |
|---|---|---|---|
| Short-form teasers | 15–30 seconds | Instagram Reels, TikTok, YouTube Shorts | Grab attention fast and stop the scroll |
| Social feed videos | 30–60 seconds | Instagram, Facebook, LinkedIn | Highlight key features and drive interest |
| Property tour videos | 1–3 minutes | Listing pages, YouTube | Showcase layout, flow, and lifestyle |
| Luxury / cinematic films | 3–5 minutes | YouTube, websites, presentations | Build emotion and elevate the listing |
How Much Does Professional Real Estate Video Production Cost?
A professional real estate video production cost range depends on the complexity of the project. In most USA cities, a professional real estate video production costs from $300 to $3000+ per property. Here is the list for the price range and what you’ll get in the range:
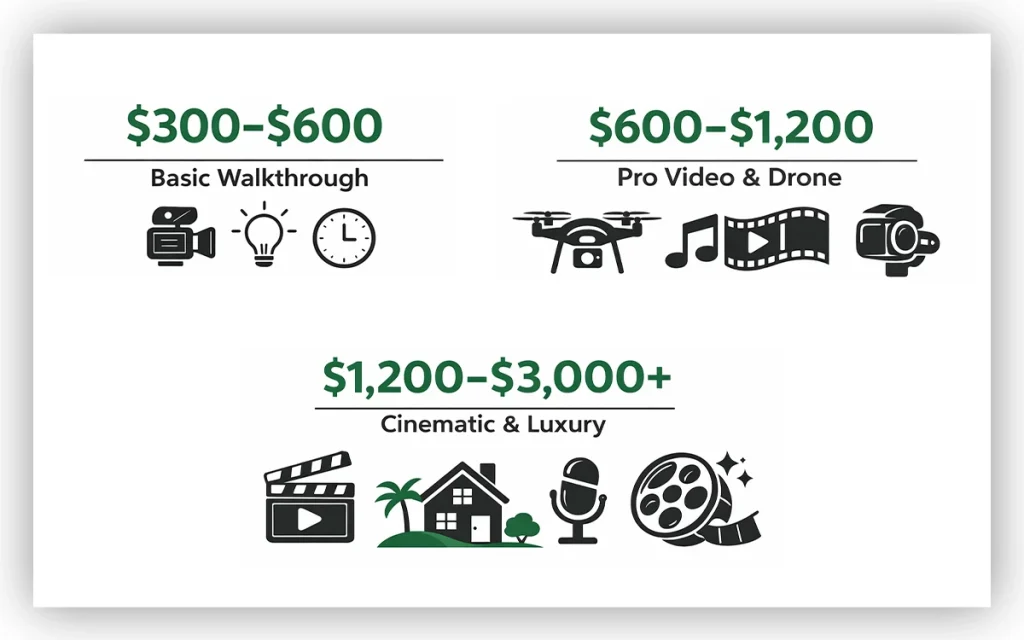
- $300–$600
This cost range usually covers a short walkthrough video of a standard home. One camera, basic lighting, minimal editing, and a quick turnaround. Great for listings where speed matters more than storytelling.
- $600–$1,200
In this cost range, you’ll get smoother camera movement, better color grading, licensed music, drone footage, and tighter edits. These videos feel polished and professional without being overproduced.
- $1,200–$3,000+
This cost range will offer you a cinematic territory. Multiple shooting angles, advanced lighting, motion graphics, lifestyle shots, scripted sequences, professional voiceovers, and detailed post-production. This level is often used for luxury homes, new developments, or personal brand marketing for agents.
What Common Mistakes Need to Be Avoided in Real Estate Videos?
The common mistakes that need to be avoided in real estate videos are bad lighting, cluttered rooms, shaky footage, and odd placement of furniture. These issues distract from the property’s true appeal, making it harder for viewers to connect with the space. The result is simple: interest drops, and so does the likelihood of a sale.
But when you focus on bright, clean spaces, steady camera movement, simple edits, and clear sound, everything changes. Add a logical flow and a narrative that highlights the home’s strongest features from a buyer’s point of view, and the video becomes far more engaging and effective at attracting interest. Here are some common mistakes that must be avoided:
- Making the Video About the Agent Instead of the Property
Buyers clicked to see the home, not a talking head. A quick intro is fine. Long monologues kill retention. The property should always be the hero.
- Bad Lighting (Especially Indoors)
Dark rooms, blown-out windows, mixed color temperatures. These instantly cheapen the listing. Natural light helps, but professional lighting control is what makes a space feel clean and inviting.
- Shaky or Rushed Camera Movement
Fast pans and handheld wobbles make viewers uncomfortable. Smooth, intentional movement gives buyers time to absorb the space and imagine themselves in it.
- Ignoring the Flow of the Home
Random room jumps confuse viewers. A good video follows the way someone would actually walk through the house. Entry. Living spaces. Bedrooms. Bathrooms. Outdoor areas. Flow matters more than fancy transitions.
- Overusing Effects and Transitions
Heavy filters, flashy transitions, and dramatic zooms date the video fast. Clean edits age better and feel more professional. If the effect is noticeable, it’s probably too much.
- Forgetting Audio Quality
Wind noise, echo, or cheap background music ruin otherwise good visuals. Clean audio and properly licensed music quietly do a lot of heavy lifting.
- Poor Framing and Crooked Lines
Tilted horizons, cut-off door frames, or wide-angle distortion make rooms feel awkward. Straight lines and thoughtful composition make spaces feel larger and more expensive.
- Making the Video Too Long
Longer doesn’t mean better. Most buyers decide within the first 20–30 seconds if they’ll keep watching. Trim aggressively. Every shot should earn its place.
- No Clear Purpose
Some videos try to do everything and end up doing nothing. Is this for social media, MLS, a luxury listing, or brand building? The goal should shape every creative decision.
- Skipping Professional Help
This one stings, but it’s real. Phones are great. Experience is better. Professional videographers don’t just record spaces. They know how to sell them visually.
FAQ’s
Are real estate videos effective for commercial properties?
Yes, real estate videos are effective for commercial properties because they clearly show size, layout, access points, and surroundings. They attract qualified buyers and tenants, boost online visibility, build trust, and help prospects evaluate opportunities before committing to an in-person visit.
Should real estate videos include voice-over or background music?
Real estate videos work best when they match the goal. And including voice-over adds clarity, context, and storytelling, especially for listings or walkthroughs. Background music sets the mood and energy. Often, combining both thoughtfully creates a more engaging, professional, and memorable viewing experience.
How can drone footage improve real estate videos?
Drone footage improves real estate videos by adding context that ground shots simply can’t. It shows the full property layout, the surrounding neighborhood, nearby amenities, and views in one sweep. This helps buyers understand scale, location, and lifestyle faster, making listings more engaging and easier to visualize.
What video style works best for luxury real estate listings?
Luxury real estate videos work best when they feel cinematic and intentional. Slow camera movement, elegant lighting, and thoughtful music matter. Emphasize lifestyle, space, and emotion, not flashy effects. The goal is aspiration, confidence, and quiet sophistication for discerning buyers.
How does lighting affect real estate video quality?
Lighting does affect real estate video quality because it directly shapes how a property feels on video. Good lighting makes spaces look larger, cleaner, and more inviting, while poor lighting creates shadows, dull colors, and noise. Natural light and balanced artificial lighting help highlight details and maintain accurate colors throughout the tour.
What is the difference between real estate video and real estate photography?
The difference between real estate video and real estate photography:
| Aspect | Real Estate Photography | Real Estate Video |
| Format | Still images | Motion visuals with clips |
| Purpose | Highlights key features quickly | Shows flow and spatial experience |
| Emotion | Informative and clean | More immersive and engaging |
| Best use | Listings, brochures, thumbnails | Websites, social media, virtual tours |
| Buyer impact | First impression | Stronger emotional connection |
What resolution and format are best for real estate videos?
The resolution and format best suited for real estate videos are shot in 4K resolution for sharp detail and future flexibility, even if you export in 1080p. Use MP4 with H.264 or H.265 compression. It balances high quality, small file size, and wide compatibility across websites and social platforms.
