The best ways to share photos with clients are free file-sharing services (WeTransfer, Hightail, Prdibi, etc.), paid platforms (Pixieset, Shootproof, etc.), and cloud storage services (Google Drive, Dropbox, etc.) that offer a professional and user-friendly experience. There are many others, but not all platforms are useful for everyone. Choosing the right file format is crucial to maintain image quality, professionalism, ensure data security, and enhance the overall client experience. We’ve tried some popular file-sharing platforms and shared the 8 best services to share photo files with clients.
1. Dropbox: Dropbox is a trusted platform used by professional photographers. It offers cloud-based storage and sharing with easy folder organization, making it ideal for managing photography projects.
2. WeTransfer: WeTransfer is a quick and easy file transfer tool that allows you to send up to 2GB of files for free. It’s perfect for sending photo collections without needing account sign-ups.
3. Google Drive: Google Drive integrates seamlessly with G Suite and allows photographers to store, organize, and share high-resolution images.
4. PixieSet: PixieSet is designed especially for photographers. It combines beautiful photo galleries with e-commerce and download options.
5. Hightail: Hightail allows photographers to send large files and folders while offering real-time collaboration.
6. Prodibi: Prodibi is a high-resolution image sharing platform. It preserves image quality during uploads, making it ideal for displaying work.
7. Shootproof: Shootproof is an all-in-one photo delivery, proofing, and sales platform. It provides galleries, download permissions, and sales features.
8. FTP Server: FTP (File Transfer Protocol) servers offer secure and direct file transfers. Best for tech-savvy users, FTP ensures controlled access to large photo collections.
What you’ll learn in this article
- 1 1. Dropbox – For Business Professionals and Project Managers
- 2 2. WeTransfer – Send Large Files & Share Photos Online
- 3 3. Google Drive – Best for Those Already Using G Suite
- 4 4. PixieSet – Best for Modern Photographers
- 5 5. Hightail – Great for Large Files and Folders
- 6 6. Prodibi – Share and Showcase Images
- 7 7. Shootproof – All-in-One Solution for Pro Photographers
- 8 8. FTP Server – Securely Managing Your File Transfer Processes
- 9 What Do You Need to Consider to Share Photos with Clients?
1. Dropbox – For Business Professionals and Project Managers

Dropbox, a cloud storage service, is a secure digital platform for sharing large files. Documents, high-res images, videos, and anything can be shared online, synced with devices, and backed up through this platform. Once the owner has uploaded their file to the dropbox, the owner or any permitted person can check and download that file. The amazing factor of Dropbox is its file-specific access. The owner can specify which file will be allowed to whom. It allows users to work at a whole new level because they can share the files as it is, without anyone making changes or cropping the file size.
Users have the flexibility to use it on their PC, Mac, and even on phones, and to collaborate with anyone. As free access has limited storage, it is recommended to clean out digital clutter every once in a while.
How Dropbox Works
Dropbox only takes 4 steps to share a file.
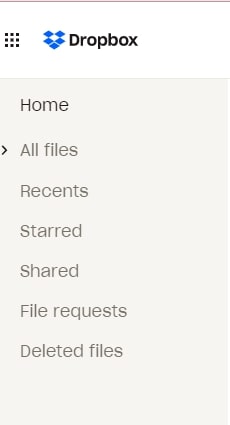
Step 1: After creating an account with Dropbox, the homepage will appear before you. Click ‘All Files’ from the menu bar.
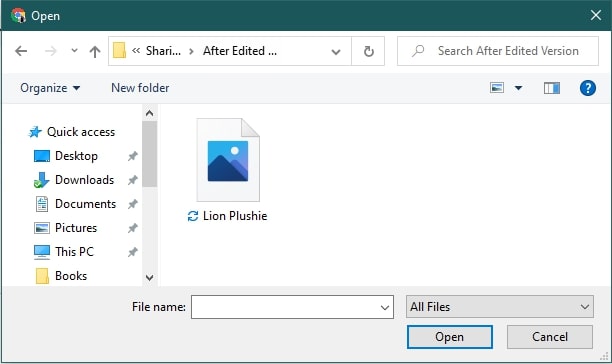
Step 2: Click ‘Upload’ and select your file/folder.

After selecting, click Open.
Step 3: Once the upload has been completed, it will be saved both on the online and desktop of Dropbox. You can share the uploaded file/folder in 2 ways.
a. Put your cursor on that particular field; you will see the ‘share’ icon.

b. Double-click the file or folder. It will open up, and you will see the ‘share’ button.

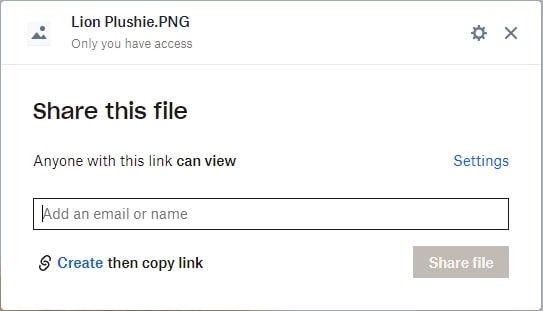
Step 4: After clicking the share, a box for inputting an email will pop up. You can control whether the receiver can edit/ view it. Do it, and it’s done.
WeTransfer is a painless, seamless, smooth, and fast platform for file-sharing services. It allows almost any file format to be shared without damaging the file resolution. Unlike some file-sharing platforms, it doesn’t have a creating or editing option for the receiver. Rather, they will be notified through the mail, and he/she will be able to download it. The only setback is, it has to be done within 7 days; otherwise, the file may get deleted (in the free version).
How WeTransfer Works
We Transfer takes only 3 steps to share files.
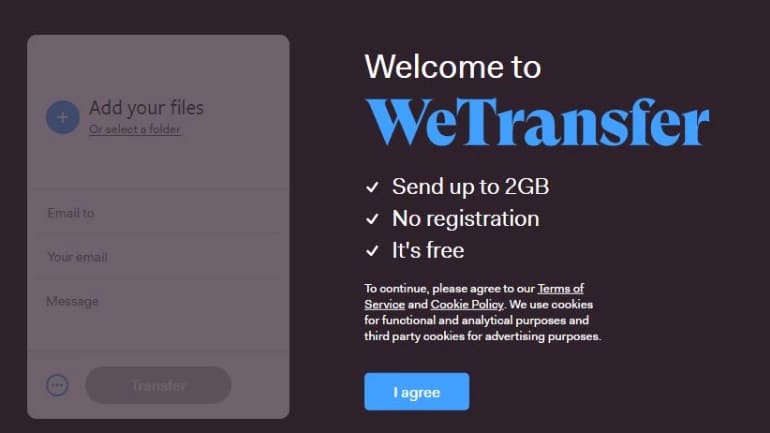
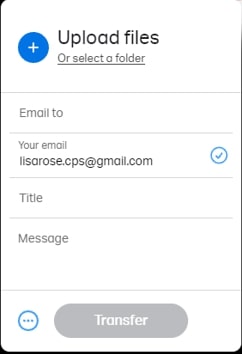
Step 1: Go to the ‘WeTransfer’ website. You will see this box as soon as the website is visible. Either sign up or input your email shown.
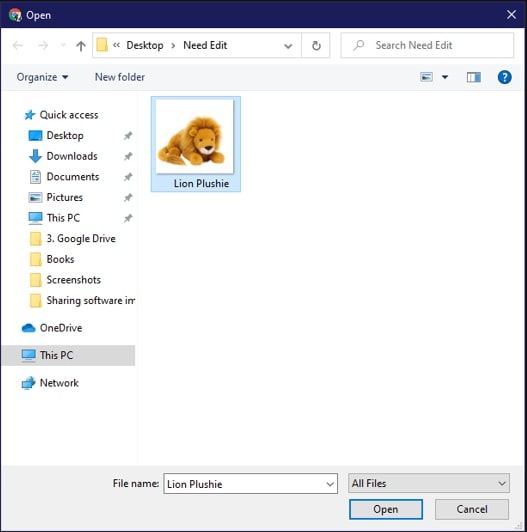
Step 2: Go to your designated location from where you will upload the files/folder and click Open.
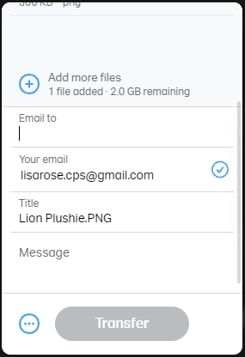
Step 3: Input the email you are sending your files/folder to, including title and message. After you are done, click ‘Transfer’.
3. Google Drive – Best for Those Already Using G Suite

GDrive has been one of the most versatile, simplest, and most popular file-sharing options. Its performances are simply fantastic. Users can conveniently organize and share their folders and files containing images, videos, or any other documents for personal, business, or public use. It is another cloud storage system that stores users’ documents online. By signing in with their Gmail and password, they can get access through any device (phone, Mac, or pc) from anywhere. Gmail owners are free to use their drive and create and upload as many files or folders as they need. They can share a single file/ full folder with someone through permission (view/edit). Also,a user has complete control and protection over his/her shared data.
How Google Drive Works
This is how you can use Google Drive to share files/folders.
Step 1: Go to Google Drive. Click New.

This box will pop up.
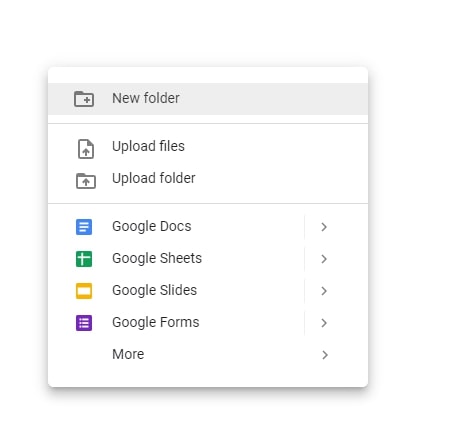
Step 2: From there, click upload file/ upload folder. A box will open. Select the location where you have kept your file to upload. Then, click Open.
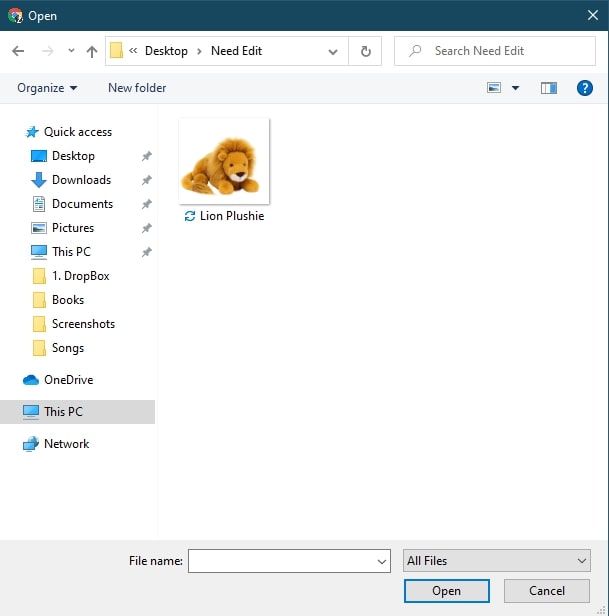
Step 3: The file will take a few seconds to upload. And once it’s complete, you will see it.
Step 4: You can share this uploaded file/folder in 2 ways.
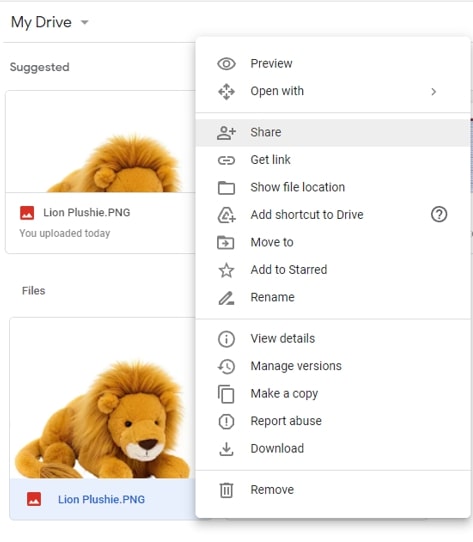
a. Put your cursor on top of the image and click the right you will see the ‘Share’ option.
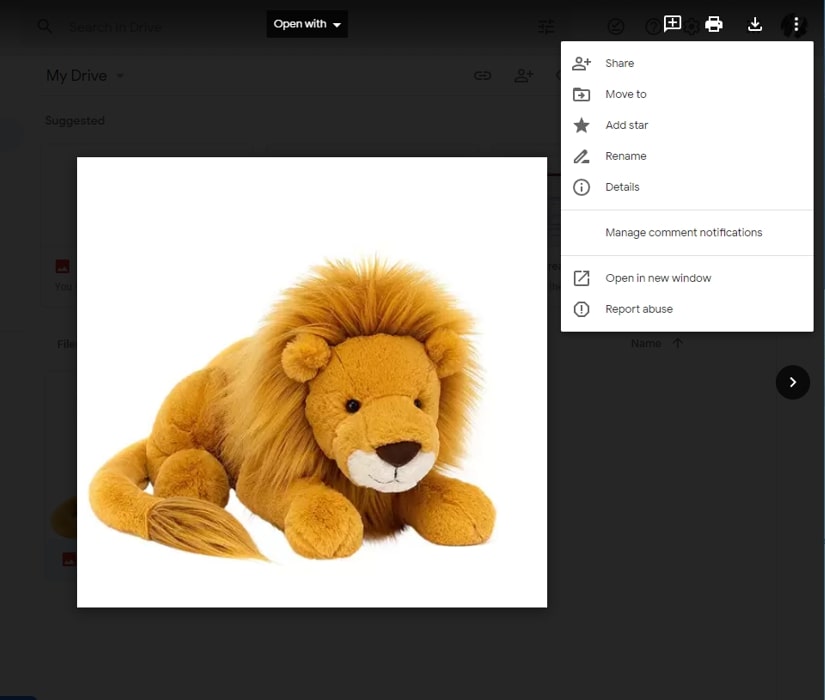
b. Or double-click the image to open. At the top of the right side, you will see 3 dots. Click there and you will find ‘Share’.
Step 5: Once you have clicked the ‘Share button,’ this box to add people will show up. Do so and that’s it.

4. PixieSet – Best for Modern Photographers

PixieSet is a name for a professional platform for safely sharing high-quality photos. It allows the creation of client-specific folders and keeps updates on matters like your client’s favorite images or downloads. It has accessibility on both desktop and mobile. Therefore, it’s easier for the receivers to select, download, and do other work seamlessly. As a result, it performs as an all-in-one platform. Last but not least, it has a Lightroom plug-in, indeed a great attraction.
How PixieSet Works
Here is how to share files through PixieSet.
Step 1: After you have signed up, the dashboard page will appear before you. Click ‘Client Gallery’ from there.

Step 2: Create a new gallery.

Step 3: Fill this box up with your collection name and pick up a date.

Step 4: Once you have created a gallery, it will instantly lead you inside. From there, go to ‘Add Photos’.

When this box (below) shows up, go to the location from where you saved your files/ drag those files here.

You will see the uploaded files as soon as the process is done.
Step 5: You need to publish these files for sharing. At the bottom of the left side, you will find a ‘Publish’ button; click it.

Step 6: Your files will get published, and you will see this page on the screen.
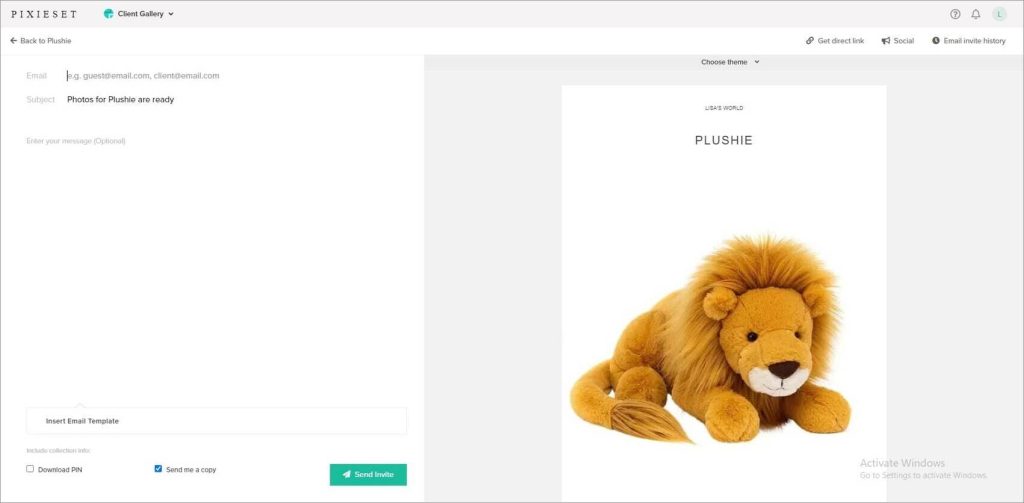
Input your receiver’s email address and hit the ‘Send Invite’ button. And that’s it.
5. Hightail – Great for Large Files and Folders

Hightail is a secure and easy file-sharing option for large files or a variety of file formats like PNG, MOV, and PPT. Users have control and complete protection over their files/folders. It is indeed a good option for collaborating on work as it permits viewing and commenting on shared files. This platform can sync with OneDrive, Dropbox, Google Drive, or any other platform and is also available in mobile phone versions.
Having a link-sharing option has made it easier for receivers to check and preview the file without having an account or needing to download it.
How Hightail Works
Here is the process for sharing files through Hightail.
Step 1: Sign in or create an account through the website; you will see this page.
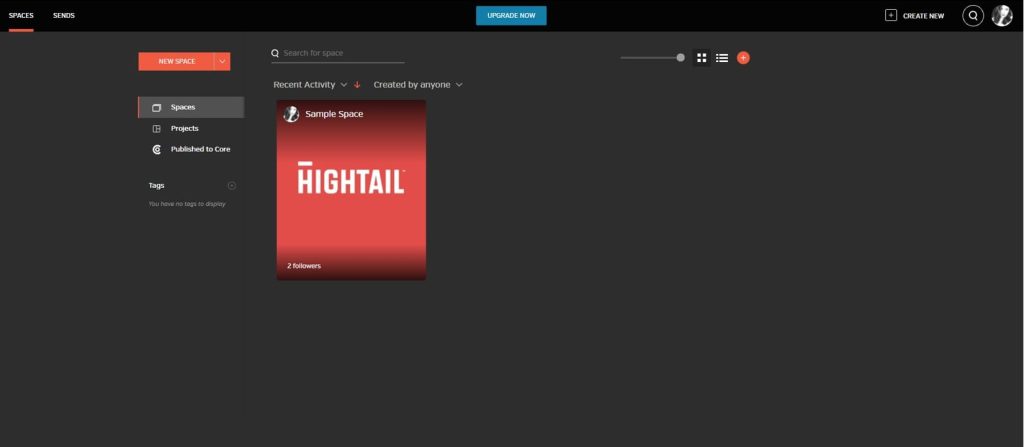
Step 2: Go to this particular spot and click the plus sign.

A box (like below) will pop up with some fields to fill up when you do so.

This platform requires you to create a space for any purpose. You can do it at any point before or after uploading your files/folders.
Step 3: Now, upload your file. You can select any platform from which you want to bring your file here. I will select my computer.

Then, go to the location of the file/folder you need to share, select it, and click open.
Step 5: While uploading, set the file name if you didn’t previously (at step 2). You can write the goal for the space as well. Then click the button ‘Create Space’.

A space under your given name will be created. As for me, this is ‘Lion Plushie’.
Step 6: Double-click on the file/folder to open. When it does, look for these 3 dots on the top of the menu. Click it; another menu will open up. Click ‘Send Via’ from there.

When you do so, it will open to another menu; click Send Via Link/ Send files from there.
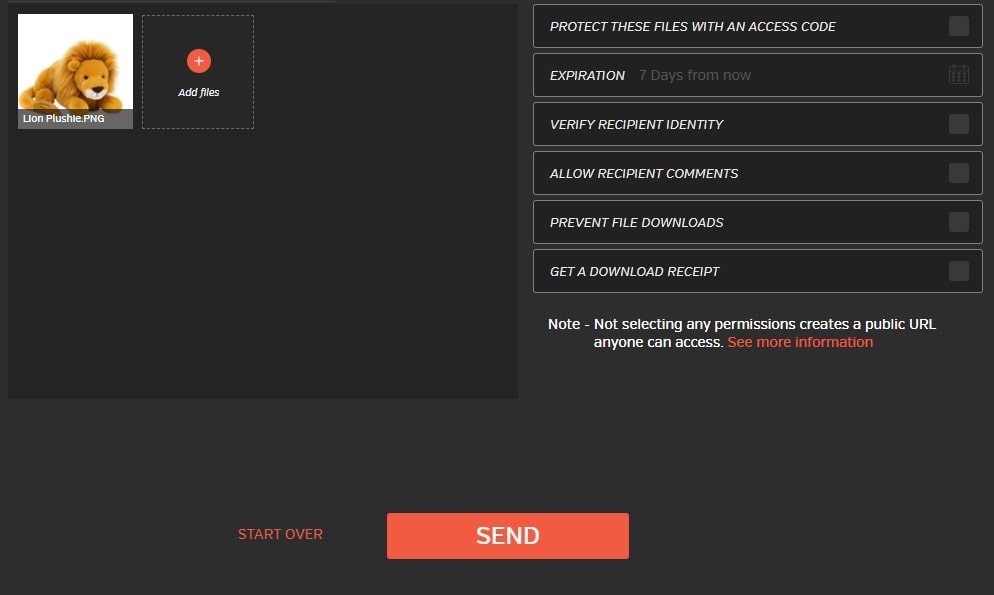
Step 8: You will see this page at this point. Input your receiver’s email with the subject and message, and click Next.

Step 10: Set your priorities and click send.

Swiss-based app Prodibi is another prominent image display, share, and embed solution. It manages color, compression, pixel, format, etc., and can update website/WordPress sites at full resolution. Its Capture One plug-in impresses professional photographers. This is an advantage for receiving feedback on full-resolution proofs. In addition, there is an extended feature for Mac which is to recognizes faces by gender, age, or emotion.
Users can see Prodibi galleries both from the mobile and web versions. Also, it is convenient for photographers to create a one-page portfolio to display work.
How Prodibi Works
You can transfer/share files/folders through Prodibi in 2 ways.
Method 1. Create Folder
Step 1: After signing in, this page will appear. Click ‘Album’ to create one.

Step 2: When this box pops up, name your file/folder.

Step 3: An album will be created under your given name, and it will instantly open. Click ‘Upload’ from there and go to the location where you have kept your file.

Step 4: When the uploading is done, click ‘Share’, and you will see a menu bar open up on the right side. Make adjustments if you need them from there, copy the link, and send it to your receiver. And it’s done.
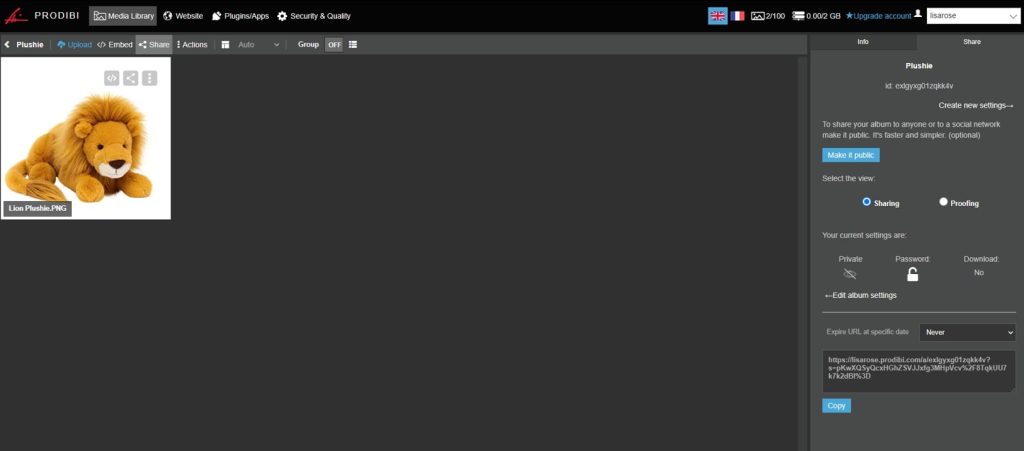
Method 2: Direct Transfer
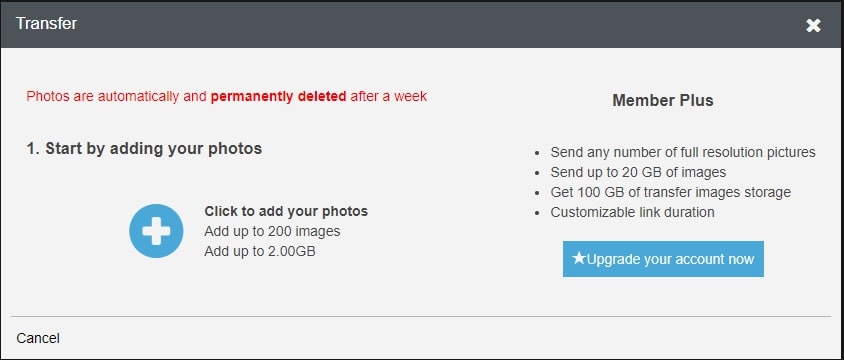
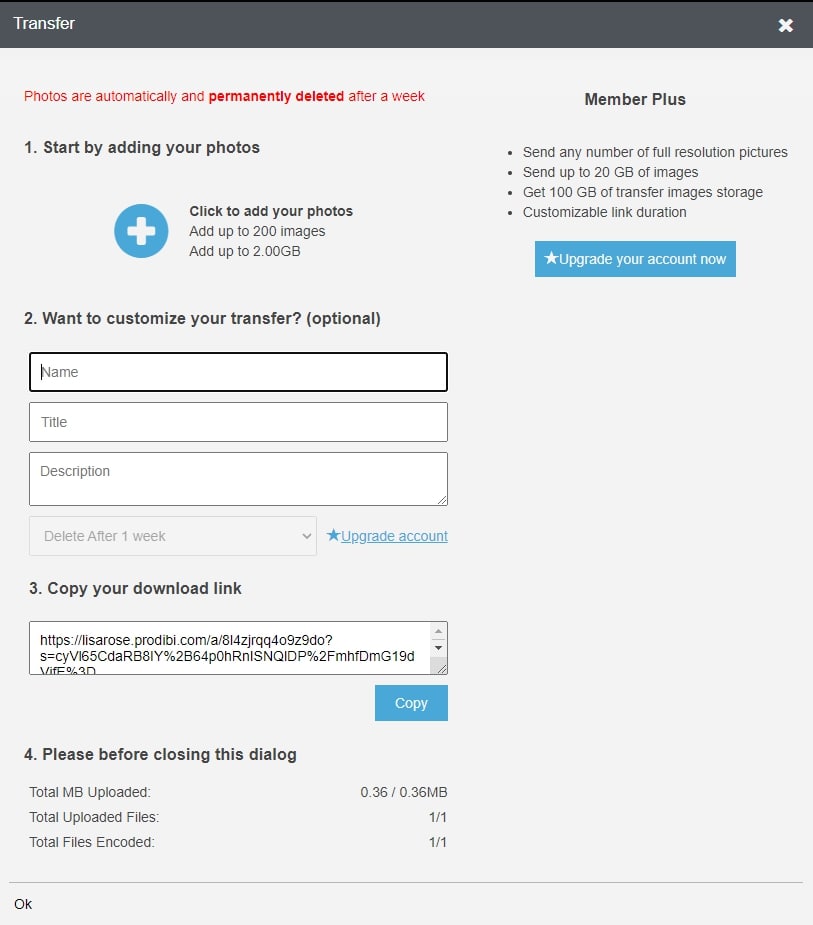
Step 1: After signing in, when the page shows up, click ‘Transfer’.

Step 2: You will see this box in front of your screen. Click the plus icon.
Step 3: Go to your designated location to upload files/folders.
Once you have confirmed the upload, you will see another box like this. Copy the link and send it to your receiver. And it’s done.
7. Shootproof – All-in-One Solution for Pro Photographers

This is an impressive option for photographers for their systematic workflow and gallery to combine. However, we better say this is a photographer-based platform that offers e-commerce solutions as well. Substitute for Pixieset; this platform offers upload, download, share (even on social media), and sell photos. In addition, users can not only customize their galleries but also put watermarks on their images. No doubt, it is a great option for photo sharing with clients.
How Shootproof Works
Step 1: Sign up and wait for this page to appear. First, you need to create a gallery. Then, click the ‘Add a Gallery’ option
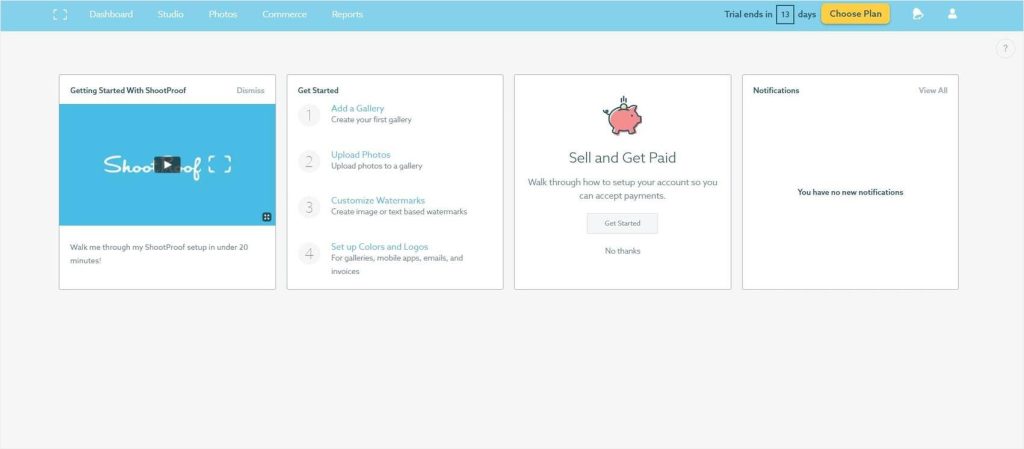
You will see this option, click to create.

Step 2: A box like this will show up; input your gallery name.

Step 3: Now upload your files/folders from your designated location.

Then, click ‘Start Upload’ when this box appears.
Step 4: After this is done, your file will be uploaded. Go to the right side at the top of the panel; you will see the share option. Click it.

Step 5: You will have the following options to share your file. Choose the one convenient for you. I have chosen the 2nd one.

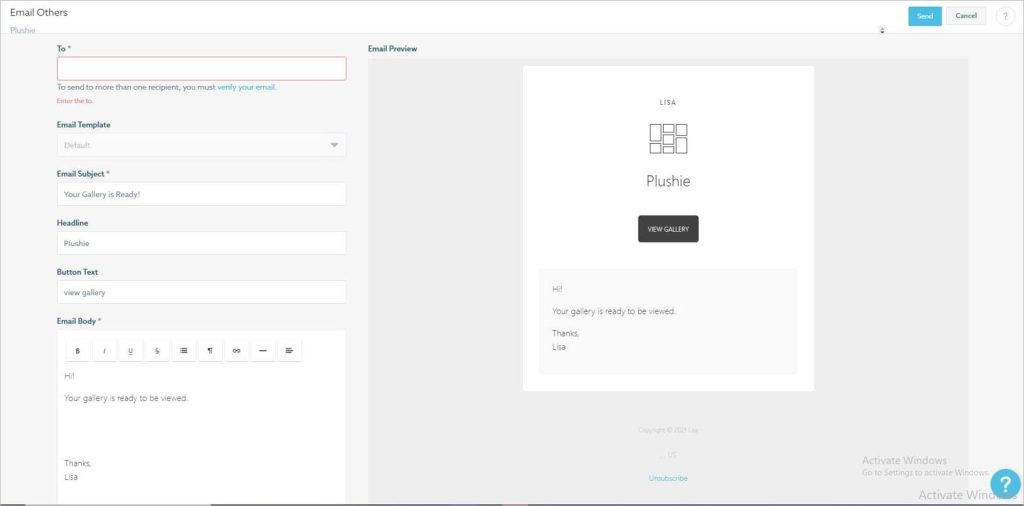
Step 6: Fill up the required field and click the ‘send’ button (right side at the top).
8. FTP Server – Securely Managing Your File Transfer Processes
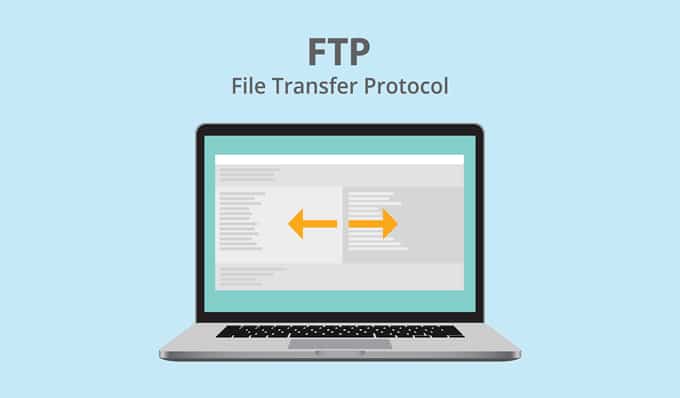
FTP Server (File Transfer Protocol Server) is one of the most secure storage methods to share confidential images, data, information, or the like. It is an enabled way to transfer files between 2 computers, one of which works as an FTP-integrated cloud server. This medium allows uploading any size and format of files. There are different FTP applications for this; however, FileZilla is the most popular FTP client/ integration that is compatible with Windows, Linux, and Mac. After the installation process is complete, the panel may look daunting, but the workings aren’t as complicated as they appear.
How the FTP Server Works
Step 1: Download the ‘FTP’ Server from this link and complete the setup. Once you have completed the installation, this panel will appear.
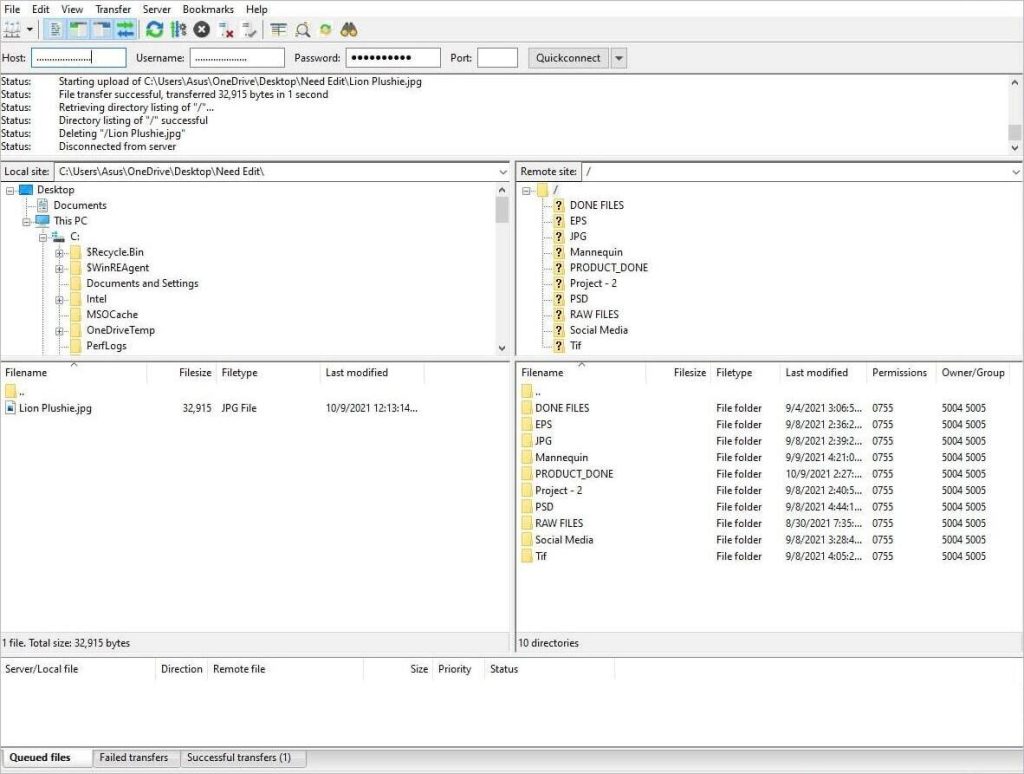
Near the top menu, fill up Host, Username, and Password to start working. You will see there are 4 boxes in the presented panel. The left 2 boxes consist of your computer files, and the right 2 boxes include the contents of your web host service. The file you select in the top box, inside contents will show up in the bottom one.
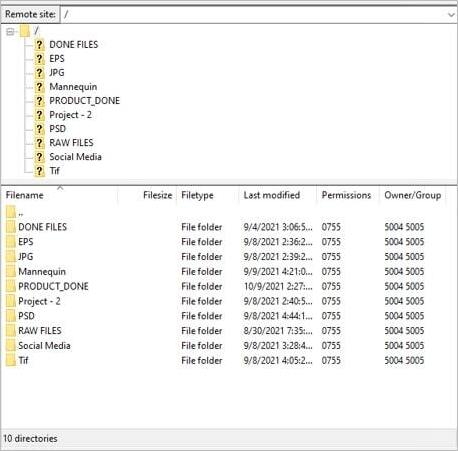
Step 2: From the right side box, select a path where you want your file to be saved.
Step 3: Now, go to the ‘Local Site’ option (1st box on the left side); from here, select the location of the files you want to upload.
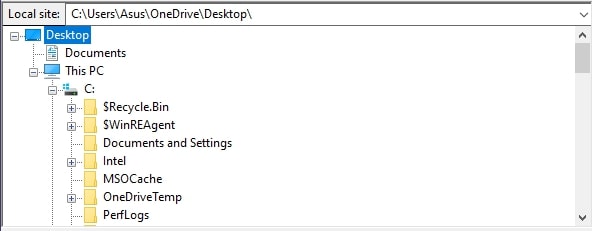
Double-click to start uploading.
Step 4: You will see the box at the bottom once the upload has started.

Step 5: When your file has been completely uploaded, you will see it on the right side. With authorization, your selected clients can get access to it as well.

It may seem complicated to choose the best one. However, there are ways to do so. Consider the following factors while choosing the best way to send high-resolution photos to clients.
- Your requirement: Features like accessibility, backup, document protection, and watermarking- exactly which features you need. Consider these matters first.
- Try for free: Every software/platform has its free version. Try those first to check out how different and convenient they are.
- Pricing/cost: If you are looking for some more essential features, maybe you should try the paid version. Then, you will find your required pricing category.
- File saving: If you have a backup option, maybe you won’t care how long a software/website saves your file. Typically, most software’s free version doesn’t save files for long. You may include this matter in your checklist.
Required Features of a File (Images) Sharing Platform
You probably have experienced file breaks, image quality drops, bad resolution, or high pixelated images that can’t be sent while sharing/transferring files. Gone are the days of living with those issues! The 21st century has made everything around us technologically advanced. This includes professional photo-sharing software as well. There is fierce competition in the software industry, too. As a result, you need to be picky while choosing the best way to deliver photos to your clients.
These are the features a good file-sharing software should have –
- Sufficient Storage
Cloud-based storage is best for streamlining work, sharing, and communicating. Commercially, you will have to send heavy image folders, which will take up a lot of space. Ensure this fact first that your preferred platform has that much capacity.
- Uncompressed Quality
An ordinary issue while sharing images is low quality. This can’t be compromised while the sole online marketing greatly depends on images. Pick a software that retains original quality while uploading, transferring, or downloading.
- Share/ Transfer Process
Most platforms offer easy-to-organize storage and time-saving sharing processes. But what you need to look for is the file volume and which type of file it allows you to transfer/share at one go.
- Protection
The online transfer process has the greatest risk of document leakage. This causes an unimaginable level of hassle. Therefore, everyone wants a secure transferring/sharing process to be ensured. As you will be delivering photos to clients, make sure your platform has got you covered.
- Proof
If you want your clients’ feedback, you need software that allows proofing. It’s a trouble-free and easy way intended for this purpose. Instead of checking emails, you can directly know which files and where you need to work as a reply to your clients.
- Compatibility
Check beforehand the compatibility of your chosen platform with the device or operating system. Some software complies well with mobile and pc or pc and Mac.

