
A pure white background in Photoshop involves replacing or adding a white background (RGB: 255, 255, 255, or hex: #FFFFFF). This is often used for product photography, e-commerce products, print materials, advertising, and others to maintain brand consistency, enhance focus on the subject, remove distractions, and fulfill e-commerce marketplace requirements.
To make a pure white background in Photoshop, you can utilize five different Photoshop tools: Quick Selection tool, Magic Wand tool, Replace Color Adjustment, Eyedropper tool, and Layer Masks.
- Quick Selection tool: The Quick Selection tool is a versatile tool used for making selections, similar texture, and color within an image. This tool is ideal for isolating subjects from their backgrounds.
- Magic Wand tool: A Magic Wand tool is another selection tool that selects pixels of similar color with one click. It is effective to select and remove backgrounds when the background is solid or has minimal variation.
- Replace Color Adjustment: The Replace Color tool in Photoshop is a color correction feature that allows you to select a specific color in an image and replace it with another color while controlling its fuzziness (range), hue, saturation, and lightness.
- Eyedropper tool: The eyedropper tool in Photoshop allows users to sample colors from an image and apply them to other elements or settings. The keyboard shortcut is “I” to activate the tool. With this tool, you can identify color fringing or shadows and perfectly create a pure white background.
- Layer Masks: A Layer Mask is a powerful and non-destructive way to control the visibility of specific parts of a layer without erasing them. It works as a way to “hide” or “reveal” areas of a layer using black, white, and gray on a mask.
What you’ll learn in this article
- 1 How to Make a Pure White Background in Photoshop Using the Quick Selection Tool
- 2 How to Make the Background White in Photoshop Using the Magic Wand Tool
- 3 How to Get a White Background in Photoshop Using the Replace Color Adjustment
- 4 How to Make a Pure White Background in Photoshop Using the Eyedropper Tool
- 5 How to Add a White Background in Photoshop Using Layer Masks
- 6 What is a Pure White Background in Photoshop?
- 7 Why Do You Need a Pure White Background?
- 8 How to Ensure the Background is Truly Pure White
- 9 Where to Get a Pure White Background in Photoshop for Product Images?
- 10 FAQs
How to Make a Pure White Background in Photoshop Using the Quick Selection Tool
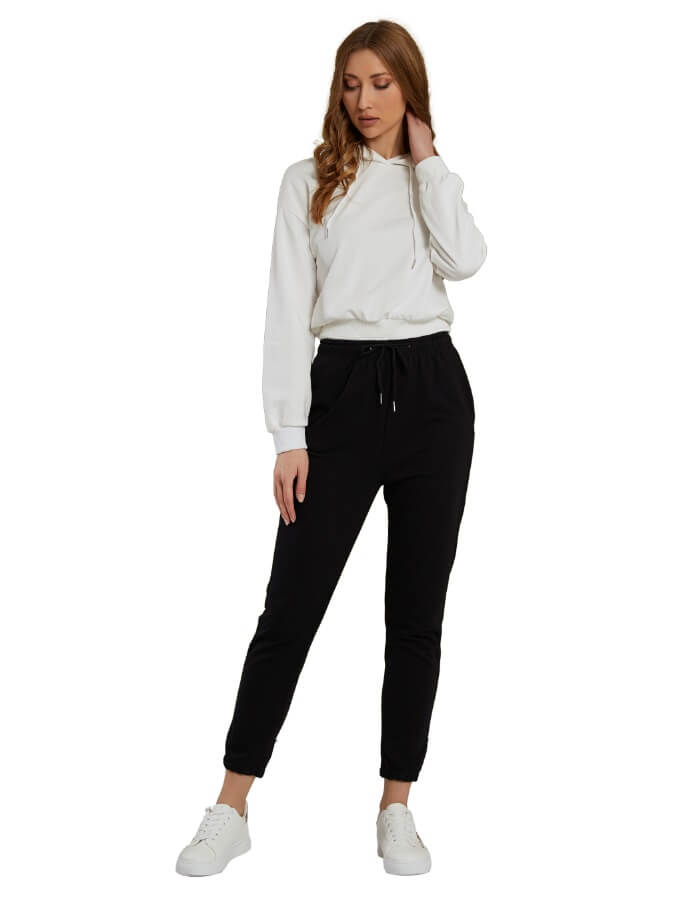
To make a pure white background, at first, you’ll have to separate the subject from the background. To do that, we’ll select the subject and make the selection as accurate as possible. Then, we’ll mask the subject and add a solid color layer as a background.
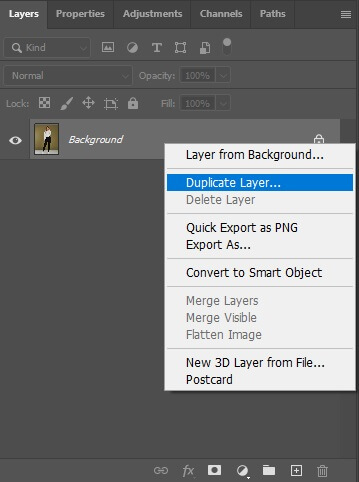
Step 1: Duplicate Layer
Go to the Layer menu. Right-click on the background layer and click on Duplicate Layer. We have made this extra layer so that we can use it later if necessary.
Step 2: Make Selection
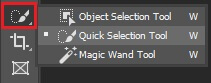
Now, from the toolbar, select the Quick Selection Tool.
From the top menu, click on Select Subject.

This will select the subject of your image.
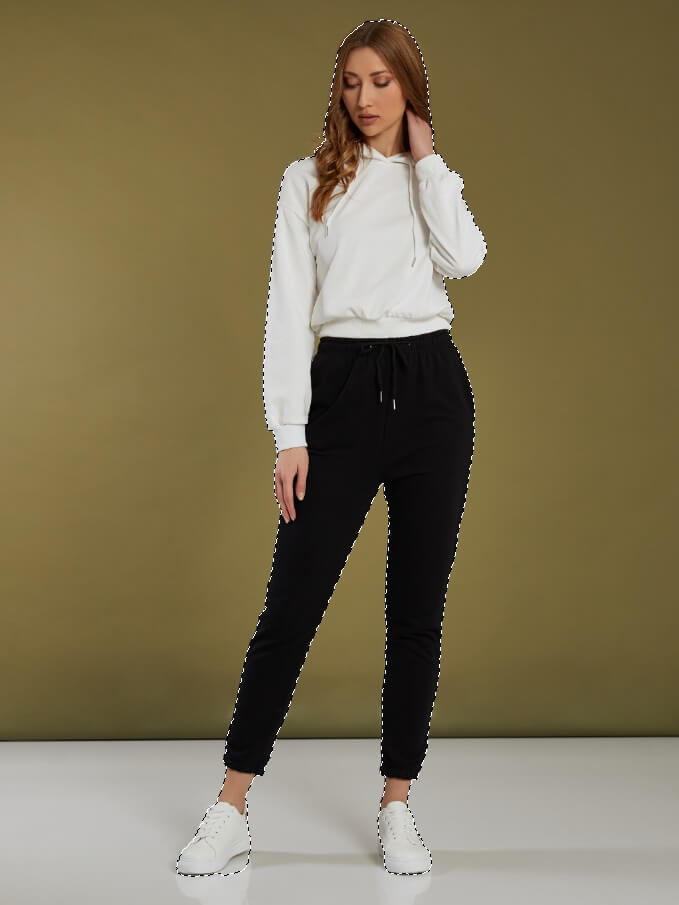
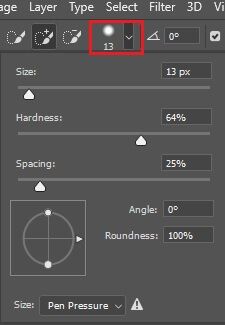
There is a chance that this selection might not be perfect. So, you’ll have to work on this. On the top menu, there is an option to change the brush size.
Now, to include any area in the selection, just click there. And to exclude any area, press alt on the keyboard and then click on the area. Then finalize your selection.

Step 3: Refine Edges
Press Ctrl + Alt + R to open Refine image. There you’ll find options to adjust the selection. You can change the contrast, smoothness by shifting the slider.
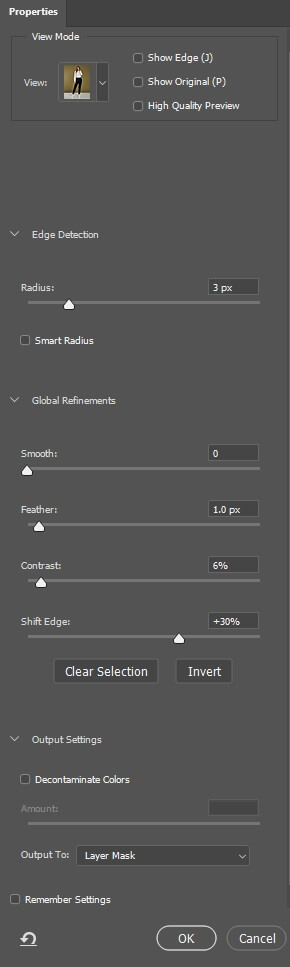
When you’re done, select Layer Mask from the Output option.
Step 4: Solid Color
From the Adjustment Layer menu, select Solid Color.
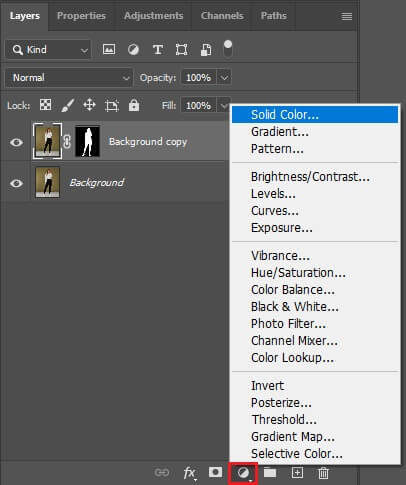
A box will pop up. Select white color from the color palette.
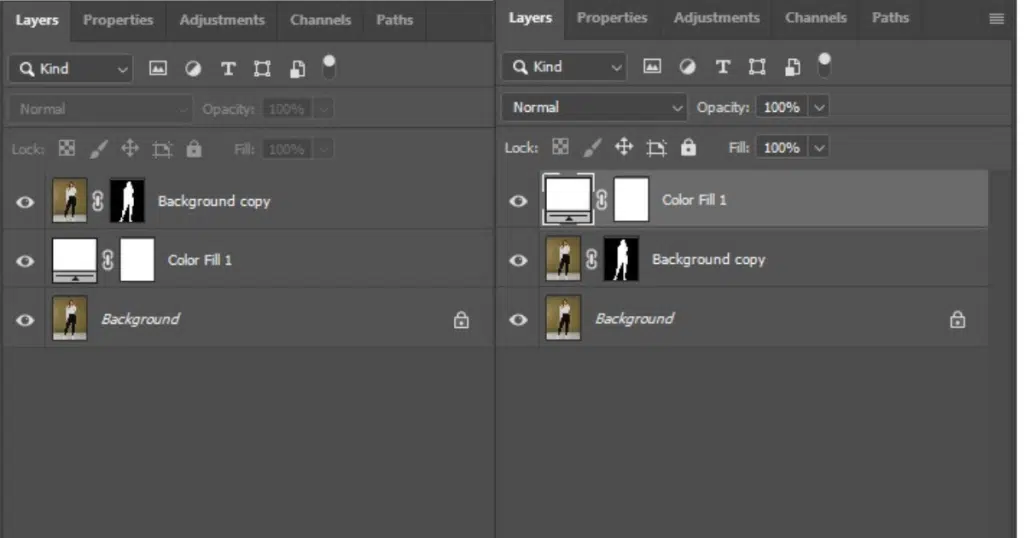
Step 5: Layer Placement
Place the Layer below the Background Copy Layer.
Step 6: Save the Image
Go to File and select Save As to save the file.
How to Make the Background White in Photoshop Using the Magic Wand Tool
To make the background white in Photoshop using the Magic Wand tool, first adjust the tool settings: Tolerance value (Low tolerance selects similar colors, and higher values select a broader range) and Contiguous (check the option to choose only adjacent pixels of similar color). For more details, check out the following steps:
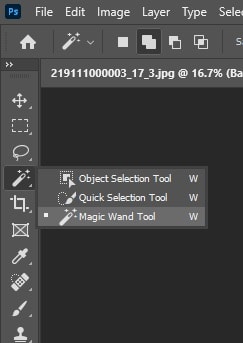
Step 1: Choose the Magic Wand Tool
Press “M” on your keyboard or choose the Magic Wand tool from the Photoshop toolbar. As mentioned earlier, adjust the tool settings to select the background as shown in the picture below.
Step 2: Expand the Selection (Optional)
If needed, expand the selection by holding “Shift” and clicking on additional areas that you want to turn white. Ensure the tool is selected when you expand the selection.
Step 3: Fill with White
After completing the selection, go to Edit > Fill. In the Fill dialog box:
- Choose “Color” from the contents dropdown menu and select “White”.
- Ensure “Mode” is set to “Normal” and Opacity is 100%.
- Click “OK” to fill the selected area with white.

Step 4: Save Your Image
Save your image with the new white background. You can deselect the selection by pressing (Ctrl + D/Cmd + D) if the selection is not right.
How to Get a White Background in Photoshop Using the Replace Color Adjustment
To get a white background in Photoshop using the Replace Color Adjustment, first select the background color you want to replace and then adjust the hue, saturation, and lightness to white. Here’s a step-by-step guide:
Step 1: Select the Replace Color Tool
After duplicating the layer, go to the Menu bar and click Image > Adjustments > Replace Color. A new Replace Color dialog box will appear.
Step 2: Select the Background Color
In the Replace Color dialog:
- Click the Eyedropper tool.
- Click on the background area in your image that you want to turn white.
- Use the fuzziness slider to adjust the selection range – increase to select more similar tones.
Step 3: Replace with White
Drag the Lightness slider all the way to the right to make the selected area white. Leave Hue and Saturation unchanged. Click Ok to apply the changes.
How to Make a Pure White Background in Photoshop Using the Eyedropper Tool
To make a pure white background in Photoshop, you can use the Eyedropper tool to create Curves or Levels adjustment layers. Here’s a more detailed breakdown:
Step 1: Select the Background
Use the Object Selection tool, Magic wand, or Pen tool to select the subject. Refine the selection using Select and Mask, Quick Mask, or other selection tools to get a clean cut-out.
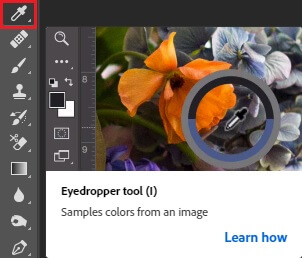
Step 2: Select the Eyedropper Tool
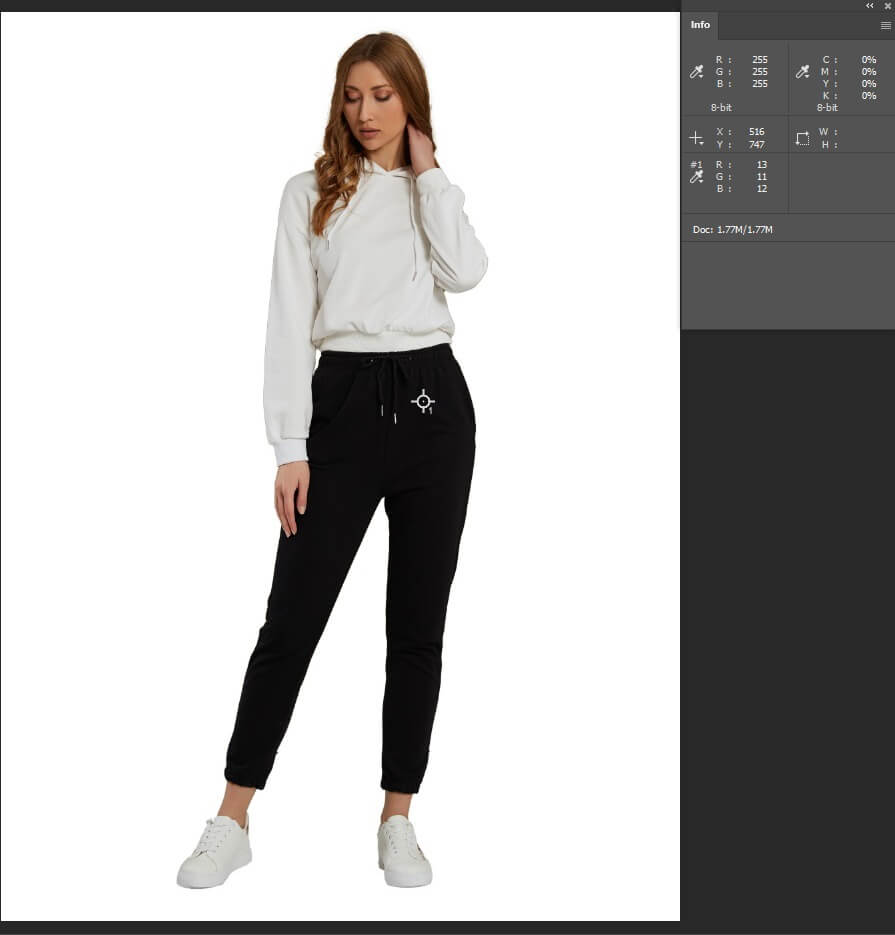
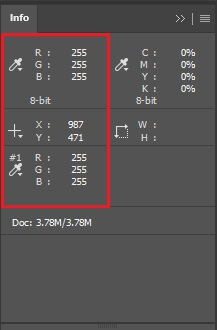
Press “I” on your keyboard or select the Eyedropper tool from the left toolbar. Look at the Info panel (Window > Info) or the Color panel to check RGB values.
Note: If the RGB (248, 250, 251); it’s not pure white. The pure white RGB range is (255, 255, 255).
Step 3: Use Levels or Curves to Adjust
Use Levels if the background isn’t pure white:
- Go to Image > Adjustments > Levels (Ctrl + L).
- Use the right white slider (under Output Levels) and drag it left until your background turns white.
- Watch the background while dragging, and ensure the RGB reaches 255.
Another option is using Curves.
- Go to Image > Adjustments > Curves (Ctrl + M).
- Select the white Eyedropper Tool in the Curves window.
- Click on the background area you want to make white.
- This will remap that color to pure white.
How to Add a White Background in Photoshop Using Layer Masks
You can add a white background in Photoshop using Layer Masks for product, portrait, or object isolation, where you want the subject on a clean white background. Here’s a detailed breakdown:
Step 1: Select the Subject
Use a Photoshop selection tool to isolate the subject from the background:
- Select the Quick Selection Tool (W) from the toolbar and click and drag over your subject to create a selection.
- Go to Select > Subject – Photoshop will automatically detect the subject.
- Use the Object Selection tool for more control; draw a box around the object.
Step 2: Refine the Selection
When the selection is active, adjust edge settings like:
- Smooth: to soften jagged edges
- Feather: to gently blend the subject into the background
- Contrast: to sharpen edges
- Output to: Layer Mask
Step 3: Add a White Background
Click on the Background layer or create a new layer beneath your masked subject. Go to Layer > New Fill Layer > Solid Color. Choose white (#ffffff) and click OK.
Drag this Layer below the masked subject in the Layers panel.
Step 4: Refine the Mask (Optional)
Click on the Layer Mask thumbnail in the subject Layer. Use a soft brush (B) with:
- Black to hide areas.
- White to reveal areas.
- Adjust the brush opacity for subtle refinements.
What is a Pure White Background in Photoshop?
A pure white background in Photoshop refers to a completely white background (RGB: 255, 255, 255) with no color tint, gray shadow, or texture. The key characteristics of a pure white background are:
- Hex code: #FFFFFF
- Brightness: 100%
- Opacity: 100% (not transparent)
- Visual: crisp, flat, no shadow.
This background is used in e-commerce product images (Amazon, Shopify, eBay, etc.), studio portraits, print catalogs, advertising agencies, fashion designers & accessories, and so on. A pure white background ensures visual consistency across multiple product images, helps in non-destructive compositing or retouching, and allows buyers to focus on the product.
What’s the Difference Between a Pure White Background and a Transparent Background?
The key differences between a pure white background and a transparent background are highlighted in the table below:
| Feature | Easier to isolate the product, small file size | Transparent Background |
|---|---|---|
| Visual appearance | Solid white color (RGB 255, 255, 255) | No visible background (see-through) |
| Use case | E-commerce, product catalogs, consistent presentation | Logos, icons, web design, mockups, or multi-layer compositions |
| File formats | JPEG, PNG (with white fill) | PNG, GIF (with alpha transparency) |
| Editing | Easier to isolate product, small file size | Allows layering, no background color |
| Platform requirements | Amazon, Etsy, eBay, or Shopify sellers | Used for design flexibility |
Pure White Background
- A pure white background is a clean and bright backdrop with a solid white color (255, 255, 255) that removes distractions and focuses attention on the subject. It is used in e-commerce product listings to meet platform requirements, like Amazon, eBay, Etsy, or Shopify.
- It draws direct attention to the subject, whether it’s a product, person, or object.
- It provides a minimalist, uncluttered look, ensuring the subject or product colors are highlighted accurately.
Transparent Background
- A transparent background of the product or subject image refers to a see-through area, enabling the image to blend seamlessly with other elements or backgrounds.
- Unlike a white, black, or solid-colored background, it has no fill or color.
- This background is useful for layering images, logos, or other design elements.
Why Do You Need a Pure White Background?
Your business or brands require a pure white background for several reasons:
- Professional & clean product visual: A pure white background makes products or subjects stand out sharply, giving a polished, high-end appearance. It eliminates distractions and keeps the focus where it should be.
- Fulfill e-commerce platform requirements: Major platforms like Amazon, eBay, Etsy, and Walmart require a pure white background (RGB 255,255,255) for main product images. This ensures, Uniformity across listings, better display on all devices, faster approval, and fewer rejections.
- Brand consistency: Using a consistent white background across your catalog, social media, and ads ensures a uniform brand aesthetic—it reflects clarity, trust, and professionalism.
- Boosts conversion rates: Images with pure white backgrounds reduce cognitive load on viewers, create a trustworthy and clean product display, and improve click-through rates (CTR) and sales performance.
- Avoid unwanted color casts: Off-white or gray backgrounds affect the product’s original color. Whereas, a pure white background ensures accurate color representation, which is vital for customer satisfaction and reduces return rates.
Why Does Your Image Look Gray Even After Using a Pure White Background in Photoshop?
Your image might look gray even after using a pure white background in Photoshop if the image is in grayscale mode or has a Hue/Saturation adjustment layer (saturation -100). To fix all these issues, you can –
- Change the image mode back to RGB color (Image > Mode > RGB color) to reduce the grayscale image mode.
- To eliminate the Hue/Saturation layer, adjust the saturation slider back to 0% or delete the Hue/Saturation layer.
Other potential issues are:
- Incorrect channels: You might switch to a single-channel view instead of RGB. Switch back to RGB by pressing Command + 2 or checking the channels panel to ensure RGB is selected.
- Color management issues: Adobe’s community mentions that color management inconsistencies, like incorrect color profiles, can cause whites to appear gray when working with images from different sources.
Can You Turn Any Background into Pure White in Photoshop?
Yes, you can turn any background into pure white in Photoshop, even if the original background is not white. Simple backgrounds are easier to make pure white, while complex ones require advanced techniques.
Can You Batch-Edit Multiple Images to Have a Pure White Background in Photoshop?
Yes, you can batch edit multiple images to have a pure white background in Photoshop. To do this requires automated action and may need some manual adjustments, like isolating the subject, removing the original background, and filling it with white. Outsource batch editing from a reputed photo editing agency that not only saves time but also provides you with natural and realistic shadows.
How Can You Avoid Color Fringing When Creating a Pure White Background in Photoshop?
You can avoid color fringing when creating a pure white background in Photoshop, using refined selections. Here’s a step-by-step guide to fix it:
Step 1: Use Refined Selections
Select your subject using different Photoshop selection tools. After that, go to Select > Select and Mask. After that, use the Refine Edge Brush tool around hair or soft edges (if the subject has any).
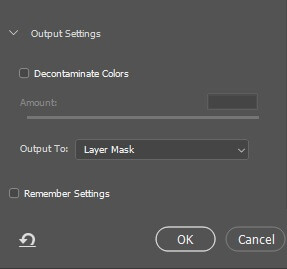
Turn on Decontaminate Colors to reduce background tint bleed.
Step 2: Add a White Background Layer
Create a new layer below your masked subject. Fill it with white (#FFFFFF) using Edit > Fill > White or a Solid Color Fill Layer.
Step 3: Fix Color Fringing Manually
If you still see color halos or edges, use the Clone Stamp Tool (S) to sample clean areas and paint over fringe areas at low opacity. Another technique is using the Defringe Filter. Go to Layer > Matting > Defringe and enter a value like 1 or 2 pixels. Photoshop removes colored pixels along the edge. Or, you can use a soft black brush to gently hide fringed areas by selecting the Layer Mask.
How to Ensure the Background is Truly Pure White
To ensure the edited background is pure white (255, 255, 255) in Photoshop, there are two effective techniques: the Eyedropper tool and the Levels or Curves Adjustment Layer. You can also use these two techniques to identify extended background color in Photoshop. Below, we’ve mentioned 2 techniques in detail:
Technique One:
- From the toolbar, take the Eyedropper Tool.
- Now, press Shift on your keyboard and click anywhere on the image. This will show an info box where you’ll find the value of the RGB color.
- Now, move the dropper to the background and check the values of R, G & B. The info will show the values of the point where ever you shift the dropper.
Technique two: Use Levels or Curves to Adjust to Pure White.
If the background isn’t pure white, fix it using one of these:
Option A: Levels
- Image > Adjustments > Levels (or press Ctrl + L).
- Drag the right white slider to the left until the background hits 255.
- Watch the RGB values as you adjust.
Option B: Curves
- Image > Adjustments > Curves (or Ctrl + M)
- Select the White Point Eyedropper in the Curves dialog.
- Click directly on the background area. It forces that color to white.
Where to Get a Pure White Background in Photoshop for Product Images?
Clipping Path Studio (CPS) is a globally recognized post-processing agency, known for its advanced photo editing services, precision, high-quality edits, consistency, and time management. From fashion to e-commerce, thousands of businesses and individuals outsource Image background removal services, a pure white background, and other post-processing services, including:
- Realistic and natural product shadow creation,
- Amazon product infographics,
- Manual pixel-perfect product retouching,
- On-model retouching,
- Bulk & high-volume e-commerce editing, and so on.
Their in-house photo editing experts perform clipping paths & cutouts to provide you with high-quality images. Also, you get 24/7 customer support, fast turnaround time, an affordable pricing plan, and 100% manual editing by professionals. Try a Free trial before finalizing your go-to solution for your creative business.
Background Removal Services With an Affordable Price
Get Free Trial
FAQs
Why pure white background cost-effective?
The pure white background is easy to shoot. You can do it using just one lightbox. There is no need to think or spend on different backgrounds and maintaining them.
Can background remover AI make a perfectly white background?
The pure white background is easy to shoot. You can do it using just one lightbox. There is no need to think or spend on different backgrounds and maintaining them.
What tool can I use to check if the background is perfectly white?
You can check the background color with the Eye Dropper Tool. After taking the tool, if you press the Shift button and click anywhere on the image at a time, it’ll show the value of that point.
Where to hire Photoshop experts to put a white background while doing bulk images?
You can find sites online that offer editing services with a pure white background. One of the best editing service providers is Clipping Path Studio. You can expect professional work from them, and this is a great place to have bulk images done.
Does a pure white background go with any kind of product?
Yes, it does. You can put a clean white background on every product image that exists. And this is not just an effect; this is also a requirement on many online sites.
