
A photo editing workflow is a systematic process to transform raw images into final, polished photographs and deliver timely, without any errors. The steps involve the initial capture to the final export, ensuring each photo meets quality standards and desired aesthetics as per client requirements. There are 6 best photo editing workflow software: Adobe Photoshop, Lightroom, Affinity, Capture One, GIMP, and Photo Mechanic. All these tools are popular for their extensive features.
A typical photo editing workflow might take 10 minutes to several hours, depending on client requirements and the photographer’s experience. Though there is no fixed rule of photo editing workflow, be aware of the 7 common mistakes: not shooting in RAW, no workflow planning (from beginning to final result), over-editing, incorrect white balance, poor composition, neglecting to back up work, and skipping lens correction.
What you’ll learn in this article
- 1 What is the Photo Editing Workflow?
- 2 Why Should You Maintain a Digital Photo Editing Workflow?
- 3 What is the Best Photo Editing Workflow Order for High-quality Results?
- 3.1 What is the Ideal Image Editing Workflow for Portrait Photographers?
- 3.2 How Can You Integrate Backups and Storage Into a Photo Editing Workflow?
- 3.3 How Do You Incorporate Color Grading Into a Photo Editing Workflow?
- 3.4 How Do Photographers Manage Large Batches in Their RAW Photo Editing Workflow?
- 4 What Software is Best for Streamlining a Photo Editing Workflow?
- 5 What are the Common Mistakes Photographers Make in Their Photo Editing Workflow?
- 6 How Long Should a Typical Photo Editing Workflow Take?
What is the Photo Editing Workflow?
A photographer’s photo editing workflow refers to a structured sequence of processing polished, professional images, from initial capture to final delivery. An ideal and systematic workflow ensures consistency, efficiency, and high-quality results, whether for print, web, or client delivery. This involves shooting in RAW & backup images, importing & organizing, initial culling, basic adjustments, lens correction & noise reduction, detailed editing, final adjustments, retouching, resizing & exporting, review & delivery.
Some renowned photo editing workflow examples are shown below:
Jessica Whitaker (Wedding/Portrait Photography) photo editing workflow:
- Jessica edits in Lightroom, exporting two versions of photos: web-sized for blogs and full-resolution for clients.
- She delivers client galleries via email or gallery services and follows up with clients for testimonials.
- She also uses blogging software to create clickable photo collages for easy sharing and Pinterest pinning.
Josh (Experienced photographer with 15+ years) photo editing workflow:
- Resize images for final use.
- Shoot in RAW and backup images.
- Crop and straighten.
- Remove unwanted objects.
- Set white balance.
- Adjust exposure.
- Remove noise.
- Adjust saturation/color grading.
- Make local adjustments.
- Adjust brightness and contrast.
- Retouch imperfections.
How Does a Photo Editing Workflow Differ for Product Vs. Portrait Photography?
The key difference between a product photography photo editing workflow vs. a portrait photography lies in the focus of the edits. Here’s a comparison table highlighting each photography genre’s editing workflow:
| Product Photo Editing Workflow | Portrait Photo Editing Workflow |
|---|---|
| Culling & Organization: Select the best images, and organize by SKU or product type. | Culling & Selection: Choose the most flattering expressions and poses, often with client input. |
| Batch Adjustments: Apply exposure, white balance, and color corrections across sets for consistency. | Global Adjustments: Correct exposure, white balance, and overall tone. |
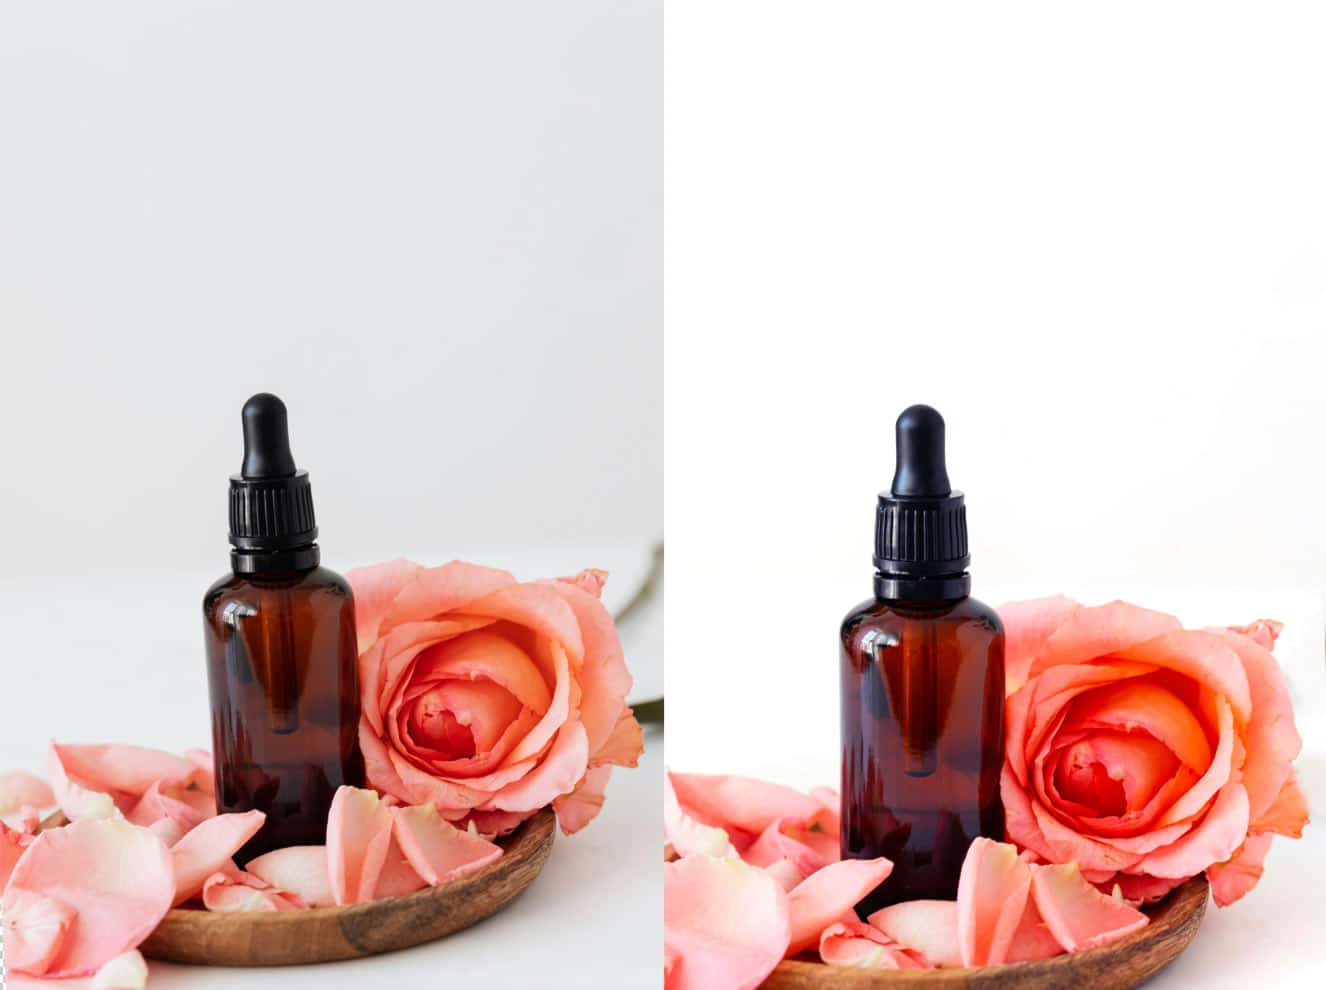
| Background Cleanup: Remove or replace backgrounds (often pure white or transparent), eliminate dust and imperfections. | Skin Retouching: Remove blemishes, smooth skin, reduce wrinkles, and even skin tone while avoiding an unnatural look. |
| Sharpening & Detailing: Enhance texture and clarity to showcase product details. | Feature Enhancement: Brighten eyes, whiten teeth, enhance hair, and subtly shape facial features. |
| Resizing & Export: Prepare images in multiple sizes/formats for web, print, or marketplace requirements. | Color Grading: Apply creative color adjustments to set the mood or match a style. |
| Automation: Use presets and batch processing to speed up repetitive edits, especially for large volumes. | Local Adjustments: Use brushes and masks for targeted edits (e.g., dodge & burn, background blur). |
Product photo post-processing workflow prioritizes speed, consistency, and technical accuracy, often leveraging automation and batch processing to handle large volumes. Whereas, portrait photo editing is more individualized, focusing on enhancing the subject’s features and mood, with greater emphasis on manual retouching and creative adjustments.
What are the Differences Between a Professional and an Amateur Photo Editing Workflow?
The difference between a professional and an amateur photo editing workflow can differ in terms of efficiency, intent, tools, and technical expertise.
| Aspect | Professional Workflow | Amateur Workflow |
|---|---|---|
| Equipment and Software | Uses high-end advanced editing software (e.g., Photoshop, Capture One, etc.) | Often uses basic cameras or smartphones and simpler editing apps |
| Image Capture | Shoots in RAW format for maximum editing flexibility | May shoot JPEG or use in-camera processing |
| File Organization | Employs systematic file naming, folder structures, and metadata tagging for easy retrieval | Less structured or inconsistent file organization |
| Editing Process | Follows a structured, multi-step workflow including culling, color correction, retouching, and quality control | Editing tends to be ad hoc, with fewer steps and less consistency |
| Editing Techniques | Uses advanced techniques like detailed retouching, local adjustments, noise reduction, and color grading | Basic adjustments such as cropping, exposure, and simple filters |
| Batch Processing | Utilizes batch editing and presets to maintain consistency and efficiency | Rarely uses batch processing; edits images individually |
| Quality Control | Includes rigorous review and quality checks before final delivery | Limited or no formal quality control |
| Time Investment | Invests significant time per image for high-quality results, especially for portraits or commercial work | Often spends less time per image, focusing on quick edits |
| Output Preparation | Prepares images for specific uses (print, web, e-commerce) with appropriate resizing and format | May export images without tailored adjustments |
| Backup and Archiving | Implements robust backup strategies (3-2-1 rule) and archives images systematically | Backup may be inconsistent or minimal |
| Creativity and Vision | Applies artistic vision and client-specific goals in editing | Editing is often experimental or casual |
| Professionalism | Adheres to deadlines, client communication, and workflow discipline | A less formal approach, often without strict deadlines or client interaction |
A professional photo editing workflow is characterized by its structure, use of advanced tools and techniques, attention to detail, and efficiency in handling large volumes while maintaining high quality. It is client-focused and integrates artistic vision with technical precision. On the contrary, an amateur workflow tends to be more casual, less organized, and simpler, often lacking the depth of editing and consistency found in professional work.
Why Should You Maintain a Digital Photo Editing Workflow?
A photographer should maintain a digital professional photo editing workflow to streamline the post-processing stage, ensuring consistency, efficiency, and quality.
What are the Benefits of a Well-Maintained Workflow?
- Consistency in photo quality: A well-defined workflow ensures that each image goes through the same adjustments and checks, resulting in a consistent look and feel across your entire portfolio. This is particularly important for projects like weddings, book covers, and professional portfolios, where a cohesive aesthetic is crucial.
- Time efficiency: An organized workflow helps you work faster by reducing the time spent on repetitive tasks. By knowing exactly what steps to take and in what order, you can streamline your editing process, allowing you to complete projects more quickly and take on more work.
- Better organization and management of photos: A structured workflow includes steps for organizing and managing your photos, making it easier to find and access specific images when needed. This prevents the chaos of misplaced or lost files and helps maintain a clean and orderly workspace.
Examples of Successful Photographers Who Maintain a Digital Photo Editing Workflow

Annie Leibovitz
One of the most renowned portrait photographers, Annie Leibovitz, is known for her meticulous workflow. From pre-visualizing her shots to the final edits, she follows a detailed process that ensures her images are both technically perfect and emotionally compelling.
Joe McNally
Joe McNally, an acclaimed photographer known for his work with National Geographic, maintains a rigorous workflow that includes extensive backups and a systematic approach to editing. His workflow allows him to handle large volumes of images efficiently while maintaining the highest quality.

Sue Bryce
Sue Bryce, a celebrated portrait and glamour photographer, emphasizes the importance of a consistent workflow in achieving her signature style. She follows a detailed editing process that includes specific retouching and color grading steps, ensuring every image meets her high standards.
Benefits in Practice
- Consistency: By following a consistent workflow, these photographers ensure their unique style is evident in every photo they produce. This consistency helps them build a recognizable brand and gain clients’ trust.
- Efficiency: These photographers use a streamlined process to manage large-scale projects without sacrificing quality. Their workflows allow them to focus more on creativity and less on technicalities.
- Organization: Properly organized workflows help them manage thousands of images, making it easy to retrieve and use photos even years after they were taken.
Maintaining a digital photo editing workflow is not just a best practice; it’s necessary for producing high-quality work in a timely and organized manner.
What is the Best Photo Editing Workflow Order for High-quality Results?
The best photo editing workflow order for high-quality results is highlighted below:
Step 1: Shoot in RAW and Backup Images

Shooting in RAW format preserves maximum image data, offering greater editing flexibility. Immediately back up your images to multiple locations using tools like external hard drives and cloud storage.
Step 2: Crop and Straighten the Image
Cropping and straightening your images enhances composition and alignment. Use tools like Adobe Lightroom or Photoshop to perform these adjustments easily.
Step 3: Remove Unwanted Objects from Photos
Remove distractions using techniques like Photoshop’s Content-Aware Fill. This step ensures your subject remains the focal point of the image.
Step 4: Set the Correct White Balance
White balance corrects color casts and ensures accurate color representation. Adjust the white balance for natural-looking photos.
Step 5: Get the Perfect Exposure
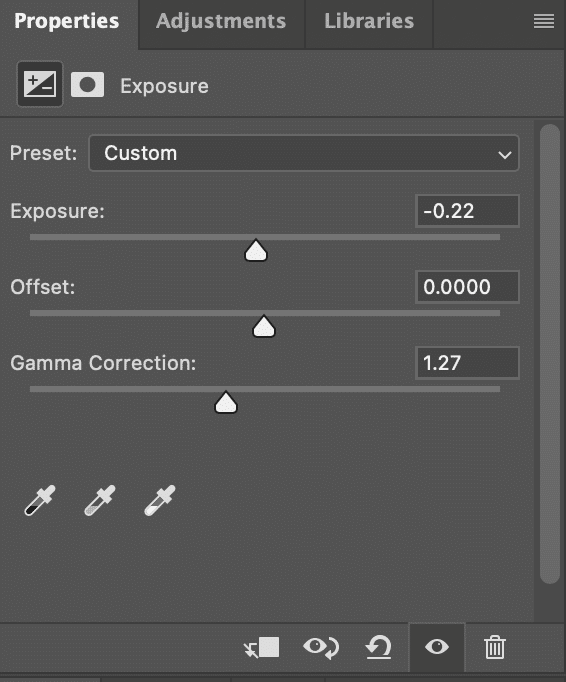
Exposure adjustments help achieve the right brightness and contrast. Use histograms and exposure sliders to correct underexposed or overexposed areas in your editing software.
Step 6: Remove Noise in the Photo
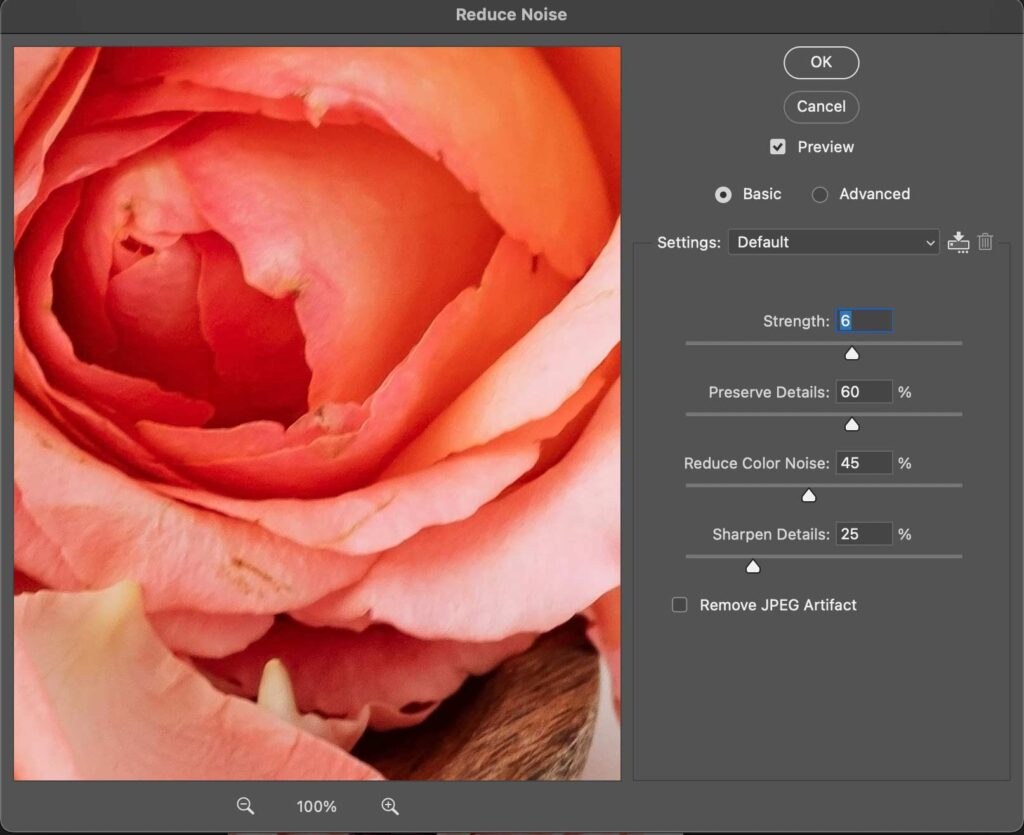
Digital noise can degrade image quality. Use noise reduction tools in software to clean up your photos while preserving details.
Step 7: Adjusting Image Saturation in Color Grading
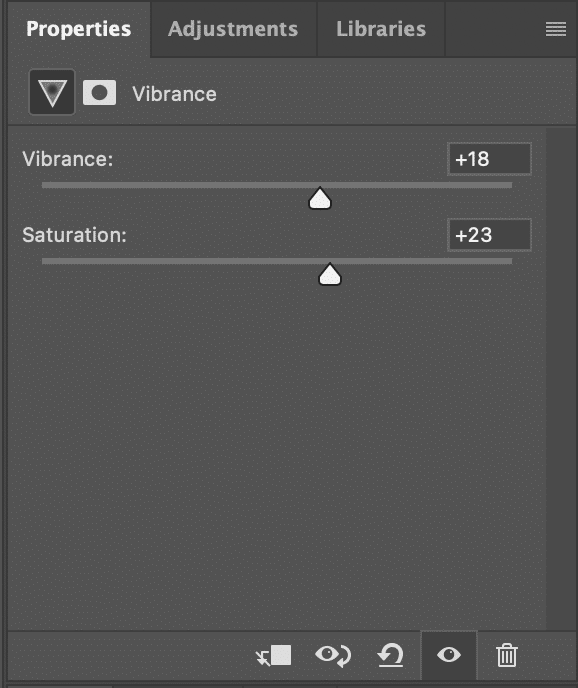
Color grading enhances mood and visual appeal. Adjust saturation levels in editing software to achieve vibrant, balanced colors that enhance your image’s impact.
Step 8: Making Local Adjustments
Local adjustments allow you to refine specific areas of your image. Use adjustment brushes and masks in Photoshop or Lightroom to selectively enhance parts of your photo.
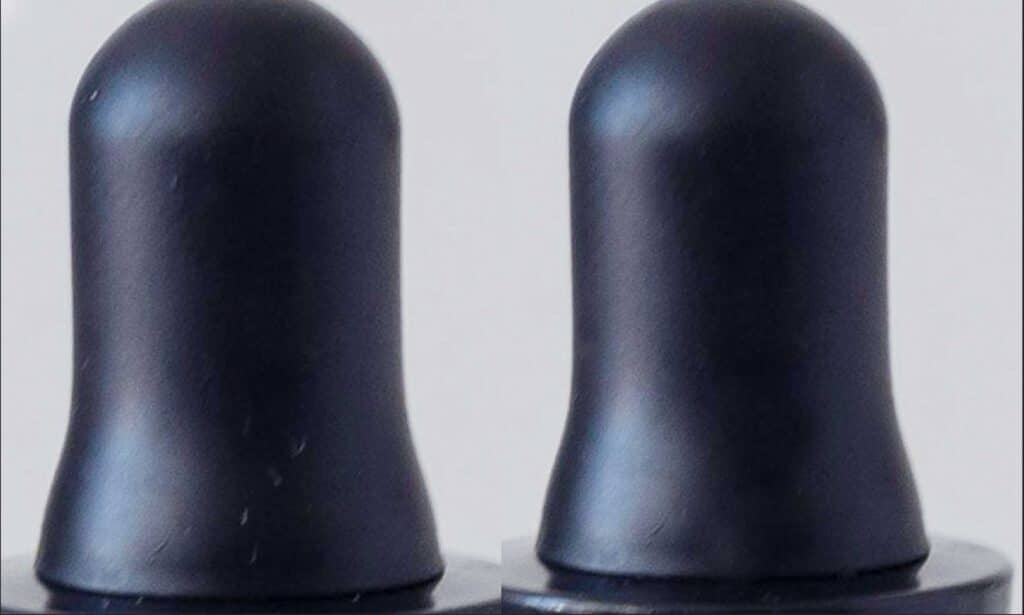
Step 9: Brightness and Contrast Adjustments
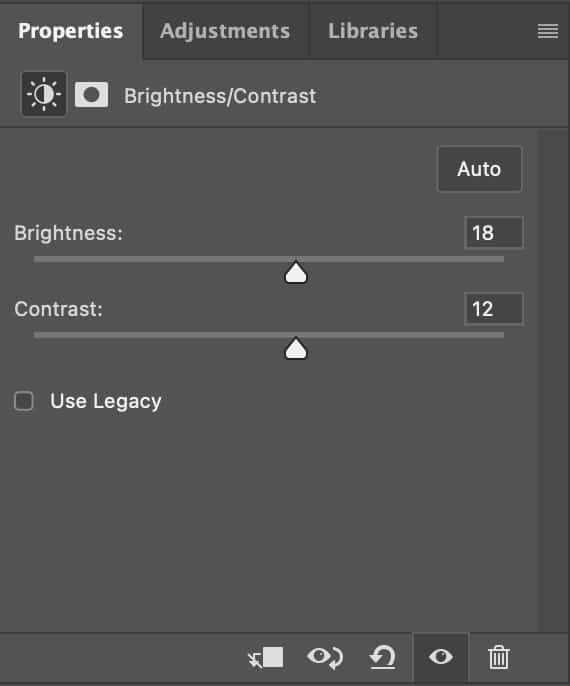
Adjusting brightness and contrast ensures your images have depth and clarity. Use the brightness adjustments to fine-tune these settings for a polished look.
Step 10: Retouch Your Photos
Retouching addresses imperfections like blemishes or spots. Utilize tools like the Healing Brush and Clone Stamp in Photoshop to perfect your photos.
Step 11: Resize the Images
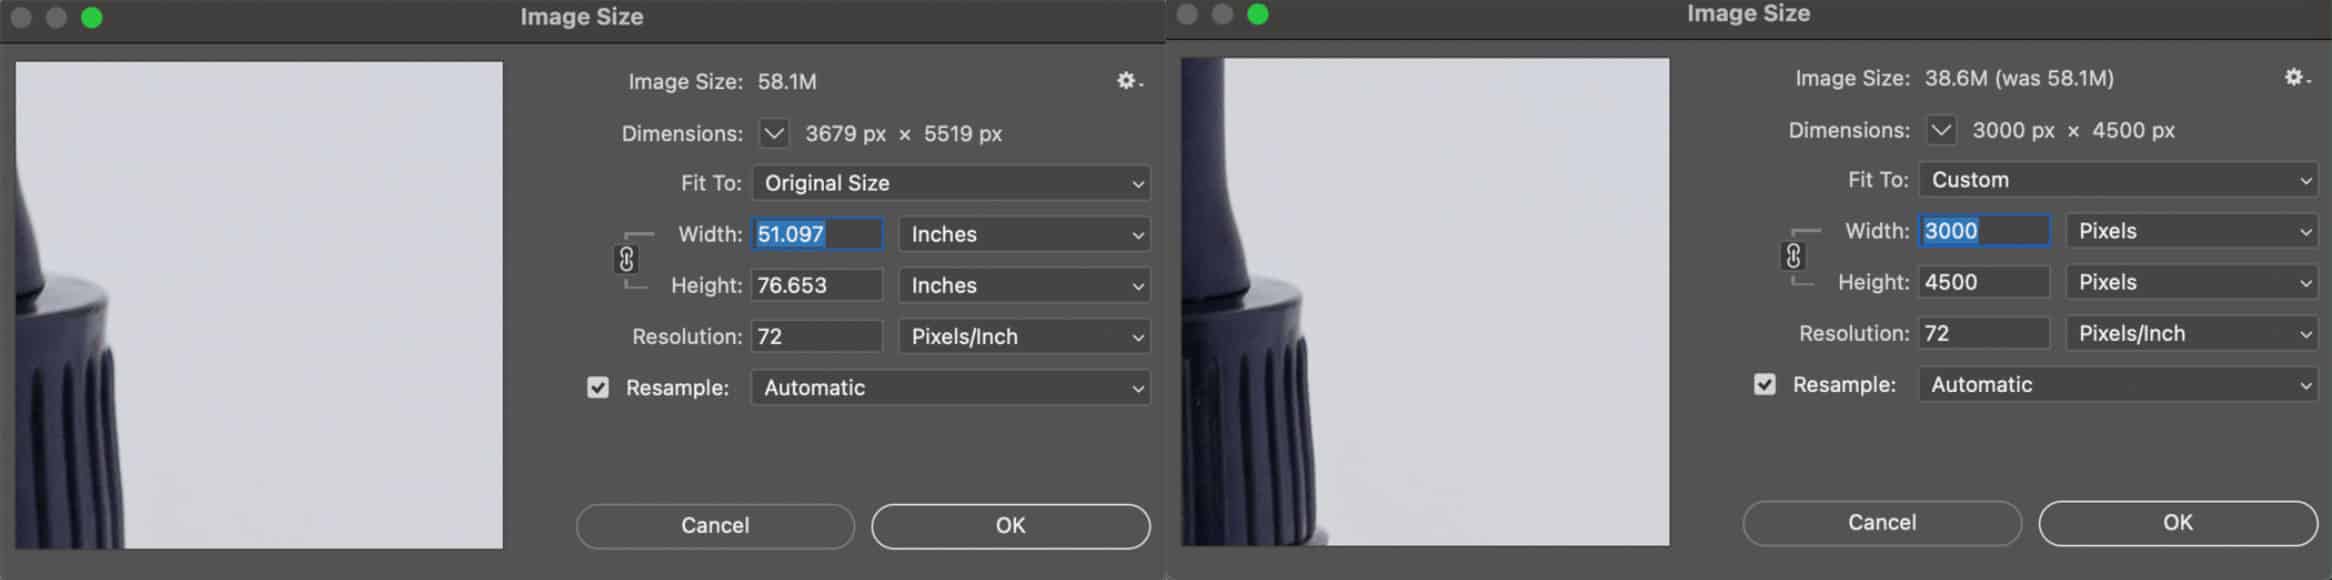
Resizing images prepares them for their intended use, such as on the web or in print. Use best practices to resize without losing quality, ensuring your images look sharp and professional.
What is the Ideal Image Editing Workflow for Portrait Photographers?
The ideal image editing workflow for portrait photographers involves a structured approach to enhance images while maintaining a polished and natural look. The workflow involves a combination of global adjustments, detailed retouching, and output preparation.
1. RAW Import and Backup
Transfer your RAW files from the SD card to a dedicated folder on your computer or external storage, organized by client and session date. Ensure to back up your files to at least one additional location, such as a NAS, external drive, or cloud storage, to prevent data loss.
2. Culling & Selection
Use an advanced and feature-rich photo editing workflow like Photoshop, Lightroom, or an AI-powered tool to sort through large batches of images, selecting the best shots based on sharpness, composition, and expression. Review and select manually to ensure the highest quality images for editing.
3. Basic Adjustments (Global Edits)
- Adjust white balance to ensure natural skin tones.
- Correct exposure, contrast, and tone curve to balance the image.
- Reduce noise and sharpen details to enhance image clarity.
- Crop and straighten to improve composition and framing.
4. Fine-tuning & Retouching
- Use healing brushes and clone tools to remove blemishes, spots, and distractions.
- Perform skin smoothing and texture enhancement, often using frequency separation or custom actions.
- Brighten eyes, whiten teeth, and enhance hair subtly to maintain a natural look.
- Replace or refine backgrounds if necessary using masks and layers.
5. Exporting and Delivery
- Export images in appropriate formats and resolutions for client delivery (high-quality JPEGs for web/digital use, TIFF for prints).
- Organize final exports in dedicated folders for easy access and archival.
How Can You Integrate Backups and Storage Into a Photo Editing Workflow?
You can integrate backups and storage into a photo editing workflow by creating multiple copies of your files, using a combination of local and cloud storage, and implementing an automated backup system. Below, we’ve highlighted details:
1. The 3-2-1 Backup System Rule
Three copies of your data, on two different types of storage media, with one copy stored off-site. Also, try to use local backups, like external hard drives (SSDs are recommended for high speed) or a Network Attached Storage (NAS) system.
2. Implement an Automated Workflow
Import photos from your memory card to your computer, and simultaneously to at least one backup location. You can use software like GoodSync or Carbon Copy Cloner to sync your main storage drive with your backup drive automatically. Try to take advantage of cloud storage to back up your files automatically.
3. Organize Your Files
Add relevant metadata and keywords to your images to improve searchability. Create a logical folder structure based on date, event, or client name.
4. Testing Your Backup System
Test your backup system to ensure that your files can be restored successfully. Simulate a data loss scenario to verify that you can restore your files from backups.
5. Use Specialized Software
Adobe Lightroom, Photoshop, Aftershoot, and other tools are available to integrate backups and storage.
How Do You Incorporate Color Grading Into a Photo Editing Workflow?
You can incorporate color grading into a photo editing workflow by manipulating hues, saturation, and brightness using tools like wheels, curves, and split toning. All these can be done after basic adjustments like white balance and exposure, before final touches like sharpening.
How Do Photographers Manage Large Batches in Their RAW Photo Editing Workflow?
Photographers handle large batches of RAW photo editing workflow utilizing various tools and techniques, including:
- Efficient importing and organization.
- Culling and selection.
- Batch editing and automation.
- Post-processing and output.
What Software is Best for Streamlining a Photo Editing Workflow?
The 6 best software for streamlining a photo editing workflow are: Adobe Photoshop, Lightroom, Capture One, Affinity Photo, GIMP, and Photo Mechanic. Below, we’ve highlighted each software’s key features, pros, and cons so that you can choose the ideal one:
Adobe Photoshop
Adobe Photoshop is a powerful tool for detailed retouching, compositing, and an advanced photo editing workflow. As a raster graphics editor, you get the flexibility of more detailed edits, like retouching, color correction, and applying effects.
Key Features
- Robust catalog system for organizing thousands of images
- Automation via Actions, Scripts, and Batch Processing
- AI-powered tools: Generative Fill, Distraction Removal, and background generation
- Extensive retouching, masking, and selection tools
- 3D editing and Substance 3D Viewer integration
- Wide plugin and preset support
- Automation and batch processing
Lightroom
Lightroom photo editing workflow is another Adobe product that is ideal for organizing, managing, and non-destructive editing of large volumes of photos. The tool is popular for its efficient batch processing, preset capabilities, and seamless integration with other Adobe products.
Key Features
- Robust catalog system for organizing thousands of images
- Presets for consistent edits and faster delivery
- Non-destructive RAW editing, maintaining original files intact
- Cloud sync and mobile app integration
- AI-powered Generative Remove and Lens Blur
Capture One
Another professional photo editing and workflow management software is Capture One, known for its high-quality raw file processing and tethered shooting capabilities. From importing to organizing, editing, and exporting images, this tool is suitable for both studio and professional workflows.
Key Features
- Superior tethering capabilities for studio shoots
- Session-based organization for project-specific workflows
- Advanced color grading and layer-based adjustments
- Optimized for RAW files, especially from high-end cameras
Affinity Photo
Affinity Photo is a one-time purchase alternative to Photoshop, offering many similar features. From editing to retouching photos, create multi-layered compositions, raster paintings, and more in one tool.
Key Features
- Supports PSD files and advanced layer management
- Built-in macro (action) recording for repetitive tasks
- Live editing with minimal performance lag
- Non-subscription model keeps workflow costs low
GIMP
GIMP photo retouching workflow is a free, open-source software with a wide range of features – importing the image, basic adjustments (cropping, and color correction), retouching, healing, and export. Also, the tool supports batch processing for efficient editing.
Key Features
- Supports batch processing with plugins like BIMP
- Layer-based editing with a customizable interface
- Script-Fu for workflow automation and repetitive tasks
Photo Mechanic
Photo Mechanic software is designed for culling, organizing, and metadata management, not editing. As a fast editing workflow tool, you can edit bulk number of images.
Key Features
- Blazing-fast image ingestion and preview
- Metadata tagging, captioning, and renaming tools
- Ideal for press, sports, and event photographers needing rapid selection and export
- Integrates seamlessly with Lightroom, Capture One, and editing software
Other Best Photo Editing Apps and AI-assisted Tools are
- Snapseed: It’s a powerful and free mobile app best for photo editing workflow. Both beginner and professional photographers can use it for its extensive features: adjustments, filters, workflow integration, and selective edits.
- VSCO: It is a photo and video editing app that can be part of a photo editing workflow, including presets, filters, and more advanced adjustments.
- Pixlr: Pixlr is considered a popular photo editing software for its AI-driven tools that automate repetitive photo editing tasks, workflow optimization, and more.
- Aftershoot: Another effective photo editing workflow software is Aftershoot. It offers AI-powered editing features: exposure, white balance, color, cropping, and straightening.
- Evoto: It is an AI-powered photo editing software designed to streamline the photo editing workflow, batch processing, and retouching.
Each tool has unique strengths, catering to different needs and preferences. Photographers can find the best tools to enhance their workflow and achieve stunning results by exploring these options.
What are the Common Mistakes Photographers Make in Their Photo Editing Workflow?
Common mistakes photographers make in their editing workflow are: not shooting in RAW, no workflow planning (from beginning to final result), over-editing, incorrect white balance, poor composition, neglecting to back up work, and skipping lens correction. Below are 7 common mistakes made by photographers in their photo editing workflow:
- Not Shooting in RAW: New photographers sometimes shoot in JPEG-only format and face difficulties switching to the RAW file format. Though JPEG images are compressed versions of RAW files and take less space on a hard drive, RAW shooting offers you higher image quality, recovers details, flexibility, and control during post-processing.
- Editing Without a Workflow Plan: When you edit randomly, without following a structured workflow, you end up with inconsistent results, missed steps, and inefficiency.
- Over-editing: Excessive saturation and vibrance, HDR effects, over-sharpening, unnecessary adjustments (skin smoothing, whitening teeth, or making other unnatural edits), or retouching make images unnatural.
- Incorrect White Balance: Another common mistake made by photographers is incorrect white balance and poor exposure. Incorrect white balance can result in inaccurate colors, whereas poor exposure (overexposed or underexposed) can lead to loss of detail in highlights or shadows, making them difficult to recover.
- Poor Composition and Framing: Cluttered images, off-center subjects, a lack of negative space, or incorrect cropping make photos unprofessional and less visually appealing.
- Not Backing Up Work: When photographers keep photo files only on one drive or memory card, there is a possibility of data loss due to hardware failure or accidental deletion.
- Avoid Lens Correction: Ignoring lens profile corrections for distortion, chromatic aberration, or vignetting reduces image quality and produces unprofessional results.
How Long Should a Typical Photo Editing Workflow Take?
A typical photo editing workflow can take from 10 minutes to several hours per photo, depending on editing complexity, client-specific requirements, and the photographer’s experience. Basic adjustments, like color and exposure, can be done in 5-10 minutes, but complex tasks like retouching can take longer. When it comes to a bulk amount of photo edits, it might take longer than usual. Below, we’ve highlighted a table for the average photo editing workflow time:
| Editing Type | Average Time (Per Image) | Details |
|---|---|---|
| Basic culling & adjustments | 1-3 minutes | Slight exposure, white balance, crop, and contrast adjustments. |
| Standard portrait retouching | 10-20 minutes | Skin retouching, blemish removal, dodge & burn, sharpening. |
| High-end beauty retouching | 30-60+ minutes | Frequency separation, micro-dodge & burn, hair retouching, advanced color grading. |
| Product editing | 10-30 minutes | Clipping paths, background removal, dust removal, color correction, and shadow creation. |
| Composite or creative edits | 1-5 hours+ | Combining multiple images, complex masking, and extensive manipulations. |
| Batch editing for events | Variable (a few hours to days) | Weddings: 400-800 images – 6-20 hours depending on workflow efficiency and preset usage. |
How Should You Organize Files for an Efficient Photo Editing Workflow?
To organize files for an efficient photo editing workflow, you should use a consistent folder structure, clear naming conventions, and metadata tagging. Also, use feature-rich and easy-to-use photo editing software that we’ve mentioned earlier. Below, we’ve highlighted the best practices for organizing files:
1. Folder Structure
- Organize folder by year, month, product, collection, or client-based (i.e., 2025 or “Smith Walter”).
- Try to add keywords (product names, SKUs, colors, or collections), tagging usage rights if you’re working with a photographer or influencers, and add location data for lifestyle shoots or location-based campaigns.
- Subfolders within each year or client folder (i.e., Smith Walter – June 2025).
- File type subfolders within each shoot/project folder (e.g., “RAW,” “Edited,” “Exports”).
2. File Naming Conventions
- Use a consistent, descriptive, and searchable naming convention for all photos. Instead of IMG_321.jpg, use a format like “Smith_Family_001.CR2”.
- Add relevant information, including Date, client name, or a brief description [Product Name]_[Color]_[Angle]_[Size]_[Date], in the filename.
3. Metadata
- Metadata is the behind-the-scenes information with your image, like the data, camera settings, and keywords.
- Allow you to organize large photo libraries or
- Tagging (keywords, captions, or other).
- Rating (rate photos within your editing software to identify quickly).
4. Backups
- 3-2-1 Rule (three copies of your files, on two different types of media, with one copy stored off-site, e.g., cloud storage).
- Regular Backups (e.g., after each shoot or editing session).
5. Photo Management Software
- Lightroom/Photoshop (use the cataloging and organizational features of these programs).
- Dedicated Software (use photo management software, e.g., Capture One, Photo Mechanic for more advanced features).
6. Other Tips
- Cloud Storage (e.g., Dropbox, Google Drive) for easy access and sharing.
- Regularly clean up your files and archive older projects.
- Use version control to manage different edits of the same photo.
How Does Clipping Path Studio Handle a High-Volume Photo Editing Workflow?
Clipping Path Studio handles a high-volume photo editing workflow by utilizing a combination of skilled professionals’ image editing services, efficient processes, and advanced photo editing workflow tools. Here’s how they generally handle it:
1. Experienced Team
They have 150+ dedicated photo editors who handle cutouts by following standard photo editing workflows. This standardization helps reduce errors and ensures consistency across a large volume of images, maintaining high quality and meeting deadlines.
2. Efficient Workflow
- Image Capture and Organization: Suggest shooting in RAW format and organizing images for easy access.
- Culling: Selecting the best images for editing to streamline the process.
- Basic and Detailed Editing: Making necessary adjustments for cropping, white balance, exposure, noise reduction, color correction, and grading.
- Retouching: Addressing imperfections.
- Resizing and Exporting: Preparing images for their intended use.
Professional Photo Post-Processing Workflow at an Affordable Price
Free Trial
3. Capacity for Large Projects
Clipping Path Studio’s photo editors handle bulk orders and complex tasks effectively. Every image is clean, polished, and consistent – excellent value for the money and top quality at the end.
4. Quality Control
Their in-house experienced designers, multiple review steps, and hand-drawn paths – all guarantee client satisfaction. CPS dedicated QC teams (quality control) thoroughly review each edited file to ensure accuracy.
5. Fast Turnaround
Clipping Path Studio is popular for offering fast turnaround time for its image cutouts, advanced retouching, and editing services. Also, you’ll experience smooth communication and handle requests in a top-notch manner.
By leveraging these strategies, Clipping Path Studio’s experts can efficiently manage high-volume workflows, ensuring consistent quality and timely delivery.
