Clothing Photogrpahy is a part of e-commerce product photography. Clothing photography doesn’t have to be complicated. In fact, it’s quite straightforward once you understand it. For all fashion or clothing-related businesses, providing professional-quality product pictures are crucial. After all, what is an e-commerce store without visual attraction? Whether you’re a beginner or a professional, this article has outlined all the steps required for apparel photography.
What you’ll learn in this article
How to Photograph Clothes – Clothing Photography Guide
We will discuss flat-lay and ghost mannequin photography techniques in this article. Additionally, you will learn about how to photograph clothes in general.
Flat-lay photography is a quick and effective way to really make your clothing images pop out. Ghost mannequin photography gives your image a 3D look, helping your clothing stand out.
1. Preparation for Flat Lay and Ghost Mannequin Photography
Before diving straight into the action, some preparation will benefit your final image. The following steps will explain how to prepare your cloth for flat-lay photography and ghost mannequin photography.
Flat Lay Photography
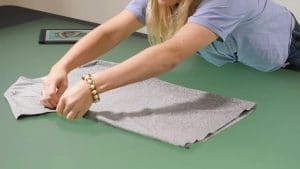
First, let us prepare the cloth itself. Try to ensure that the cloth appears in the most pristine condition possible.
You can steam or iron the cloth to eliminate folds and creases. Do remember to remove any price tags, labels or stickers from the cloth.
It’s preferable to use a lint roller to take off microscopic dust and loose fabric. Lint may not be noticeable to the eye, but it is very clear to the camera!
You can achieve a good image just by laying the cloth. However, for a very realistic look, it’s a good idea to stuff the clothing with tissue or cardboard. This really helps buyers imagine how the clothes will look on them.
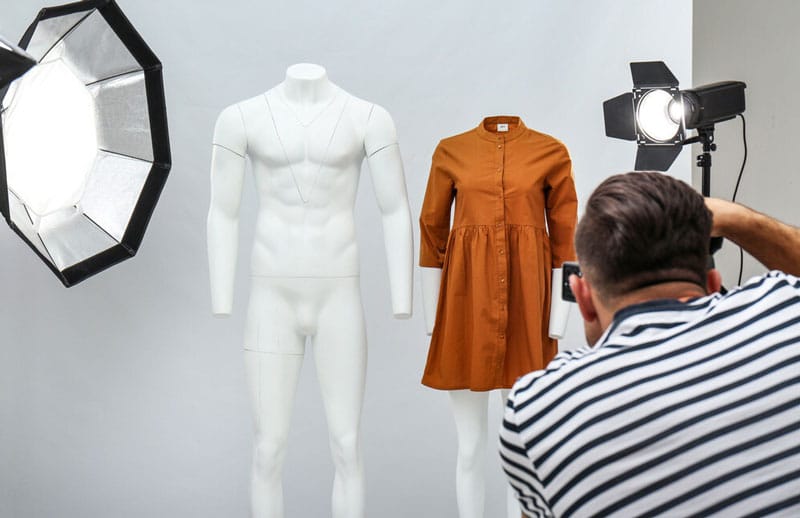
Ghost Mannequin Photography
Also known as invisible mannequin photography, ghost mannequin photography is almost a must-do for clothing businesses. It can be done normally, but for special appeal, you can also do a 360-degree effect with it.
The 360-degree ghost mannequin effect is trendy and hyperrealistic. It provides a 3D feel which attracts young consumers.
Similar to a flat lay, it’s good to ensure that there are no imperfections in the look and fit of the clothing.
A clever trick is to clip from behind the cloth and provide a tight fit from the front.
Some clothing may require stuffing to highlight certain areas, and you can easily do that by inserting tissues inside the mannequin.
Using a fixed zoom for invisible mannequin photography will make your images consistent. Also, try to use a fixed position for your mannequin.
Next, take pictures of the following angles :
- The front side of the clothing dressed normally on the mannequin
- Back side of the clothing, dressed inside out on the mannequin
- All sides of the mannequin rotated from front to back (only for the 360-degree effect)
Tip: Be careful of the clip’s visibility during the rotated shots!
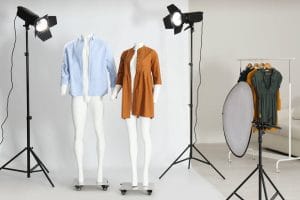
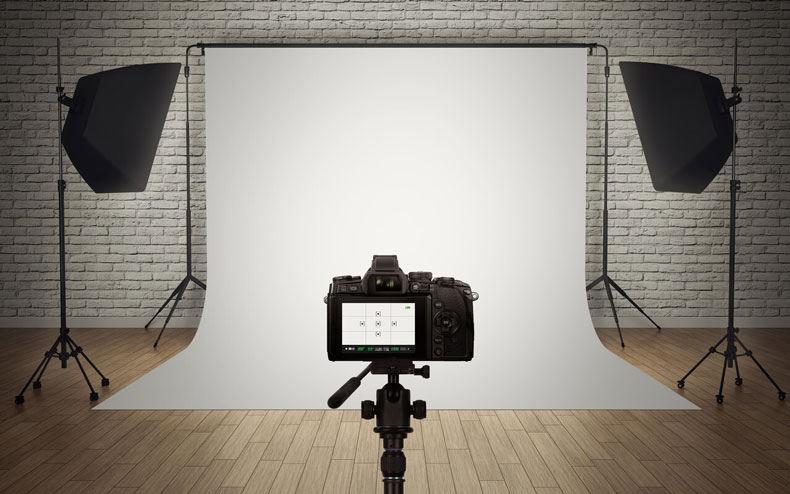
2. Equipment for a Clothing Photography Setting Up
If you set up your equipment the right way, you can proceed without a fancy studio. These are the following pieces of equipment you can use to get a high-quality image with a simple set-up.
Backdrop – Background for Clothes Photography
For both flat-lay and ghost mannequin photography, a backdrop is essential, especially in white. E-commerce clothing or product photography looks best in a white background, as using colors can distract the viewer or take the focus off of the cloth. Flat lay requires you to put the backdrop as flat as possible. You can use white paper, cloth or just the floor.
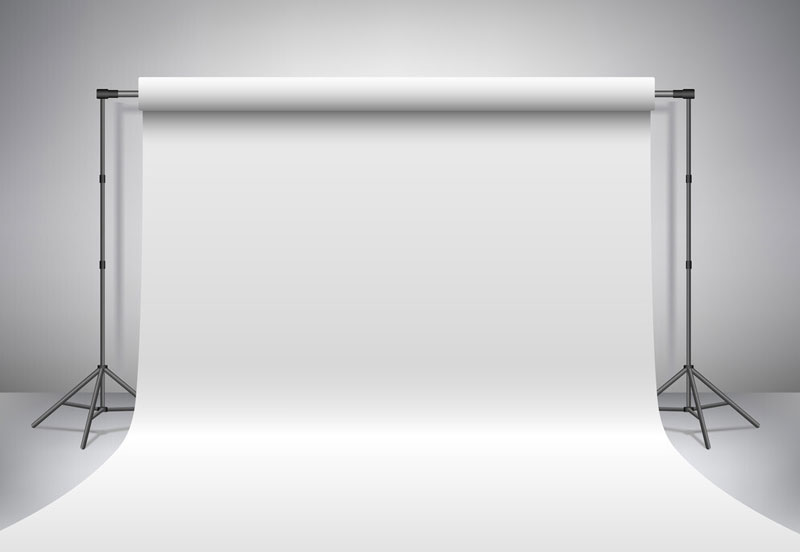
No matter what you use, make sure to lay it on a completely flat surface! That surface can be a large table, the floor, or any other flat surface. For ghost mannequin photography, you need to hang a background in the back. Using a C-stand along with tape works amazingly in positioning the paper.
If c-stands aren’t convenient for you, simply tape your paper to the wall! You can also use seamless paper rolls as a cheaper alternative.
What is the Best Background for Clothing Photography?
A grey background is the best for clothing photography as it has the least contrast with any color. But for very bright-colored clothing or grey clothing, a white background is best.
What is the Size of a Softbox for Clothing Photography?
18” to 24” is the size of a softbox for clothing photography. The general rule is to use a softbox the same size as your cloth. So the larger the cloth, the larger the soft box.
Lighting Setup for Clothing Photography
Lighting your product, whether naturally or artificially, is a must for apparel photography. Having artificial lighting is always preferred as it can both aid and replace natural light. You will need light heads, softboxes, and battery packs. Lighthead is simply the light itself, and for starters, you will be well off with just a “monolight” light head.
In flat-lay apparel photography, you can put the light head or softbox (softboxes diffuse light evenly to your product) directly above the cloth. However, your cloth might have reflective surfaces, and positioning the light directly overhead will produce reflections in the picture.
Thus, positioning the light at an angle will reduce reflection. If possible, placing two identical light sources at two opposite angles will give you the most consistent lighting. For ghost mannequin photography, lights must always be angled. Like a flat lay, if you can place two light sources from opposing 45-degree angles facing the product, you will get the best results.
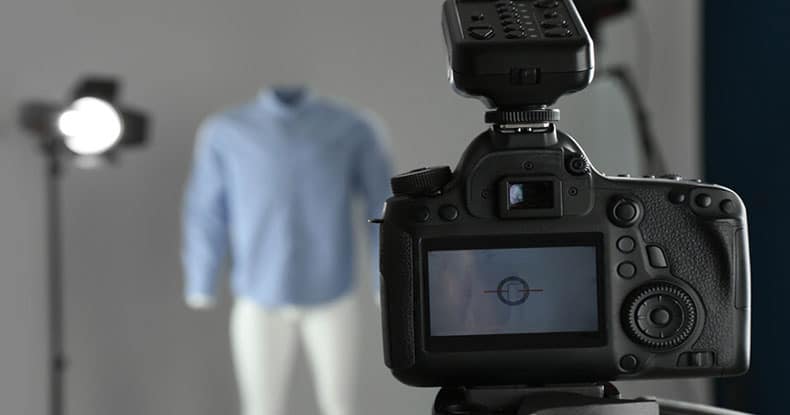
You should mount your camera on a tripod stand, as minor shakes will bring inconsistency in the photos. Even the most inexpensive tripods will do. Position the camera directly facing the product.
Tips:
- To ensure there are no shadows, move your light back and forth or change the light’s power.
- Whichever light you use, ensure that it’s not too bright and wash out the picture!
3. Camera Settings for Clothing Photography
It’s good to adjust the camera and make use of its full potential, resulting in a professional quality image for your clothing store.
1. ISO Setting
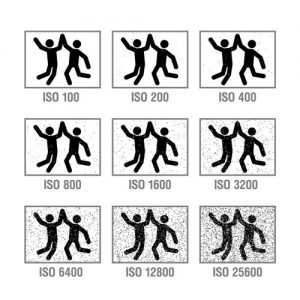
The lowest ISO setting is always better. But depending on the lighting, lowering it too much might provide a dark image. If needed, adjust your lighting but keep the ISO as low as possible.
Make sure you don’t raise the ISO above 600, as a lot of noise and bright patches will appear in the photo if you do.
2. Aperture
Aperture (the setting represented by f/15, f/1.8, etc.), controls the focus of various portions of the image. A higher aperture means more of the photo will be in full focus. An aperture greater than f/11 is preferred as it allows for all portions of the clothing to be in focus, but your mileage may vary.
3. Shutter Speed
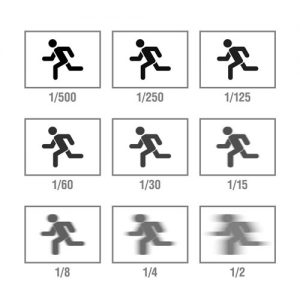
Shutter speed basically controls how fast or slow the camera blinks to capture an image. For still photography like apparel photography, shutter speed is not a major issue as nothing is moving.
You can select the lowest possible shutter speed (the lowest value in the denominator e.g. 1/60 or lower) and capture a great image, as long as the low shutter speed doesn’t blur the picture.
Lower speeds will help capture greater definition, especially since the camera is still on a tripod. If you’re using your hands, then a slightly higher shutter speed may be suitable.
4. White Balance
Often, an image can come out with a bluish or orange tint. This is due to the white balance not being adjusted properly.
Keep selecting different white balance settings until you find the one that is the most neutral and whitish in color.
Usually, the AUTO white balance function in modern cameras does a good job.
5. Color Temperature
Your clothing may look slightly off-colored if the camera’s color temperature settings aren’t calibrated properly.
Typically, there are two color temperatures known as cool and warm temperatures. Warm will provide a slightly yellowish tint, whereas cool will provide a more bluish tint.
Whichever option you choose, make sure you choose the one that does not tint the photo unrealistically.
Tip: Always, always check your camera’s viewfinder or LCD screen to ensure accurate adjustment.
What is the Best Lens for Commercial Clothing Photography?
Zoom lenses and macro lenses are the best lens for commercial clothing Photography. However, standard lenses work fine too.
4. Styling Your Clothing
There are a handful of ways in which you can style your clothing product. For flat-lay photography and ghost mannequin photography, it’s actually quite simple. Stuffing the cloth with materials is almost always done to make the clothing appear realistic. You can take this a step further by using tapes or clips to hold the cloth and provide a good fit. You can also stuff certain parts more and certain parts less to highlight the garments’ features. For example, the hip portion of a top can be tightened more than other portions to make it resemble a human figure.
Make sure you take pictures of both the back and front of the clothing. The audience value stores more which show all the sides of the clothing. Using a differently colored backdrop is a quick way of making the cloth pop out. You can do this to get a specific vibe or look for your garment. However, it’s not advised to do this for e-commerce stores as some consumers can be deterred from colorful backdrops. These are suitable only when you have a specific goal or consumer base in mind.
5. Shoot
Time to shoot! Start by shooting from multiple angles to check which angle suits you best. Experiment by zooming in and out from these angles. However, never use digital zoom! Always use manual lens zoom, because digital zoom reduces image quality.
Close shot
Some close-ups of certain parts of your clothing can really make your store stand out. Taking close-ups of the neck, collars, cufflinks, etc. boosts credibility in your clothing. It shows the viewer that you are proud of highlighting each detail of your clothing. If your clothing has details, close shots are a must-do. If it’s difficult to lower your tripod very close to the clothing, you can just use your hands. Ensure you adjust the shutter speed while taking photos with your hands to avoid blurring.
Full shot
A full shot is essentially a picture of the entire clothing in one frame. Full shots work similarly to close shots, as they highlight multiple features of the cloth. There’s no doubt that full shots are needed for all apparel photography.
Tip: To avoid shadowing in close shots, move your light to different spots where it would produce fewer shadows for the specific angle that you’ll be shooting.
What are the Best Ways to Photograph Clothing?
Clothing photography can be done in several ways. The most popular forms of photography are:
1. Ghost mannequin photography: The cloth is dressed on the mannequin and through photography post-production processes, the mannequin is removed. This makes the clothes look more realistic to the customer.
2. Flat-lay photography: The clothing is laid on the surface and stuffed with materials to resemble a human body. This procedure is much easier.
How Much Do Photographers Charge for Photographing Clothes?
Photographers charge for photographing clothes around $50 per photoshoot to $500 per photoshoot. The price varies depending on your needs, location, and clothing.
Why Need Post-production After Clothing Photography
Finally, your photoshoot is complete. But this isn’t the end. Outsourcing image editing services will help you get the best out of your images. Photography post-production is very important for all images to look professional. It helps you take your clothing images to the next level by removing all minor inconsistencies that naturally occur in a photo. These minor inconsistencies can really undermine your brand’s reputation. If high quality post-production isn’t feasible, even the most minimalistic post-production is going to be better than no processing at all.
What is the Best Clothing Photography Post-Production Process?
The post-production processes outlined below make a huge difference to your final image. These are a must-do for any kind of apparel photography.
1. Cropping and Alignment
First, align and crop your photos properly. Make sure all the images are aligned centrally, with the edges in line with one another. Crop these images according to your website’s needs or preferences.
Creating guidelines in a Photoshop template will greatly boost alignment and cropping speed.
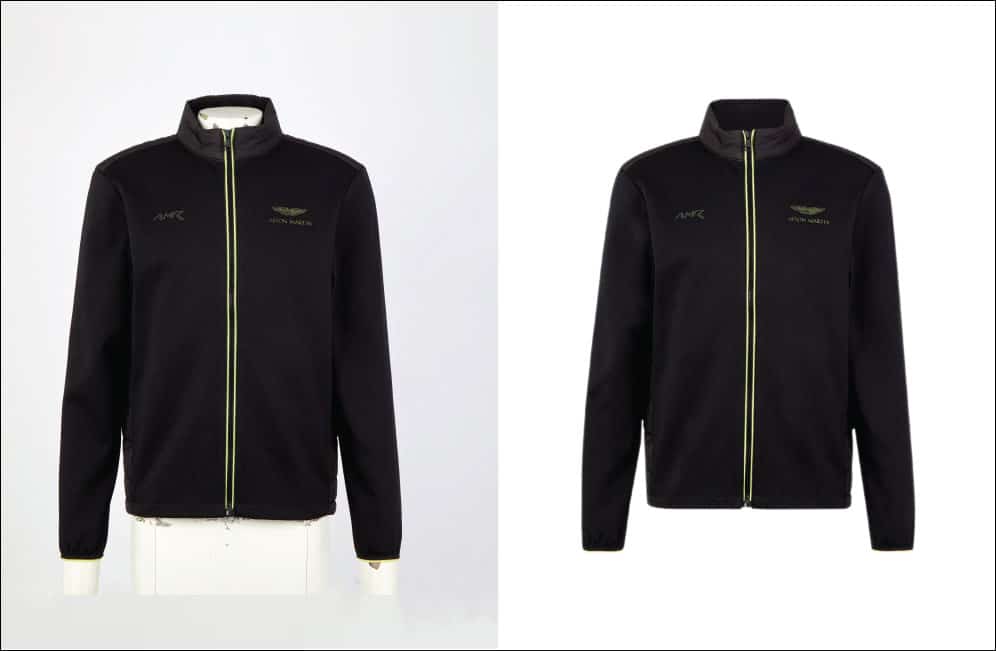
2. Background Removal
Your image background may contain inconsistencies like shadowing or blurring. This can be edited in post-production or you can just completely remove the image background.
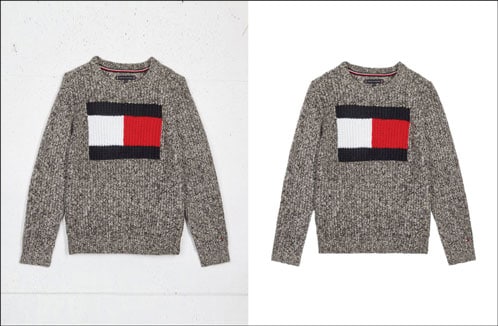
Removing the image background will allow you to use your clothing photo more flexibly on your webpage.
3. Color Correction & Retouching
Photo color correction is the most critical post-production stage. Whether you use Photoshop or any other software, you need to learn and utilize its color correction tools. White balance, exposure, color tints, etc. may need to be adjusted in order to represent clothing accuracy. You should adjust the color to make the clothing look as realistic as possible. Retouching is essentially making such modifications to individual portions of an image. There might be just one small portion of the image where the light appeared darker. Or a minor shadow/crease appeared on the clothing.
You might feel it’s not an issue, but it really affects viewership. You can get retouching done by yourself through Photoshop or just outsource Photoshop’s retouching service else to do it for you.
4. Ghost Mannequin Effect
To achieve the ghost mannequin effect, you need to remove the background of the images using software like Photoshop. Afterward, place the clothing’s front side on top of the backside. That’s it! You have achieved the ghost mannequin / invisible mannequin effect!
For the 3D effect, you simply erase the mannequin as well as the background from the rotated shots. Then you just place these rotated images alongside the front and back images in your e-commerce website, giving a rotatable 3D vibe. You can outsource ghost mannequin services to eliminate bottlenecks. A professional outsourced photo editing service should at a minimum deliver images within 24 hours.
