
Food creates a mood. If a mouthwatering dish is placed in front of you, you’ll forget whatever you’re feeling right now. However, when just logging on to social media platforms like Instagram, Pinterest, or even YouTube, a lot of food-related content appears in the newsfeeds and tempts you. It’s only created through mouthwatering food photography or videography.
Even you know, only mouthwatering food photography will increase audience interaction, whether you are a food photographer or make video content about food vlogs.
To take appealing food photos, all you really need is good lighting and the right angle. The perfect lighting can convey a concept about food. So, the right choice of lighting setup is crucial; don’t think that only your advanced equipment can produce fantastic food photos, but a mix of them can.
Keep scrolling down! You will get amazing tips on food photography lighting setup. Lastly, some bonus tips are waiting for you to give your food a mood.
Let’s dive in.
What you’ll learn in this article
Why is Light Setup Essential for Food Photography?
A perfect light setup in photography captures clarity, textures, atmosphere, and emotions beautifully bloomed in the finished food photographs.
You can take better shots by heeding to how light reflects off the angles and curves of your subject, as well as which parts of the subject are illuminated and which are in darkness. The more efficiently you’re using light, the more beautifully composed your subjects are.
On Instagram, there are 300 million food photos posted. The University of Michigan estimates that compared to non-food photos, food photos generate 30% more engagement.
You will now fully grasp how important, appealing food photos are to you after looking at these statistics. Thus, you need a camera with the perfect lens for food photography, a backdrop, some props, and a lighting setup that combines artificial and natural light when photographing a mouthwatering dish.
Use Proper Studio Lights for Food Photography
Food photography is a skill that you must master if you want to win over your audience’s hearts and stomachs. The lighting is, therefore, a concerning aspect of it.
In photography, the two primary types of light are used. These are natural light and artificial, or studio light. The luminosity of both lights has a significant effect on the subject. However, studio lighting is more adaptable, while natural light is not.

Therefore, using studio lighting when photographing food can be a wise decision. Yes, there are times when you can’t take photos the way you think, so keep trying different angles. However, let’s find more benefits of the best studio lighting for food photography, such as
Take Precise Shots
Precision in taking photos is undoubtedly crucial; so is food photography. If you are just a beginner in food photography or running a video blog, unpolished shots could turn away viewers, costing you a huge loss.
Remember that lighting can determine an angle and the right details. The more precisely your food photographs are clicked, the higher your video or photograph conversion rate.
Create an Innovative Shot
Every field can experience outstanding effects from innovation. So there, we have several shots that can be wonderfully executed through a proper studio lighting setup. Create creative shots, like adding some seasonings to foods. We have some ideas for lighting setup to make your shots fantastic.
- Dramatic shots
The contrast between light and dark helps food photographers create dramatic shots. To cast a shadow on the side edge, place a reflector on the side of the light opposite it. Thus, your food image becomes more dramatic.
- Capture splashy shots
Splashes of liquid beverages are the most popular in food photography. It gives your photo a more lively feel. To get real liquid splashy shots, there needs to be constant light.
- Cool deconstructionshots
Deconstruction shots are comparatively a new concept in food photography. It produces it by dicing your food or putting its ingredients on display. Using a backlight or sidelight with a light diffuser softbox will give your dish a more realistic feel, add some shadows, and highlight the main subject.
- Reflective shots
Adding reflections is a great way to make your food photos better than ever. Use a glassy surface and let the light fall at the desired angle to get the right reflection.
- Symmetrical shots
Symmetrical shots have a particular allure that draws your audience to your photographs. The food photography for this sort of flat-lay style must be up to the mark, so an overhead strobe light with a softbox is used to illuminate every angle.
- Action shots
Action shots essentially freeze the motion, increasing your food photography’s dynamic and realism. You must be knowledgeable about the shutter speed, the deal-breaking angle, and the ideal lighting setup. Natural light is best for it, but if it’s too bright, you can use continuous lighting with a softbox.
Click Photos Anywhere and Anytime
The best times to use natural light are only during the summer or on cloudy days. But you have good control over the studio lights but limited control over the weather.
However, studio lights are not dependent on the seasons; you can use them anywhere, day or night. Food photographers probably use studio light more frequently than sunlight. You can develop more flexible ideas with studio lighting.
The 7 Best Lighting for Food Photography
Lighting is the most powerful photographic compositional element; it paints the shot you click. Most people will leave your site if the food images are not correctly painted.
Whether or not you have an idea about an effective lighting setup, you must go through it here so that you recognize most of the things you never considered previously. For food photography, you should understand how light works and sets.
1. Natural Light-Authentic Shots
When feasible, use natural lighting in food photography. It improves the accuracy and color texture of your photographs, so you can produce really drool-worthy photos.
I agree that it is difficult to cope with, yet it allows you to get greater genuineness. If you discover that the natural or window lighting is too intense, use a diffuser or reflector with the light and a translucent cloth on it.

A darkish backdrop or materials that may absorb light is another technique to employ natural light to enhance your photo. Be mindful of experimenting with the lighting to produce the most appealing food presentation for the viewers’ eyes.
2. Ring Light – Bright Front Lighting
Why are there so many food blogs on Instagram with bright, perfectly lit photos?
It is only because of the ring light!
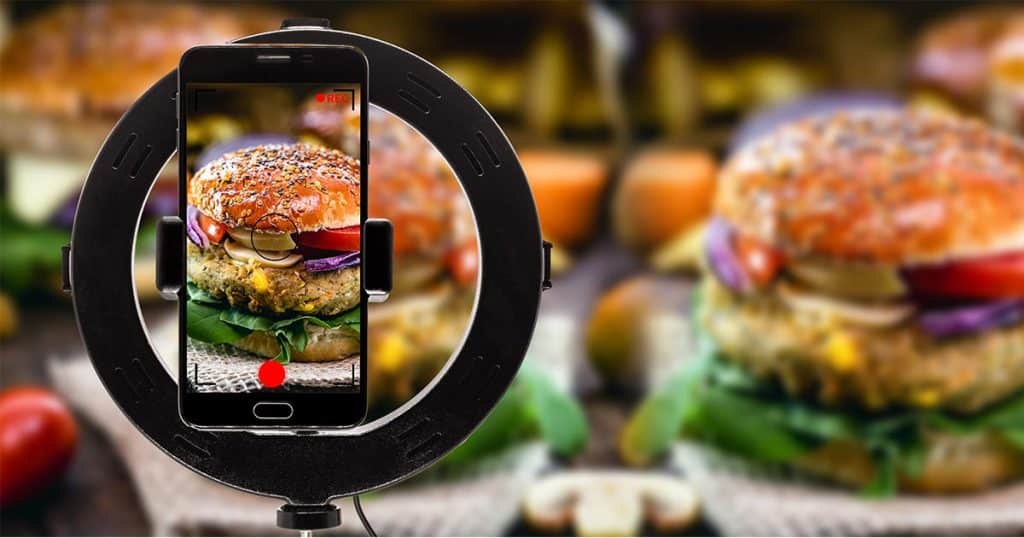
It is the most commonly chosen source of handy lighting and an alternative source of sunlight. Since you can carry it with you and take pictures from wherever you feel appropriate, it is more adaptable than that. If you’re just starting, this is the better choice.
The focal point of the image is illuminated by a powerful frontal ring light that is mounted to the tripod. If you want to get flattering pictures, you can easily change the direction. This goose-neck lighting setup creates a fascinating frontal light on the main subject. Keep the right distance between the light and the table as well. Some factors you should know about if using it-
- A brighter light that reflects off the camera lens will cast more shadows, defeating the purpose of creating glare. Set the ring light’s reflection as well as the location of the light.
- Rustic or clean background for food photography is preferable if you’re using a ring light. But it’s not hard and fast rules.
- Angles change the mood of the food photographs. The ring light will evenly disperse light around an object, making it simpler to see where the shadows are hidden. Use a bounce card with a ring light to brighten the edges of shadows that reflect light to add fill light.
3. Overhead Light – Moody Shots
What can lead you to dramatic and mysterious images while surfing the web? Only the overhead lighting setups cause it to happen!
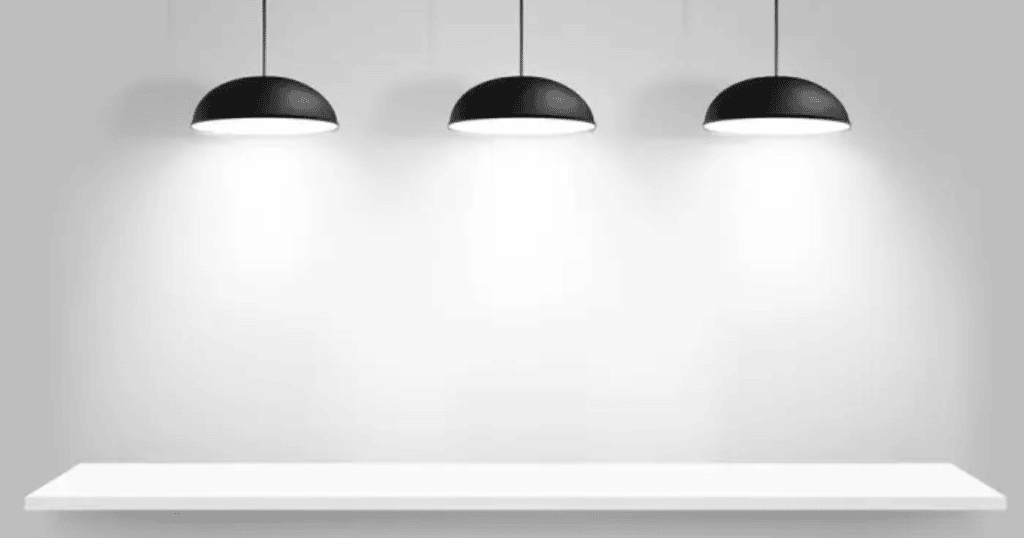
The overhead lighting setup is a style of lighting where the light comes from above and perfectly illuminates your entire table. However, some shadows are cast on the edges, giving it a dramatic appearance. Sometimes In photographs, overhead lights can occasionally produce a harsh reflection, but you can soften the light by adding a softbox.
If you click food photos on your menu or post them on your social media profile, your photographs of food dishes could be a deal-breaker! Because the whole social media, food photographs are spread whether posted on food blogs or to run a campaign for your restaurant. The flat images look so enticing to the eyes of consumers through his lighting setup.
4. Direct Front Light (One Light)
Having artificial lighting will allow you to be a little more versatile. One light source can also be the best option for enhancing your food products’ stand-out to the audience.
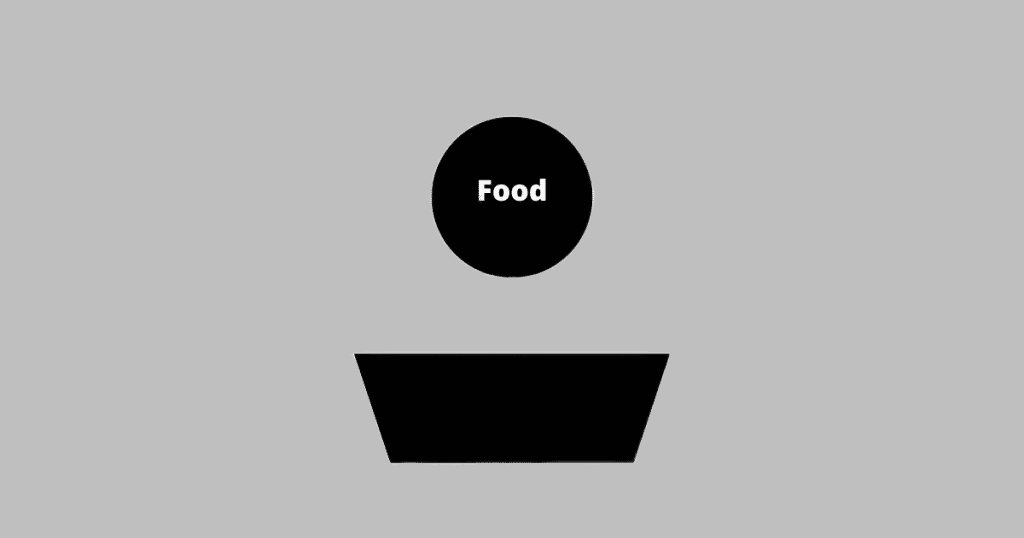
Set up a single light source with an umbrella 45 degrees away from your dish so that the light is uniformly soft and diffused. Just place the camera in front of the item. You can use a tripod to stabilize your camera.
If you intend to use this light as a backlight, the picture has to be dramatic. Considering that backlighting is a skillful technique for taking mouthwatering food photos. Avoid positioning your dish too close to the background if you want to take vertical pictures.
Otherwise, the edge might cast some shadows. However, this setup won’t work for you if your product is on a reflective background.
5. Even Light Setup for Reflective Products (Two Lights)
When illuminated in the food images, it’s really hard to light the core part of the images evenly. With its harsh reflections, one light casts more shadows when used alone. In order to get the main subject evenly lit, you can use two lights. The two lights can be adjusted precisely in areas where a single light produces a hot spot and is slightly inadequate for illumination.

- The diffuser helps even more and is 45 degrees away from the camera, but you can also use reflectors or softboxes to soften your light if it is a reflective object.
- The main light can be pointed toward the table’s back or the extreme left edge. Place the fill light wherever you put the reflector. Set your fill light to less power than your main light.
- The dark or matte tabletop and the distance to your main subject produce balanced food images.
This arrangement ensures that dishes are distributed more evenly. The steps and elements in this process can increase the viewer appeal of your food photography.
6. The Triangle Setup (Three Lights)
The precise details of your tabletop dish setting with some beautiful props can be beautifully captured with a triangle lighting setup.
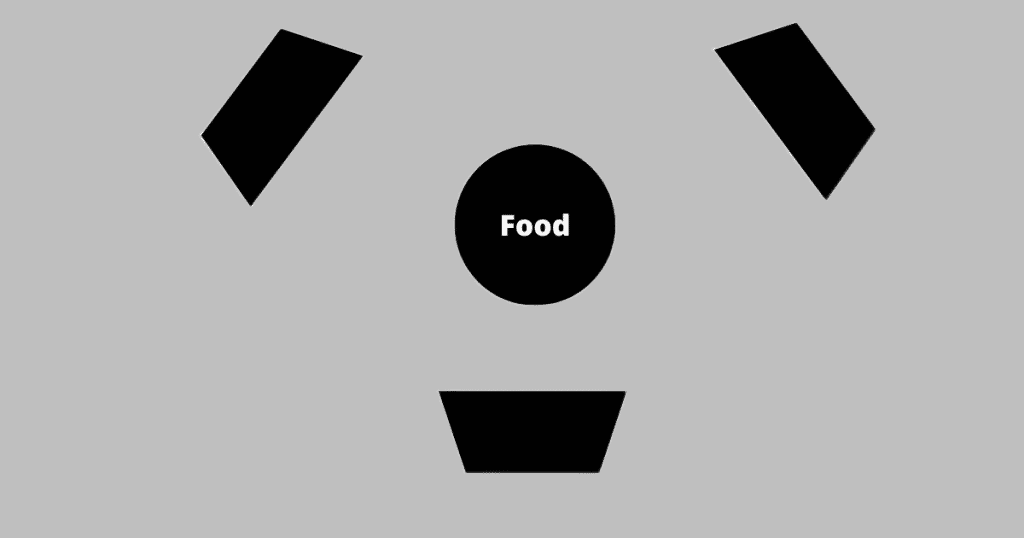
When you place the main subject fully covered with the triangle lighting setup, it lights up from all sides evenly. But sometimes, the harsh lighting can create a reflection, so your products might look very flat.
There is another method to erect this triangular structure. You should move them into the proper place while installing the light. Place the primary light 45 degrees to the right and fill the light to the left with the same amount, then backlight behind the subject to create amazing and dramatic food shots. As a result, you must alter the lighting based on the key light, fill light, and backlight.
7. The Separation Setup
What do you feel if your background is disturbed? You must make a few adjustments to your food photography in order to illuminate the background and convey a moody atmosphere.

If you’re using three lights for the separation setup, you should set up the lighting so that there are two lights facing different directions and one light facing the main subject, creating a V-shape. You can add a few subtle shadows to your food photography to make the images pop. To take minimalistic photos, you can also add some reflectors and some fill light from a flashlight.
You can also read: What are the Best Light Boxes for Food Photography?
The Top 5 Brands for Food Photography Lighting
Want to master the art of producing jaw-dropping food photography? These lighting kits can help you go from being a beginner to being a professional food photographer. We can help you choose from among the many top-notch gadgets out there.
Neewer
Neewer’s professional food photography lighting setup can elevate your food photography skills. If you’re new to vlogging or snapping photos, it might be preferable to use this lighting setup when making a vlog for your food review.
You can find 210cm foldable light stands in this kit, along with 60×60 cm softboxes with CFL lights. If you’re a food photographer or YouTube food vlogger, a portable, simple-to-use LED bulb lighting setup can produce scrumptious photos that improve the credibility of your brand with customers.
Godox
The Godox strobe studio flashlight kit provides a powerful flash of light similar to that produced by artificial on-camera light. On the other hand, a strobe flash produces a much shorter and brighter burst of light. They go by the name “monolights” and have a full power output of 100 to 1,000 watts with a quick recycling time.
In this kit, you can get an FT-16 trigger to control the flash power and a reflector umbrella, two 50x70cm LED panel softboxes with light stands, a Draw-bar, and 3 types of barn doors. Your food actionable shots will be greatly improved with this kit.
For professionals, this straightforward off-camera product photoshoot lighting kit has many possibilities. It does not just create the best food images; it can also do wonderful product images and portraits.
Fositan
Your excellent photography will improve and reach a higher level with the help of the Foistan lighting kit. This kit includes 11 bulbs, 3 light stands with sandbags, 10 socket heads, and 10 white diffusers.
Even if you’re just starting, this extensive kit turns you into a professional photographer. Making the most creative, organic, and even ideal shots with it. It easily fits into your luggage whenever you travel. It is portable and equipped with a sizable light setup that can help you get the shots you want.
Travor
Travor lighting setup kits must be the best option for food vloggers. This kit gives you a 150W super bright LED continuous light option with a barn door and a softbox. You can use this continuous light as side lighting or as a front light that gives many of the details about the food.
However, it produces a dramatic effect when used as a backlight on food products like beverages. Its dimming adjustments are simple to use and do a great job. Additionally, using this, you can produce creative portrait photography.
Linco
The photography studio lighting kit from Lincostore might click on your tabletop in a remarkable way. Two mini cirrus headlights and stands equipped with 5500k LED light bulbs, a 15″ Morning Glory softbox, and a diffuser are included in this kit.
This portable kit allows you to change the direction in which you want to click easily. The subject can be evenly illuminated by a set of combo lights that are simple to assemble, lightweight, and insanely bright.
With its affordability and flexibility, this setup must be your best option if you want to take the best food photos for your vlog, restaurant menu, or even an online meeting.
Dramatic Tips to Make Your Food Photography Perfect
A food photographer needs to have a strong understanding of food presentation in addition to a keen sense of lighting and exposure. One of the most important elements of the entire food photography subgenre is food presentation.
You should adopt a variety of strategies to make your food seem as appealing as possible. It’s a great way to divert more audiences towards your clicked photographs. There are some queries you need to figure out. These are-
- What’s the theme of photography?
- How is it prepared?
- Does it plate the fake ingredients or create a fresh vibe?
- Which props work better with it?
You’ll also need to take some factors into account after discovering the answers to the aforementioned questions. Here are a few quick tips to help you take better pictures of food.
Play Around with Different Angles
First and foremost, for compositional factors, you need to think of the angle. In food photography, various angles add versatility.
The most common angle is directly above the food, but depending on its size, shape, and height, you can adjust the angle to produce Instagram-worthy food photos that will make people salivate for your food vlogging wall or your restaurant’s menu.
When photographed from the top, some dishes appear stunning, while others are flat. You can use props, cutlery, or additional dishes to surround the main subject. Therefore, you must exercise caution when using colorful props in place of neutral ones because they may detract from the main subject.
For example, if you want to highlight the cheesy jumbo burger, you need to click it vertically to define its layer with dropped cheese.
Food Must be of Fresh and Colorful Textures
Playing with colors and textures must be a great food photography tip. By bringing a sense of texture and creating moods that are earthy and rustic, it enhances the quality of photographs.
Brightly colored fruits and vegetables are better for visualizing than monotonous meals. If the colored things are not fresh, you can refresh them with ice water. Leafy greens quickly wilt; utilize these strategies to prepare additional greens.
Make Use of Negative Space
Negative space in photography might allow the viewer’s eye to pause and focus on the key topic.
Maintain the placement of the most crucial compositional components, i.e., the food, along these lines or at the intersections of the grid’s thirds.
The rule of thirds can immediately improve all of your photos. In photography, the theory of negative space is intimately linked to the rule of thirds. In such a situation, the major point focuses on the important issues, while the second contains less detail and the third is quite empty.
Tell a Tale with Your Hero Elements
Food is highly subjective and personal. If you want to convey a story with your images, you need to grasp your camera’s aperture, shutter speed, and ISO settings. These three pillars are inactive in order to take great food shots without the need for artificial lighting.
Focus on the hero aspect before capturing delicious photographs, and see if you can utilize any props to enhance its appearance to the viewers. But don’t make such a mess of your photos that it draws attention away from the hero element. So, before you start telling a tale with your food images, you should be well-versed in food style.
Follow the Food Trend
Nowadays, food trends have become a feast for the eyes. Following these trends can create a storm on social media sites, especially Instagram. The proper lighting setups are required to make delectable images, such as -overhead shots, ingredients at stake, building a tale, monochromatic craze, and many more food porn trends.
Above the picture you look at, this tortilla wrap recipe has become the most trending food trend on the internet in 2021, even if it is still now. On Instagram and TikTok, the recipes are frequently aware of trends and may help forecast wider business trends.
If you find something popular that appears exceptionally attractive, put your twist on it and capture it accurately with the best use of light.
FAQ’s (Frequently Asked Questions)
Why is food photography so hard?
Every genre of photography is challenging. But because food deteriorates so quickly in front of the camera, food photography can also be challenging to capture accurately. A short while later, when you remove some icy items from the freezer, you will notice that they have begun to melt. You’ll need to get the perfect setup and click it as quickly as possible.
Are LED lights good for food photography?
Without a doubt, LED lighting is ideal for food photographers as it provides excellent continuous lighting. When making still images and videos, it is the best choice.
Why do professional food photographers use backlighting?
Backlighting is positioned so that the food subject can be attractively highlighted. The majority of experienced food photographers use it because it also minimizes harsh reflections and shadows.
What color of light is best for food photography?
For the best food photography, use warm light between 2700k and 3000k; this color temperature range is ideal for surrounding spaces.
Is a ring light good for food photography?
Unquestionably, it enhances the subject with even, incredibly bright lighting and nearly eliminates the shadows. The ring light has a gooseneck that allows you to direct the light directly to your subject on the table.
Which is the best background for food photography?
The food photography background may be either rustic or clean. However, you should consider that both extremes of the range make the observer uneasy. You must strike the right balance between the two.
Final Thoughts
Creating a food visualization would extend the cultural knowledge and appreciation for food. What type of food photography lighting setup can actually create the most effective visuals for you?
A lot of food photography involves some sort of experimentation. Different shots require different lighting. You can encourage viewers to interact with your products by experimenting with studio lighting for various lighting setups and taking jaw-dropping pictures.
The factors stated above might help you in your quest for food photography. However, things aren’t always as they appear. Give yourself enough time to establish yourself as a reputable food blogger or photographer.
But, don’t forget to photoshop your food images to make them more appealing to your audience. Clipping Path Studio offers a number of services that may assist you in developing striking food photographs in a short period of time.
