
Multiple clipping path is an advanced photo editing technique that uses the pen tool to isolate different elements within the same image to further edit, recolor, add shadows, or perform other retouching work. A multi-clipping path is useful not only for representing product listings but also for enhancing overall aesthetics. It is used to create product catalogs, combine images in a composite, remove unwanted elements, and so on.
There are 4 different types of multiple clipping path services: basic, simple, medium, and complex. Tools that are used to clip paths include the Photoshop pen tool, direct selection, etc. This technique is used in different industries: e-commerce, fashion, real estate, photography, etc.
The cost of multiple clipping in New York, USA, ranges from $2 to $10 per image among the professional clipping path agencies. Multiple clipping services ensure image quality and showcase the product’s variations in one image to entice your target audience.
What is Multiple Clipping Path?
A multiple clipping path is a photo editing technique to create additional paths within the product or shot to isolate multiple elements. The Photoshop pen tool is used to create image clipping or deep etching.
After applying multiple clipping paths, a photo editor can apply individual editing and work on specific areas/objects within the same image instead of editing the entire image. For example, correcting the color of a garment item, showcasing product variations by changing colors, and so on. Multipaths are used in e-commerce for product photography, fashion, jewelry, and other products to ensure high-quality, professional-looking images for online stores.
What Options Does Multiple Clipping Path Allow?
Multiple clipping path allows for applying multiple fill effects, creating multiple layers, backdrop removal, and image manipulation.
Apply Multiple Fill Effects
Multiple fill effect is a photo editing technique that involves applying multiple fill colors, patterns, or textures to different product sections. Product prototyping (3D models or mockups), home decor & furniture, apparel & fashion industries use this technique for product customization, mockups, and others. Different editing techniques are:
- Applying different colors to separate product parts.
- Adding textures (e.g., fabric patterns, metal shine).
- Enhancing shadow and lighting effects to create depth.
Create Multiple Image Layers
Advertising & marketing agencies (promotional content with editable layers), gaming & animation, photography & retouching studios, industry use multiple clippings to separate different image elements into layers. The process allows advanced editing and customization for marketing or advertising needs. Different editing techniques are:
- Creating individual layers for product parts.
- Enabling separate adjustments for each layer.
- Facilitating 3D rendering or animated effects.
Backdrop Removal With Multiple Clipping Paths
The background removal technique extracts a subject from a busy or distracting background while keeping individual product parts intact. E-commerce & online retail, real estate & architecture, and food photography mostly use multiple clipart to edit out the background for the following reasons.
- Separate product parts for independent background removal.
- Refine edges and shadows for a natural look.
- Create a transparent or white background for online listings.
Image Manipulation With Multiple Clipping Paths
Image manipulation allows for advanced modifications, like combining multiple images, reshaping objects, or enhancing product aesthetics. Advertising & creative design, fashion & beauty, product photography use clipping path with the following image manipulation techniques.
- Adding or removing elements from an image.
- Creating composites by merging multiple images.
- Reshaping or retouching parts of a product.
What are the Different Types of Multiple Clipping Path Services?
There are 4 different types of multi-clipping path services: basic, simple, medium, and complex. Depending on multiple subjects or complex elements, allowing for precise editing and manipulation of individual parts, each category serves a specific purpose with slight differences.
1. Basic Multiple Clipping Path
Basic multi-clipping paths involve isolating a single outline or minimal curves. Mainly, it is applied to several objects with straight, well-defined, or smooth edges in the interior or exterior. For example:
- Jewelry with separate paths for the chain
- Sunglasses or eyeglasses
- Electronics with screens
- Modular desks and tables
- Smartwatches
- Simple objects of two or three colors
Industries that use basic multiple clipping paths: Advertising & marketing, graphic design, fashion & jewelry, e-commerce, and automotive.
2. Simple Multiple Clipping Path
Simple multiple clipping paths are applied for objects with exteriors and interiors composed of a few straight, curved edges, multiple color variations, and basic textures. This editing is more complex than basic clipping. For example,
- A small grouping of similar, solid-color garments, such as jackets or folded dress shirts.
- Stacks of solid color towels, sheets, or other linens in different colors.
- Groupings of dishes, mugs, or cutlery.
- Single, simple objects with more than two “holes,” such as claw hair clips or tire rims.
Industries that use simple multiple clipping paths: Fashion, home appliances, jewelry & accessories.
3. Medium Multiple Clipping Path
Medium multiple clipping paths work for complex paths with holes, gaps, or layered sections. Here, Photoshop experts apply different editing techniques, such as selective shadow or highlight adjustments, compound paths for overlapping areas, and so on. Some product examples are:
- Models wearing multiple pieces, such as pants, shirts, and accessories
- Complex, isolated garments such as fully customizable shoes or jacket/shirt/tie combinations
- Garments with complicated clasps or ties
Industries that use medium multiple clipping paths: Furniture, jewelry, luxury fashion items like fur coats, embroidered dresses, and so on.
4. Complex Multiple Clipping Path
Complex multiple clipping paths need to be used in conjunction with other techniques to isolate objects smoothly and perfectly. Some editing techniques are masking for transparency, the advanced pen tool to refine edges for precision, and so on. For example,
- Furniture with multiple cut-outs, such as chairs with a mesh backing
- Complicated jewellery with detailed links or multiple gemstones
- A grouping of multiple, dissimilar objects
- A grouping of multiple people
- Images that have more than one furry or fuzzy-edged product
- Complex objects with multiple “holes,” such as bicycles or pet crates
Industries that use complex multiple clipping paths: Automobile & machinery, apparel, luxury products, and so on.
Why is Multiple Clipping Path Important for E-commerce Photos?
A multiple clipping path is important for e-commerce photos because it isolates different elements of an image in the same background, enables more control, and ensures professional image editing quality. According to Etsy’s buyer survey, 90% of Etsy shoppers are influenced by the quality of product images when making a purchase decision. Other impacts of multiple clipping for e-commerce are as follows.
- To create precise background removal & replacement: Multiple clipping paths isolate the product from its background to create a clean, distraction-free look. It also enables seamless background replacement, making images adaptable to various platforms (Amazon, eBay, Shopify, etc.).
- To apply color correction & variations: Adjust individual product parts for accurate color representation is possible with multiple clipping paths. It helps display different color options within the same product and ensures brand color consistency.
- To enhance product details and textures: Online marketers and e-commerce sellers use multiple clipping techniques for different promotional campaigns to create product mockups, lifestyle images, and ads.
- To increase customer trust & engagement: Product photographers use multiple clipping to create professional, high-resolution images that build credibility and enhance customer confidence, leading to higher conversion rates.
- To improve mobile & web display quality: Multiple path ensures images are optimized for different screen sizes and resolutions. Also, this editing technique helps maintain clarity, sharpness, and detail on all devices.
How to Create Multiple Clipping Paths in Photoshop?
To create multiple clipping paths in Photoshop, use the Photoshop Pen tool to draw paths around each subject, create a separate path for each, load them as selections, and then create clipping masks for each layer. Here’s a detailed step-by-step guide to creating multiple paths in Photoshop.
Step 1: Open the Image in Photoshop
Open the edited image file in Photoshop – simply drag and drop the file onto Photoshop. You can create a new document by going to File > New and choosing the desired settings. Alternatively, you can get access to the New File settings.
Step 2: Access the Pen Tool
Access the pen tool from the left side of the Photoshop toolbar or by pressing “P” on your keyboard.
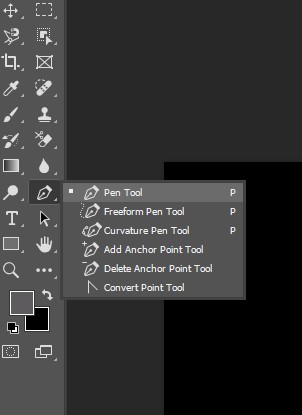
Step 3: Select the Path Option
Once you’ve selected the Pen tool, select the path, not the shape.

Step 4: Draw the First Path
Draw your first path on the canvas. Click on the canvas where you want to place an anchor point. [Anchor points are the points that mark the end of a path segment, forming the basis for creating shapes and paths.]
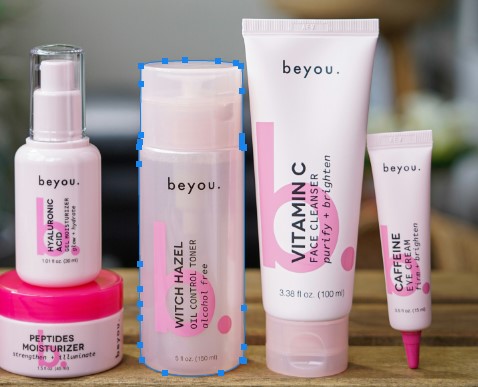
Whenever you click on the canvas, you’ll create a new anchor point and a path segment connecting it to the previous one. Click and drag to create curved path segments. To finish a path, either click on the first anchor point you made to close it into a shape or press “Enter or Esc” to leave it open.
Step 5: Open the Path Palette
When you’ve created your first path, open the Path palette to see and manage your paths. The Path palette is on the screen’s right side, along with other panels like Layers and Channels. If you don’t see it, go to Window -> Path and check it. The Path palette will show you a list of paths you’ve created earlier.
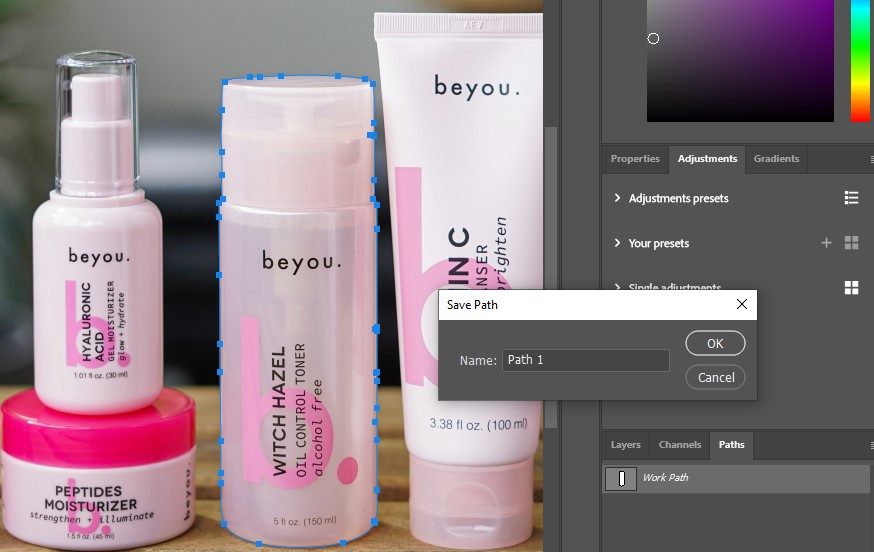
Step 6: Save the First Path
After selecting each object, you’ve to save your work path, and for this, press “CTRL+S.” If you create multiple paths, you must save each object’s work path. You can rename your path and save it.
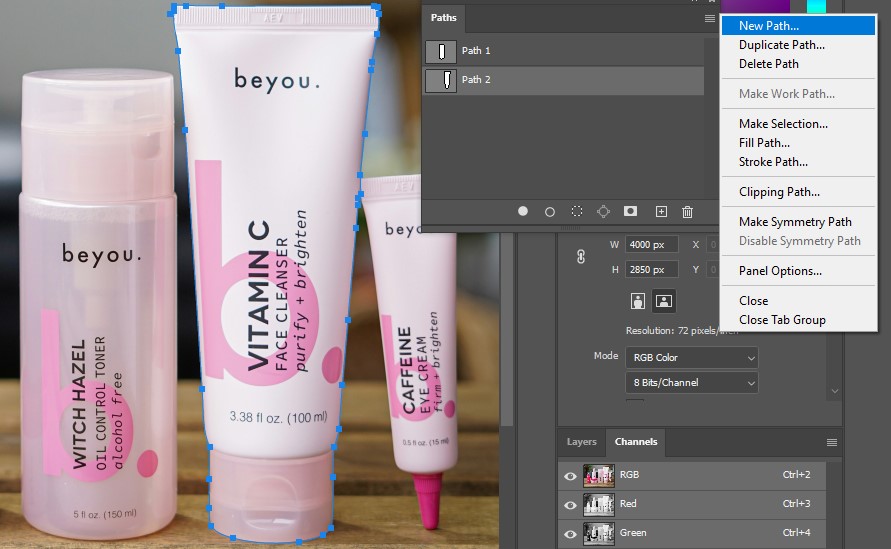
Step 7: Create Multiple Paths
If you want to create a new work path, you can select the “New Path” option and repeat steps 4. You can create as many paths as you want and edit them later using other tools like the Direct Selection Tool or the Convert Point Tool.
How to Merge Paths in Photoshop?
To merge paths in Photoshop, select the paths in the Layers panel, then use the “Merge Shape Components” option in the Path Operations flyout menu. Or, use the keyboard shortcut Ctrl+E (Windows) or Cmd+E (Mac).
Step 1: Select the Paths
Open the Paths panel (Window > Paths) and then select the paths you want to merge by clicking the Path Selection tool.
To access the Path Selection tool, press Shift-A until it appears in the Tools panel. Ensure the paths are on the same layer or shape layer.
Step 2: Use the Path Operations
Merge shape components by selecting the paths in the Layers panel.
- Click the Path Operations button in the toolbar.
- Choose “Merge Shape Components” from the layout menu.
Or select the paths in the Layers panel and press Ctrl+E (Windows) or Cmd+E (Mac).
How Do You Make Multiple Parallel Lines in Photoshop?
To make multiple parallel lines in Photoshop, draw a line, duplicate it using Ctrl/Cmd + Alt/Opt + T, and then use Ctrl/Cmd + Alt/Opt + Shift + T to repeat the transformation for more lines.
- Select the Line Tool or Shape Tool from the Photoshop toolbar or press U on your keyboard. Simply, click and drag to draw your desired line.
- You can adjust the width and color of the line from the options bar at the top.
- Press and hold the Shift key, then drag the cursor straight up from the endpoint of the first line. This will create a second line that is parallel to the first one. The Shift key helps you keep the two lines aligned.
- You can release the Shift key when the two lines are drawn as you prefer and repeat this process to create more parallel lines as needed.
- To finish, press Enter or Return on your keyboard or click on the checkmark icon from the options bar.
How Do You Create a Custom Path Shape in Photoshop?
Create a custom path shape in Photoshop by using the Pen tool. After that, define a custom shape by going to Edit > Define Custom Shape and naming it.
- Select the Pen tool (P) from the toolbar and ensure the mode is set to Path. Click and drag on the canvas to create a path outlining your desired shape.
- You can use the Direct Selection tool (A) to adjust the anchor points and curves of the path.
- Go to Edit > Define Custom Shape when the path operation is complete. Give your shape a name and click OK.
- When you use your custom shape, select the Custom Shape Tool (U) from the toolbar and choose your shape from the options bar. After that, drag it on the canvas to draw your shape with any color or style.
How Much Does Multiple Clipping Path Service Cost in New York, USA?
Multiple clipping path services cost in New York, USA, vary between $2 to $10 per image, and custom service costs above $15 per image. Multiple clipping path pricing is also charged by type, by hours, by projects, and by packages.
Multiple Clipping Path Pricing by Types
Different multiple clipping paths come in different levels of complexity, and the pricing varies as well.
1. Basic Multi-Clipping Path Cost
The basic multi-clipping path price starts at $2 per image. A basic multi-clipping path is a photo editing technique that is used to isolate different objects, colors, or parts of an image by creating multiple clipping paths. This editing is used for individual adjustments like color correction, shadowing, and background removal. For example,
- Apparel & fashion (Changing fabric colors and adjusting textures).
- Jewelry (gemstones, metals, or other precise retouching).
- Footwear (adjust materials like leather, rubber, and fabric).
- Electronics, cosmetics, and so on.
2. Simple Multi-Clipping Path Cost
The simple multiple clipping path costs start at $2 per image. It is a photo editing technique that is useful for images with minimal elements and fewer curves. It is applied to products with straightforward shapes and no intricate edges. For example,
- T-shirts
- Mobile Phones
- Bottles
- Simple handbags, and so on.
3. Medium Multi-clipping Path Cost
The cost of medium multi clipping path starts at $4 per image. Medium multiple clipping path involves products with more detailed edges, multiple parts, and less complexity in shape or transparency. Photoshop pros edit individual sections separately. For example,
- Jewelry with a few gemstones
- Shoes with different textures
- Sunglasses with lenses and frames
- Watches with dial details, and so on.
4. Complex Multi-Clipping Path
Complex multi-clipping path price starts at $10 per image. It is applied to products with intricate details, multiple components, and fine edges like hair, lace, or transparency. Here, photo editing experts perform advanced retouching, detailed background removal, and color correction. For example,
- High-end jewelry with detailed gemstones.
- Hair products (wigs, extensions, etc.).
- Food photography with layered elements.
- Group product shots with shadows and reflections.
Multiple Clipping Path Pricing by Hour
The hourly photo editing rate depends mainly on the agency’s expertise, experience, image complexity, and project volume. Here is a chart of Clipping Path Studio’s multiple clipping path hourly pricing rates.
| Clipping Path Types | Hours | Rate |
|---|---|---|
| Simple | 12 hours | $2.80 |
| 24 hours | $2.00 | |
| 48 hours | $1.60 | |
| Medium | 12 hours | $5.60 |
| 24 hours | $4 | |
| 48 hours | $3.20 | |
| Complex | 12 hours | $14.00 |
| 24 hours | $10.00 | |
| 48 hours | $8.00 |
Project-Based Pricing for Multiple Clipping
From basic to complex, multiple clipping paths or retouching rates depend on image volume, editing complexity, and companies’ pricing policies. Consult with your selected post-production service provider before assigning your photo editing projects.
Service Package-Based Pricing for Multiple Clipping
Some reputed photo editing companies offer outsourcing clipping and photo editing services in package pricing, along with customized photo editing solutions. The package pricing is decided based on the types and variations of editing and clipping solutions the clients need.
How Can Outsourcing Multi-Clipping Path Service Online Benefit Your Business?
Outsourcing multi-clipping path service online benefits businesses by enhancing visual content and attracting potential traffic to the online stores. This is the key reason professional photographers, studio coordinators, e-commerce managers, online marketers, advertising agencies, and many other professionals outsource clipping paths in New York. Other positive impacts of outsourcing multi-clipping solutions are mentioned below.
- Pixel-Perfect Results: Tech-savvy designers of clipping path service companies have years of editing experience. They handle complex multiple clipping and serve high-end and pixel-perfect solutions to fulfill e-commerce businesses’ demands. Also, they ensure consistency in image quality across websites, catalogs, advertisements, and other marketing channels.
- Fast Turnaround: Professional clipping path outsourcing companies work with bulk orders and have a dedicated high-end in-house photo editing team to meet your deadlines.
- Affordable Pricing: By outsourcing multi-clipping from reputed photo editing agencies like Clipping Path Studio (CPS), you get a competitive price rate for any post-production services. Bulk discounts for a large volume of projects, seasonal promotions, festival cut-offs, and other cost-saving deals are available all year round, which is a win-win solution for businesses of different sizes.
- E-commerce Optimized: You’ll get customer-oriented, high-quality images with different image formats that align with your e-commerce and other distribution channel requirements.
- 24/7 Support: Active 24/7 client support is a deal-maker that assists global clients with any queries.
- Hassle-Free Onboarding: Use a free trial to explore their editing expertise. With CPS, you receive an easy 4-step onboarding process, respecting your valuable time.
FAQs about Multi Clipping Path Service
Can multiple clipping paths be applied to any type of image?
Yes, multiple clipping paths can be applied to any image, such as JPEGs, PNGs, TIFFs, or any pixel-based images without restrictions. Images containing complex objects or multiple elements, such as jewelry, clothing with intricate details, or objects with holes, need multiple clipping paths.
Are there any limitations or challenges associated with using multiple clipping paths?
Yes, there are some limitations or challenges associated with using multiple clipping paths which including dealing with intricate designs or large image volumes, potential errors, and so on.
Can I use multiple clipping paths to retouch e-commerce product photography?
Yes, you can use multiple clipping paths to retouch e-commerce product photography, allowing precise background removal and manipulation of individual elements within the image.
When to use multi-clipping path?
You can use the multi-clipping path to isolate the subject and replace it with a clean background, and other usage platforms are:
- Multiple clipping paths are useful for selecting and editing a specific region or altering an image’s shape.
- A multi-clipping path allows you to change and adjust the appropriate colors based on your needs.
- You can use the multi-clipping path to adjust the opacity and add filters and effects.
- You can use multi-clipping paths to add multiple textures and image shadowing within the same image.
When not to use multi-clipping path?
Multi-clipping paths should not be used when the objects contain simple shapes, clean backgrounds, single object isolation, hair, and fuzzy edges. If your image only contains one image, you can do all of the clipping work with just one layer without using the multi-clipping path.
Final Overview
Here is a summary of what this article has covered so far:
- Multi-clipping path or multi-layer clipping refers to separating individual objects within an image so that you can use those isolating elements for further edits, recoloring, and other advanced retouching.
- There are 4 different types of multi-clipping path services, such as basic, simple, medium, and complex.
- Professional-grade multi-clipping allows for applying multiple fill effects, creating multiple image layers, backdrop removal, and image manipulation.
- Multiple clipping paths are created by using the Photoshop Pen tool or the Direct Selection tool.
- In New York, USA, the multiple clipping path service costs from $2 to $10 per image. Other pricing factors are hourly paid rate, flat rate, project fees, and packages offered by photo editing agencies.
- Outsourcing multi-clipping path services benefits all industries from professional photography to e-commerce by offering cost-effective editing solutions, saving time, and boosting sales.
