
Outdoor product photography (Exterior product photography) refers to capturing products in a natural environment rather than in a controlled studio setup. It provides plenty of natural lighting, stunning backdrops, and real-life context to showcase products in their authentic form and create emotional connections with customers. For example, you might photograph skincare products on rocks near a waterfall or hiking boots on rugged trails.
The importance of shooting outdoor product photography is to build an emotional connection and enhance brand storytelling. There are 10 types of products you can shoot outdoors, such as apparel & accessories, food & drinks, pet products, travel products, and so on. Some creative ideas to capture open-air product photography you can apply are: individual shots, group shots, flat-lay shots, close-up shots, packaging shots, action shots, and 360-view product photography.
After capturing amazing products, edit those visuals for a professional outlook. For this, you can outsource to a renowned agency, like Clipping Path Studio (CPS), where you get clipping path service, product background removal service, 360-degree product editing, shadow removal, and many others that help to achieve polished, high-converting images for your brand’s website, ads, and social media.
What you’ll learn in this article
What is Outdoor Product Photography?
Outdoor product photography involves capturing the product images in natural settings, utilizing natural light and environments instead of studio setups. The outdoor product photography niche aims to showcase products in a way that highlights their features and appeal within a real-world context, emphasizing a lifestyle or connection to nature.
For example, Nike, a top-rated footwear brand, showcases its shoes and sneakers on roads, trails, or other outdoor locations. Some common challenges of outdoor photography are:
- Unpredictable weather or natural lightning conditions.
- Difficulty controlling shadows or reflections.
- Need location scouting and potential permits for photoshopping.
What is the Difference Between CGI vs. Traditional Outdoor Product Photography?
The difference between CGI (Computer-Generated Imagery) vs. traditional outdoor product photography is as follows:
| Aspect | CGI Product Photography | Traditional Outdoor Product Photography |
|---|---|---|
| Definition | CGI product photography utilizes computer-generated imagery to create realistic product images. | Traditional product photography involves using cameras, specialized lighting setups, and often a studio environment to capture realistic, detailed, and authentic images of products. |
| Process | 3D modeling, texturing, rendering, and compositing using Blender, Maya, Cinema4D, and other software. | Planning location, transporting products, setting up natural or additional lighting, shooting with a camera, and post-processing. |
| Cost | High | Budget-friendly; involves photographer skills, equipment rental, location permits, travel, and reshoots. |
| Realism | Naturally realistic, as the product is physically photographed in a real environment. No risk of digital inconsistency. | Naturally realistic as the product is physically photographed in a real environment. No risk of digital inconsistency. |
| Use cases | Conceptual images, advertising with dramatic settings, or when the product is not yet manufactured. | Ideal for lifestyle shots, authentic brand storytelling, and when tactile realism is important. |
| Limitations | Needs expert CGI skills. | Unpredictable weather conditions and photographer skills. |
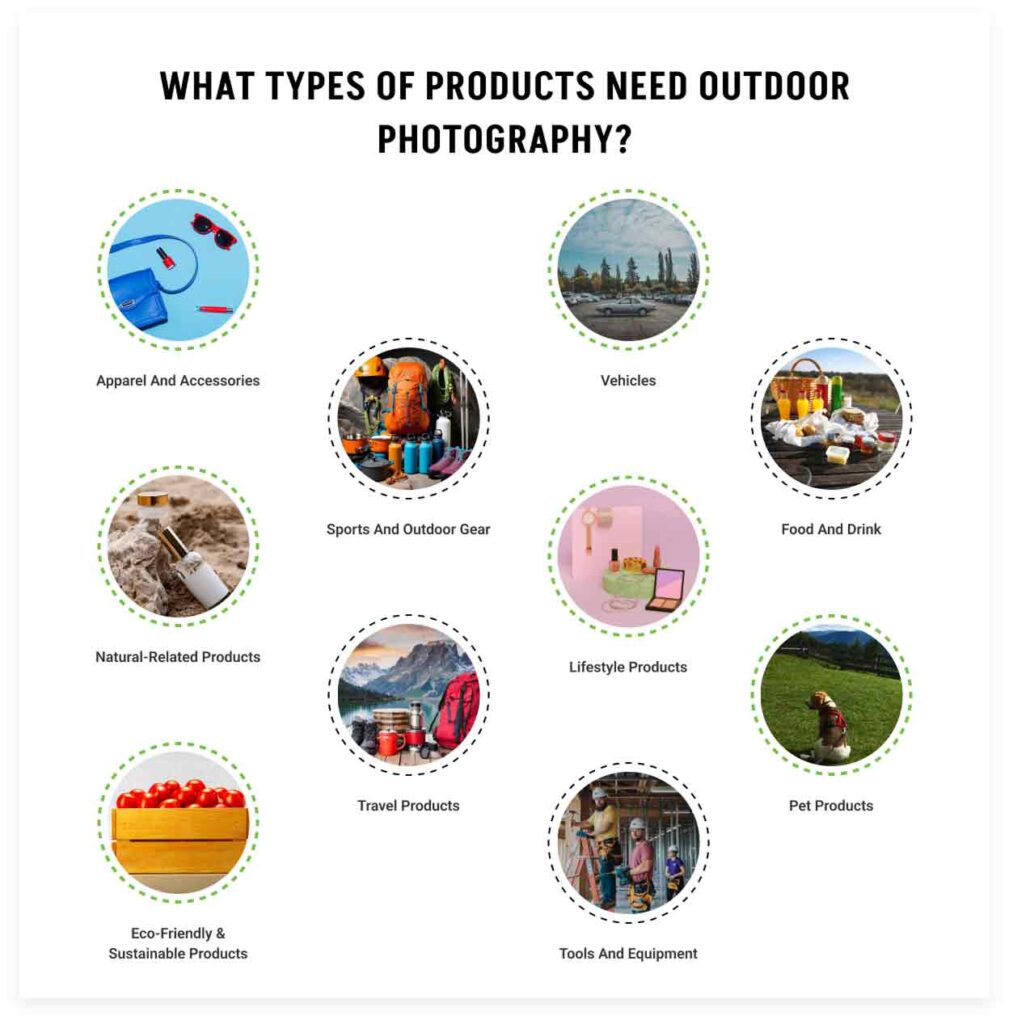
What Types of Products Need Outdoor Photography?
10 types of products that need outdoor photography include.
1. Apparel and accessories,
2. Sports and outdoor gear,
3. Vehicles,
4. Tools and equipment,
5. Food and drink,
6. Nature-related products,
7. Lifestyle products,
8. Travel products,
9. Pet products, and
10. Eco-friendly & sustainable products.
Product photography outdoors is best for products where the environment or lifestyle associated with the product is a key selling point—for example, vehicles, outdoor gear, clothing, and so on. This infographic presents the top 10 types of products ideal for outdoor photography.
1. Apparel and Accessories
Apparel, fashion items, and accessories, like jewelry, bags, sunglasses, and others, can be shown in context with models or arranged naturally in outdoor settings, allowing potential buyers to visualize how the items look and feel in real life.
Reason to shoot outdoors:
- Introduce potential buyers to real-life stylings in natural light to build trust.
- Effective for fashion campaigns, lookbooks, e-commerce lifestyle images, social media branding, and so on.
- Highlights seasonality and lifestyle contexts (i.e., summer dresses on beaches, jackets in urban streets, etc.).
2. Sports and Outdoor Gear
Popular sports and outdoor gear are hiking backpacks, camping tents, yoga mats, running shoes (i.e., Nike sneakers/shoes), bicycles, surfboards, etc. By showcasing these products in real-life environments, you can demonstrate durability, performance, and usability.
Reason to shoot outdoors:
- Brand advertisements, e-commerce banners, and product packaging visuals.
- Shows functionality in action (i.e., hiking, running, etc.), boosting credibility and relatability for active consumers.
3. Vehicles
Vehicles like cars, motorcycles, e-bikes, boats, and others are shot outdoors to highlight key features (wheels, color, etc.), design, and aesthetic appeal under natural lighting with environmental reflections.
Reason to shoot outdoors:
- Automotive ads, brochures, dealership displays, website hero images.
- Real roads, landscapes, and natural reflections build an emotional connection with buyers, positioning vehicles as part of aspirational lifestyles.
4. Tools and Equipment
You can photograph different tools outdoors, like construction gear, garden equipment, or heavy equipment machinery in action or in realistic environments. By doing so, you give viewers a practical use, build trust, and engagement.
Reason to shoot outdoors:
- Shows practical use context, enhancing credibility.
- Highlights durability and ruggedness under natural conditions.
- Creates authentic branding images for contractors, builders, and DIY brands.
5. Food and Drink
Drinks like coffee, tea, or alcoholic beverages can be photographed in appealing outdoor locations, enhancing their appeal and associating them with a relaxing or social atmosphere.
Reason to Shoot Outdoors:
- Creates a fresh, lifestyle-oriented feel.
- Appeals to consumers’ desire for outdoor dining, relaxation, and social moments.
- Natural lighting enhances the colors and textures of food.
Outdoor settings can create a natural and appealing backdrop for beauty products, especially those marketed for outdoor activities or sun protection. Healthcare and wellness products like sunscreen, vitamins, or fitness trackers can be showcased in outdoor settings, emphasizing their role in promoting a healthy and active lifestyle.
Reason to Shoot Outdoors:
- Reinforces the natural, sustainable branding of the product.
- Builds customer trust by aligning visuals with brand values.
- Adds realism and beauty without artificial backdrops.
7. Lifestyle Products
Lifestyle outdoor products are camping gear, garden equipment, fashion items (hats, shoes, sunglasses, etc.), skincare, perfumes, and so on. You can shoot all these items in outdoor settings to show how they fit into a daily lifestyle or activity.
Reason to Shoot Outdoors:
- Shows practical use context, enhancing credibility.
- Highlights durability and ruggedness under natural conditions.
- Creates authentic branding images for contractors, builders, and DIY brands.
8. Travel Products
You can photograph outdoors bottled beverages, picnic foods, ready-to-eat packaged snacks, fresh produce, and others, providing a sensory appeal with natural light and environment.
Reason to Shoot Outdoors:
- Evokes picnic, travel, and freshness themes, enhancing brand storytelling and consumer appetite appeal.
- To fulfill commercial purposes, like packaging visuals, social media content, ads, and recipe promotions.
9. Pet Products
You can shoot pet food, collars, leashes, outdoor toys, and pet beds, incorporating pets. These types of photos evoke emotional attachment in pet lovers.
Reason to Shoot Outdoors:
- Conveys happiness, freedom, and product reliability, crucial for pet owners’ purchasing decisions.
- Effective for pet store advertisements, brand packaging, and social media campaigns.
10. Eco-friendly & Sustainable Products
Some eco-friendly and sustainable products are reusable straws, bamboo products, and biodegradable packaging. These products’ outdoor photoshoot reinforces eco-friendly messaging with authentic environmental backdrops.
Reason to Shoot Outdoors:
- Strengthens environmental narrative and consumer trust.
- Effective for green brand campaigns, sustainability reports, and e-commerce listings.
Why Should You Use Outdoor Product Photography?
You should use outdoor product photography to boost online sales, brand perception, and offer buyers real-life product visuals that build trust and credibility. Other benefits are highlighted below:
- Improve Contextual Imagery: Brand photography outdoors provides a real-world context for products, allowing customers to visualize how they might use or interact with the item in their own lives. Think of a camping tent photographed in a forest. It builds buyers’ credibility and relatability, which improves conversion rates of your online store.
- Highlights Functionality: Outdoor photography showcases product use and performance, including gear, tools, and vehicles. For example, you can showcase different hiking gear, like boots, backpacks, and others, in a mountainous landscape, demonstrating their features and durability.
- Makes the Brand Unique: Outdoor photography allows you to tell a unique brand story with a personal touch, making products aspirational and emotionally appealing. For example, a water bottle photographed on a rugged hike or a camping trip showcases its durability and ability to withstand tough conditions.
- Adds Visual Variety to Marketing Content: You get flexibility to combine studio and outdoor photography techniques, keeping your content dynamic, fresh, and engaging for campaigns. For example, e-commerce owners mix studio product shots with outdoor lifestyle images to boost conversion.
- Supports Seasonal Promotions: Outdoor images align with seasonal themes (summer, winter, holidays), making promotions more impactful. For example, Jackets in autumn woods or drinks in sunny gardens directly evoke seasonal vibes.
- Creates Emotional Connection: Outdoor environments trigger positive emotions like freedom, freshness, health, and adventure, enhancing product desirability. For example, Healthy snack bars photographed on a mountain hike connect with fitness-focused consumers.
- Endless Creativity: When you shoot outdoors, you get unlimited backgrounds, soft natural light, textures, natural props, and beautiful compositions (rocks, wood, grass, sand, sky, etc.), enhancing artistic freedom without additional setup costs.
The 8 Best Outdoor Product Photography Ideas
The 8 best outdoor product photography ideas are individual shots, group shots, flat-lay shots, lifestyle shots, close-up shots, packaging shots, hanging shots, 360-view product photography, and reflection shots. This infographic presents 8 of the best On-location product photography ideas.

Individual Shots
An individual product shot, also known as a single or solo shot, where only one specific item is focused, showcasing against a clean background. These images are often used as the main product image on online listings and marketing materials. The goal is to highlight its features. For example, a bottle of perfume isolated on a minimalist background.
How to shoot:
- The rule of thirds and center framing both function well to draw attention exclusively to the product.
- Placing the product on one-third of the frame makes the photo a bit more unique and eye-catching rather than placing it at the center.
- Placing the product on a neutral surface, like a rock, wooden plank, or clean ground, keep focus on the product.
- Shoot at eye level or slightly above for dimension.
Group Shots
A group product photoshoot involves photographing multiple products together in a single image to showcase a collection or demonstrate variety. It’s a way to present a brand’s range and can be used on e-commerce sites, social media, and marketing materials to attract customers and encourage purchases. For example, a beauty product photoshoot, perfume photography, and others to showcase variations, identical designs in multiple colors, or products.
How to shoot:
- Utilize balanced compositions on grass, sand, or stone.
- Ensure consistent lighting across all products.
- Use wide apertures (f/4-f/5.6) to keep products sharp and the background softly blurred.
Flat-lay Shots
Flat lay product photography or overhead photography refers to a technique where products are arranged on a flat surface and photographed from a directly overhead, bird’s-eye view. The top-down framing highlights the distinctive qualities of the products. This style is popular for e-commerce, social media, and marketing. For example, flat lay clothing photography, displaying makeup palettes, skincare items, showcasing necklaces, etc.
How to shoot:
- Use a clean outdoor surface (e.g., wooden table, blanket on grass, stone floor).
- Shoot directly overhead with a wide lens.
- Use a diffuser to soften direct sunlight.
- Placing the products with some color-contrasting props in an outdoor location.
Lifestyle Shots
Outdoor lifestyle photography showcases products in real-life settings, demonstrating how they’re used and integrate into everyday situations. Unlike traditional photography, fashion outdoor photography, like clothing photography, watches photography, and others, aims to create an emotional connection with the viewer by placing the product in context and telling a story.
How to shoot:
- Find a clean, textured surface (wood, stone, grass).
- Arrange items thoughtfully, using different props, like leaves, flowers, or other natural elements.
- Avoid harsh midday sunlight to prevent strong shadows.
Close-up Shot
Close-up product photography refers to macro product photography that captures a subject at a close range, emphasizing fine details and textures. This photography technique is useful in e-commerce and product marketing, allowing customers to examine the quality and intricate features of a product they can’t physically touch.
How to shoot:
- Use macro or zoom lenses.
- Position in shaded areas or use diffusers to avoid harsh shadows.
- Capture branding details, unique textures, or craftsmanship.
Packaging Shots
Packaging product photography, also known as packshot photography, focuses on capturing images of a product alongside its packaging and labels. These product images are essential for e-commerce, marketing materials, and social media to showcase the product’s presentation and branding.
How to shoot:
- Place packaging and product side by side or stacked attractively on natural surfaces.
- Ensure both are well-lit and branding is clear.
- Consider soft backlighting for a glow effect.
Hanging Shots
Hanging environmental product photography refers to a technique where products, like clothing, jewelry, or accessories, are photographed in mid-air, often appearing to float or defy gravity. This style of photography helps you to create a dynamic and engaging visual, showcasing the product’s shape, drape, or movement uniquely.
How to shoot:
- Use strong supports to ensure safety.
- Shoot upwards with sky or greenery as a backdrop for minimal distractions.
- Avoid the midday sun directly overhead.
360-view Product Photography
360-view nature product photography, also known as 360 spin photography. This photography technique represents the product as it rotates in 3 ways:
- Single-row, where a product spins any one side
- Multi-row, 3d image effect by stitching 12-14 images, and
- Twin-axis, making the product rotate both side-wise and up-down.
With this visual, viewers can rotate and zoom in on the product to see it from all angles. This method enhances online shopping by providing a more comprehensive view of the product, similar to what a customer would experience in a physical store.
How to shoot:
- Place the product on a portable turntable outdoors under even lighting.
- Capture images at every 10-15° rotation.
- Use diffusers to maintain consistent lighting on all sides.
Reflection Shots
Reflection product photography focuses on capturing the unique characteristics of items with reflective surfaces, such as cosmetics, glass, jewelry, water surface, etc.. The challenge lies in controlling light to avoid unwanted glare or distortions while highlighting the product’s details. This involves using various techniques like diffused lighting, strategic angles, and reflectors to achieve a clean and appealing image.
How to shoot:
- Use still water surfaces like ponds or calm beach edges.
- Shoot low to capture both the product and the reflection.
- Avoid strong winds or harsh midday sun for cleaner reflections.
How to Shoot Outdoor Product Photography
To shoot outdoor product photography, choose the location wisely, style the product photo, adjust the camera settings manually, use the rule of thirds, and include props. I will explain how to conduct product shoots in natural environments, as shown in this diagram.
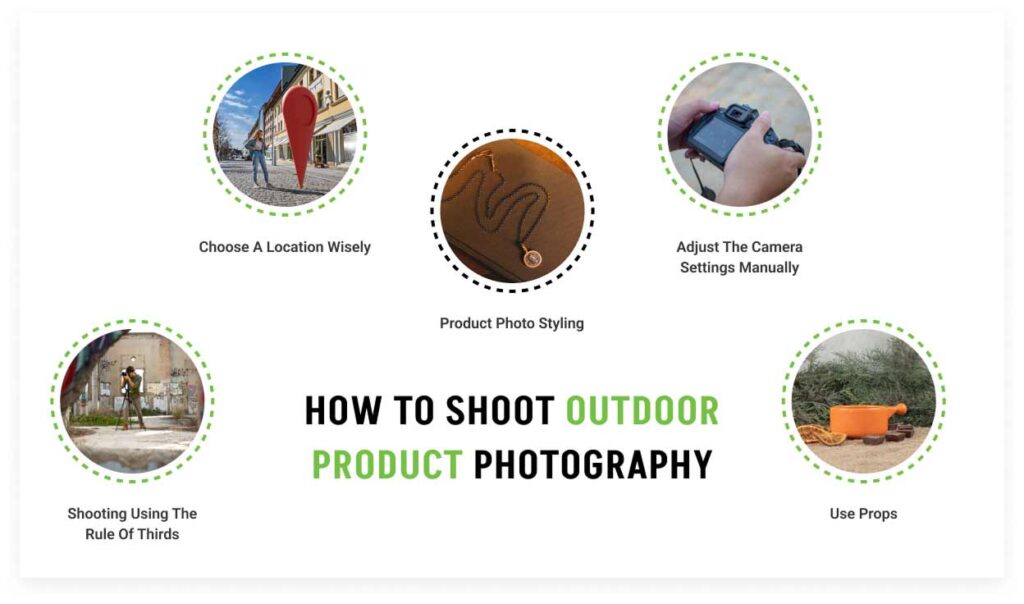
1. Choose a Location Wisely
You’ve plenty of location options to shoot outside product photography, such as woods, on the beach, in the mountains, on the highway, and many others. Before selecting a suitable one, think about your product and vision, like what you want your shoppers to feel after visualizing the image.
Suppose you plan to promote your new cappuccino store. The question is: do you want your buyers to feel cozy? Or, do you want them to feel adventurous? Pick the location once you’ve made the decision. For example,
- The forest surrounding trees and foliage is a source of natural greenery that can create a serene and organic backdrop.
- Urban elements, like graffiti walls, cityscapes, or industrial structures, help you to add a modern, edgy vibe, making the product stand out in a contemporary context.
- Majestic mountains are a popular backdrop for outdoor gear or adventure-related products, emphasizing the durability and ruggedness.
- Set up a picnic scene in a park, with your product, like food, drink, or lifestyle products, as the focal point.
- Find a rustic setting like an old barn, wooden fence, or field of wildflowers to showcase the aesthetic of handmade or vintage products.
- Capture your product on the beach, using sand, sea, and sky as the backdrop.
- Outdoor backyard photography ideas are ideal for gardening tools, camping gear, beverages and snacks, picnic supplies, and others.
2. Product Photo Styling
After selecting a suitable place for your outdoor photoshoot, focus on styling the product. Some outdoor commercial photography tips with product styling are as follows:
- Clean the product properly, ensuring there are no spots, dirt, or dust. Carry microfiber cloths for quick cleaning.
- Plan your product color palette, maintaining brand harmony. For example, Earthy browns and greens for eco-friendly brands, vibrant blues and yellows for active lifestyle products.
- Use foreground elements (e.g., blurred leaves, grass) and background natural textures to create depth and draw attention to the product.
3. Adjust the Camera Settings Manually
The intensity of natural light depends on the time of day and the weather. Using the automatic camera settings can result in either an underexposed or an overexposed image. Therefore, the best way to solve this issue is to adjust the camera settings manually.
The three Environmental product photography camera settings that need to be adjusted manually are:
- Aperture: The hole in the lens through which light enters the lens is known as an aperture. The primary function of this aperture is to control the amount of light that flows in, as a small amount of light can make the images darker, and an excess amount of light can wash out the images.
Remember, the lower the aperture value is, the wider the shutter will stay open. That is, f/1.8 will have a larger opening than f/11. So, to ensure a minimum amount of light entrance, the recommended range of aperture for outdoor photography is f/10 to f/16.
- ISO: Digital camera light sensors are controlled by ISO, which determines how sensitive they are to light. The imbalance of ISO may result in your photographs being grainy. Besides, ISO and shutter speed are closely related to each other; that is, lower ISO values will result in a slower shutter speed. On a sunny day, keep your ISO between 100 and 200. However, you can raise the value to brighten the images in cloudy conditions.
- Shutter Speed: Shutter speed determines the opening and closing speed of the shutter of the camera. This speed should be controlled depending on the light source. That is, the shutter should close faster in a bright environment, whereas a slower shutter speed is advised for having a well-exposed image in a dark environment. That’s why the optimal shutter speed on a bright sunny day is 1/500 to 1/1000.
4. Shooting Using the Rule of Thirds
Every camera frame has 2 horizontal and 2 vertical grid lines intersecting each other that divide the whole frame into 9 equal squares. This rule states that you must place your product on one-third of the frame, leaving the other two-thirds of the frame free.
The rule of thirds is an effective technique to make a composition captivating and well-balanced because-
- Easy to place the products
- Identifying the focus point is relatively easy
- Brings attention to the product naturally
Other shooting techniques are:
- Multiple Angles: Capture your product from different angles to showcase its features and create a comprehensive view for the customer.
- Leading lines: Utilize natural or man-made lines (i.e., roads, fences, etc.) to guide the viewer’s eye towards your product.
- Lifestyle appeal: The best way to shoot product photography in a natural setting is to highlight its real-life uses that make it relatable to potential customers.
5. Use Props
You can use different field product photography props to add a complement to your products. But avoid overusing props that might steal the focus from the main product. Whether shooting on a beach or in your backyard, you will always find natural elements that complement your product and the setting. Besides, using props with contrasting colors can enhance the visualization of the composition. Natural objects that are frequently used as props include:
- Flowers
- Fruits
- Leaves
- Sand
- Shells
- Stones and many others
How to Shoot Outdoor Model Photography
To effectively shoot outdoor model photography, focus on utilizing natural light, choosing the right location and time of day, and understanding your camera settings. Consider the background, experiment with different angles, and don’t forget to communicate with and pose your model for natural-looking results.
1. Choosing the Right Location
Look for clean, uncluttered backgrounds that enhance but don’t overpower the model. Use natural frames like tree tunnels or reflections to add depth and interest. Or, you can utilize urban settings such as city streets, rooftops, or architectural elements to add an edgy, modern vibe.
2. Lighting Setup
Outdoor photography depends on natural light. The best times are during the golden hours — shortly after sunrise or before sunset — when light is soft and flattering. Use backlighting creatively for a glow effect, and consider reflectors or diffusers to control shadows and balance light on the model’s face.
3. Camera Settings and Gear
- Camera & Lens: A DSLR or mirrorless camera with a fast prime lens (e.g., 50mm f/1.8 or 85mm f/1.8) is ideal for sharp, crisp portraits with pleasing background blur.
- Aperture: Use apertures around f/2.8 to f/4 to keep the model’s face and outfit sharp while softly blurring the background, making the subject stand out.
- ISO & Shutter Speed: Keep ISO low (100-400) to reduce noise; adjust shutter speed to avoid motion blur, especially if the model moves.
- Additional Gear: Bring a tripod, reflectors, and portable storage for props and wardrobe changes. A suitcase with wheels can help transport gear and clothes easily.
4. Model Appearance and Wardrobe
Suggest model outfits that suit the location and theme, balancing style with practicality for outdoor conditions (weather, terrain). Also, ensure makeup is suited for natural light (often less heavy than studio makeup) and consider weather effects like wind or humidity. Try to keep the model comfortable and confident by providing breaks, water, and a relaxed atmosphere.
5. Posing and Interaction
Encourage the model to move naturally, such as walking, twirling, or interacting with the surroundings, to capture candid, lively shots. Have the model lean against walls, sit on steps, or engage with natural elements, like branches or water, to add interest and context.
6. Composition Tips
- Rule of Thirds: Position the model off-center to create balanced, engaging compositions.
- Leading Lines and Textures: Use natural lines (paths, fences) and textures (leaves, bricks) to draw the viewer’s eye to the model.
- Experiment with Angles: Shoot from different perspectives, such as low angles to emphasize stature or high angles for a unique viewpoint.
How to Avoid Shadows in Outdoor Product Photography?
You can avoid shadows in outdoor product photography using diffused lighting, positioning your product strategically, and utilizing reflectors. Try to avoid direct sunlight because it creates harsh shadows, and take advantage of the “golden hour” (early morning or late afternoon) to get soft lighting. You can also remove unplanned shadows from your photos through the Photoshop image editing technique.
Below, we’ve provided a detailed guide on how you can avoid shadows in photography and post-processing:
A. During Photography: How to Minimize Shadows
- Shoot in Golden Hour or Overcast Days: Try to shoot early morning, late afternoon, or on cloudy days when sunlight is soft and diffused. By doing so, you can easily avoid harsh shadows. Also, avoid direct overhead sunlight because it might cause strong, unwanted shadows and high contrast.
- Use diffusers and Reflectors: You can use a translucent diffuser (e.g., diffusion fabric or softbox) between the sun and the product to soften light and reduce shadow intensity. On the other hand, you can use white foam boards or professional reflectors opposite the light source to bounce light back onto shadowed areas, filling in shadows and balancing exposure.
- Utilize Multiple Light Sources or Fill Light: Use two or more light sources from different angles (key light, fill light, backlight, etc.) to fill shadows and create even lighting. Also, you can use a subtle fill flash to brighten shadowed areas without overpowering natural light.
- Positioning and Angles: Position the product so the sunlight hits it from the front or side rather than from behind to minimize harsh shadows. To do this, experiment with different angles to avoid shadows.
- Use Light Tents or Light Boxes: Enclosing the product in a light tent diffuses the light evenly and greatly reduces shadows.
- Avoid Using On-camera Flash: Built-in camera flashes create harsh, concentrated light and strong shadows; instead, rely on natural light and external lighting setups.
B. In Post-Processing: How to Reduce or Remove Shadows
- Shadow Removal Tools: Use Photoshop tools like the Clone Stamp, Healing Brush, and Pen Tool to remove or soften shadows around the product carefully.
- Adjust Brightness and Contrast Locally: Select shadowed areas and brighten or reduce contrast to blend shadows with the surrounding light.
- Add Soft Shadows Strategically: Sometimes, completely removing shadows makes images look flat. Instead, soften shadows or add subtle, controlled shadows to maintain depth and realism.
Where to Get Outdoor Product Image Editing Services?
You can get outdoor product image editing services from Clipping Path Studio, a renowned post-processing agency, where you get high-quality, polished, and professional outdoor product images that increase sales. You’ll get several image editing services like background removal, color correction, shadow manipulation, clipping paths, cutout, and batch processing.
Professional Outdoor Product Photo Editing at a Great Price
Contact Us
Where to Get Professional Outdoor Photography Services?
To get professional outdoor photography services, you can use online platforms, like Upwork, Fiverr, or research photographers in your area using Yelp or Google. From brand photography outdoors to large product photography, lifestyle, macro, or other photography, you need to hire professional photographers who can fulfill your product’s specific requirements and meet consumers’ demands.
Here’s a more detailed breakdown:
1. Online Research: Before online researching, determine what kind of outdoor photography you need, whose style aligns with your vision, and most importantly, the location. Below, we’ve highlighted the 3 best online research platforms:
- Yelp: Search for “Outdoor Photoshoot” or specific types of photography (e.g., family, senior, etc.) in your desired location.
- Google: Use similar search terms and look for websites with portfolios and contact information.
- Specialized Platforms: Explore platforms like Upwork for a variety of outdoor and lifestyle photography services.
2. Freelance photographers: Search for photographers specializing in outdoor or lifestyle photography, and consider their experience and portfolio. You can look for several platforms, including:
- Upwork (Search for “product photographer outdoor” and filter by location)
- LinkedIn (Find photographers, check profiles, and see real outdoor campaigns)
- Instagram (Use hashtags like #OutdoorProductPhotography, #ProductPhotographer)
3. Local Photography Studios: Many commercial photography agencies or studios offer outdoor photography services, so it’s worth checking with studios in your area.
Why Consider Hiring a Professional Outdoor Product Photographer
Hiring a professional outdoor product photographer is essential for creating high-quality visuals that attract customers, enhance brand image, and drive sales. Industry-expert photographers have the expertise, necessary equipment, and skills to capture products in the best possible light and outdoor settings, highlighting key features and uniqueness that evoke audiences. Here’s why you should hire a professional outdoor product photographer:
1. Cost-effective Result
Photography equipment such as cameras, lenses, lights, and others is quite expensive. If you are not a professional photographer, there is a very slim chance that you will be able to take photos like a professional, meaning that your entire investment in the equipment will be wasted.
So, to get the best outdoor photography, hiring a professional photographer will be a wise choice because they will use their high-end equipment and deliver usable edited photos at a comparatively lower cost.
2. Strong Professional Background
A professional photographer has years of experience in the photography industry. The year-long experience has taught them the use of lighting, framing, and other skills required to make a product look professional. Besides, they have a much better sense of art direction than an amateur or non-professional photographer.
Moreover, a professional outdoor lifestyle photographer has expertise in both outdoor model photography and outdoor glamour photography because they know how to make the best use of models with products to make products look more appealing to customers, along with other styles of photography that include nature.
3. Professional-quality Images
Professional photographers are well aware of the consequences of producing low-quality images. They use top-quality lenses to capture crystal-clear, high-resolution images. Besides, they give extra emphasis to capturing the details of the products. The high resolution and precisely captured minute details allow customers to zoom in on the images to see the details without any image distortion.
So, getting high-quality images is guaranteed when working with a professional photographer.
4. Consistent Result
Each professional photographer has a distinctive photographic style that serves as their signature. Utilizing a professional photographer will give your products a consistent look that you can’t get from a non-professional photographer.
Besides, a professional photographer will keep the color scheme, framing, and other elements consistent, which will help to build your brand image.
