
Aperture in photography is the opening in a camera lens that controls how much light enters the camera sensor. Like your eye’s pupil –
- A wide-open pupil (low f-number) = more light enters,
- A small pupil (high f-number) = less light enters.
There are 3 types of aperture: Wide aperture, mid-range aperture, and narrow aperture – all of these aperture values affect exposure, depth of field, and bokeh. However, the best aperture range depends on lighting conditions and the subject. For example, the best aperture range for portraits of a single person is f/1.4-f/2.8, landscapes is f/8-f/16, macro photography’s sweet spot is f/8-f/16, and so on.
What is Aperture in Photography?
Aperture in photography refers to the size of the camera lens opening, which determines how much light enters your camera and hits the image sensor. The function of the aperture in photography is like the pupil of your eye, adjusting light depending on the environment (bigger when it needs to let more light in and smaller when it needs to let less light in).
Another name for aperture in photography is ‘f-stops’, used to describe the size of the opening in the lens or a fraction of the focal length of your lens. For example, if you use a 50mm lens at an aperture of f/2, the aperture opening is ½ the size of your focal length, ie, 25mm. That means the larger the f-number, the smaller the aperture; and the lower the f-number, the wider the aperture.
Note: The lens aperture settings will also impact the depth of field (DOF) in your photography.
What are the F-stop and F-number?
The F-stop and F-number both refer to aperture value in photography- a ratio that describes the aperture setting on a camera lens, determining how much light enters the lens. On the other hand, an open aperture in photography refers to a lens’s diaphragm being adjusted to allow a large amount of light to pass through to the camera’s sensor.
However, on your LCD screen or viewfinder, your aperture will look like f/2, f/3.5, and so on. Some cameras might omit the slash and write f-stops like f2, f3, and so on.
What is Aperture Priority Mode?
Aperture priority in photography mode is a “semi-manual” or “semi-automatic” camera setting that allows you to select the aperture while the camera sets an appropriate shutter speed. The aperture priority is abbreviated as “A” or “Av” on camera mode dials.
For example, if the scene is very bright or darker, you can choose a small or a larger aperture to avoid overexposing or underexposing the image. Aperture priority is a popular mode for portrait, landscape, and still life photography. Also, beginner-level photographers who are not yet comfortable with manual mode take advantage of aperture priority mode.
What is the Sweet Spot for Aperture?
The sweet spot for aperture in photography refers to the aperture settings where the lens produces the sharpest images. Every lens’s sweet spot is different – for many lenses, the sweet spot range is within f/5.6 to f/11.
What are the Different Types of Aperture in Photography?
There are 3 different types of apertures in photography: Wide aperture, Narrow aperture, and Mid-range aperture. These different aperture types influence the depth of the field, exposure, and overall image appearance.
1. Wide Aperture (Small f-numbers: f/1.4-f/4)
The wide aperture or a large aperture in photography refers to the lens’s large opening to let more light into the camera, which is useful in low-light situations. It creates a shallow depth of field, blurring the background and focusing the subject. The common range of shooting in a low aperture: f/1.8, f/2, and f/2.8.
When to use
- Low-light situations (indoor, evening, dark forest, night sky, weddings, etc.).
- Portraits for blurry background
- Artistic shots isolating subjects
2. Mid-range Aperture (Higher f-numbers: f/5.6-f/8)
An aperture setting offers a balance between light intake and depth of field. It offers a moderate amount of background blur.
When to use
- Suitable for landscape, architecture, street photography, and group portraits
- General outdoor photography
- Maximum lens sharpness is desired (sweet spot between f/5.6-f/8)
3. Narrow Aperture (Large f-number: f/11-f/22)
The narrow or small aperture in photography creates a small opening in the lens to let in less light. It restricts light entry, resulting in a darker image and a deeper depth of field (more of the scene is in focus).
When to use
- Background & subject mostly in focus
- Suitable for landscape, architecture, and where you want everything in focus from foreground to background
- Macro shots need maximum depth of field
What is the Purpose of Aperture in Photography?
The purpose of aperture effects in photography is to control the amount of light entering the camera and control depth of field (DOF). Here’s a detailed breakdown:
1. Light Control
- Aperture measurement in photography depends on f-numbers (f/2,f/2.8, f/11, and so on).
- A wider aperture (lower f-number, like f/2.8) lets in more light, resulting in a brighter image.
- A narrower aperture (higher f-number, like f/16) lets in less light, leading to a darker image.
- Aperture is a key component of the exposure triangle, alongside shutter speed and ISO, and adjusting it helps control how light or dark an image appears.
2. Depth of Field
- Aperture directly affects the depth of the field, which is the area of the image that appears sharp.
- A wider camera aperture in photography (lower f-number) creates a shallow depth of field, meaning only a small area is in focus, while the background and foreground are blurred. This is often used for portraits and low-light photography to isolate the subject from the background.
- A narrower aperture (higher f-number) creates a deep depth of field, meaning a larger area of the image is in focus. This is useful for landscapes and situations where you want everything in the scene to be sharp.
What Does Aperture Do to Your Photos?
Aperture increases or reduces how much light is being accepted by your camera’s lens. However, this simple change can make drastic changes to a photo. These are the lists of things that are directly linked to the aperture.
- Unwanted microelements in the photo
- Exposure/brightness
- Depth of field/focus
- Effects like bokeh, starburst, and Sunstar
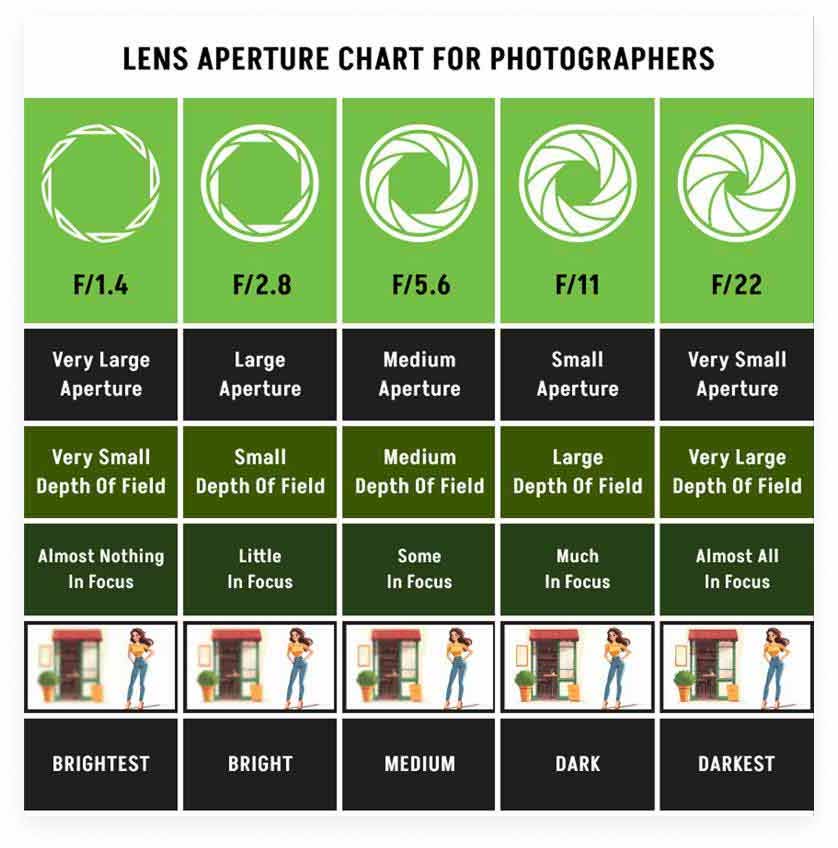
Below, we’ve provided a lens aperture chart for photographers:
How to Pick the Right Aperture
To pick the right aperture, you need to balance exposure, depth of field, and creative intent based on the shooting conditions and subject. Here’s a practical, user-friendly guide based on expert suggestions:
1. Consider Your Subject and Desired Depth of Field
- Portrait Shots: Use a wide aperture (small f-number like f/1.4 to f/2.8) to create a shallow depth of field. This blurs the background, making your subject stand out with beautiful bokeh.
- Landscape Shots: Use a narrow aperture (large f-number like f/8 to f/16) to maximize depth of field, keeping foreground and background in focus.
- General or Group Shots: Use a mid-range aperture (around f/4 to f/5.6) to balance sharpness and some background separation.
2. Assess the Lighting Conditions
- In low light or indoor settings, choose a wider aperture to allow more light in and avoid underexposure.
- In bright daylight, use a smaller aperture to prevent overexposure and maintain detail.
3. Understand Your Lens’s Sweet Spot
- Most lenses deliver the sharpest images around f/5.6 to f/8. If sharpness is a priority, especially in landscapes or architecture, try to shoot within this range.
4. Balance Aperture with Shutter Speed and ISO
- Aperture is part of the exposure triangle. If you open up the aperture (lower f-number), you can use a faster shutter speed or lower ISO to avoid overexposure.
- Conversely, a smaller aperture requires slower shutter speeds or higher ISO to maintain exposure.
5. Experiment and Practice
- Start with a setting like f/5.6 as a baseline. Take multiple shots at different apertures to see how the depth of the field and exposure change.
- Adjust based on your creative goals and lighting.
How to Set Camera Aperture?
There are 3 ways to set the camera aperture: (1) Aperture Priority (A or AV) mode, (2) Manual (M) mode, and (3) AUTO (Auto, A or A+) mode.
1. Aperture Priority (A or Av) mode
2. Manual (M) mode
3. AUTO (Auto, A or A+) mode.
Here, we’ve shared some situations and aperture values:
- f/0.95 – f/1.4: One of the “fast” maximum apertures available on premium prime lenses, allowing you to gather as much light as possible. These aperture values are useful for capturing low-light photography (photographing the night sky, wedding receptions, portraits in dimly-lit rooms, corporate events, etc).
- f/1.8 – f/2.0: Some prime lenses are limited to f/1.8, but you can use those to get aesthetically pleasing portraiture with shallow focus.
- f/2.8 – f/4: Zoom lenses are limited to a maximum aperture of f/2.8 to f/4. You’ll get some subject separation at these aperture values, without impacting the background. Ideal for travel, sports, and wildlife photography.
- f/5.6 – f/8: This is the right starting point for most landscape, architectural, documentary, and portrait photographers, where you don’t want a blurry background.
- f/11 – f/16: These aperture values are ideal for macro photography or landscape photography with a nearby foreground. Even though these apertures offer more depth of field and low-level sharpness due to the effect of lens diffraction.
- f/22 and smaller: The value is best to move away from your subject or use a focus stacking technique instead.
How Does Aperture Affect Exposure?
A wider aperture (smaller f-number, like f/2.8) allows more light to reach the sensor, resulting in a brighter image. On the contrary, a narrow aperture value (larger f-number, like f/16) restricts light, leading to a darker image. You can change the aperture while keeping the exposure intact through Aperture Priority or Manual mode.
In Manual mode, you can maintain the exposure by changing ISO and shutter speed. In aperture priority mode, it’s much easier as the camera sets everything else automatically as you change the aperture.
How Does Aperture Affect the Depth of Field?
Depth of field is the area of an image that is in focus and sharp enough to be acceptable to the human eye. In photography, this particular area of focus is referred to as the focus plane.

How Does Aperture Affect Bokeh?
Aperture controlled by the f-number affects the bokeh effect- a wider aperture (smaller f-number, f/1.8) creates a shallower depth of field, resulting in a more blurry background. Whereas, a narrow aperture (large f-number, f/8) produces a greater depth of field, making more of the scene appear in focus and reducing the bokeh effect. Below, we’ve highlighted a table of bokeh and aperture photography examples:
| Aperture (f-stop) | Scenario Example | Effect on Bokeh | Use Case |
|---|---|---|---|
| f/1.4 – f/2.0 | Portrait of a person with trees in the background | Very strong bokeh: Background extremely blurred and creamy | Artistic portraits, low-light photography. |
| f/2.8 – f/4 | A couple of photos outdoors | Strong bokeh: Background still blurred, but subject remains fully | Portraits with visible separation from the background. |
| f/5.6 – f/8 | Group photo or half-body portrait with scenery | Mild bokeh: Background slightly blurred, more | Environmental portraits, group photos. |
| f/11 – f/16 | Landscape photo | Minimal to no bokeh: Everything from front to back in focus | Landscapes, architecture, and product photos need depth and clarity. |
Note: Bokeh effect can be created with any type of camera, but is commonly associated with DSLRs and mirrorless cameras.
How Does Aperture Affect Starburst?
A smaller aperture (higher f-number) is crucial for creating a sharper and stronger starburst effect in photography. When you photograph a bright point light source (sun, street lights, car headlights), it can appear with rays radiating outward in your photos. This is called a starburst or sunstar.
| Aperture Setting | Starburst Effect | Reason |
|---|---|---|
| Wide Aperture (f/1.8 – f/4) | Little to no starburst, lights appear as soft glowing blobs. | A wide opening produces minimal light diffraction. |
| Mid-Range Aperture (f/5.6 – f/8) | Mild starburst starts appearing. | Some diffraction causes small rays. |
| Narrow Aperture (f/11 – f/16 – f/22) | Strong, sharp, defined starburst with clear rays. | Small opening causes light diffraction around aperture blades, creating star rays. |
How to Measure Aperture Size?
Aperture size is measured using f-numbers or f-stops (like f/1.8, f/2, f/4.5, etc). The f-number is calculated using:
f-number = Focal Length of Lens/Diameter of Aperture
For example: If you’ve a 50mm lens set at f/2, then
Diameter of Aperture = 50mm/2 = 25mm
That means, at f/2, your aperture opening is 25mm wide. For more details, we’ve provided a conceptual table of aperture size with examples:
| F-stop (f-number) | Description | Appx. Aperture Opening (on a 50mm lens) | Appx. Aperture Opening (on a 50mm lens) |
|---|---|---|---|
| f/1.4 | Very large opening, lots of light, very shallow depth of field. | ~35.7mm | Big wide circle |
| f/2.8 | Large opening, good for portraits, blurred background. | ~17.8mm | Large circle |
| f/4 | Medium-large opening, sharper than wide open. | ~12.5mm | Medium-large circle |
| f/8 | Medium-large opening, sharper than wide open. | ~6.25mm | Medium-small circle |
| f/16 | Small opening, high depth of field, landscape use. | ~3.12mm | Small circle |
| f/22 | Very small opening, max depth of field, but may soften due to diffraction. | ~2.27mm | Tiny circle |
Key Notes
- Smaller f-number = larger aperture opening.
- f/1.4 is wide open
- f/16 is very small
- Larger f-number = smaller aperture opening
- Aperture size is a ratio, not a direct measurement in mm on your camera dial.
What are the Best Aperture Ranges by Photography Style?
The best aperture ranges by photography style are as follows:
| Photography Genre | Aperture Range | What it Highlights Most | Effect |
|---|---|---|---|
| Product photography | f/8 – f/11 | Product details (logos, label designs, key features, and more) | Ensures maximum sharpness, highlighting textures and features clearly. |
| Landscape photography | f/8, f/11, and even f/16 | Entire scene (foreground to background) | Provides a deep depth of field, keeping everything sharp from near objects to distant scenery. |
| Portrait photography (single subject) | f/1.4 – f/2.8 | Subject’s eyes/face; blurred background | Creates shallow depth of field, isolates subject, produces creamy bokeh for artistic effect. |
| Macro photography | f/8 – f/16 | Small subject details (flowers, insects) | Increases depth of field for close-up subjects while retaining fine detail focus. |
| Street photography | f/5.6 – f/8 | Main subject + environment | Balances the sharpness of the subject and surroundings, useful for quick shooting with enough depth of field. |
| Sports photography | f/2.8 – f/4 | Moving subject | Wide aperture allows a faster shutter speed, freezing motion while slightly blurring the background to isolate the athlete. |
| Night photography (Cityscapes) | f/8 – f/16 | City lights, building details | Keeps sharpness throughout the scene and creates starburst effects from point lights. |
| Family portrait photography (group portraits) | f/4 – f/8 | All people in the group | Ensures enough depth of field to keep everyone in focus, while slightly blurring the background for subject emphasis. |
| Architectural photography | f/8 – f/16 | Building lines and structures | Provides deep focus and clarity, ensuring lines remain sharp from front to back. |
How to Move Photos from Aperture to Photos?
To move photos from Aperture to Photos, ensure you’ve macOS. You can import your Aperture library directly into the Photos app. First, ensure your Aperture library is backed up. Then, open Photos and use the “File > Import” option to select your Aperture library. Photos will then import your photos, creating a new Photos library while leaving your Aperture library intact.
How to Check Photos’ Aperture?
To check the photos’ aperture, you need to check the photo’s EXIF data, which contains all the camera settings used when the photo was captured. To check the data, right-click the photo, access its properties, and navigate the details or information tab. You’ll also get shutter speed and ISO setting details. Here’s a more detailed process:
1. Access the Photo Properties
- Right-click on the image file in your file explorer (Windows or macOS).
- Select “Properties” (Windows) or “Get Info” (macOS).
- In the properties window, find and click on the “Details” tab (Windows) or the “More Info” section (macOS).
2. Locate Aperture Details
The aperture value in photography will be listed within the details or information section, represented by an f-number, such as f/2.8, f/5.6, or f/16.
3. Use Photo Editing Software
Adobe Photoshop or Lightroom displays EXIF data within their interface so that users can find the aperture information by opening the image and looking for the “Properties,” “Info,” or “Metadata” panel.
