
Product photography is a category of shooting products from different angles to publish on e-commerce product listings, social media ads, company websites, and other platforms. Product Image is crucial in modern online marketing, especially for influencing consumer behavior and driving sales. Professionally taken product photos enhance brand credibility, showcase the product in its best form, and contribute to boosting product sales.
There are 21 types of product photography that professional photographers utilize, including e-commerce shots, single product shots, group product shots, collage shots, and pack shots. Camera, lens, artificial light, tripod, and backdrops are essential equipment needed for shooting product images. To shoot product images, ensure an evenly lit environment, a plain and clutter-free background, and the product in a steady position or motion as necessary.
Product photos come with many mistakes and flaws. That’s why product photographers, e-commerce businesses, advertising, and marketing agencies have their own expert photo editors to ensure quality, consistency, and professional appearance.
What is Product Photography?
Product photography is the specific type of photography that involves capturing shots of products, their features, design, material, and shape, allowing viewers to understand their usability and increasing sales for product manufacturers and brands.
Professional product images are used for running campaigns, demonstrating products, and creating listings on e-commerce platforms, company websites, and social media ad campaigns, among other purposes. Commercial-standard product images look high-quality, clear, accurate, and authentic. As an award-winning product photographer, I can tell editing is an essential and mandatory step to ensure image quality to drive sales for brands.
What is a Product Hero Shot?
A product hero shot is a strategically designed prominent product photo displayed in an e-commerce product listing or a company website.
It is high-quality, compelling, and professionally presented, which makes potential customers aware and attracts them to check. Hero images are the most powerful visuals that convert viewers into paying customers.
What are the Different Types of Product Photography?
There are 21 types of product photography, counted based on the purpose of the images, ways to shoot, framing, and setup as follows.
1. E-commerce Product Photography
E-commerce product photography refers to product photography specifically created for e-commerce platforms, such as Amazon, eBay, Etsy, and Shopify. Each platform has specific product image guidelines that all sellers must follow to ensure quality, consistency, and a professional appearance. E-commerce photography captures products from different angles on white or plain, simple backgrounds to deliver visual information and drive sales.
Industry: All types of products.
2. Single Product Photography

Single-product photography refers to capturing a single product occupying the entire frame. Single product images capture products from different angles depending on the publishing purposes. The purpose of such images is to deliver the basic message of what the product is about, how it works, and how it solves the buyer’s problems.
Industry: All types of products, including fashion items, electronic gadgets, beauty products, etc.
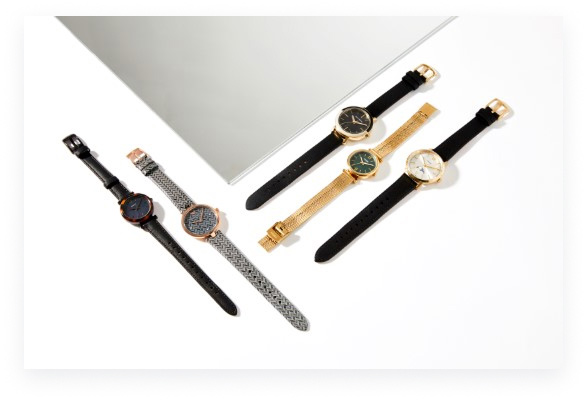
3. Group Product Photography
Group photos are taken by placing several products together in the frame. The purpose of group product photographs is to clarify the product from different angles, such as size, materials, finishing, packaging, purpose, showcase variation, or deliver more information about it. Group product images add more context and clarity to online shoppers’ purchasing decisions.
Industry: Beauty and cosmetics products, fashion industry, sports product industry, electronic gadgets, and food and beverage products.
4. College Product Photography
College product photography involves merging multiple product images to convey a unified message. By using photo editing software, you can add graphics, text, and visual elements to the products to create a collage.
Industry: Fashion and beauty products, lifestyle brands, home decor products, etc.
5. Packshot/Packaging Product Photography
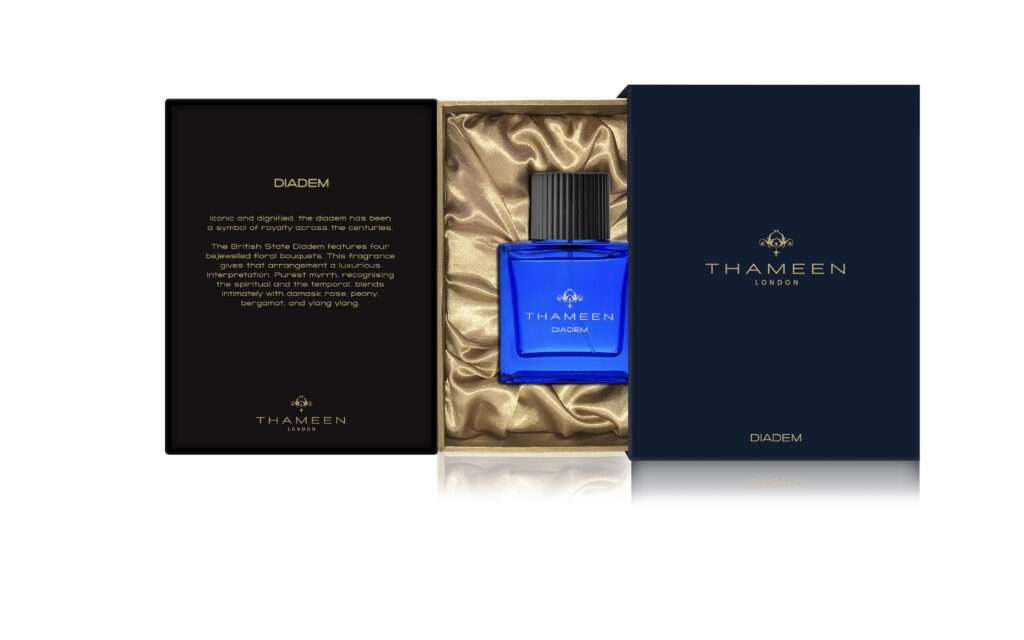
Packshot product photography refers to images with the packaging, labeling, or company logo of a product. Packaging photos disclose vital information, including the product name, logo or trademark, size, weight, components, materials, and any necessary cautions. Such photos aim to build trustworthiness by allowing customers to make informed decisions while buying. You can get packshot product images, packshot 3d, and packshot 360-degree format.
Industry: Electronic gadgets, consumer goods, cosmetics and beauty products, pharmaceutical products, packaging design agencies, etc.
6. Details or Close-up Shots for Product
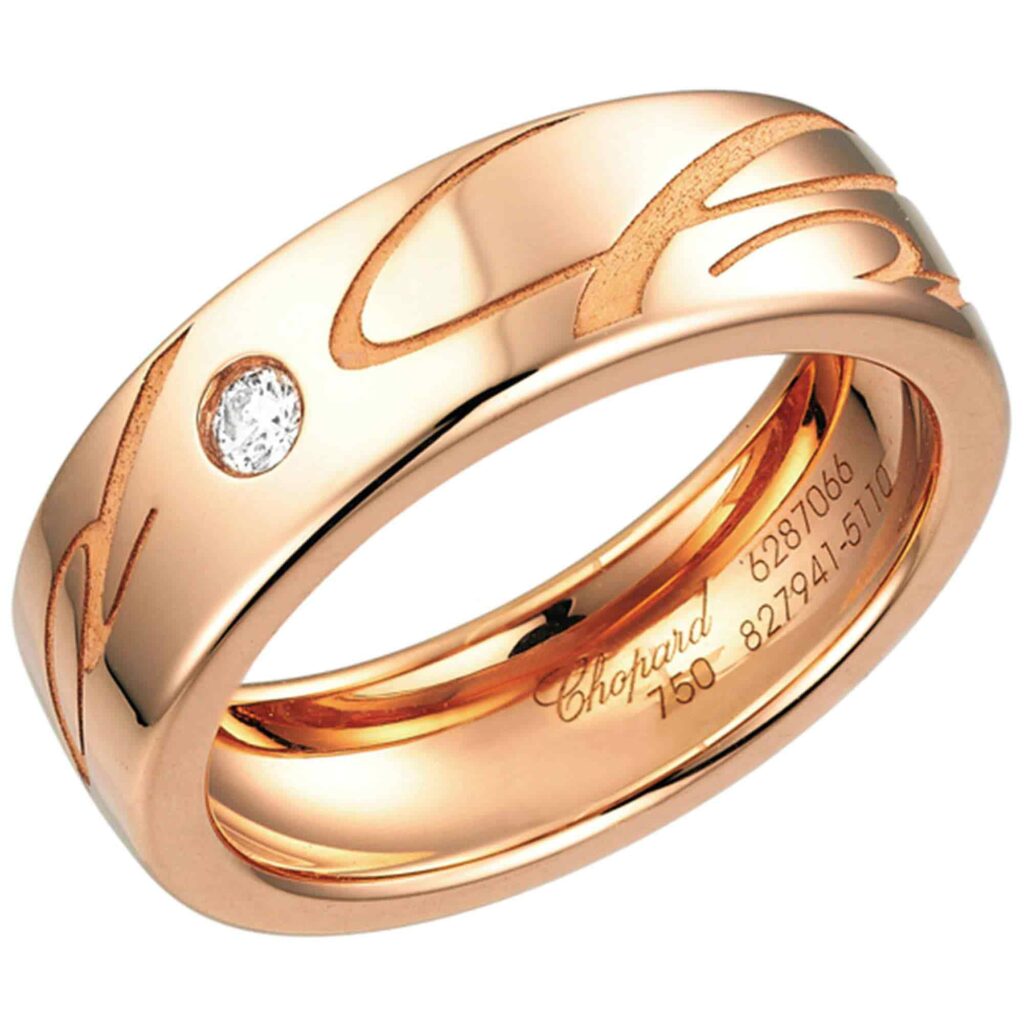
A detail shot or close-up is a close shot of small products or parts, used to demonstrate specific details, attributes, unique features, or functionality of products, and to support the description. Close-up shots are taken with a macro lens to make the tiny products or specific parts look lifelike. Such shots clear the buyer’s confusion and build trust in the products.
Industry: Food and beverage industry, jewelry industry, apparel industry, etc.
7. 360-Degree Product Photos
360-degree product photography involves shooting products from all angles and merging those images for consistent rotation with image editing software. Such images rotate in 3 ways, single-row where a product spins any one side, multi-row, which is a 3d image created by stitching 12-14 images, and twin-axis, making the product rotate both side-wise and up-down. 360-degree photography is used to provide a comprehensive view, so buyers don’t need to swap or scroll and have a clear view at once.
Industry: Jewelry products, apparel and footwear products, home appliances, automotive, electronic gadgets, etc.
8. Lifestyle/Contextual Product Photography
A lifestyle product photo shoot is a type of photo that showcases the product in a user’s actual life, its placement, and its significance in daily activities. Lifestyle photography helps new users understand products better and how they can change their lives, ultimately convincing them to make a purchase.
Industry: Home decor and furniture products, automotive industry, beauty and cosmetic products, electronic products and gadgets, etc.
9. Action/Movement Shot for Products
Action shots for product displays show how a product performs. It is another form of lifestyle photography, except that action photos require the right momentum for the exact shot.
Industry: Automotive, Electronic gadgets, fashion and apparel, cooking utensils, etc.
10. White Background Product Photography

White backgrounds are used for creating a minimalist and clean look for product images. White background product images are a fundamental requirement for e-commerce. Such backgrounds hold viewers’ attention to the products without distraction.
Industry: All types of products.
11. Size-Oriented Product Photography
Size-oriented product photography aims to display products’ sizes based on their dimension. Products come in lifelike sizes, smaller, and larger. Product photographers take comparison or scale-up shots to display the product’s size in terms of real-life settings.
Industry: Large products (furniture or automotive), small products (jewelry), electronic products, etc.
12. Hanging Product Photos
Hanging product photography involves taking shots of products by suspending them with thread or rope. This type of photography shows zero gravity in images, making the product look detailed and minimalist. The rope or thread is later removed in post-production. Hanging images add depth and create a 3d effect in the product.
Industry: Apparel products, shoe products, jewelry items, and fashion accessories (bags, watches, sunglasses, etc).
13. Flat Lay/Tabletop Product Photos
Flat-lay product photography involves taking shots of a product by laying it on a flat surface. It is easy to set and creates a minimalist, uniform, and professional look for images.
Industry: Clothing photography, food photography, jewelry photography, books and magazines, baby products, gadgets, etc.
14. Infographic Images for Products
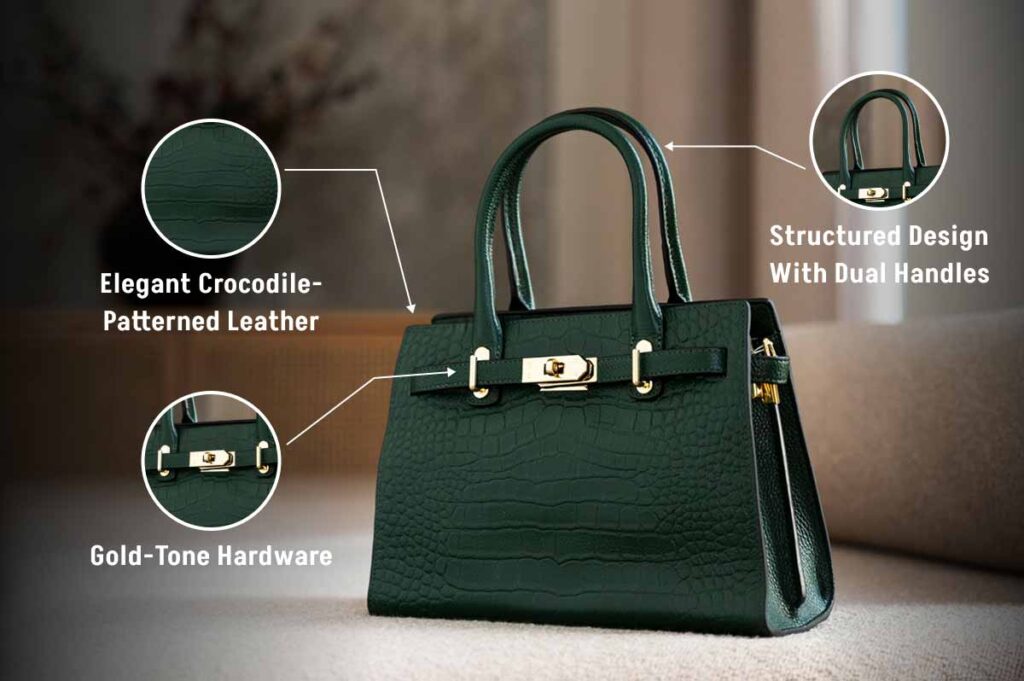
Infographic images, which often feature product photos with accompanying information and data, aim to educate viewers and help them make informed decisions. This type of image display comparison reveals vital perspectives, shows features or benefits in detail, and connects potential buyers with the brand.
Industry: Electronic gadgets, health and fitness products, sports items, home appliances, automotive, etc.
15. Promotional/Advertisement Product Photos
Promotional product images are used to showcase products in their best light for marketing purposes. By using photo editing software, expert photo editors create graphics or designs for different parts to deliver the brand message.
Industry: E-commerce, advertising photography, print media, and marketing agency.
16. Social Media Product Photography
Social media product photography refers to product images captured for publication on social media platforms, including Instagram, Pinterest, and Facebook. Considering the number of 5.24 billion social media users, it is a great platform to target a niche-relevant audience and increase sales.
Industry: All types of products.
17. Process Photography for Products
Process photography demonstrates how a product is manufactured, utilized, and maintained to educate users. Process product photos, especially effective for handmade products, to show craftsmanship.
Industry: Food, pottery, handmade products, electronic gadgets, etc.
18. Studio/Indoor Product Photography
Studio Photography is shot in a controlled indoor environment, typically a studio, utilizing artificial lighting, backdrops, and props. It’s used for precise control over lighting, shadows, and background, ensuring consistency and a polished, professional look.
Industry: Fashion industry, electronic industry, apparel industry, and any other types of products.
19. Outdoor Product Photography
Outdoor product photography involves capturing images of products in outdoor settings. The setting features natural elements as a backdrop, including natural light. Outdoor photography helps customers relate the products to their lives and creates a sense of urgency to purchase.
Industry: Automotive industry, sportswear products, clothing products, eco-friendly products, etc.
20. Creative Product Photography
Creative product photography involves representing products with artistic elements, unconventional methods, compositions, and abstract concepts. Such photos are used to evoke emotion and differentiate the brand from competitors.
Industry: High-end luxury products, Beauty and cosmetic products, food and beverage, handmade products, boutiques, lifestyle brands, etc.
21. Service as a Product Photography
Service is an intangible product that is often taken for granted by demonstrating situations, before-and-after images, etc. Service photography often has models to clarify the services.
Industry: Healthcare and medicine, hospitality, SAAS businesses, automotive services, etc.
Why is Product Photography Important for E-commerce?
Product photography is important for e-commerce to display products’ natural and professional looks, clarify viewers’ confusion, and connect buyers with the brands to increase sales. When shooting, my clients often say to ensure that product images drive sales. To do that, showcasing products in high-quality, pristine condition, accurately representing their color and dimension, is a must. Other reasons why product photography is essential for e-commerce are as follows.
- Creates a perfect product presentation: Professional product images show products’ features, highlight the USPs, and convince viewers to buy them. Such images are suitable for online publishing and can be used on other platforms, including company websites and social media.
- Optimizes product discovery: Well-optimized images contribute to higher search engine rankings and broaden online visibility for brands.
- Enhances brand credibility: E-commerce brands publish consistent and quality images, signaling trustworthiness, increasing customers’ engagement, and nurturing their trust in the products.
- Increase conversion rate: E-commerce product photos have a specific image measurement by aligning with it, sellers ensure high-quality, professional, and compelling images. Such images pique viewers’ interest in buying the products and boost sales.
- Reduce product return rates: Professional product photography ensures accurate colors and a uniform appearance for both physical and digital products. Accurate product representation reduces product return rates.
How Does Product Photography Influence Buyer Decisions?
Product photography influences buyer decisions by changing their perspective and challenging their assumptions. When buying a product, the buyer relates it to their most recent purchasing experience and subconsciously compares it, creating a situation of uncertainty about whether to make a purchase or not. Here, professional-grade product photography can dominate their thoughts.
High-quality product images convince buyers about the products’ authenticity, features, functionality, benefits, and usability. It challenges their thoughts, and there are thousands of research data points backing it up as follows.
- In a 2022 study by Slazzer titled Facts, Stats, and Impact of Product Photography on Modern e-commerce Buying Experience!, it is reported that 90% of internet consumers cite photo quality as the most crucial element in an online purchase.
- A 2018 blog by EMARKETER titled For Online Shoppers, Photos Can Influence a Purchase it, reported that 60% of US digital shoppers check an average of 3 to 4 images when shopping online.
- A 2024 blog by BusinessDasher titled 9 Importance of Product Photography Statistics in E-commerce reported that high-quality product images increase conversion rates by 94% when compared with low-quality images.
- A 2020 blog by Adobe for Business titled A guide to effective product photography quoted that 22% of product returns happen due to looking different than the images.
What Equipment Do You Need for a Product Photo Shoot?
The equipment you need for a product photo shoot is a camera, a lens, an artificial light setup, a tripod, a backdrop, and necessary accessories. As I own a photography studio, it is equipped with all types of necessary gear I need, from smaller to larger ones. But I don’t recommend you to own everything; instead, consider your resource affordability, service ranges to decide what you must own.
1. Camera
The best cameras for product photography are DSLR cameras to ensure professional-grade product images. There are mirrorless cameras, full-frame cameras, APS-C (crop sensor cameras), and medium format cameras widely used for shooting products due to their offered benefits as follows.
| Camera | Description |
|---|---|
| DSLR cameras | Robust build, reliability, and battery longevity. It allows extensive lens options and is widely used for both studio and indoor product photography. |
| Mirrorless cameras | Compact and lightweight with advanced autofocus. Users get a real-time electronic viewfinder and silent shooting. Usable for both studio and outdoor shooting. |
| Full-frame camera | High-quality images and dynamic range even in low-light situations. It is often recommended for high-end product shots, commercial advertising, and printing work. |
| APS-C (crop sensor) cameras | Smaller sensor than full-frame cameras, affordable, lightweight, and delivers professional results. Popular among e-commerce product photographers for portability and pricing. |
| Medium format cameras | Large yet delivers excellent dynamic range, detail, and color. Recommended for using high-end product photography, ensure the highest image quality and printing. |
2. Lens
The best lens for product photography is the one that creates focused, clear, and sharp images. A prime lens, a macro lens, a standard lens, and a wide-angle lens are the most commonly used product photography lenses.
| Lens | Description |
|---|---|
| Prime Lens | Offers sharpness and a wide aperture within a fixed focal length. It has low distortion and allows natural perspective for medium-sized products such as apparel, food photographs, sportswear, and fashion items. Example: Nikon Nikkor Z MC 105mm f/2.8 VR S, Canon EF 85mm f/1.8 USM, and Canon EF 50mm f/1.4 USM Lens. |
| Macro Lens | Offers life-size magnification, sharpness, and texture capturing. A macro lens is best for capturing details and shooting tiny products, such as jewelry photography, food photography, and the smallest parts of electronic gadgets. Example: Canon EF 100mm f/2.8 Macro USM Lens, Nikon Z MC 50mm f/2.8 Macro Lens, and Sony FE 50mm f/2.8 Macro. |
| Zoom Lens | Offers versatility for shooting range, allowing you to shoot products in lifestyle settings and motion. It allows quick framing adjustments depending on the studio setting. Example: Nikon Z 24-70mm f/4 S Lens, and Canon EF 70-200mm f/2.8L IS II USM. |
| Wide-angle Lens | A wide-angle lens is used for shooting large products in open or big spaces, such as furniture products, car photographs, etc. It exaggerates perspective, making the foreground appear larger. Example: Canon EF-S 24mm f/2.8 STM, Canon EF 28mm f/2.8 IS USM, etc. |
3. Artificial Light Setup
The most commonly used artificial lights for product photography include fluorescent bulbs, LED bulbs, tungsten bulbs, flashlights, strobe lights, softboxes, octaboxes, scrims, umbrellas, and bounce cards. Artificial lights offer constant and steady illumination, are portable, and are available in stores within your budget. A photography setup is required to light with the following lights.
- Key light: Focuses entirely on the subject.
- Fill light: Backup key light to fill in shadows.
- Backlight: Stays behind the subject to separate the frame from the background.
- Front/flat light: This is placed directly in front of the subject.
- Soft light: Diffuses the light’s intensity level.
- Split light: This is placed on both sides of the product for even lighting.
Is Natural Light Effective for Product Photography?
Natural light is most effective for product photography during the golden hour, a period that occurs after sunrise and before sunset. At that time, the sun’s rays are soft, and by using a bounce card, you can balance the light well enough to shoot products. Avoid shooting during the harsh sunlight (noon); otherwise, images may get distorted.
4. Tripod
The best tripod for product photography is one that is well-constructed from durable materials, has stable footing, a reasonable payload, customizable height, and flexible orientation. The Vanguard Alta Pro 263AP Aluminum Tripod, the Manfrotto 055 Aluminum 3-Section Tripod with Horizontal Column (MT055XPRO3), and the K&F Concept TM2515T Aluminum DSLR Camera Tripod are some of the popular product photography tripods used in the photography industry.
5. Backdrop
The best background for product photography depends on the product’s purpose and the intended publishing platforms. A white background is used for a minimalist and professional look for products, such as e-commerce product photography. Social media and company website product images mostly follow a custom or brand-specific background. Popular product photography backdrops include vinyl, seamless paper, printed backdrops, chromakey, collapsible backgrounds, muslin, velvet, and canvas.
What is the Difference between Background and Backdrop in Product Photography?
A product photography background is its tangibility. A background refers to all types of natural and artificial surfaces that are used behind the photography frame. A backdrop is a tangible, man-made object used as a background for shooting products.
6. Accessories
Depending on the products and their purpose, you can use necessary complementary props to develop a story that helps buyers understand. Professional product photography requires several pieces of gear to assist with the photo shoot, such as a camera bag, lens filters, and external hard drives.
How to Shoot Product Photos?
To shoot product photos, follow these 4 steps.
1. Decide on the location
2. Prepare the setup
3. Shoot products from different angles
4. Have your images edited to publish.
1. Decide on the Location
I take e-commerce product images or collage images in a controlled environment. Lifestyle images are shot outdoors in contextual environments. It depends on the products and if the clients need on-location shooting. Ensure the location is evenly lit.
2. Prepare the Setup
Product photography setup includes three fundamental equipment: camera, background, and light. A professional studio setup owns high-volume gear; however, if you are just starting, ensure your fundamental equipment is on standby.
- Position your camera: Place the camera and the product parallel at eye level. The best camera settings for product photography are ISO 100-200, aperture f/8 to f/11, and shutter speed 1/250s for still objects and 1/1000s or higher for moving objects. Follow appropriate photography compositions while shooting the product as follows.
- Central placement: Keep the product in the center, prioritizing the negative space.
- Rule of thirds: Divide the frame into 9 boxes and put the product in any of the 4 intersections or any of the 9 boxes.
- Rule of odds: Shoot an odd number of product photos.
- Dynamic diagonals: Place the product diagonally and use an arrangement of lines to guide the viewer’s eye toward the product.
- Flat-lay/Top-down viewpoint: Shoot the product from above as it lies on a flat surface.
- Background: Look for the right product photography backdrops to shoot your products. You will get them online within your budget. Place the background on a flat surface or hang it with a C-stand, and then put the product on it. Make sure the background doesn’t outshine the products or distract viewers’ attention. Or you can always change background colors by using software.
- Lighting: While shooting indoors, choose a room with a window where sunlight enters. Use reflective papers, and bounce cards if the lights are harsh. As for using the artificial lights, keep them at eye level. Veteran photographers recommend using at least 2 lights, one key light at a 45-degree angle of the product, and another as a fill light.
3. Shoot the product
Experiment with different angles and take shots. While shooting, avoid built-in camera flashes so as not to ruin the atmosphere you’ve created. Start with a minimalist setup and then add props as necessary.
4. Have your images edited
Editing enhances image quality, resolution, and appearance through perfect coloring, sizing, and removing distractions. Depending on the product editing category, for example, clothing products need ghost mannequins, beauty products need photo retouching, etc. When ensuring consistency and quality, it’s better to collaborate with professional photo product editing service providers whose expertise, knowledge, and service category you can take advantage of.
How to Take Product Photos with a Phone?
To take product photos with a phone, use the phone’s grid feature while taking the shot. Avoid using Zoom or Flash; instead, use your feet to zoom while capturing product photos with an Android phone or iPhone. Ensure the products are clean, the room is well-lit, and you are using a neutral or white background. Avoid using any filters and adjust focus, exposure, white balance, and shoot in the highest resolution. Use the Adobe Lightroom and Snapseed apps to edit images taken with your phone.
How to Take Product Photos for Etsy?
To take product photos for Etsy, follow the guidelines outlined below.
- Images must be a minimum of 2000 pixels on the shortest side.
- Image file size 10MB or less
- Image aspect ratio 4:3
- Image format: .jpg, .png, etc.
Use consistent and even lighting, and product placement on a clean white background. Take multiple shots from the front, back, sides, scale shots, take close-up shots, etc. Have your images edited by e-commerce photo editing services to maintain uniformity, color coherence, professional and realistic appearance, and e-commerce-specific size guidelines.
What are the Common Mistakes to Avoid in Product Photography?
Common photography mistakes to avoid in product photography include a lack of understanding of the purposes of product photography, shooting in poor lighting, a cluttered background, and making editing optional.
- Lacking the understanding of the purpose: Many amateur photographers go with the flow, get a product, and shoot. It makes the product look flat without any selling purpose. Even if the products are the same, the choice of the target audience differs. While shooting, consider the products’ end users, what their needs are, and what piques their attention.
- Shooting in poor lighting to create an artistic environment: Insufficient or uneven lighting creates inconsistency in the setup. Considering such a situation for a creative setup is detrimental to professional product photography. A well-planned, creative lighting setup is essential.
- Cluttering the background: Using too many props to develop a story is a big mistake. It distracts viewers and clutters the setup. Keep ample negative space (even with props) to let viewers breathe and understand the photographs.
- Inconsistent styling of multiple products: While shooting group product shots, inconsistent styling, camera angle, and lack of composition would make the scene haphazard. Take a moment to develop a cohesive style that will create a positive impression for the product brands.
- Making image editing optional: Post-production is an integral part of creating high-end images. Renowned photographers do a finishing touch to edit. Focus on moderate yet standard editing. Over-editing consumes time and ruins the image’s purpose.
10 Product Photography Tips
Here are my 10 product photography tips for you to ensure picture-perfect images for commercial usage.
1. Prepare the Product
Make the product polished, original in color, and in pristine condition. Use new products, if not thoroughly clean them for a spotless look. While shooting clothing products, iron them and remove the stains and marks. Don’t worry if any marks are permanent; edit them out during post-production.
2. Own Necessary Gears
Prepare your essential gear, as well as any other necessary items. When starting out, consider purchasing pre-owned gear to save on expenses. Be selective in choosing what gears you must have rather than what you should have.
3. Choose Product Photography Angle Wisely
Try different photography angles to find which one describes the product best. The most popular product photography angles are as follows.
| Angle | Description |
|---|---|
| Front | Eye-level, the product is side posed (example: footwear) |
| Profile | Eye-level, a product from the backside |
| Back | A bird-eye view shot taken from up above |
| High | In a worm-eye view, the subject is positioned high |
| Low | A worm-eye view, the subject is positioned high |
| Micro | Shows details of a product |
| 45-degree/ three-quarter | Shows subjects’ multiple viewpoints |
4. Stay Aware of the Trend
Get connected with the product photographers’ community. It would help you stay informed, seek inspiration, and suggestions, and land jobs.
5. Shoot in Various Locations
Shoot any locations around you, inside your home, near nature, traveling, eating, or anything related to the subject. Versatile natures would both hone your skills and broaden your perspective about shooting products from different angles.
6. Use Props to Scale up Images
Use a moderate amount of props inside your frame so that it doesn’t clutter the scene. Product photos for social media are often decorated with props to make the reason for the photo obvious. Props are used for adding value to the image story development.
7. Avoid Using Filters
Filters are fascinating features. It can add some fun to your images. But for professional photography, it’s risky as it can ruin your photos. Therefore, you are better off without it.
8. Make Use of Color Psychology
Understanding color theory plays a vital role in capturing the right emotions according to age and gender-based audiences. Take advantage of different colors inside the frame while shooting or editing.
9. Consider the Purpose and Platform while Shooting
When shooting for e-commerce, the setup is minimalist and clean. Brand images and social media images allow customization and creativity to be applied to them. Be sure to review the platform’s image guidelines.
10. Hire Professionals to Edit Your Images
Editing elevates image quality and resistance. A slight retouch makes a huge difference in image appearance. If you don’t have time or lack editing skills, collaborating with professional image editing agencies would get you the same advantage.
When to Hire a Professional Product Photographer?
To hire a professional product photographer, consider the following situations.
1. During the following client-specific requirements
2. During time-constraining situations
3. When lacking skill and expertise
4. While ensuring quality and consistent services
5. When making your brand recognizable
1. During the following client-specific requirements: E-commerce businesses rely on high-quality images a lot to convince potential customers to make a purchase. Collaborating with a professional product photographer allows them to manage time, schedule day-to-day activities, streamline workflows, and ensure high-quality, professional-grade images for marketing.
2. During time-constraining situations: Professional photographers and photography studios often hire or collaborate with other photographers to gain the extra edge, add diversity in photography style, and eliminate heavy workloads during peak seasons (spring and fall).
3. When lacking skill and expertise: Many solopreneurs and online store owners doing photography themselves can stay ahead of the competition by hiring product photographers to shoot product images. Their skill and expertise are valued qualities that renowned brands mostly rely on.
4. While ensuring quality and consistent appearance: Hiring professional product photographers allows you to ensure quality and consistent images that speak volumes about your brand. Quality images represent products in front of online customers.
5. When creating brand awareness: Hiring professional photographers for product images secures the brand as a reliable one. People believe in quality brands and their products through images. It establishes the brand’s professionalism to drive sales.
What are the Best Ways to Hire a Professional Product Photographer?
The best ways to hire a professional product photographer are as follows.
- Research online to come across expert photographers.
- Ask on communities at Quora and Reddit for suggestions.
- Ask peer professionals for recommendations.
- Take advantage of marketplaces within your needs and budgets.
Make a list of photographers and asses their profile, work styles, reviews and ratings, and budget. Experienced product photographers have their net cast wide enough to reach different platforms as follows.
- Snappr is the largest photography network ready to support people’s visual needs in photography, photo editing, or any other visual content creation.
- Upwork is one of the widely recognized freelancing platforms that shelters product photographers with various expertise. You can employ them based on time, days, project, or product.
- Photography studios such as Squareshot, POW Product Photography, and Pencilone—these photography studios offer commercial-grade photography services for global clients.
What Should You Look for When Hiring a Product Photographer?
When hiring a product photographer, look for their portfolio, expertise, charge rate, location, and availability.
- A portfolio would give you an idea of what types of products they have worked on, and if that satisfies your commercial needs.
- Expertise indicates how skillful and creative they are in creating images.
- Budget-friendly charge rate is a priority, but quality services come at a price.
- Photographers near your business are preferable; hiring someone from another region would increase your photography costs.
- Check for their available time to shoot. Most photographers mention the schedule on their website.
How Much Money Do Product Photographers in the USA Make?
Product photographers in the USA make around $42k-$44k or higher, depending on their expertise and the location they are serving. Product photographers in NYC and the surrounding area charge higher rates considering the high living expenses. Product photographers who work in relatively urban or other less-populated areas charge much less.
How Does a Product Photographer Ensure Product Image Quality?
Product photographers ensure product image quality by editing. Working over the years, they have built up a relationship with several photo editing companies and stick to those for consistent and quality images. Renowned professional photo editing companies ensure high-quality images at a faster turnaround, a competitive pricing structure, and address photographers’ unique work styles across the images.
What Software is Best for Editing Product Photography?
The best software for editing product photography is feature-rich, offers a user-friendly workflow, has plenty of guidelines and tutorials to support editors, and updates frequently. Adobe Photoshop, Adobe Lightroom, Skylum Luminar Neo, ON1 Photo RAW, DXO PhotoLab, and CyberLink PhotoDirector365 are some of the popular photo editing software used for product photography. All this software comes in a free trial and an affordable pricing structure.
How to Outsource E-commerce Product Photo Editing Services?
To outsource an e-commerce image editing company for product images, check the company’s portfolio, service categories, client testimonials, and pricing structure. Test the free trial option to understand their editing style firsthand. If all these align, you can either contact them or proceed through the get a quote CTA.
Outsource Product Photo Editing at an Affordable Price
Free Trial
