
Feather Edges in Photoshop refers to the technique of softening the edges of a selection, mask, or shape, creating a gradual transition between the selected area and the surrounding pixels.
To feather edges in Photoshop, you first need to make a selection around the area of an image using the selection tool and adjust the feather radius to soften the edges of that selection. Below, we’ve highlighted a step-by-step process on how to feather out edges in Photoshop:
What you’ll learn in this article
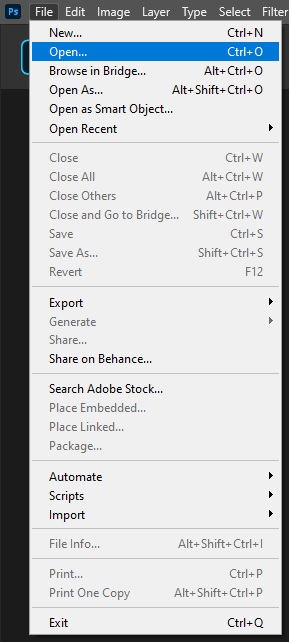
- 1 Step 1: Open the Image in Photoshop
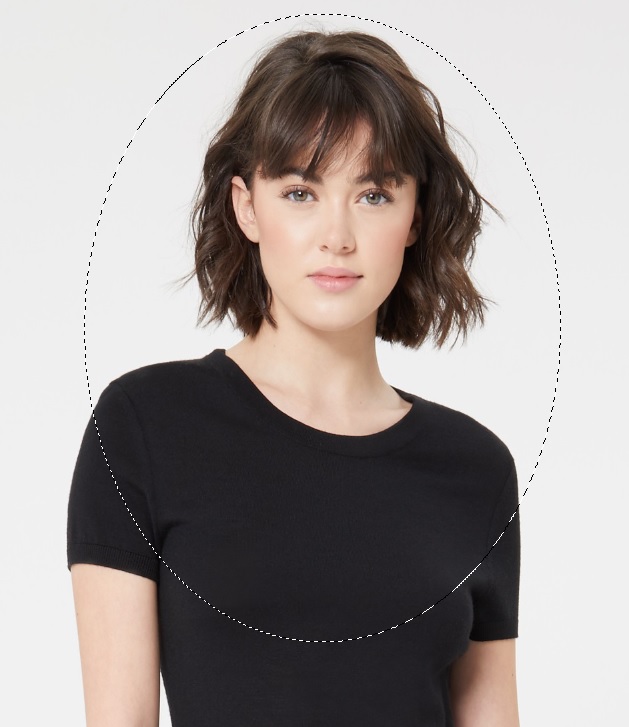
- 2 Step 2: Make a Selection
- 3 Step 3: Feather the Selection
- 4 Step 4: Change the Background
- 5 Step 6: Place the Layer
- 6 Step 7: Save the Image File
- 7 How Do You Soften Edges in Photoshop
- 8 How to Blur Edges in Photoshop
- 9 How to Refine Edges in Photoshop
- 10 How Do You Feather a Shape in Photoshop?
- 11 What is Feathering in Photoshop?
- 11.1 Is Feathering Destructive in Photoshop?
- 11.2 When Should I Use Feathering in Photoshop?
- 11.3 What are the Best Ways to Use Feathering in Photoshop?
- 11.4 Can I Apply Feathering Before Making a Selection?
- 11.5 Can I Feather-layer Styles Like Drop Shadows?
- 11.6 Can I Undo or Adjust the Feathering After Applying It?
- 11.7 What’s the Difference Between Feather and Anti-alias in Photoshop?
- 11.8 What are Feather Edges in Photoshop?
- 11.9 What is the Right Amount to Feather Edges?
Step 1: Open the Image in Photoshop
You can drag and drop the image you want to edit or select the “File” option from the Photoshop top menu bar, click the “Open” and choose the image from your desktop.
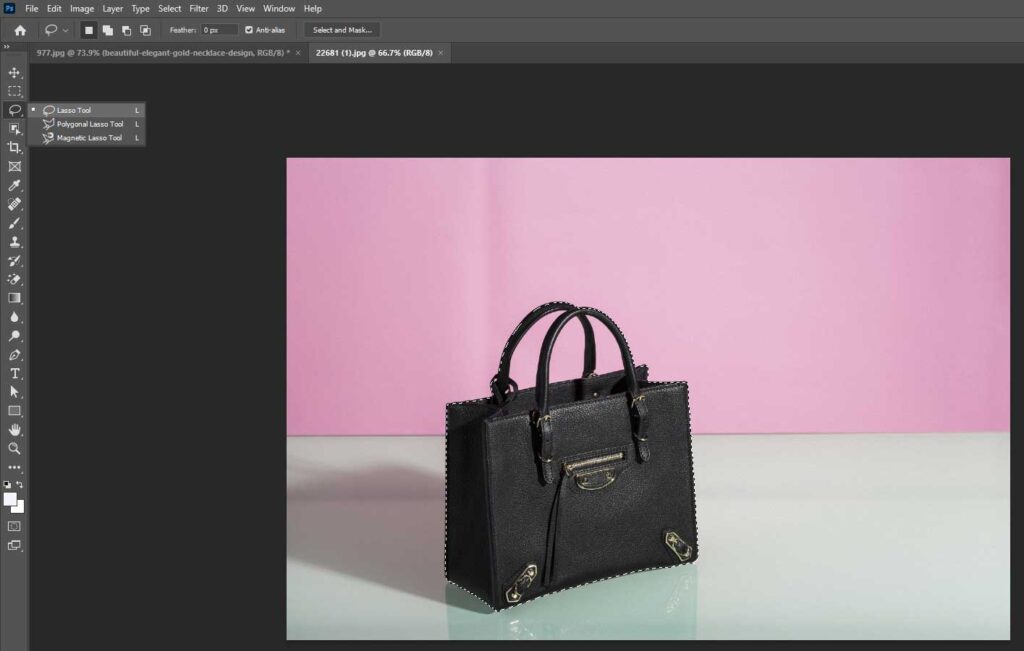
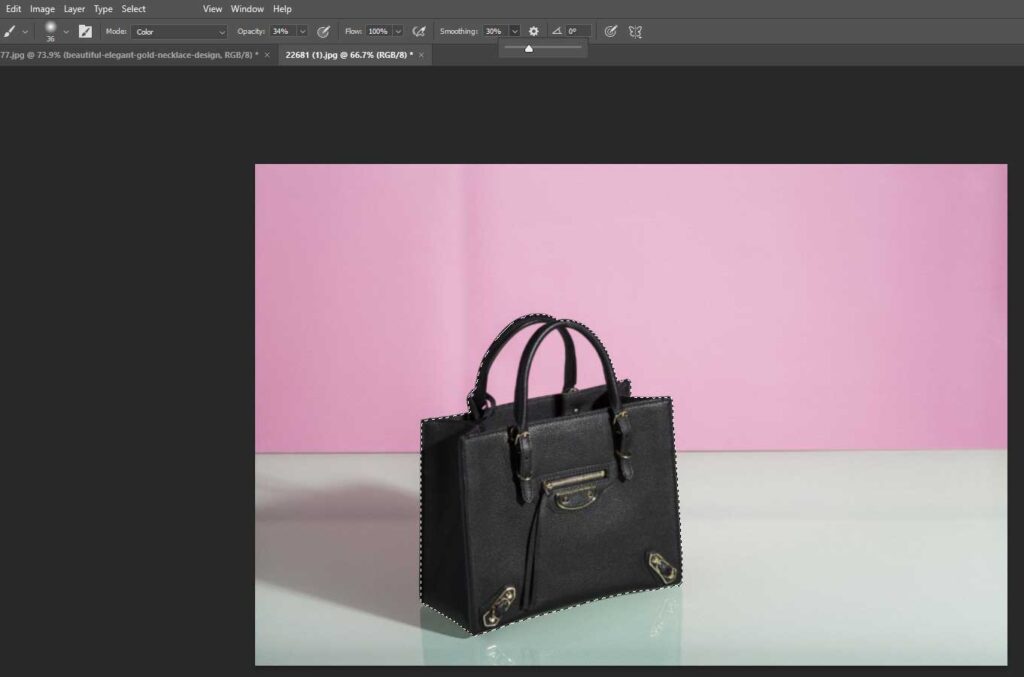
Step 2: Make a Selection
You can use any selection tools, like the Marquee tool, the Elliptical Marquee tool, the Lasso tool, and others, depending on the shape of your selection. Make a selection over your image, and it’ll appear as a dotted line on the image. You can “Deselect” if the selection is not made properly.
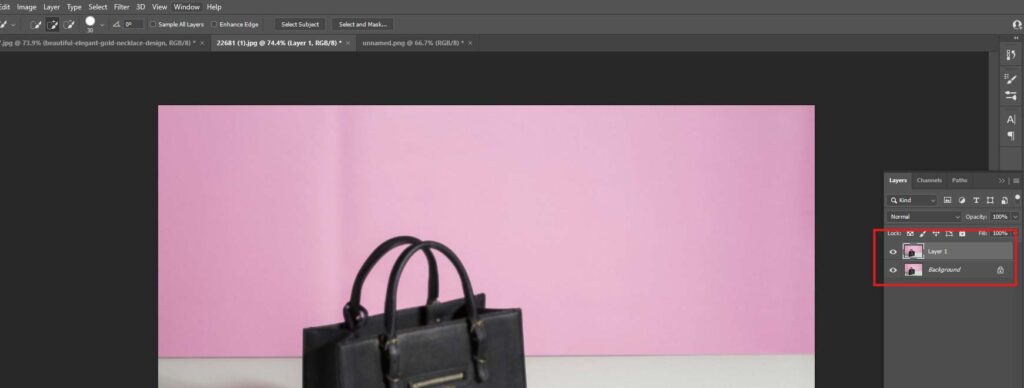
Step 3: Feather the Selection
After making the selection, press ‘Ctrl+Alt+R’ to open Refine Edges. You can also find the option under the Select menu from the top bar.
A new window will pop up. Move the Feather Slider to control the hardness of the edge.
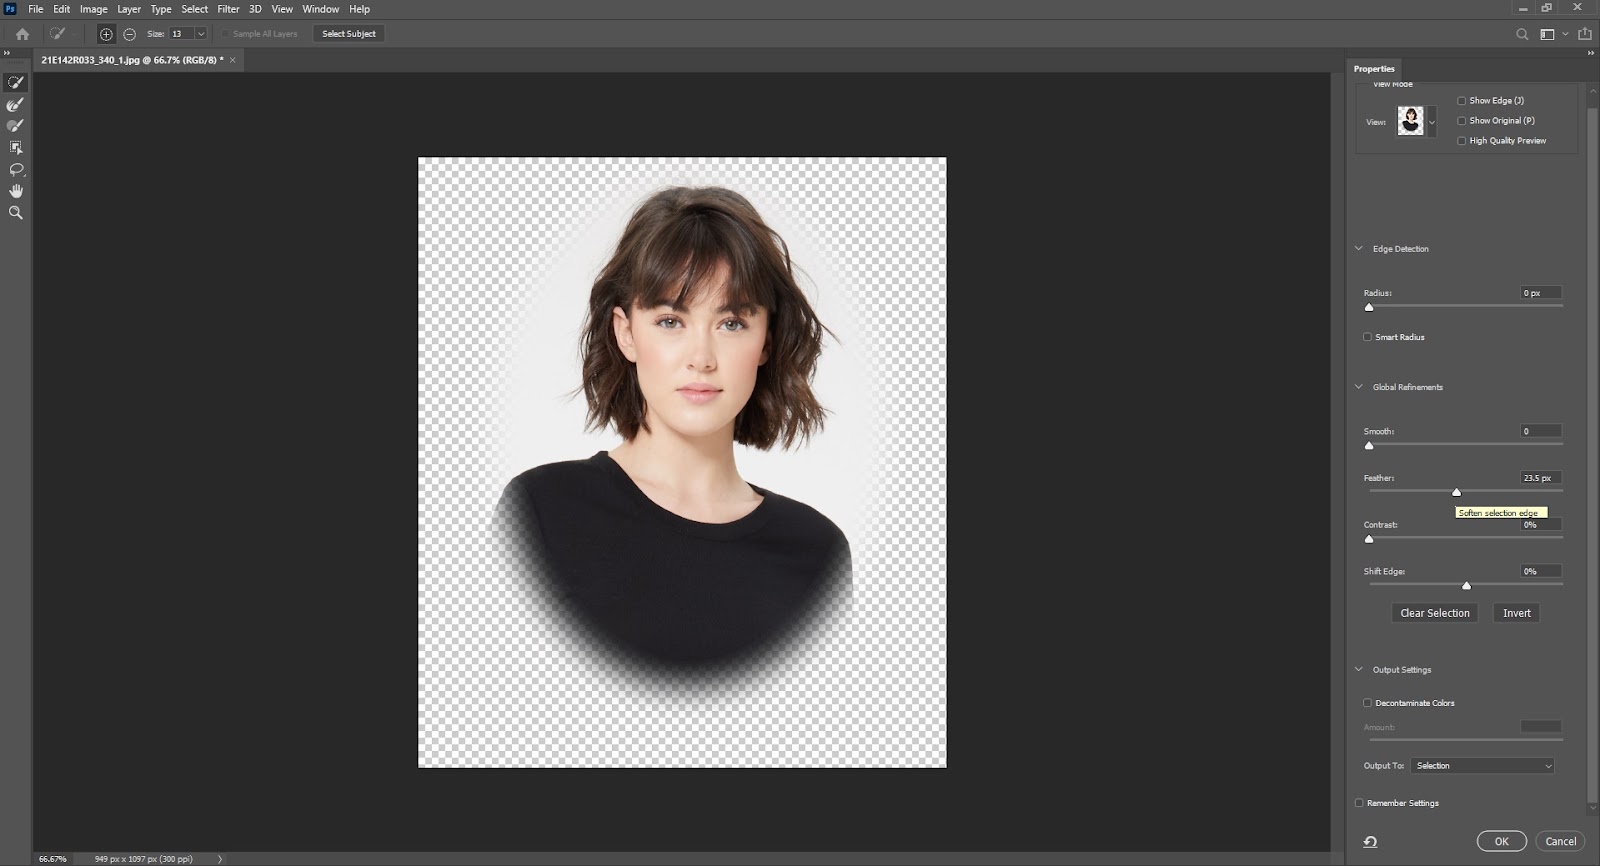
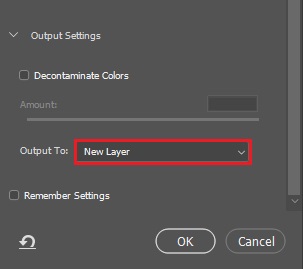
Select New Layer from the Output menu and click Ok.
You can move the selected part to place it at a suitable place in the image.
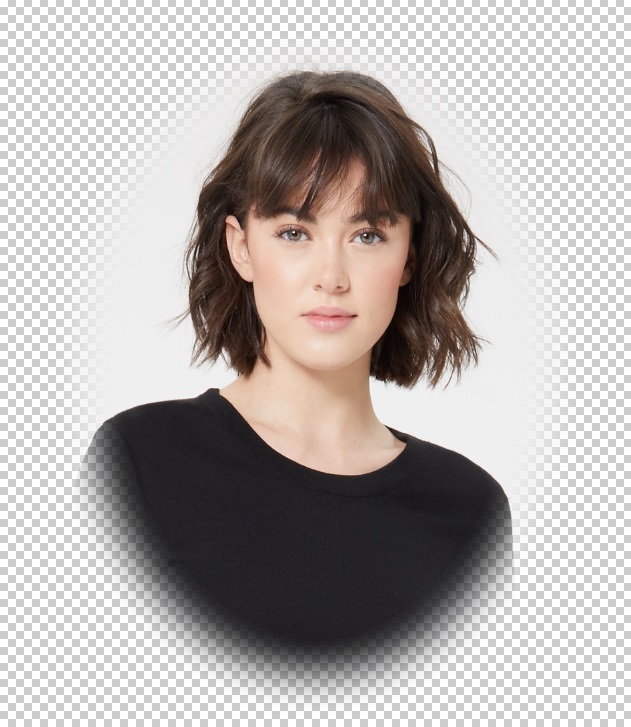
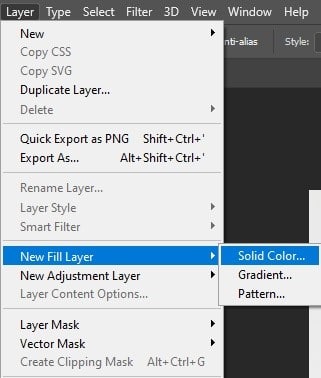
Step 4: Change the Background
Now, you can change the background color or add a different background to this image. Here, we’re changing the background color of this image by adding a new fill layer. From the top menu, click on Layer > New Fill Layer > Solid Color.
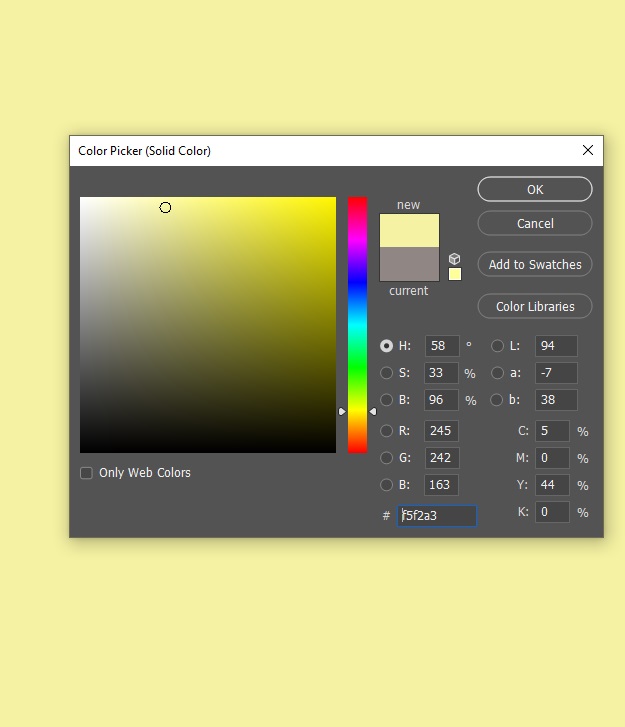
A color palette will open up. Choose the color you want to use as background.
Step 6: Place the Layer
Place the New Solid Color Layer below the Background Copy layer.
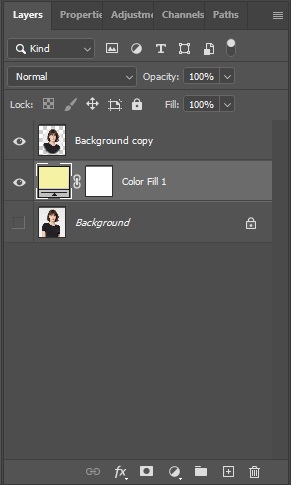
Now, your feathering will be visible.
Step 7: Save the Image File
Go to File, and select Save As to save the final output.
Bonus step:
Soften edges. To make product background smooth or to blend edges in Photoshop, enter a number into the “Feather Radius” field. You can start between 20 and 30 and adjust as needed. This number determines how many pixels away from the edge of your selection the Feather tool is before smoothing and blending.
How Do You Soften Edges in Photoshop
You can soften or smooth cutout edges in Photoshop to apply 3 tools, including Anti-aliasing, Feathering, and the Blur tool. Each tool is effective for different types of edges and situations – whether you’re selecting objects, working with shapes, or refining images. Below, we’ve highlighted the anti-alias and blur tool of how to soft edge for product image Photoshop, and portraits.
How Do You Soften Edges in Photoshop Using Anti-aliasing?
To soften edges in Photoshop using Anti-Aliasing, follow these steps:
- Choose a selection tool
- Select the Anti-alias tool
Step 1: Choose a Selection Tool
From the Photoshop toolbar, use any selection tool, like Lasso, Polygonal Lasso, Magnetic Lasso, Magic Wand tool, or others.
Step 2: Select the Anti-alias Tool
From the “Options Bar,” check anti-alias before making your selection. After that, edit, mask, or cut.
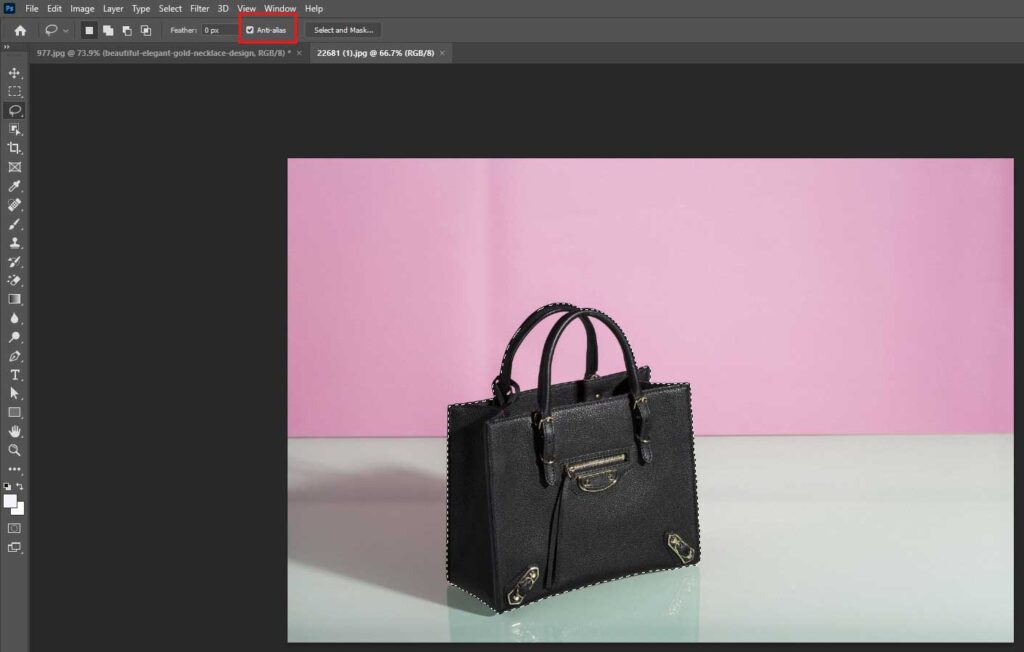
Note: you can’t apply anti-aliasing after the selection is made. So, enable it before making a selection.
How Do You Soften Edges in Photoshop Using the Blur Tool?
To soften edges in Photoshop using the Blur Tool, follow these steps.
- Select the blur tool
- Set the brush size
- Strengthen the brush
- Smooth the edge
Step 1: Select the Blur Tool
Select the Blur tool from the toolbar or press the shortcut key: R.
Step 2: Set the Brush Size
Select the Blur tool from the toolbar and press ] or [ to adjust the size of the brush.
Step 3: Strengthen the Brush
Use the Strength (10-30%) drop-down menu at the top of the screen to select the intensity value (you want to blur). The higher the percentage, the more vivid the blur.
Step 4: Smooth the Edge
Run the Blur tool over the edges you want to smooth.
How to Blur Edges in Photoshop
You can blur edges in Photoshop, using a combination of selection tools, feathering, and blurring filters. Below, we’ve highlighted 3 common methods to blur edges:
How Do You Blur Edges Using Feather in Photoshop?
To blur edges using Feather in Photoshop, follow these steps:
- Select an area
- Feather the selection
- Apply your action
Step 1: Select an Area
Use a tool like the Lasso Tool, Marquee Tool, or Quick Selection Tool.
Step 2: Feather the Selection
Go to “Select > Modify > Feather” (or press Shift + F6). Enter a value (e.g., 20 pixels) and click OK. [Note: Higher = softer edge]
Step 3: Apply Your Action
Now, copy, mask, delete, or adjust the selection, which will provide you a soft, blurred edges in Photoshop.
How Do You Blur Edges with Gaussian Blur + Mask
To blur edges using Gaussian Blur and a mask, follow these steps:
- Duplicate the layer
- Add a layer mask
- Apply a Gaussian Blur
Step 1: Duplicate the Layer
Duplicate the layer to edit the image independently, and for this, use the shortcut key: Ctrl+J (Cmd+J on Mac).
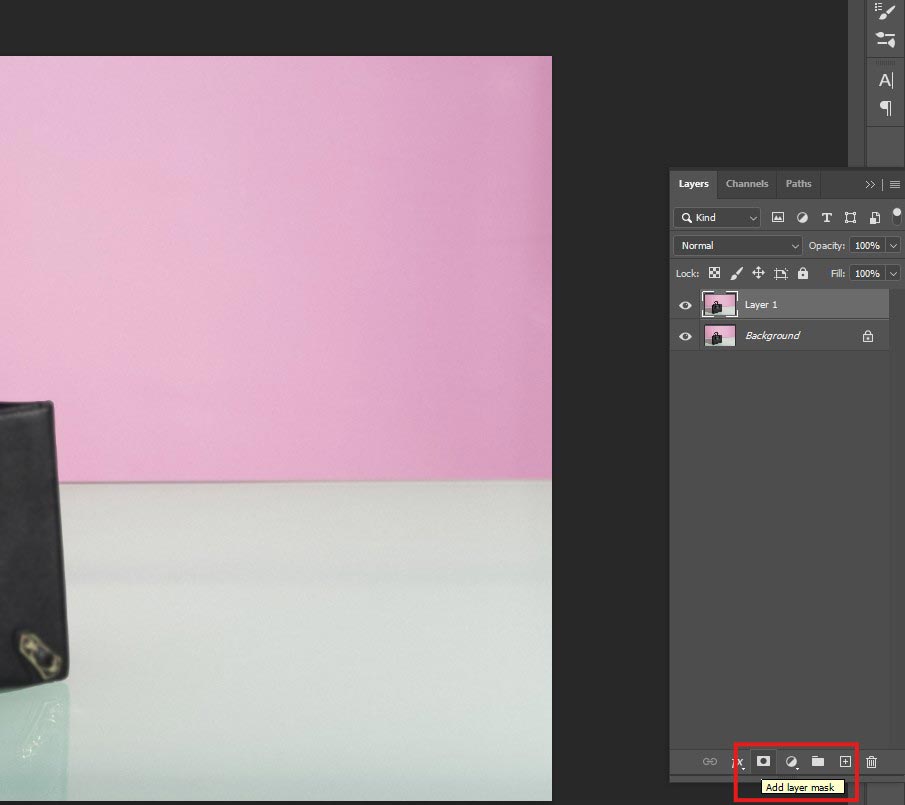
Step 2: Add a Layer Mask
Select the “Layer” option from Photoshop’s top menu and then click the “Layer Mask > Reveal All.”
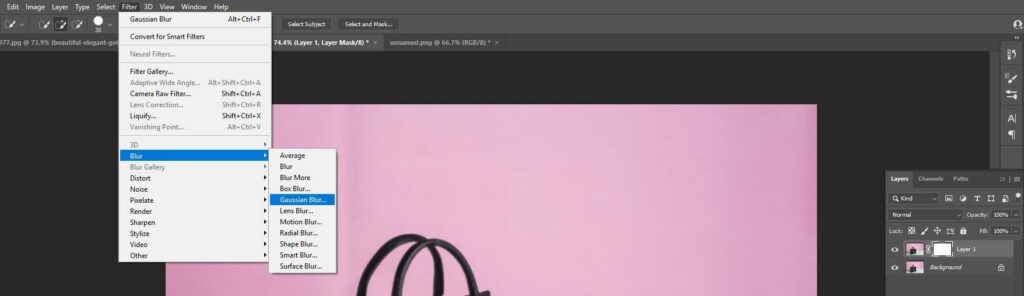
Step 3: Apply a Gaussian Blur to the Mask
Select the mask thumbnail, use a soft black brush to paint along the edges, and go to “Filter > Blur > Gaussian Blur” to choose a value to soften. [You’ll find the “Filter” option in Photoshop’s top toolbar]
How Do You Blur Edges Using the Blur Tool in Photoshop? (Manual Blurring)
To blur edges in Photoshop using the Blur Tool, follow these steps:
- Select the blur tool
- Set the strength value
- Brush selection and paint over them
Step 1: Select the Blur Tool
Select the Blur Tool from Photoshop’s toolbar (i.e., teardrop icon).
Step 2: Set the Strength Value
Set Strength (30–70%) in the top bar.
Step 3: Brush Selection and Paint Over Them
Use a soft brush and paint over the edges to blur them.
How Do You Blur Edges of Hair or Complex Objects in Photoshop with Select and Mask?
To blur the edges of hair or complex objects in Photoshop using Select and Mask, follow these steps:
- Select the selection tool
- Adjust the value
- Save the edited image
Step 1: Select the Selection Tool
Make a rough selection using the Quick Selection Tool and then click Select and Mask (top toolbar).
Step 2: Adjust the Value
Feather to soften edges. Smooth, Shift Edge, or Contrast as needed.
Step 3: Save the Edited Image
Save the edited image to a Layer Mask or New Layer.
Pro Tips: Use Smart Objects before applying blur filters to keep edits reversible. Combine multiple techniques for best results (e.g., Feather + Mask + Blur Tool). Zoom in while working to better control the softness.
How to Refine Edges in Photoshop
To refine the edges in Photoshop, including the steps:
- Duplicate the layer
- Select the selection tool
- Open the Select and Mask workspace
- Choose a view mode
- Refine the edges
- Output the selection
Step 1: Duplicate the Layer
Before editing the image, right-click the background layer and select Duplicate Layer to create a backup of your original image or use the shortcut key: Ctrl/Cmd+J.
Step 2: Select the Selection tool
Choose any selection tools, including the Select Object tool, Lasso tool, Quick Selection tool, or others, to select the area around the object.
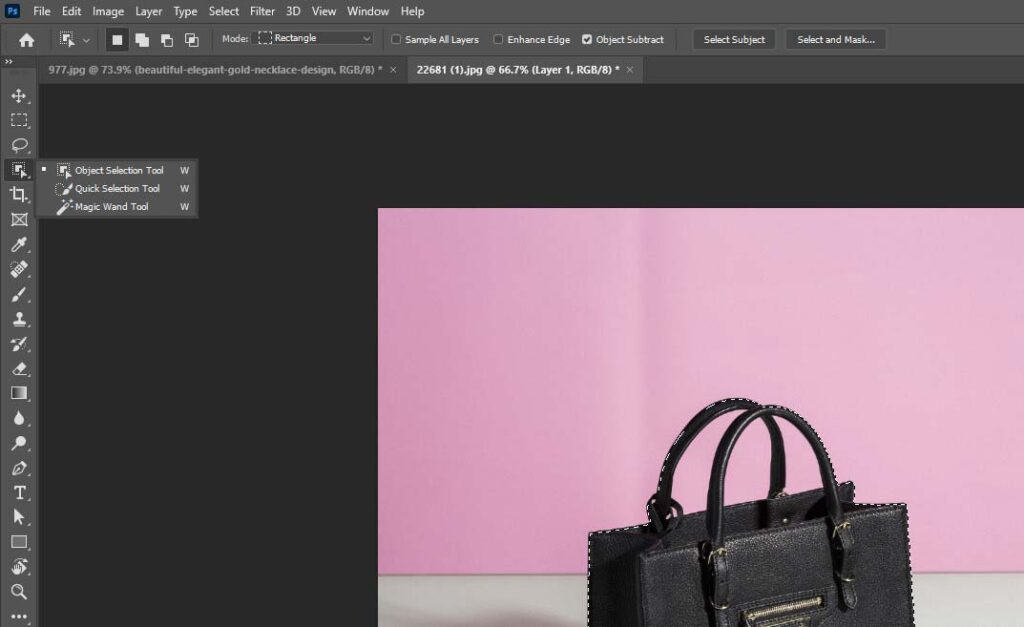
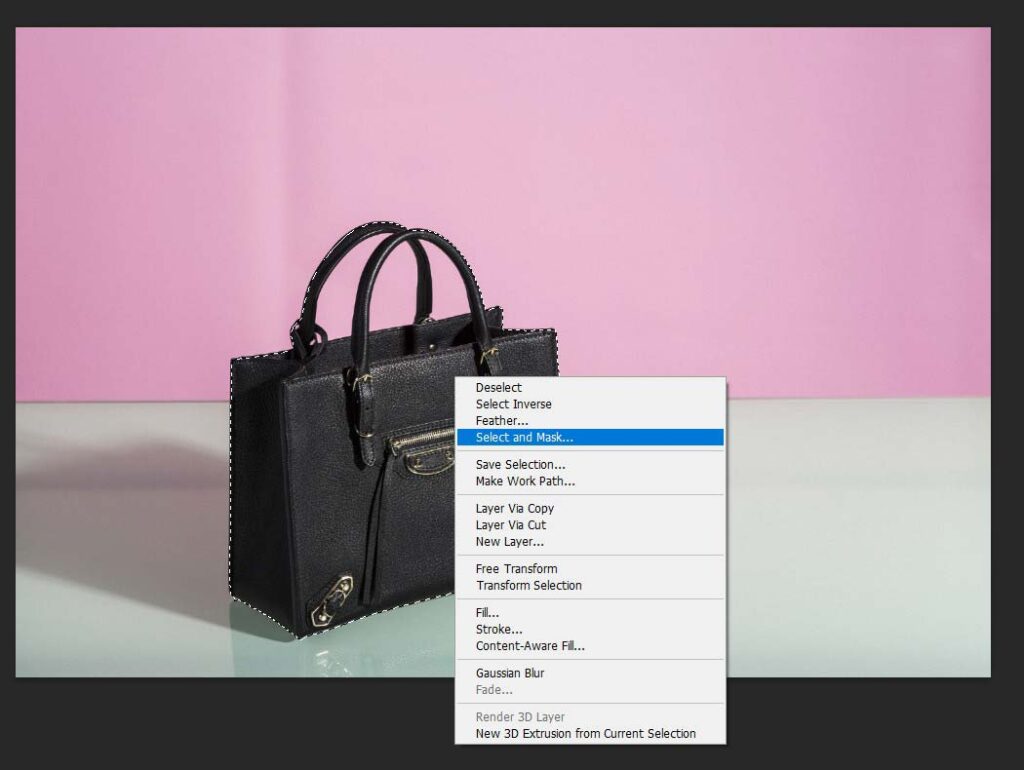
You notice a row of black, animated dashed lines known as the “marching ants.” Hold the Alt key (Windows) or Command key (Mac) and click on any areas you want to remove from the selection.
Step 3: Open Select and Mask Workspace
Ensure your selection is active and click “Select and Mask” from the top options bar, or click the option “Select > Select and Mask.” You’ll notice a workspace where you can refine edges perfectly.
Step 4: Choose a View Mode
It’s a helpful technique to notice edge details. On the right Panel, choose a view mode: Black or White.
Step 5: Refine the Edges
Use the tools and sliders to refine the edges:
- Refine Edge Brush Tool (R): Paint along hair/fur or soft edges to auto-refine them.

- Brush Tool (B): Manually add/remove from the selection.
- Lasso Tool (L): Redraw parts of the selection.
For edge Settings, go to the right panel sliders and select smooth (reduces jagged lines on the selection), feather (softens the edge for a more natural blend), contrast (sharpens the edge; useful after feathering), and shift edge (moves the edge inwards or outwards).
Step 6: Output the Selection
When you’ve done refining, go to the Properties tab and find the Output To option at the bottom of the panel. Choose an option for what you want to do with your finished selection. Suppose, if you want to add a new background to it, you can choose output as a “new document.” To continue editing the selection in the existing document, choose New Layer with Layer Mask.
How Do You Feather a Shape in Photoshop?
To feather the edge of a shape in Photoshop, use the “Select and Mask” (Refine Edge) feature after making a shape selection. Adjust the Feather slider within this panel to control the softness of the edges. You can also use a Gaussian blur on a layer mask applied to the shape.
Below, we’ve highlighted 2 different methods on how to feather a shape in Photoshop:
How Do You Feather a Shape in Photoshop by Rasterizing?
To feather a shape in Photoshop by rasterizing, follow these steps:
- Select the shape tool
- Select Rasterize Layer
- Select the shape layer thumbnail
- Feather the selection
- Deselct
Step 1: Select the Shape Tool
Draw the Shape using the Shape Tool (Rectangle, Ellipse, etc.).
Step 2: Select Rasterize Layer
Right-click the shape layer in the “Layers panel” to choose Rasterize Layer.
Step 3: Select the Shape Layer Thumbnail
Hold Ctrl (Cmd) and click the thumbnail of the shape layer to make a selection.
Step 4: Feather the Selection
Go to the “Select” option and click on the Modify > Feather to choose the feather radius (e.g., 20px). Now, click OK.
Step 5: Deselect if Needed
You can “Deselect” (Ctrl + D) the selection if any correction is required.
Note: Rasterizing makes the shape no longer editable as a vector.
How Do You Feather a Shape in Photoshop Using a Layer Mask and Gaussian Blur?
To feather a shape in Photoshop, you can use a layer mask along with the Gaussian Blur filter, including the following steps:
- Draw the shape
- Add a layer mask
- Select the mask thumbnail
- Apply a Gaussian blur
Step 1: Draw the Shape
At first, draw the shape using Photoshop’s Shape Tool, like Rectangle, Ellipse, etc..
Step 2: Add a Layer Mask
Select the shape layer and click the “Add Layer Mask” icon at the bottom of the Layers panel.
Step 3: Select the Mask Thumbnail
After that, select the mask thumbnail.
Step 4: Apply a Gaussian Blur
Go to “Filter > Blur > Gaussian Blur” and choose a radius to feather the edge.
What is Feathering in Photoshop?
Feathering in Photoshop is a common photo editing technique to soften the edges of an image or selection, creating a smooth, gradual transition between the selected area and the surrounding pixels.
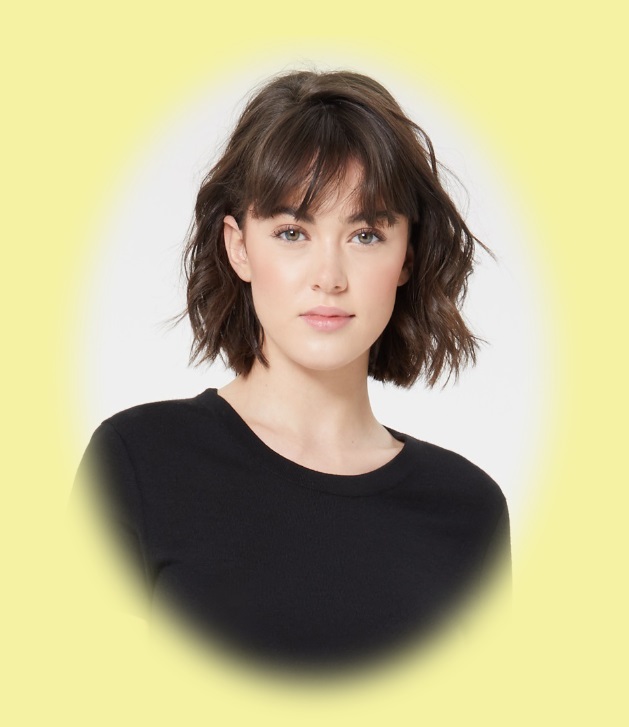
Whether you cut out an image’s selected portion or want to highlight a specific part, the feathering effect helps you make it look natural. You can achieve this effect by determining the degree of softness or blur applied to the edges. The higher the radius value, the more gradual the transition. A lower value will retain more of the original sharpness.
Is Feathering Destructive in Photoshop?
Yes, feathering is destructive when you apply Feather to a selection, delete, or cut part of the layer. Feathering layers is non-destructive when you use Layer Masks and apply Feather via the Properties panel.
When Should I Use Feathering in Photoshop?
You can use the feathering effect in Photoshop when you want to blend edges, like –
- Compositing objects onto new backgrounds or creating masks
- Preventing harsh, unnatural edges
- Enhancing realism and effects (soft shadows & highlights, and realistic photo manipulation)
- Refining selections and masks
- Merging two images
- Remove hard edges
- Creating various artistic effects, like vignettes
- Matching background or hiding layers
What are the Best Ways to Use Feathering in Photoshop?
The best ways to use the feathering in Photoshop make your edits look natural, blended, and professional. Other feather tool use cases are:
- Feather the edges of an entire image or layer
- Soften the edges of a shape
- Add feathered edges to vignettes
- Feather the edges of a selection, and copy and paste the selection to a separate layer
- Feather brush Photoshop
- Use Layer Masks with Adjustable Feathering
- Smooth out the harsh cut outs
- Combine with Smart filters
- Build smooth light and shadow gradients
Can I Apply Feathering Before Making a Selection?
No, you can’t apply feathering before making a selection in Photoshop. Feathering is a post-selection process that softens the edges of an existing selection.
How Do I Feather Only the Inside or Outside of the selection?
To feather only the inside or outside of the selection in Photoshop, use Layer > Matting > Defringe to feather the inside transparent pixels. To feather the outside, first expand the selection, then apply feathering.
Can I Feather-layer Styles Like Drop Shadows?
Yes, double-click the layer style to open the “Layer Style” dialog. Under the Blending Options, adjust the Spread slider to feather/extend the shadow edge.
Can I Undo or Adjust the Feathering After Applying It?
No, when you apply feathering directly to a selection, it cannot be edited unless you undo and reapply it. To keep flexibility, consider using layer masks with a soft brush.
What’s the Difference Between Feather and Anti-alias in Photoshop?
Anti-aliasing smooths rough edges but doesn’t fade or blur the edge itself. Feathering blurs and fades the actual edge pixels to blend with the background. Below, we’ve highlighted key differences:
| Feature | Feather | Anti-alias |
|---|---|---|
| Purpose | Softens the entire edge with a gradual fade | Smooths jagged edges of curves and angles |
| Effect | Creates a blurred transition around the edge | Creates a clean, slightly softened edge |
| How it works | Expands the selection into a gradient of transparency | Averages edge pixels to reduce jaggedness |
| Use case | When you want a faded/blurred edge | When you want a smooth, clean outline |
| Blur visibility | Clearly visible soft edge | Subtle smoothing only |
| Where it’s used | In selection tools (Feather option or Select > Modify > Feather) | In shape/text tools, Lasso, Marquee, etc. |
What are Feather Edges in Photoshop?
Photoshop Feather Edges refers to softening or blurring the edges of a selection, shape, or mask to create a smoother, more natural transition between the selected area and its background.
Feather edges are useful for several purposes, including:
- Selection tools (i.e., Lasso, Marquee, etc.)
- Masks and Layer Masks
- Selections converted into masks
- Softening borders around shapes or objects
What is the Right Amount to Feather Edges?
The right amount to feather edges is based on your needs. Use a small feather radius, like 0.5–2px, for fine details such as hair, jewelry, or small objects. A higher radius of 5–20px works for larger subjects or soft background transitions. Too much feathering can cause blurriness.
