
Learn how to create a clipping path in Photoshop using 6 different selection tools and how clipping paths add benefit to e-commerce businesses and product photos.
Clipping path in Photoshop is an effective tool for removing products from their background, changing background colors, creating composite product photos, adding shadow, and so on. To create a clipping path in Photoshop, you can use 6 different selection tools: Pen tool, Lasso tool, Magnetic Lasso tool, Quick Selection tool, Magic Wand tool, and Layer Masks. Once you get an idea of how to do clipping paths, you can edit your photos perfectly.
If you have a workload and can’t get enough time to retouch product images, it’s worth investing in outsourcing clipping path service from a renowned image post-processing company.
How to Create a Clipping Path in Photoshop: Best 6 Tools to Use
You can create a clipping path in Photoshop using different selection tools, such as the Pen tool, Lasso tool, Magnetic Lasso tool, Quick Selection tool, Magic Wand tool, and Layer Masks. Below, we’ve highlighted all selection tools:
How to Create a Clipping Path in Photoshop Using the Pen Tool
To create a clipping path in Photoshop using the Pen tool, first, select the tool (pen tool shortcut key: P) and then draw a path around the object you want to isolate. Below, we’ve provided a detailed guide:
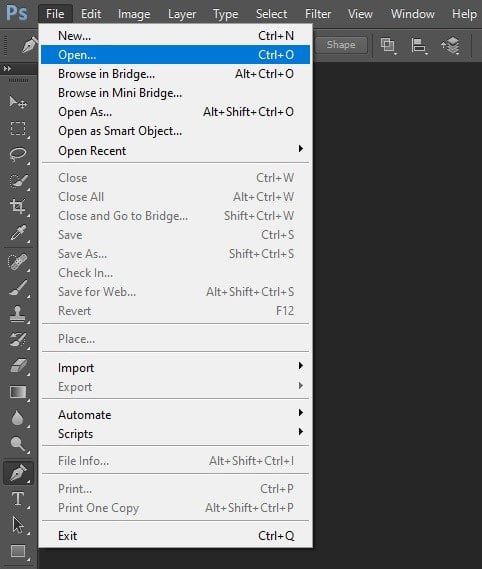
Step 1: Open File
Launch Photoshop on your pc and open the file in Adobe Photoshop.
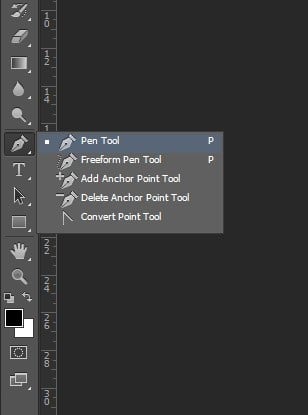
Step 2: Pick the Pen Tool
Next, go to the toolbar menu and select the pen tool.
Step 3: Create Anchor Points
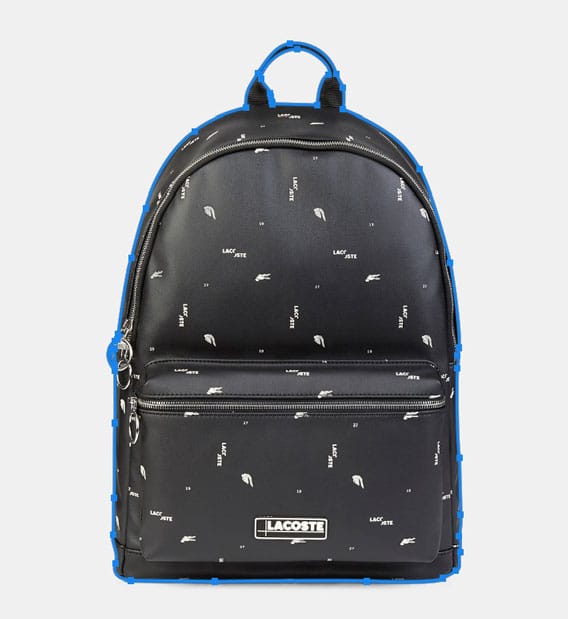
After taking the pen tool, at first, zoom your image to see the edges. You can keep it around 300%. This will allow you to draw the path accurately. Now, start pointing to the edges of the object you want to cut out. These points are called Anchor points. Keep marking till you reach the starting point.
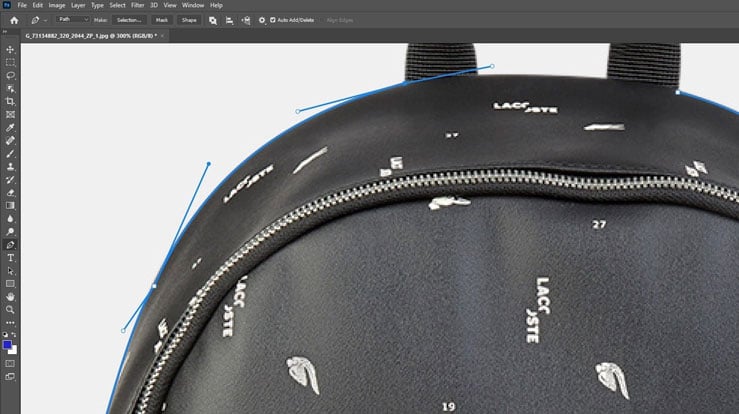
When you’re separating one object from another, you need to be careful with the edges to give it a natural look. So mark as perfectly as possible.
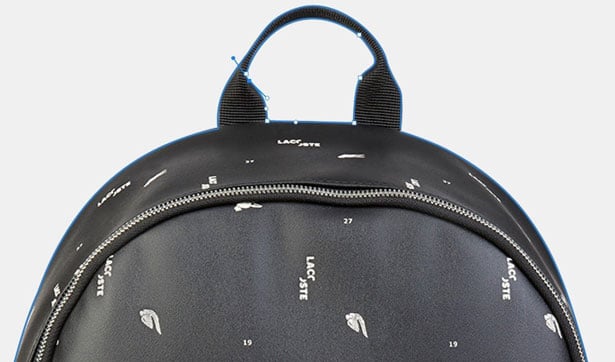
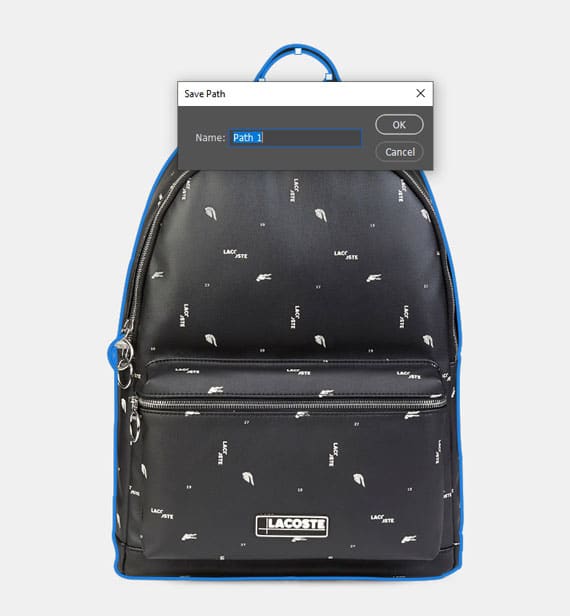
Step 4: Inside Path
The image that’s taken here, has another space inside the handle. So we’ll have to create another path inside.
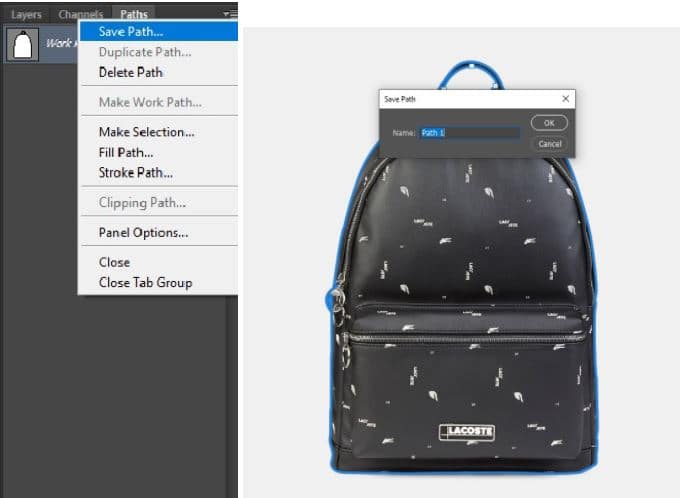
Step 5: Save Path
When you’re done with the marking, go to the layer panel. Then select the path tab. Now, go to the menu on the top left corner and select Save Path. And name the path as ‘Path 1’.
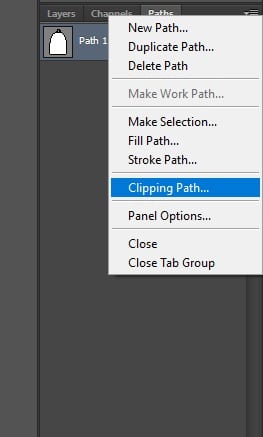
Step 6: Clipping Path
Go to the same menu and select Clipping Path.
A box will pop up showing some options. There is one box called Flatness. Flatness is the count of the closeness of the clipping path to the edge of the image. This determines the smoothness of the image.
An increased value of the flatness makes the edge blur. If the value is lower, the edge will be smoother and sharper.
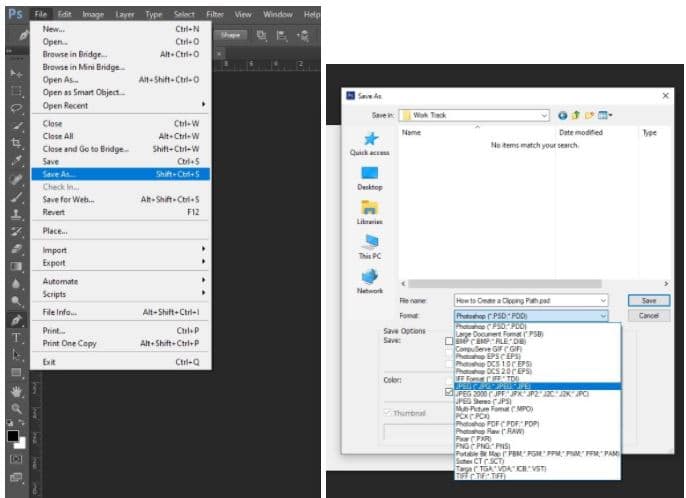
Step 7: Save Your Photo
Finally, save your image. You can use this file later to make any changes there. Or you can send it to someone else too, the path will be there, and they can use it according to their need.
Don’t forget to save both the PSD and JPEG files. This will give you access to use this image in whichever way you want.
To Remove Background
After saving the photo, you can use the image anytime for whatever change you want to make. For example, you can change the background from this image. Once you’re done with making the clipping path, click on the right button of your mouse and click on ‘make selection’.
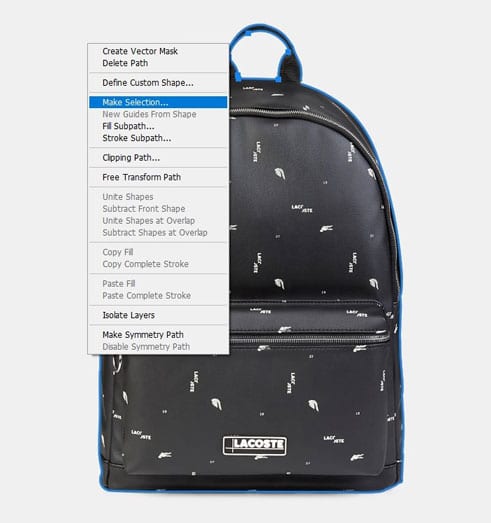
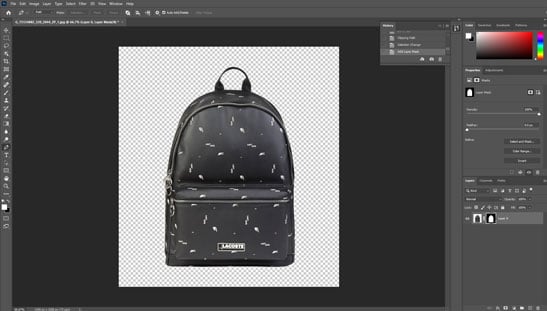
Now add a layer mask, and your background is removed.
When to Use the Pen Tool to Create a Clipping Path
You can use the Photoshop Pen tool when –
- You need sharp, smooth, and accurate outlines around subjects.
- The tool excels in complex or curved objects for both straight lines and curves.
- The tool is used in e-commerce, advertising, and photography for color correction, compositing, background removal, and so on.
- You deal with low-contrast edges or intricate details.
How Do You Create a Clipping Path Using the Photoshop Lasso Tool
To create a clipping path using the Lasso tool in Photoshop, first, select an area of your image and then convert that selection into a work path. After that, save the work path as a clipping path and use it to define the visible area of a layer or image. Here’s a detailed guide:
Step 1: Open the Edited Image
Go to File > Open and select the image you want to edit for further use.
Step 2: Make a Selection Around the Subject/Product
Press L on your keyboard or select the Lasso tool from the toolbar. For straight edges, use the Polygonal Lasso tool. But for freehand selections, use the standard Lasso tool.

Step 3: Adjust the Lasso Tool Settings
Before creating a clipping path, adjust the settings, such as Feather (to soften the selection edges) and Anti-alias (to smooth the selection boundary). With these settings, you can create a more natural-looking selection.
Step 4: Draw a Clipping Path Around the Object
Create a path around the product, and, for better accuracy, zoom (Ctrl / Cmd). When you complete the path, loop back to the starting point. You’ll notice “marching ants” around the selection, just like the image below.

Step 5: Convert the Selection to a Path
With your selection active, go to Windows > Paths. After that, click the menu icon (bottom corner of the panel) and select Make Work Path. Ensure you set the Tolerance (1-2 pixels for better accuracy).
Step 6: Save the Clipping Path
In the Paths panel, double-click the Work Path and rename it. With the path selected, go to the panel menu again and choose Clipping Path. Now, select your path from the drop-down list and click Ok.

Don’t forget to save the file as Photoshop EPS or TIFF with the clipping path for print or catalog print. For web or layered editing, save the file as PSD.
When to Use the Lasso Tool to Create a Clipping Path
You can use the Selection tool to create Photoshop clipping paths for –
- Organic or irregular shapes (objects like hair, plants, fur, or clothing with loose folds).
- Quick selections (when you need to isolate an object rapidly, i.e., previews, mockups, storyboards, etc.).
- Rough work or first drafts (ideal for rough clipping paths to refine later with masking or vector tools).
- Touch-ups to existing paths (useful for adding or subtracting from a selection in combination with other tools).
- Image editing with minimal edge precision (ideal for replacing the background, and the selection doesn’t need pixel-perfect precision).
When not to use the Lasso tool: For precise, clean edges, high-resolution images, where jagged edges from hand tracing.
How to Create a Clipping Path in Photoshop Using the Magnetic Lasso Tool
When you want to detect edges automatically, placing anchor points based on contrast, the Magnetic Lasso tool is the best tool to create a clipping path in Photoshop. Here’s a step-by-step guide to creating a Photoshop clipping path using the Magnetic Lasso tool:
Step 1: Select the Magnetic Lasso Tool
In the Tools panel, click and hold the Lasso tool or press the “L” to choose the Magnetic Lasso tool.
Step 2: Set up the Tool (Optional)
Set the Width (10- 20px) to control how far it looks for edges from your cursor. Adjust contrast (10-15%) to edge contrast, and Frequency (i.e., 57) controls how often anchor points are added.
Step 3: Trace Around the Object
Move the cursor slowly along the edge of your object, and the tool automatically places a point. You can undo the selection by pressing Backspace/ Delete. Complete the selection by clicking the starting point or double-clicking to close it.

Step 4: Convert the Selection to a Path
Go to Window > Paths to open the Paths panel. In the Paths panel, click the menu icon and choose Make Work Path. Set the Tolerance (1-2 pixels for better detail).
Step 5: Save the Clipping Path
Double-click the Work Path in the Paths panel and name it. With the path selected, open the panel menu again and choose Clipping Path. Choose your path name from the dropdown and click Ok.
When to Use the Magnetic Lasso Tool to Create a Clipping Path
You can use the Magnetic Lasso tool to create a clipping path for –
- Good contrast between subject and background (best when the object stands out from its background).
- Irregular, organic shapes (ideal for shapes that are too complex for the Polygonal Lasso tool).
- Quick Selections with moderate accuracy (great for mockups, drafts, or internal work where speed matters more than pixel-perfect results).
- Beginner-friendly Path creation.
- Time-effective edits.
How Do You Make a Photoshop Clipping Path Using the Quick Selection Tool
Creating a clipping path in Photoshop using the Quick Selection tool is a fast and effective way to isolate a subject. You can do this easily by going through the steps below:
Step 1: Select the Quick Selection Tool
Press “W” on your keyboard or select it from the toolbar. Also, ensure that the “Add to Selection” mode is active.
Step 2: Brush Over the Subject
Click and drag over the area you want to select, and Photoshop will automatically detect edges. You can use ([ ]) bracket keys to adjust the brush size. However, you can subtract from the selection by holding Alt while brushing.

Step 3: Refine the Selection (If Required)
Click Select and Mask in the top menu to clean up the edges. For this, use tools like Refine Edge Brush or Feather to smooth the outline and click OK. Also, you can use an Eraser tool (E) to refine the selection manually.
After that, convert the selection to a path as we’ve discussed in the Magnetic Lasso tool, and ensure you save the file as PSD or TIFF.
When to Use the Quick Selection Tool to Create a Clipping Path
The Quick Selection tool is ideal when:
- You need to isolate objects with distinct edges.
- The subject has complex shapes or fuzzy edges where a brush-like selection is more efficient.
- You plan to refine the selection using Photoshop’s Refine Edge or Select, or Mask.
- You want to save time on simpler clipping tasks or preliminary selections before detailed editing.
How to Make a Clipping Path in Photoshop Using the Magic Wand Tool
Creating a clipping path with the Magic Wand tool in Photoshop is suitable when you’ve images with large areas of similar or uniform color. Here’s a detailed guide:
Step 1: Open Your Image and Duplicate the Layer
Open your edited image in Photoshop (File > Open). Also, must duplicate the background layer to preserve the original image (Right-click the layer > Duplicate Layer).
Step 2: Select the Magic Wand Tool
Choose the Magic Wand Tool from the toolbar or press W. Adjust the Tolerance value in the options bar (default is 32). A higher tolerance selects a broader range of colors, while a lower tolerance selects colors closer to the clicked pixel.
Step 3: Make the Initial Selection
Click on the background or the area you want to remove. The Magic Wand Tool selects contiguous pixels of similar color. To add to the selection, hold Shift and click on other areas. To subtract, hold Alt (Windows) or Option (Mac) and click.

Step 4: Refine the Selection
Use Select > Modify > Expand or Contract to adjust the selection edges if needed. Or, use Select > Modify > Feather (or press Shift + F6) to soften the edges for a smoother transition.

Step 5: Invert the Selection (If Needed)
If you select the background but want the object, go to Select > Inverse to switch the selection to the subject.
Step 6: Convert the Selection to a Path
Open the Paths panel (Window > Paths). Click the menu icon in the Paths panel and choose Make Work Path. Now, set the tolerance (lower values create a path closer to the selection edge) and click OK.
Step 7: Save the Clipping Path
In the Paths panel, double-click the Work Path and name it to save the clipping path for future use.
Step 8: Apply the Clipping Path
You can now use this path to create masks, isolate the object, or export it for print/web use.
When to Use the Quick Selection Tool to Create a Clipping Path
You can use the Quick Selection tool to create a clipping path when:
- You deal with clear, distinct edges and some complexity, like people, animals, and products with textured surfaces.
- You need a fast initial selection to save time.
- For simpler or moderately detailed clipping tasks.
- Working on images where the background contrasts well with the subject.
How to Add a Clipping Path in Photoshop Using the Layer Masks Tool
Photoshop Layer Mask provides you with a non-destructive way to create a clipping path by hiding or revealing parts of a layer without deleting pixels permanently. Here’s how you do it:
Step 1: Open Your Image and Prepare Layers
Open your image in Photoshop. Unlock the background layer if needed by double-clicking it and converting it to a normal layer.
Step 2: Select the Subject or Area to Isolate
Use any selection tool you prefer (e.g., Pen Tool, Quick Selection Tool, or Lasso Tool) to select the object you want to isolate carefully. Refine the selection if necessary using Select and Mask for smooth edges.
Step 3: Add a Layer Mask
With the selection active, click the Add Layer Mask button at the bottom of the Layers panel (it looks like a rectangle with a circle inside). This creates a mask that hides everything outside the selection, effectively isolating your object.
Step 4: Refine the Mask (Optional)
Click on the mask thumbnail in the Layers panel. Use the Brush Tool with black or white paint to hide or reveal parts of the image for fine-tuning. You can also use the Properties panel to adjust Feather or Density for smoother edges.
Step 5: Use the Mask as a Clipping Path
Although layer masks are pixel-based (raster), they function similarly to clipping paths by controlling visibility. You can place this masked layer over any background or use it in compositions without permanently altering the original image.
When to Use the Layer Mask Tool to Create a Clipping Path
You can use the Layer Mask when –
- You want to hide or reveal parts of an image.
- You work with complex or soft edges, semi-transparent areas, and fine details.
- Working on a single layer, making them suitable for isolating objects.
- For photo retouching and color correction.
- You want the flexibility to refine.
How to Create a Path Around an Image in Photoshop?
Use the Photoshop Pen tool to create a path around an image. With a Pen tool, you can draw a vector path around the image and save the path in the Paths panel. Here’s a step-by-step guide:
Step 1: Select the Pen Tool
Press “P” on your keyboard or select the Pen Tool from the toolbar. In the top menu bar, ensure the Path (not Shape) is selected.
Step 2: Zoom in for Precision
Press “Ctrl/Cmd +” to zoom in. This helps you place points more accurately around the edges.
Step 3: Start Drawing the Path
Click along the edge of the object to create straight-line segments. For curves, click and drag to create direction handles for smooth curves. Use as few points as possible for a clean, smooth path.
Tips:
- Hold Alt/Option and click an anchor point to break the curve for sharper corners.
- Use Ctrl / Cmd to temporarily switch to the Direct Selection Tool and adjust points.
Step 4: Complete the Path
Connect the last anchor point back to the starting point to close the Path (you’ll see a small circle near the cursor).
Step 5: Save the Path
Open the Paths panel via Window > Paths. You’ll see “Work Path” listed—double-click it to save and name it.
Step 6: Export or Use the Path
You can use the path to:
- Create a selection (Right-click > Make Selection).
- Stroke the path (Right-click > Stroke Path).
How to Make a Stroke Path in Photoshop?
To make a stroke path in Photoshop, you need to create a path using the Pen tool, Path Selection tool, or by making a selection, and then converting it to a work path. Here’s a step-by-step guide:
Step 1: Create a Path
You can create a path in several ways:
Using the Pen Tool:
- Select the Pen Tool (P), ensuring it is set to Path (not Shape) in the top bar. Click to place anchor points and draw your path.
Using an Existing Selection:
- Make a selection using any selection tool (e.g., Lasso or Quick Selection).
- Go to the Paths panel (Window > Paths).
Click “Make Work Path from Selection” (bottom of the panel).
Step 2: Choose a Brush Tool and Settings
Select the Brush Tool ( or press “B” on the keyboard). In the top menu, choose your brush size, hardness, and style. This determines how the stroke will look.
Step 3: Stroke the Path
Click the Windows option from the top sidebar and select the Paths to open the Paths panel. Right-click (or Control-click) on the path name (e.g., “Work Path”).
Step 5: Select Stroke Path
In the dialog box, choose a brush or other tool like Pencil, Eraser, etc. Leave “Simulate Pressure” unchecked unless you want tapered ends. Click OK.
Step 6: Finalize or Hide the Path
If you’re done, click anywhere outside the path in the Paths panel to deselect it. You can also delete or save it as needed.
What is the Shortcut Key for Clipping Paths in Photoshop?
The shortcuts for clipping paths in Photoshop are discussed below:
- A new Clipping Path creation: Ctrl + Alt + Shift + C (Windows) or Cmd + Option + Shift + C (macOS).
- Add or subtract to an existing clipping path: Ctrl + Alt + C (Windows) or Cmd + Option + C (macOS) and Ctrl + Alt + Shift + C (Windows) or Cmd + Option + Shift + C (macOS).
- Intersect with an existing clipping path: Ctrl + Alt + Shift + C (Windows) or Cmd + Option + Shift + C (macOS).
- Load a saved clipping path: Ctrl + Alt + Shift + K (Windows) or Cmd + Option + Shift + K (macOS).
- Save a clipping path: Ctrl + Alt + Shift + K (Windows) or Cmd + Option + Shift + K (macOS).
What is the Purpose of Creating a Clipping Path?
Being an expert on how to do a clipping path in Photoshop is a must if you’re working in e-commerce product photography.
- Removing Image Background
First of all, this is mostly used to remove the background of an image. If you want to remove the background, change the color of the background or make an image transparent, you’ll have to do the clipping before that.
- Retouching or Color Correction
Another use is while doing retouching or image color correction. The clipping path lets us select a particular area or separate that from the image, that way we get to edit that particular place separately.
- Removing Unwanted Parts
Moreover, removing unwanted parts from the image is another vital use of the clipping path. It’s not unusual to have unnecessary parts in an image while shooting. If you want to remove those parts from your image, you’ll have to create the path first and then remove it from your image.
- Add a drop shadow
After isolating an object with a clipping path, you can add realistic shadows, reflections, or other visual effects that enhance the images’ depth and professionalism.
- Professional photo retouching
Clipping paths give flexibility to photo editing experts for professional photo retouching without affecting the rest of the image. This includes fixing spots, smoothing edges, or enhancing specific areas.
- Restoration or Manipulation
The clipping path in Photoshop is useful in the restoration and manipulation of the image, too. Touch-up in an image requires clipping. Same in masking. You’ll have to do clipping first if you want to do masking.
Removing background, color correction, or retouching, all are necessary in Photoshop editing. In e-commerce product photography, the purpose of doing all these is to produce a high-quality, clean yet natural-looking image. The image plays such an important role in the e-commerce business to attract viewers and increase sales.
How Does Creating a Clipping Path Improve Product Images?
When it comes to editing product photos, the clipping path is a fundamental task that enhances overall visuals and gives them a professional appearance. Here’s how clipping paths improve product images for e-commerce, marketing, and print media:
- Professional background removal: Clipping paths help to replace busy backgrounds with a uniform color, such as white or solid colors that integrate products professionally.
- Precise object isolation: A clipping path isolates the product from its surroundings, allowing for more versatility in image editing, like color adjustments, retouching, etc.
- Consistent visuals: Clipping paths ensure a uniform look and feel across product images, maintaining a cohesive brand identity and professional presentation. This appearance is important for e-commerce stores with multiple product listings.
- Enhanced visual appeal: By isolating the product and removing distractions, clipping paths make the image more appealing and engaging, which leads to higher clicks and increased sales.
- Creative flexibility: By creating a clipping path, you get creative flexibility, like the creation of composite images, customized backgrounds, special effects, and so on, that perfectly fulfill digital marketing channel requirements.
- Streamlined design processes: Clipping paths simplify the design process by allowing the seamless integration of isolated objects into different layouts and designs.
Why Should E-commerce Businesses Use Clipping Paths?
From e-commerce businesses to studio owners, outsource clipping path service because of professional product presentation, brand perception, and overall sales performance. Here are the key reasons behind outsourcing clipping path service:
- Professional product presentation: Photo retouching experts utilize clipping paths to give product images a uniform appearance across your e-commerce store. This consistency enhances shoppers’ overall shopping experience, making your store eye-catching and trustworthy. For example, as an apparel retailer, you can utilize clipping paths to showcase garments on a clean white background, creating a sleek, cohesive catalog that boosts brand credibility.
- Increased focus on product details: By eliminating distracting backgrounds, customers can visualize product features, colors, and textures, leading to more informed purchase decisions. For example, a jewelry store owner utilizes clipping paths to isolate rings and necklaces, allowing shoppers to examine intricate details closely.
- Flexibility for marketing and multi-platform use: Utilizing clipping paths, you can place product items into different backgrounds or marketing materials, like banners, ads, social media posts, and so on. For example, a home decor brand integrates clipped product images into lifestyle scenes for Instagram, helping customers visualize items in real-world settings.
- Improved website performance: Images with transparent or uniform backgrounds tend to have smaller file sizes, which improves website loading speed, reduces bounce rates, and enhances user experience. For example, an electronics store benefits from faster-loading product pages, keeping potential buyers engaged and decreasing cart abandonment.
- Enhanced brand consistency and trust: Uniform, high-quality images across all product listings reinforce your brand identity and make your online store appear more reliable. For example, a cosmetics retailer uses clipping paths to ensure all product images match color or packaging, maintain the same style and background, and strengthen brand recognition.
- Efficient and cost-effective workflow: Clipping paths streamline the image editing process, allowing for batch edits and easier manipulation. Outsourcing this task can also be cost-effective, saving on software and labor costs.
- Adaptation for multiple platforms and formats: Clipping Path provides the best photo editing solutions: resizing, cropping, and reformatting images for different platforms (web, mobile, and marketplaces) without losing quality or consistency. For example, a shoe retailer prepares the same product image for use on their website, Amazon, and mobile app, all with perfect alignment and background.
However, clipping paths are essential to present products professionally, boost customer trust, and maximize sales.
FAQs about Creating a Clipping Path in Photoshop
What is a clipping group in Photoshop?
A clipping group in Photoshop is a set of two or more adjacent layers where the bottommost layer acts as a mask, controlling the visibility of the content in the layers above it.
Which tool is used to create straight and curved paths in Photoshop?
In Photoshop, the Pen tool and its variations, including the Curvature Pen tool, are used to create straight and curved paths.
How do I use Path Finder in Photoshop?
To use Path Finder in Photoshop, you’ll need to select two or more shape layers or paths, then choose the desired mode from the Properties panel. Another effective way is to hold down Alt (Option on Mac) and click on the mode icon to create a compound shape that preserves the original layers.
How do you convert the Pen tool to selection in Photoshop?
To convert a path created with the Pen tool into a selection in Photoshop, you can right-click on the path and choose “Make Selection”. Or, you can press Ctrl + Enter (Windows) or Cmd + Return (Mac) with the path selected.
How do I release a clipping path?
To release a clipping path in Photoshop, you need to remove the constraint that limits the layer’s visibility to the shape of the path.
How can I edit a clipping path after I create it?
Use the Direct Selection Tool (white arrow) to click on anchor points and adjust the path. You can move, delete, or add anchor points to refine the clipping path as needed.
Final Overview
- The shortcut to create a new clipping path in Photoshop is Ctrl + Alt + Shift + C (Windows) or Cmd + Option + Shift + C (macOS).
- In Photoshop, a clipping path is a closed vector path or shape that’s used to isolate or “cut out” a portion of an image.
- There are 6 different selection tools to create a clipping path: Pen tool, Lasso tool, Magnetic Lasso tool, Quick Selection tool, Magic Wand tool, and Layer Masks.
