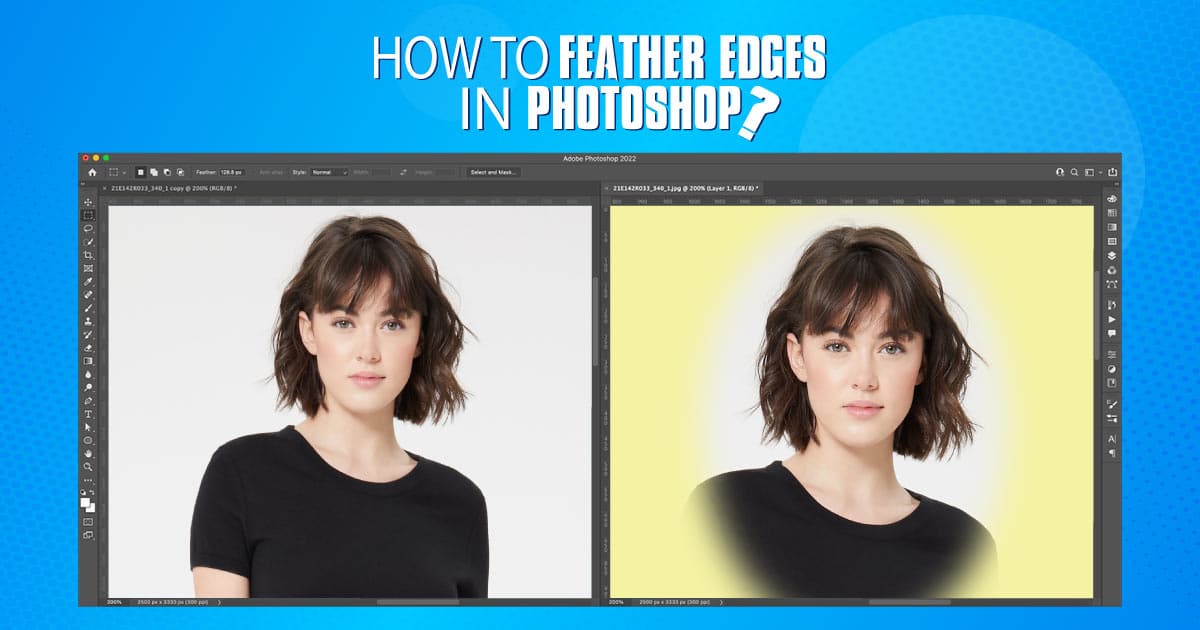
Photography has become more popular than ever because of the growth of the digital world. E-commerce businesses won’t be able to survive without photography. Along with that, photo editing is essential too. No images pass to upload without editing in the commercial world.
Photoshop is another name for photo editing. Being a software, it has brought so many features to create stunning images. Feathering is one of those effects of Photoshop that has versatile use. This feature has the potential to produce gorgeous images.
What you’ll learn in this article
What is Feathering in Photoshop?
The hard edge might often look unrealistic while merging images. Feathering can be an answer to this issue. Be it the edge of an image or an area within an image, feathering can adjust the edge and it can be done in any shape.
Feathering in Photoshop means softening the edges of an image. This means smoothing the sides or edges of an image or of a particular part. This effect fades away the border gradually which looks more pleasing.
This effect is mostly used while adding one image with another. Also, this effect might be needed to apply in many other cases. Sometimes it is used to create artistic effects too.
How to Feather Edges in Photoshop?
To Feather Edges, at first, you need to determine which area you want to work on. After marking the area, you’ll have to do the feathering according to your wish. Photoshop has made this process quite easy.
This can be done by following a few steps in Photoshop. Check the steps and try it out –
Step 1: Open
After starting Photoshop, go to File and click on Open to open the file you want to work on.
Step 2: Take the Tool
There are several tools in Photoshop to make selections in photoshop. Lasso Tool, Marquee Tool, etc. Here, we’ll use the Elliptical Marquee Tool to make the selection. You can choose whichever shape you want.
Select the Marquee Tool from the toolbar.

Step 3: Make Selection
Now, draw a shape that you want to work on.
Step 4: Feather the Selection
After making the selection, press ‘Ctrl+Alt+R’ to open Refine Edges. You can also find the option under the Select menu from the top bar.
A new window will pop up. Move the Feather Slider to control the hardness of the edge.
Select New Layer from the Output menu and click Ok.
You can move the selected part to place it at a suitable place in the image.
Step 5: Change the Background
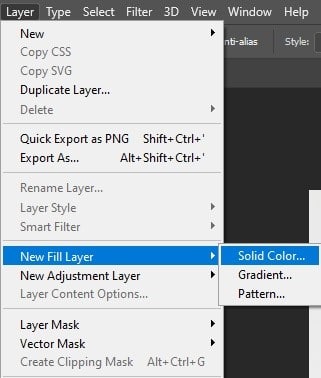
Now, you can change the background color or add a different background to this image. Here, we’re changing the background color of this image by adding a new fill layer. From the top menu, click on Layer > New Fill Layer > Solid Color.

A color palette will open up. Choose the color you want to use as background.
Step 6: Place the Layer
Place the New Solid Color Layer below the Background Copy layer.
Now, your feathering will be visible.
Step 7: Save
Go to File, and select Save As to save the final output.

Also Read; How To Cut Out an Image In Photoshop
How Can You Feather a Shape in Photoshop?
It is possible to feather a shape in Photoshop. You can create any kind of shape in Photoshop. Under the Marquee Tool, there are several shapes that you can choose. It allows the creation of shapes with lines too. Also, you can draw random shapes with the Lasso Tool.
Along with all these, you can create shapes with Text Tool too. After creating the shape, you can feather it in Photoshop and later work on it.
You May Also Read; How to Remove Clothing Wrinkles in Photoshop
Final Thought
If you can master feathering in Photoshop, it’ll allow you to produce creative and eye-catching images. You can utilize this effect in many ways. The more experiments you do, the more ways you’ll find to apply this feature. From commercial works to creating art, feathering can be a great tool for photographers and designers.

