Photography is no anymore a minor subject in e-commerce photography. According to statistics, 75% of online shoppers take photos as the deciding factor while deciding on a potential purchase. So, photography is basically the core reason for buying a product. And to create competitive images, there is no alternative to professional post-processing.
Oftentimes, unwanted objects or spots create distractions for the viewers. That’s why almost all the editors keep knowledge on how to remove unwanted objects in photoshop. Because distractions can cause a negative impact on the customers. So, this process is essential for any kind of photography in the e-commerce field.
What you’ll learn in this article
- 1 How to Remove Unwanted Objects From Photos?
- 2 How to Remove Unwanted Objects with Brush Tool in Photoshop
- 3 How to Remove Unwanted Objects with Spot Healing Brush Tool in Photoshop
- 4 How to Remove Unwanted Objects with Patch Tool in Photoshop
- 5 How to Remove Unwanted Objects with Clone Stamp Tool in Photoshop
- 6 How to Remove Unwanted Objects with Content-Aware Fill in Photoshop
- 7 We Care For Your Images
- 8 Final Thought
How to Remove Unwanted Objects From Photos?
Photoshop has multiple options to remove objects from a photo. You can use any of these to remove the object you don’t want in your image. We’ll discuss all the five tools you can use to remove objects from your image.
Here they are –
1. Brush Tool
The brush tool is useful for painting any area. While removing an object, this tool paints the unwanted area with the color reference you give. You should use a brush tool if the background is of plain color and doesn’t have much texture.
2. Spot Healing Brush Tool
This tool works based on the surface you’re working on. By picking only the colors, it can merge the object with the surrounding area. This tool should be used in an image where the highlights and shadows are not vividly defined.
3. Patch Tool
The patch tool can cut an area and add it to the unwanted object of your image. It will cover up the area you want to hide. This tool is useful while working with a less textured background.
4. Clone Stamp Tool
With the clone stamp tool, you can literally clone an area. You can copy the sample and paint on the object, and it’ll remove the object like magic. This tool can be used in any kind of image, including textured and high-contrast images.
5. Content-Aware Fill
Content-aware fill removes the object and fills and merges the area with the background. This feature is also applicable for any kind of image as it is intelligent enough to cover up the object by merging with the background.
You May Also Learn: How to Extend Background in Photoshop
How to Remove Unwanted Objects with Brush Tool in Photoshop
The brush tool works in a really simple way. You’ll have to give the color sample and then brush the unwanted area. You just need to be careful while picking the color because this tool will only read the color you give as the sample.
These are the steps you need to follow –
Step 1: Open the File
Go to File from the top left corner. Click on Open and select the file you want to work on.
Step 2: Pick Color
You will have to choose a color that you will use to replace the area. For that, take the Eye Dropper Tool from the toolbar.
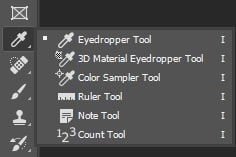
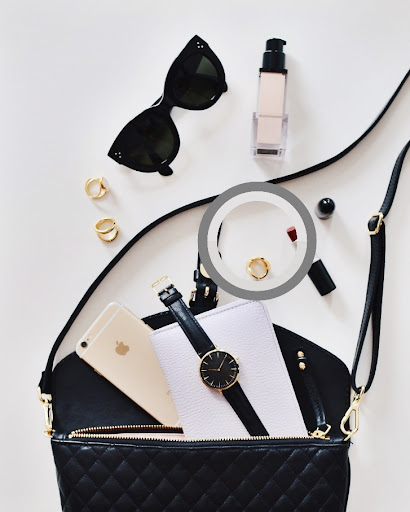
And now, click on the color you want to paint on the unwanted object. The foreground color will change according to your reference.
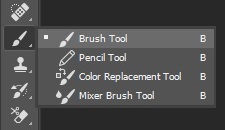
Step 3: Take the Brush Tool
From the toolbar, select the Brush Tool.
Step 4: Adjust Size
Go to the top menu, and you’ll find options to adjust the brush size and intensity. From there, make the necessary changes according to your need.
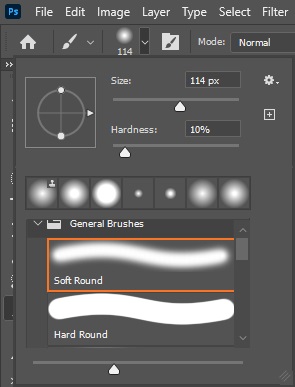
In general, you can keep the size and hardness medium and check what works best for your image.
Step 5: Brush
Now, brush on the area you want to remove. You can try and shift the size while working.

Step 6: Save
Now go to the File and click on Save As to save the file. Keep both JPEG and PPT to work flexibly in the future.

Pro Tips:
- While painting, change different sizes of brush throughout the process. Because you’ll need different brush strokes in different areas.
- To apply the accurate color, find out the color code and just input that as a reference.
You May Also Learn: How to Remove Background in Photoshop
How to Remove Unwanted Objects with Spot Healing Brush Tool in Photoshop
Spot healing brush tool works with the sample of surroundings. You just need to brush on the area, and it’ll replace the area with the background. This tool doesn’t take highlights and shadows. It only takes the color of the sample area.
Check out the steps below –
Step 1: Open the File
Go to File from the top left corner. Click on Open and select the file you want to work on.
Step 2: Take the Tool
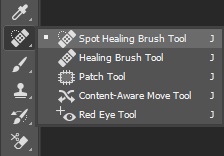
From the toolbar, select the Spot Healing Brush Tool. You will find it just above the Brush Tool.
Step 3: Adjust Size
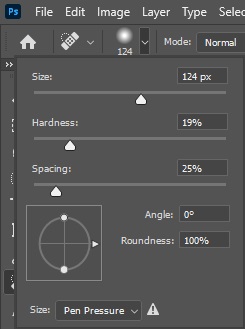
Again, from the top menu, open the options to adjust the brush size and intensity and make the necessary changes according to your need.
Step 4: Brush
Now brush on the object that you want to remove from the image.

Step 5: Save
Now go to the File and click on Save As to save the file. Keep both JPEG and PPT for future use.

Pro Tips:
- Change the sample as you move the brush to match the background. Even the slightest change of light and color matters here.
- Don’t drag the brush; rather click separately on each area.
How to Remove Unwanted Objects with Patch Tool in Photoshop
The patch tool is like the patchwork that people do on clothing. You mark an area and drag that on the object you want to remove. But unlike clothing, it doesn’t leave any trace of patching. It just vanishes the object under the selected area.
These are the steps you need to follow to remove an object with the patch tool –
Step 1: Open the file
Go to File from the top left corner. Click on Open and select the file you want to work on.
Step 2: Take the Patch Tool
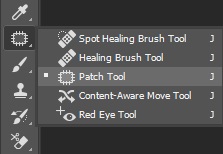
From the toolbar, take the Patch Tool. You’ll find the tool under the Spot Healing Brush menu.
Step 3: Take feference
You will have to mark an area as a reference first. This is like cutting the area.

Step 4: Replace
Now, click and drag the area on the object you want to replace. You might need several attempts to do it perfectly.

Step 5: Save
Go o to the File and click on Save As to save the file. Keep both JPEG and PPT in case you need to work on the file later.

Pro Tips :
- Take the reference area bigger than the object you want to remove.
- Try to keep only one kind of light condition in the reference area.
You May Also Like: How to Change Background Color In Photoshop
How to Remove Unwanted Objects with Clone Stamp Tool in Photoshop
The clone stamp tool is exactly what its name says. It takes the sample and then clones the area, as simple as that. The clone stamp tool creates an exact copy of whatever you select as the sample. You just need to take the sample and then clone it by brushing on the area.
Here are the steps to follow –
Step 1: Open the file
Go to File from the top left corner. Click on Open and select the file you want to work on.
Step 2: Take the Clone Stamp Tool
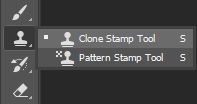
From the toolbar, take the Clone Stamp Tool. You’ll find the tool just under the Brush tool.
Step 3: Take sample
Just like Spot Healing Brush Tool, determine the area you want to replace the object with. Then press the Alt button and click on the object you want to remove.

Step 4: Brush
Adjust the brush size from the top menu.
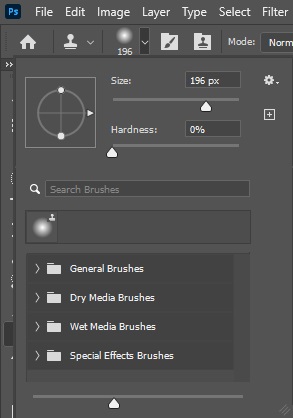
Drag the mouse on the object to brush the area and replace it with your sample.
Step 5: Save
Now go to the File and click on Save As to save the file. Keep both JPEG and PPT for future use.

Pro Tips :
- Be careful with the edge to maintain the same color tone as the background.
- As you drag the cursor, make sure you’re not brushing too much that covers the area with unwanted texture.
How to Remove Unwanted Objects with Content-Aware Fill in Photoshop
To remove an object with the content-aware tool, first, you need to select the object and then fill the area with the background. The content-aware tool basically fills a selected area by merging with the color and texture of the background.
Check out the process here –
Step 1: Open the file
Go to File from the top left corner. Click on Open and select the file you want to work on.
Step 2: Make selection
Take the Quick Selection Tool from the toolbar.
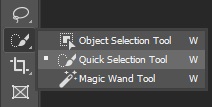
Now, make a selection around the object you want to remove.

Step 3: Expand
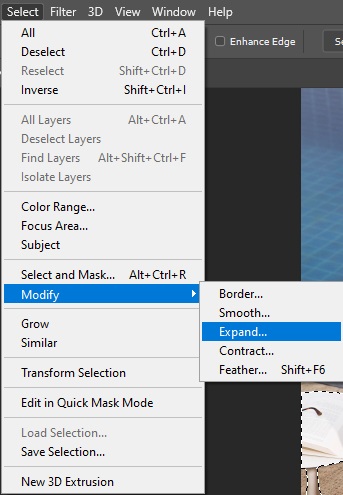
From the top menu, click on Select > Modify > Expand.
A box will pop up. Input a number from 5 to 10 in the “Expand By” box and click on OK.
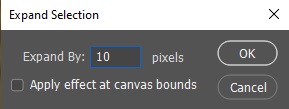
This will extend the selection. That means it’ll include some more part of the background in the selection. You should do this to make sure all the pixels of the object are removed. The higher the number, the larger the selected area.
Step 4: Fill
From the top left corner, click on Edit. Now select Fill. A box will pop up. From the Contents menu, select Content-Aware and click OK.
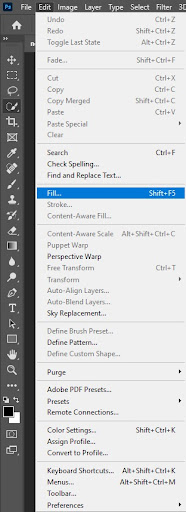
The object will be removed and replaced with the background.

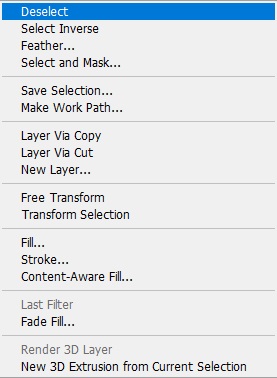
Step 5: Deselect
Right-click on the mouse and click on Deselect to remove the selection.
Step 6: Save
Go o to the File and click on Save As to save the file. Keep both JPEG and PPT in case you need to work on the file later.

Pro Tips :
- Make the selection as accurate as possible.
- Don’t expand the selection too much.
You May Also Like: How to Make Transparent Background in Photoshop
We Care For Your Images
Now you know everything that you need to know to remove objects from your images. It won’t be difficult for you to do it by yourself. But it requires time and practice to be an expert at this. Also, while working with bulk images, it becomes difficult to work with all the images alone.
You’ll find plenty of services available online that will do the job for you. One of the best places to remove unwanted objects and remove background from images is Clipping Path Studio. We have years of experience in this field and have satisfied thousands of customers with their impressive work.
Clipping Path Studio has an efficient and committed team who prioritizes creating the best quality of images. With the latest technology, they are determined to produce top-notch work. Before trying, you are most welcome to go for the free trial just to be sure that you’re not wasting your time and money.
Final Thought
Creating stunning images is the only way to reach customers in an e-commerce business. Your images represent you and your brand, and this is the first step to impressing your customers. So, be as smart as you can while dealing with your images.

