
Skincare product photography is essential to showcase skincare products in all their splendor, evoke emotions, and build a connection with the audience. Whether you’re a seasoned professional looking to expand your photography portfolio or seeking to master this niche, this guide elevates your skills to new heights.
In that article, we’ll cover all important details, like essential equipment list, lighting setups, backdrops, styling guide, step-by-step process to do skincare photoshoot, and more. Let’s begin!
What you’ll learn in this article
- 1 Why Should You Use High-quality Skincare Product Images?
- 2 What are the Essential Equipment for Skincare Product Photography?
- 3 What Types of Lighting are Best for Skincare Product Photography?
- 4 How to Choose a Backdrop for Skincare Product Photography?
- 5 How to Do Skincare Product Photography?
- 6 8 Creative Skincare Products Photoshoot Ideas
- 6.1 1. Experiment with Creative Photography Setup
- 6.2 2. Capturing Textures
- 6.3 3. Diverse Models Representation
- 6.4 4. Incorporate Natural Elements
- 6.5 5. Use Negative Space Wisely
- 6.6 6. Spice It Up with Composition Techniques
- 6.7 7. Use Camera Angles & Perspectives
- 6.8 8. Get Inspiration from Multiple Networks
- 6.9 5 Pro Tips to Achieve Results from Skincare Product Photography
- 6.10 Tip 1: Water Splashes
- 6.11 Tip 2: Skincare Products’ Smudges and Smears
- 6.12 Tip 3: Reflective Surface
- 6.13 Tip 4: Shadow or Silhouette on One Side
- 6.14 Tip 5: Ingredient-focused
- 7 What are the Common Challenges in Skincare Product Photography?
- 7.1 1. Unprepared Items
- 7.2 2. Poor Lighting
- 7.3 3. Incorrect White Balance
- 7.4 4. Reflective Surfaces
- 7.5 5. Busy and Distracting Backgrounds
- 7.6 6. Blurred Images
- 7.7 7. Making Too Few Images
- 7.8 8. Lack of Scale
- 7.9 9. Composition and Framing
- 7.10 10. Missing the Post-processing Step
- 7.11 11. Overly Creative Angles and Positioning
- 7.12 12. Inconsistency in Image
- 8 What is Skincare Product Photography?
- 8.1 Why is Skincare Product Photography Important for Brands and Businesses in the Beauty Industry?
- 8.2 How Can You Make Skincare Product Photos More Appealing to Your Target Audience?
- 8.3 Can You Use a Smartphone for Skincare Photography?
- 8.4 Is it Necessary to Use a Tripod for Smartphones and iPhones?
- 8.5 How Much Should You Charge for Skincare Photoshoots?
- 8.6 How to Prepare Your Skincare Product Photos for Market?
Why Should You Use High-quality Skincare Product Images?
High-quality skincare product images influence customer perception, brand credibility, and sales. So, it’s important to know the exact reasons behind investing in high-end product photography, such as –
First Impressions Count
The first contact a client has with your product online is the product photography. Polished and clean product images reflect professionalism and attention to detail. Whereas, blurry photos make a brand unreliable and unprofessional. So, think of detailed images as an unofficial business card for all customers who come in contact with your brand.
Gain their Trust
Professional photography can be a game-changer, especially when it comes to skincare products. So, pay attention to the fact that the first interaction with the customer through the image allows them to look at your product, examine it, and see for themselves its high quality. This way, you earn their appreciation and trust and convince them to return to your brand.
Brand Consistency
Keep your brand image consistent throughout the entire digital interaction with your audience. High-quality product photos convey the feeling of safety and luxury, while a beautiful promotional image helps create a long-lasting impression in the client’s mind. Present your brand as you wish to be seen and remembered by your customers, and create a safe environment for them to return to.
Evoke Emotions
Consumers seek more than a solution to their skin concerns; they also seek an emotional connection. Telling a story through pictures lets you connect with people and evoke those feelings. Incorporating storytelling techniques into skincare product photography allows brands to stand out from the competition. For this, you can apply different techniques,
- Rather than relying solely on static images of products, brands can convey their brand values and unique selling points through imagery that tells a story.
- Brands can establish trust and credibility by displaying the product creation process visually appealingly.
- Showcasing authentic testimonials with favorable outcomes will benefit the connection your brand has with its target audience.
Increased Sales
A good skincare product photography captures your audience, holds its attention, and converts it into sales. That means high-quality images reduce return rates by fulfilling customer expectations. Polished images showing the product in use or context, answering potential questions and concerns, lead to more purchasing decisions.
Why is Skincare Product Photography Important for Brands and Businesses in the Beauty Industry?
Skincare product photography is important for brands and businesses in the beauty industry to showcase product details, textures, and packaging. Also, it helps build brand identity and attract potential customers.
What are the Essential Equipment for Skincare Product Photography?
The essential equipment for skincare product photography is a camera, lens, tripod, lighting equipment, and other accessories. For more in-depth details, go through the following section:
Camera
A photographer’s vision comes to life through cameras. So, consider your camera configurations and techniques like manual mode, white balance, aperture, advanced autofocus system, and others to provide jaw-dropping photos.
Here are the 5 best-selling cameras for skincare photography:
| Camera Brand | Type | Reason to Choose |
|---|---|---|
| Canon EOS R6 | Versatile & all-in-one | Handles different lighting conditions perfectly |
| Canon Rebel Series | Entry-point | Best for beginners |
| Sony A6400 | Entry-point | Best for beginners |
| Nikon Z 5 | Full-frame | Performs well in low light & has in-body image stabilization (IBIS) |
| Sony A7 IV | Full-frame hybrid | Excellent autofocus, image quality, and video features |
DSLR or mirrorless: which one is right for you?
DSLR cameras are popular for their more accurate and natural viewing experience through optical viewfinders. Mirrorless cameras are ideal for providing more information and adaptability. Now, the choice is yours, which one you stick to!
- Can you use a smartphone for skincare photography?
Yes, you can use a high-resolution camera for basic skincare photoshoots, like showcasing textures and details. Many modern smartphones have advanced camera systems, i.e., high-resolution sensors, multiple lenses, higher megapixels, and image processing software.
Lens
Choosing the best lens depends on magnification ratio, focal length, aperture range, optical quality, budget, and focus. For example, a macro lens is popular for close-up details, whereas prime lenses are ideal for sharp focus and exceptional image quality.
Here are the 5 best lenses for skincare product photoshoots:
| Lens Type | Focal Length | Reason to Choose |
|---|---|---|
| Macro Lens | Canon EF 100mm f/2.8 | Ideal for capturing every little detail of the product. |
| Macro Lens | Canon EF-S 60mm f/2.8 | Great for shooting palettes or products in the packaging. |
| Zoom lens | Canon 24-70mm f/2.8 | Popular for shooting a collection of products ensuring exposure control. |
| Macro | Sony FE 90mm f/2.8 | Sharp images with accurate color, smooth bokeh, and built-in image stabilization. |
| Macro | Nikon NIKKOR Z 105mm f/2.8 | Outstanding detail, robust, and weather-sealed, durable, and true-to-life colors. |
Tripod & Stabilizers
A sturdy tripod, stabilizers, and remote trigger make capturing sharp and blur-free images across multiple shots easy. Tripod allows for precise framing and composition, supports the creation of special effects like light trails or motion blur, and more. In the marketplace, tripods are available for adjustable heights and angles.
Here are the 5 best tripods for skincare photoshoots:
| Tripod | Reason to Choose |
|---|---|
| Vanguard VEO 3+ 303CBS | Ideal for heavy camera & lens setups (you can center column through a complete 180-degree arc). |
| 3 Legged Thing Winston 2.0 | Super-sturdy, enormously versatile, and folds down pretty small. |
| Manfrotto MT055CXPRO3 | Popular among enthusiast photographers worldwide for its rigid quick-action 3-section legs and 90-degree pivot facility. |
| Vanguard Veo 3+ 263AB | Rock-steady aluminum tripod packed full of advanced features. |
| Benro Rhino carbon fiber (VX20 ball head) | Ideal for heavy camera & lens setups (you can center the column through a complete 180-degree arc). |
- Is it necessary to use a tripod for smartphones and iPhones?
Yes, it is necessary to use tripods for smartphones and iPhones to get blur-free and professional product images. The 5 best-selling tripods for smartphones and iPhones are:
- Joby GorillaPod 1K Kit (best smartphone tripod)
- Manfrotto PIXI Mini tripod kit (best tabletop tripod)
- Joby GorillaPod 3K Kit (flexible leg option)
- Ulanzi ST-27 metal phone tripod mount clip (best smartphone tripod mount)
- Joby GripTight Pro Telepod (best overall tripod)
Props
Props allow you to add context and highlight a story about your skincare items, but use them sparingly to avoid clutter. For example, to shoot a nighttime serum, consider using a soft towel, candle, flower buds, or a sleep mask to give users a relaxing bedtime ambiance. But for a moisturizing cream, you can include a few flowers, a bowl of water, or key product ingredients to suggest product details, hydration, and natural ingredients.
Accessories
There are other must-have photography accessories, such as –
- External hard device: You need much storage and processing power for raw images and operating editing software.
- Batteries: For outdoor photoshoots, you need extra batteries and charges to avoid unwanted incidents.
- Air blaster: It’s a must-have thing for removing dust from products and camera sensors when you plan to shoot outdoor product photography.
- Microfiber cleaning cloths: To keep your camera and lens surfaces spotless, keep microfiber cleaning cloths in your camera bag.
- Lens cleaning kit: Ensure you’ve cleaning solution, brushes, and tools to clean the lens.
Other essential product photography accessories are anti-dust cover, gaffer tape, anti-static gloves, and more.
Computer and Software
Compute is an important tool for processing raw images, and photo editing tools like Adobe Photoshop, Lightroom, and others provide you with professional and polished product images. You can also use third-party software like Pixlr, GIMP, and many more. Or, you can outsource post-processing services from a photo editing company with an in-house experienced designer team, advanced software, and quality work within an estimated time.
What Types of Lighting are Best for Skincare Product Photography?
Natural and artificial lighting are the best for skincare product photography and other photography genres. For good and feature-rich photos, you must maintain proper lighting techniques.
Here, we’ve enclosed a master guide on product lighting that helps you capture jaw-dropping product photos!
Natural Light
Natural light is a cost-effective and excellent skincare product photography lighting source. Professional photographers suggest shooting during the Golden hour, which is considered the best time for outdoor product photography. The period occurs 2 times a day – (a) after sunrise and (b) before sunset.
When the sunlight is diffused by clouds or bounced by a light-colored surface, it creates soft shadows and gives an aesthetic outlook. However, you can utilize natural light for indoor photoshoots by using a simple and clean surface, i.e., a white table near the window or a white reflector just opposite the window.
Artificial Light
Artificial light is another popular skincare or makeup product shot lighting source. When natural light isn’t available or plan to shoot in a studio, it will be a reliable alternative. Some commonly used artificial lighting sources are:
| Light Source | Reason to Use | Lighting Set Up |
|---|---|---|
| Hard light | Emphasize the angles, create intense visual effects, and provide a detailed image | Use a bare light bulb or spotlight. Position a single focused light in front of the product at a relatively large angle to avoid shadows |
| Soft light | Smoothens the features and removes the sharp shadow edges | Position a light source directly behind the product, positioned slightly off-center to avoid harsh shadows |
| Flat light | Creates limited shadows, making it a good choice for portraits | Light placed right in front of the subject |
| Backlight | Highlight the product’s shape, texture, and details | Place the light source behind a product |
| Softbox | Provides soft, diffused light similar to natural light, minimizes harsh shadows, and evenly illuminates the product | Set up two softboxes at 45-degree angles on either side of the product |
| Ring light | Perfect for close-up shots, uniform, shadow-free lighting, and packaging details | Effective for a single product; place the ring light directly in front of the product by positioning the camera in the center of the ring |
| Continuous light | Allows you to experiment with the lighting effect on your camera screen in real life | Use continuous LED panel lights to shoot in a controlled environment like a studio |
| Flashlight or strobe light | Powerful lighting; offers precise control over light exposure | To soften the shadows or light use a diffuser or bounce it off a white wall or ceiling |
| Rim light | Use to create a dramatic effect, add depth, and dimension, and make the subject stand out from the background | Create a three-dimensional vibe and light the edge from the back |
| Front Light | Minimize shadows and reveal details | Light up the product from the front |
| Split light | Create a sharp contrast between light and shadow | Position the light source at a 90-degree angle and move it from the subject for a dramatic effect |
Light Modifiers
Light modifiers are essential tools for creating a balanced lighting effect, reducing harsh shadows, and highlighting key features of the product. Some mostly used light modifiers for cosmetic and skincare product photoshoots include:
- Gels
- Flags or gobos
- Grids
- Polarizing filters
- Bunce cards
- Umbrellas
- Snoots, and more.
Common Lighting Setup Examples
1. Single skincare product photoshoot
a. Objective: Highlighting product texture, shape, and packaging details. For example, a luxury face cream jar or serum.
b. Lighting setup
- Light source – position the softbox at a 45-degree angle above the product.
- Fill light – place a reflector or secondary light on the opposite side to fill in shadows. Use a small additional light from above to help highlight the product’s top, shape, and texture.
- Background – clean and plain surface (white or light pastel colors).
- Backlight – use a small light source (i.e., LED panel) to create a halo effect or edge lighting.
2. Group product shot
a. Objective: Showcase multiple products and maintain individual details. For example, a skincare set.
b. Lighting setup
- Product arrangement – consider product heights to add visual interest.
- Key light – position two softbox lights at 45-degree angles on either side of the group.
- Fill light – use diffusers or reflectors on both sides to eliminate shadows between products.
- Background light – use low-intensity backlight to separate the products from the background.
- Details – ensure consistent brightness; use flags to block unwanted light.
How to Choose a Backdrop for Skincare Product Photography?
To choose a perfect backdrop for a skincare product photoshoot, you need to focus on your brand identity, focus on the product’s purpose, pay attention to the target audience, and more. Here are 7 tips on how to choose the best backdrop for product photography:
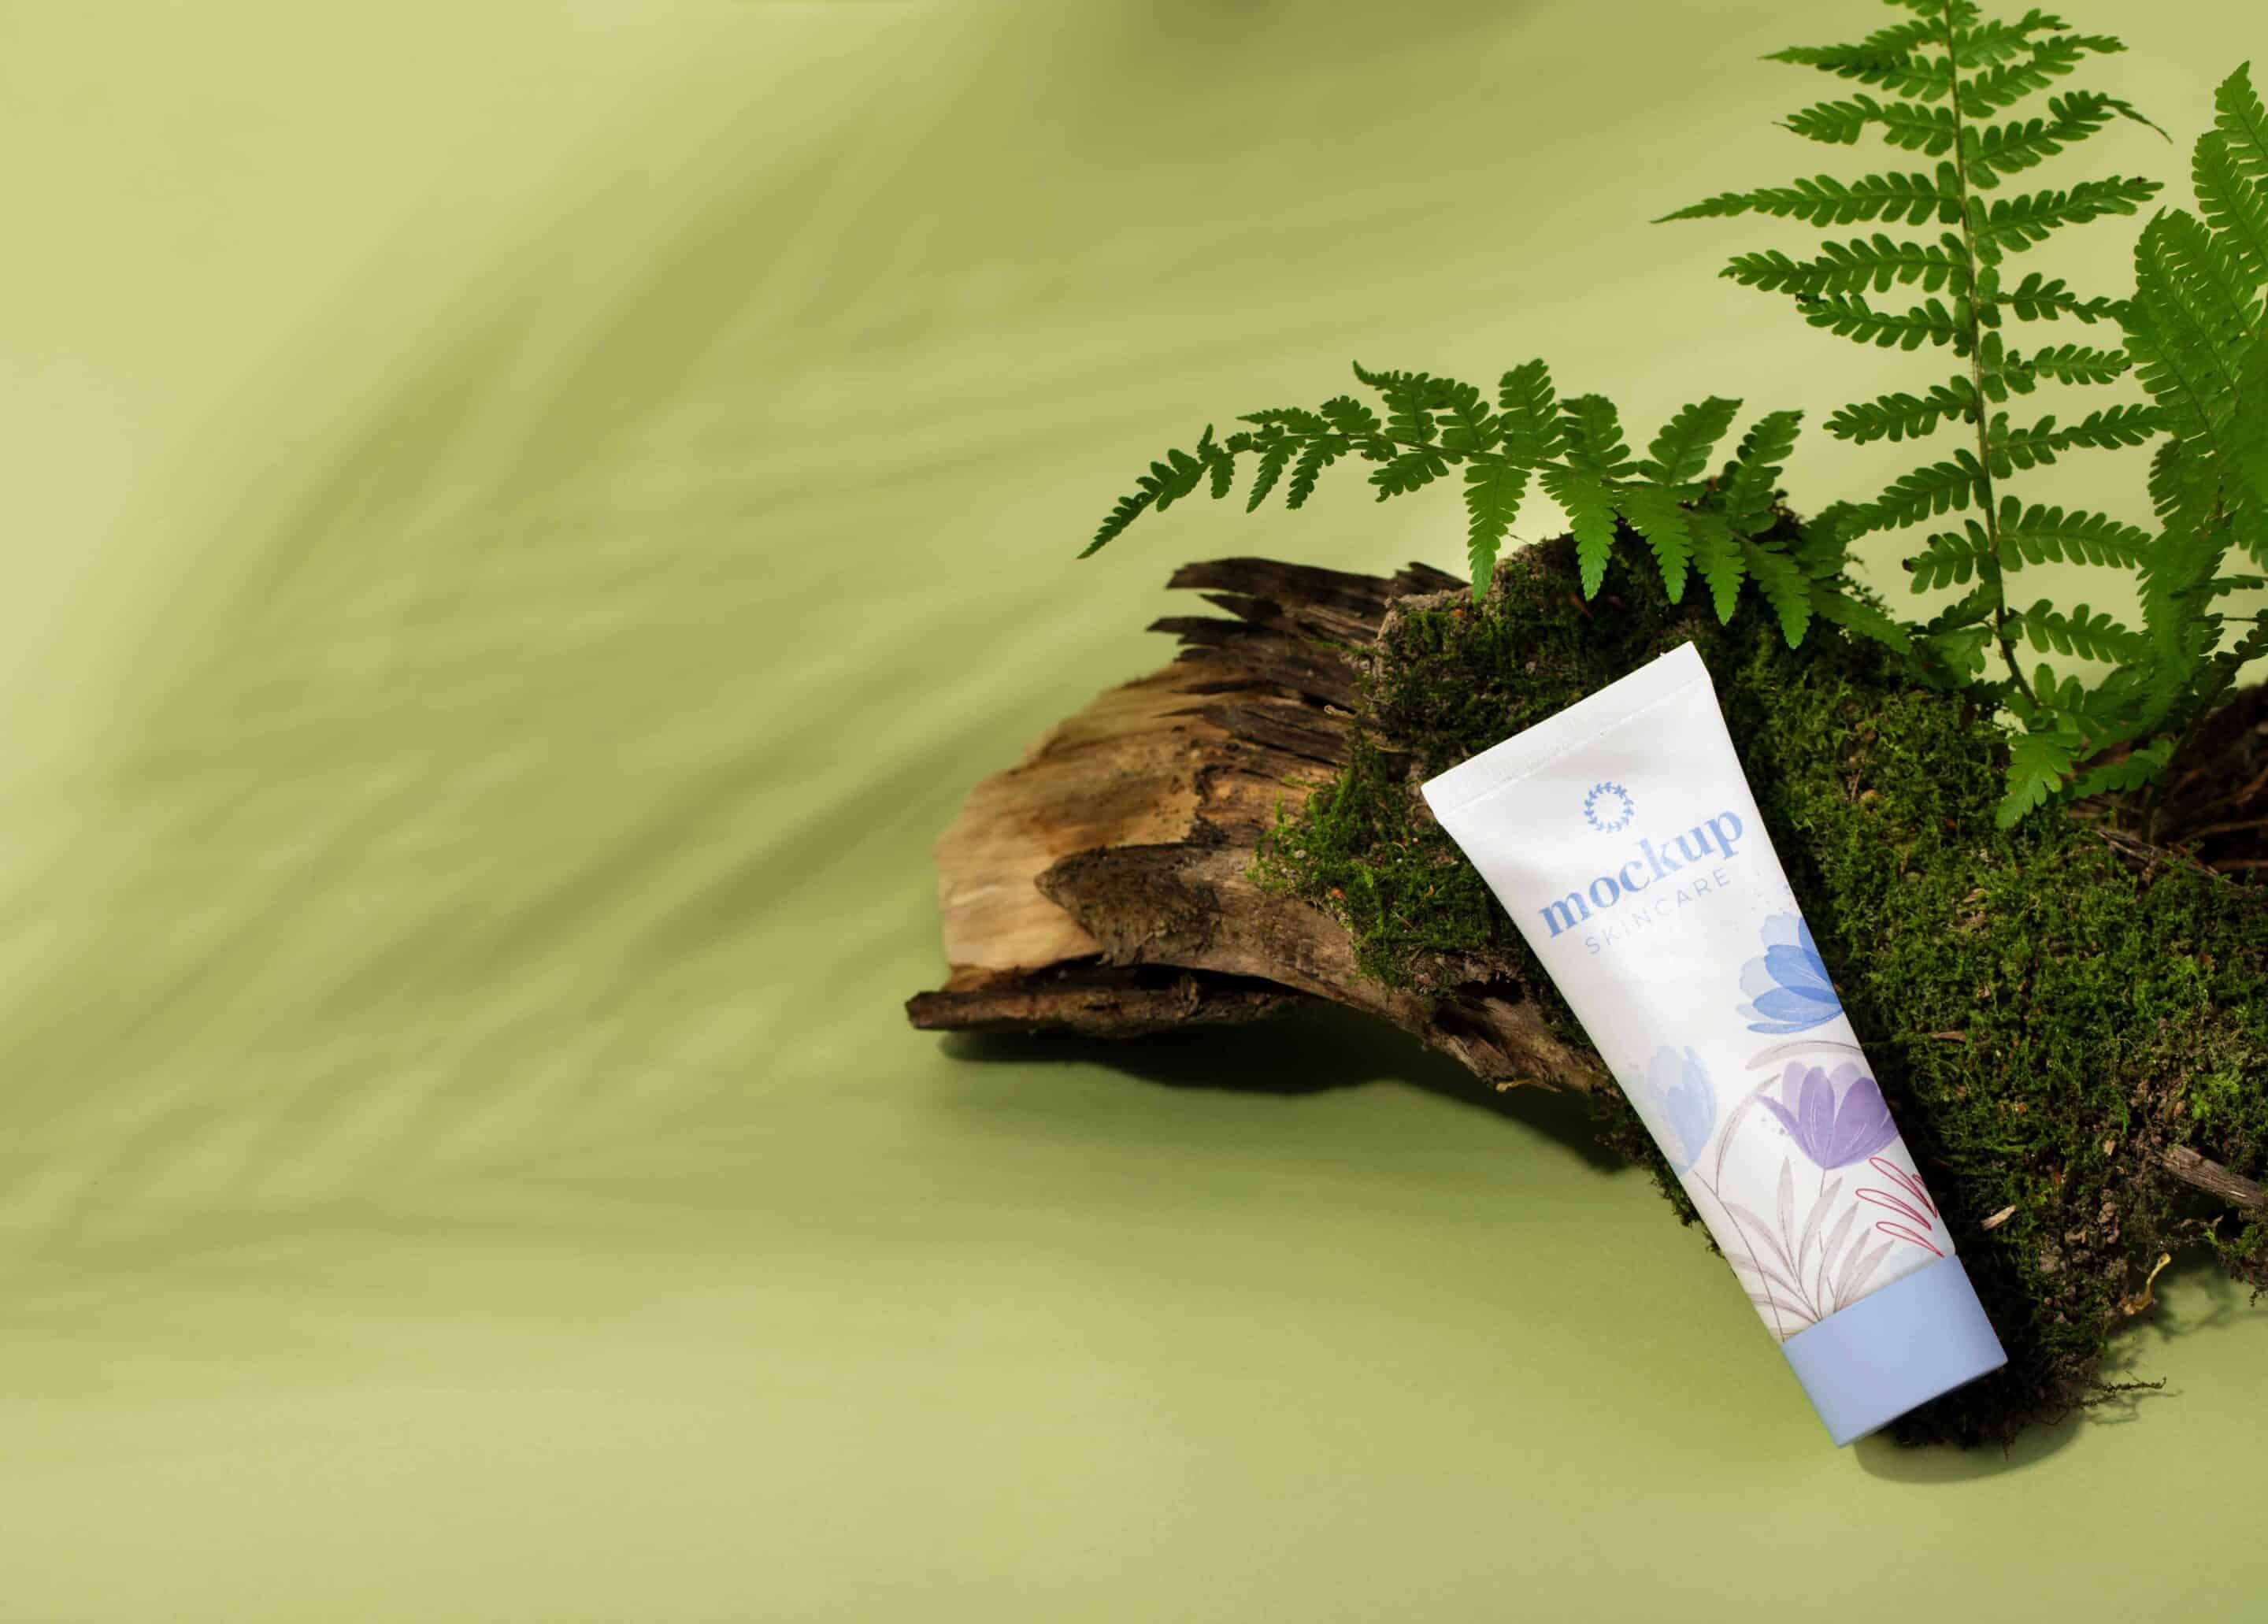
- Match with the brand identity: Choose a backdrop that reinforces brand identity and makes the product more relatable to consumers. For example, a high-end brand might use sleek and minimalist backdrops with a matte finish. Whereas, an eco-conscious skincare brand might prefer natural elements.
- Understand your audience: Try to reflect the lifestyle and preferences of your target customers. For example, professional audiences prefer clean and muted tones with a modern feel. Meanwhile, bright, dynamic backdrops with playful elements attract youth.
- Complement the product’s packaging: Choose backdrop colors and textures that enhance the skincare items’ packaging without overpowering it. For example, you can pair with vibrant or textured backdrops for contrast.
- Product size and grouping: Focus more on product collections and size before choosing a backdrop. You can use a simple, clean, or subtle patterns backdrop to provide the focus on the product.
- Consider the distribution channel: Social media platforms like Instagram invite all sorts of creative, colored, and textured backdrops. On the contrary, Shopify, Amazon, or other e-commerce platforms refer to showcase product design against a white background.
- Budget-friendly option: You can go with DIY materials like painted boards, fabric, or even printed designs to save extra costs and setups.
What are the Best Skincare Product Photography Backdrops?
The best skincare product photography backdrops are vinyl backdrops, muslin cloths, white & black seamless paper, foilage, and many more. Below we’ve highlighted the best cosmetic & skincare product backdrops and reasons why you choose them:
| Backdrop Idea | Reason to Choose |
|---|---|
| Vinyl backdrop | Different styles of vinyl backdrops are available: faux wood boards, faux marble, and solid colors. |
| Foam board | White foam board is popular for its wild or subtle features. |
| Paper | Seamless paper backdrops are popular for entry-level and one-time projects. |
| Fabric & cloth backdrops | They are more durable than paper and aren’t reflective. |
| Stone or sand | Natural backdrops help to express the grit and depth of the product. |
| Foliage | Live plants, dried florals, or shrubs are best for eco-friendly skincare items. |
| Rugs | It is magical and provides depth and texture to the product. |
| Decorative tile | Glossy, satin, matte, or other textures and patterns add extra beauty to products. |
| Ice | Conveys the sense of calmness of your product. |
| Smoke | Smoke from fog machines has an incredible and inimitable eternal effect. |
| Bokeh technique | Blur the background to focus on the product. |
How to Do Skincare Product Photography?
You’ve essential equipment, lighting, and backdrop list at your hands, let’s set up the shooting spot as follows –
1. Setup Your Space or Studio
Choose a well-lit area with enough natural light or set up artificial lighting for a studio photoshoot. A simple background is always welcoming, but you can use other colors as product background.
2. Prepare & Style Your Product
Clean and polish your product before placing it in the center of the frame. Also, choose simple props by considering the color schemes around the product. Don’t forget to shoot multiple shots from different angles and review images to ensure proper focus and exposure.
3. Understand Your Skincare Photography Client
Always keep your client’s needs and requirements in mind. Ask questions and get more information about the photos. Since skincare product photography is highly adaptable, it can be used for a website, product images, social media, or brochures.
So, depending on where the images will appear, you should prepare accordingly. For example, a product image should be crisp, clean, and detailed, whereas a photo for social media should include colorful and attractive elements.
4. Familiarize Yourself with the Brand
Each brand has a unique selling point as well as an identity. These elements should always be considered when doing a skincare product photography session. Study the brand in advance and familiarize yourself with its tone, theme, and style. Maybe it uses certain elements in the backgrounds, or it has a specific way to shoot the photos. Make sure to include those in your photos.
5. Details Matter
Your customers first interact with your product through its online product image. Therefore, a detailed, realistic, and correct photo will help reduce their concerns while raising their trust in your brand. More details in a photo mean your clients can better understand what they will buy and what their product will look like, so they are more willing to buy it.
6. Action Speaks Louder
If you wish to connect even more with your audience, include in your skincare product photography shots that show the product “in action”. When displaying such images, the customers will have an easier time imagining themselves using the product. Therefore, the product becomes more relatable.
7. Camera Settings for Skincare Photoshoot
Here are some important camera settings that ease your process of shooting skincare products:
- Set a white balance to auto, or daylight mode or use a custom white balance to improve color rendering.
- Use a narrow aperture (f/5.6 to f/11 or f/16) to focus the entire product.
- Use a low ISO setting like 100-200 to minimize noise.
- Set the shutter speed of 1/160 sec to avoid interference from body movement/
- Try to shoot in RAW format.
- Must use a tripod to keep the camera steady.
- Use the remote control to avoid smudging.
8 Creative Skincare Products Photoshoot Ideas
While embellishing your organized photography setup, utilize these expert-suggested ideas to enhance your skincare products.
1. Experiment with Creative Photography Setup
Visually appealing skincare products not only drive sales but also build a memorable relationship with customers. Here are some aesthetic and stunning skincare product image shots ideas:
a. Clean and minimalistic setups: The minimalist style emphasizes clean lines, a simple background, and the core focus on the product, with few distractions in the frame.
- Place the product at the center or slightly off-center with minimal props – plant, stone, or others.
- Use soft natural light or diffused artificial light to highlight textures and create shadows.
- Use a single neutral-colored background (white, beige, or light gray). For example, The Ordinary brand.
b. Before and after setups: These shots effectively showcase transformative benefits of specific skin concerns products, like acne, wrinkles, or dryness. For example, Olay uses these shots in their anti-aging campaigns, highlighting skin transformation and more.
- Split the image into two halves, showcasing before and after changes using the product.
- Use the same lighting, angles, and model positioning.
- Shoot a series of images representing a step-by-step product using a guide.
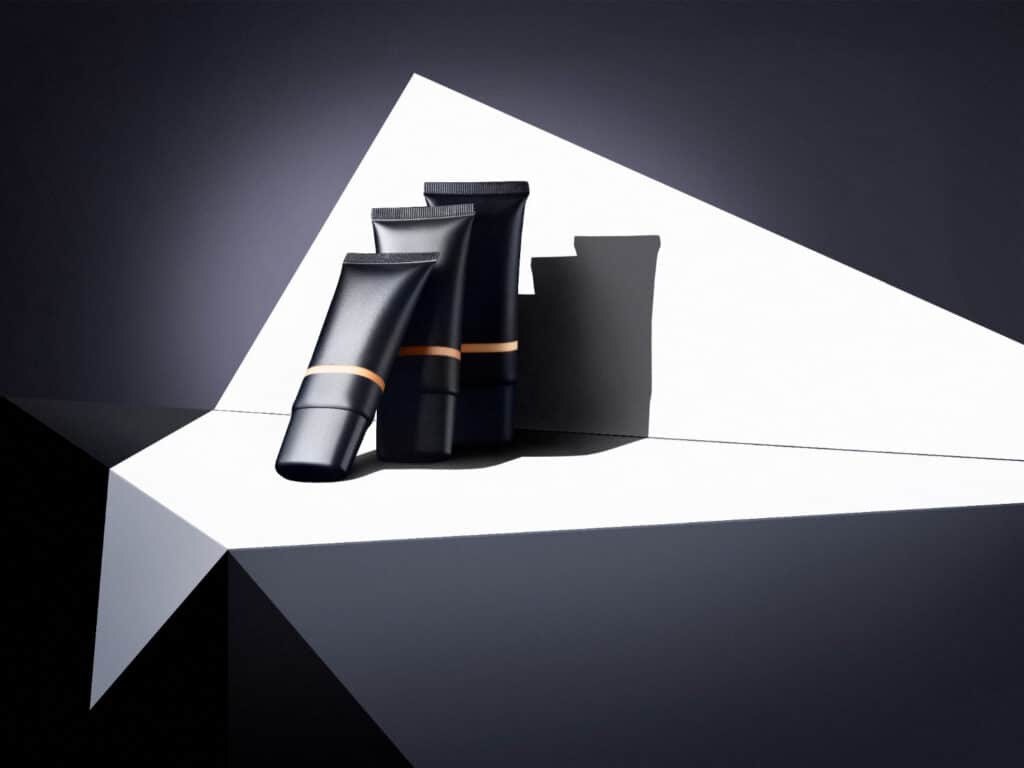
c. Modern setups: A modern skincare shoot incorporates abstract elements and dynamic compositions to reflect the brand’s beauty. The shoot appeals to online shoppers the most.
- Try to utilize geometric shapes like squares, cubes, circles, or sleek metallic props.
- Play with bold contrasts like matte vs. gloss to highlight product packaging.
- Use high-fashion styling to interact with the skincare items in an elevated and stylish setting.
c. Luxury setups: Want to create an elegant and high-end atmosphere to reinforce the premium quality of skincare items like Chanel Beauty? Try luxury setups to emphasize exclusivity and refinement with –
- Neutral or textured backgrounds, like white marble, black velvet, or gold-toned metal surfaces.
- Use minimalist props like crystal vases, ceramic bowls, or others.
- Use softbox lighting to create an even, flattering light or backlighting to add a halo effect.
2. Capturing Textures
Soft, diffused lighting can help enhance the texture of the skincare product, making it appear more inviting and appealing. You can achieve this by using diffusers or bouncing light off reflective surfaces. Playing around with different light directions and intensities can produce visually interesting shadows and highlight the product’s texture.
3. Diverse Models Representation
Cosmetic product photographers prefer models or real people who resonate with your target audience and represent the diversity of skincare product items. It connects buyers to the brand and builds trust. You can highlight different phases by demonstrating how the item is used for product application and its effectiveness. In this shoot, you must pay attention to angles, lighting, and composition to ensure the product is the central focus.
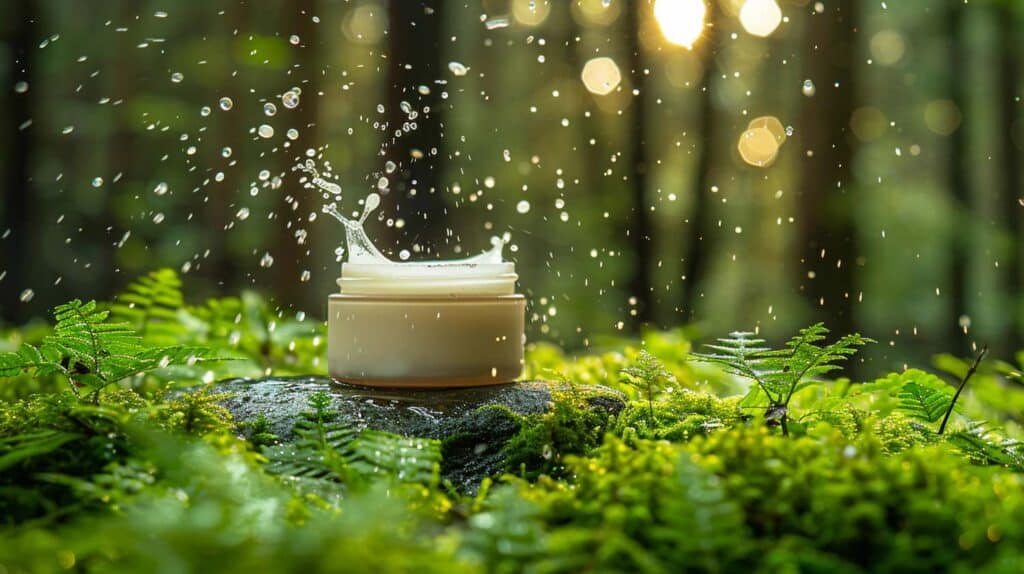
4. Incorporate Natural Elements
A skincare product’s beauty lies in its key elements. Incorporate nature into your skincare photoshoot through natural objects, including:
- Flowers (to spice things up)
- Blossoming petals (to evoke purity and freshness)
- Leaves or stems (to add visual interest)
- Seashells and stones (offer a sense of stability and grounding), and more.
5. Use Negative Space Wisely
Negative space photography refers to giving space around the main subject. There are different rules to utilize this technique in your skincare or beauty product photography, such as –
- The rule of thirds
- Light and shadow placement

- Contrast between shadows and highlights in black and white photos
- The golden ratio, and
- Shoot in a wide aperture.
6. Spice It Up with Composition Techniques
The compositional technique in product photography is how a photographer arranges visual elements within their frame. There are different easy-to-follow compositional techniques to produce top-notch images for your e-commerce business, such as –
a. Rule of thirds
This composition technique is best for showcasing product features aesthetically pleasingly. It involves dividing an image into 9 equal parts with 2×2 horizontal and vertical lines intersecting at 4 points. Place the product at one of these intersections to create a balanced composition.
Step-by-step guide to follow this technique:
- First, determine the main focal point of your image (i.e., product itself, packaging, or brand elements).
- After determining the focal point, position the product either along 1 one of the vertical or horizontal lines or one of the intersections.
b. Leading lines
Leading lines are used to direct the viewer’s eye to a product or focal point, naturally or artificially (man-made). It can be straight, curved, horizontal, vertical, or diagonal. Some examples of leading lines are roads, rivers, shadows, train lines, buildings, window panes, doorways, people, etc. Here are some essential tips for using the leading line in cosmetic photography:
- Place the subject at an angle or use props like arrows or roads to create diagonal lines and add dynamism to your product image.
- Use horizontal or vertical lines to create balance and draw attention to specific features of cosmetic products.
- Try different angles and perspectives to find the best way to incorporate the best leading lines.
- Try converging lines (lines from foreground and background meet) to create a sense of depth and movement within the product image.
c. Golden ratio
The golden ratio in skincare photography adds harmony, off-center midpoints, and spirals. It is a proportion of approximately 1:1.61 to 1 based on the Fibonacci sequence; each number is the sum of the 2 previous numbers.
d. Symmetrical and asymmetrical balance
Symmetrical tactics are used in which the arrangement of the elements is a mirror image on both sides of a central axis. On the other hand, asymmetrical tactics employ different elements on either side of a central axis to still achieve balance through placement, size, and color. Both create a dynamic visual effect.
7. Use Camera Angles & Perspectives
Skincare product photography – from highlighting product details, texture, premium materials, and color to adding visual interest, camera angles play a vital role. Here are some commonly used camera angles:
| Type of Shot | Position Guide | Benefits |
|---|---|---|
| Individual shots | Use a tripod and position the camera at the front angle or straight-on for symmetry. | Focus entirely on the product and guide customers to be amazed at the product’s appearance. |
| Group shots | Arrange products in an organized layout (i.e., pyramid, rows, or staggered) and ensure uniform lighting across all items. | Ideal for social media platforms and cohesive branding. |
| Packaging shot | Focus on sharp & clean lines, and place the packaging at a straight-on or 45-degree angle for depth. | Detail-oriented product presentations build trust and give a positive sense of product quality. |
| Scale shots | Maintain natural and well-balanced lighting and shoot at a straight-on angle for clarity. | Add realism to the product view (correct size perception). |
| Hero shot | Style products using props, reflective surfaces, or others, and use a high-angle for depth and interest. | Communicates the product’s essence and premium value. |
| Lifestyle/candid shots | Place the product in context (i.e., model’s handles, vanity, etc.), use soft light, and shoot at a front angle, profile, or 45-degree. | Customers imagine the product in their daily routine. |
| High-angle shot | Position the camera 30-45 degrees from above and use even lighting to illuminate every product. | Perfect for showcasing multiple products, adds dimensionality and elegance. |
| Straight/eye-level shot | Place the product upright on a plain background, use soft lighting, and align the camera at eye level. | Ideal to create a symmetrical view of branding, labels, and details. |
| 45-degree angle shot | Place the camera at a 45-degree angle, tilt the product slightly forward or backward, and use soft lighting. | Works well for group and individual hero shots. |
| Top-down/flat-lay shot | Places the camera directly overhead, lay the products on a textured or neutral backdrop, and use props like natural elements, flowers, etc. | Perfect for demonstrating brand stories and showing multiple products. |
| Close-up/macro shot | Use a macro lens to focus on specific areas like labels, product textures, creams, and so on. | Creates premium appeal and enhances visual storytelling. |
8. Get Inspiration from Multiple Networks
Get fresh and realistic inspirations for skincare product photos from multiple platforms and networks, such as:
- Explore top-rated and popular photography websites, like 500px, Fstoppers, Pixabay, Unsplash, and more.
- Follow blogs of portfolios of fellow product photographers.
- Join niche-relevant groups or communities on Quora, Reddit, Facebook, Instagram or others. For example, “Product Photography” or “Skincare photography.”
- Participate in photography contests or challenges to hone your skills.
- Browse projects related to cosmetic or skincare products on Behance or other sites.
- Take advantage of social media platforms for the latest trends, photography styles, user preferences, and more. For example, ASMR products reveal skincare routines, etc.
- Explore the best fashion brands or companies’ editorial fashion magazines, lookbooks, or campaign photoshoots.
5 Pro Tips to Achieve Results from Skincare Product Photography
Try out some creative tips to give a new height to your product photography.
Tip 1: Water Splashes
The water splash adds dynamism, excitement, and a refreshing vibe to the cosmetic product photoshoot. This technique goes with hydrate or moisture product items. Use a water spray bottle or dropper to create the effect and ensure the focus remains on the item.
Tip 2: Skincare Products’ Smudges and Smears
Want to add an artistic and edgy touch through a beauty product photoshoot? The smudges and smears technique helps to convey a sense of realness and authenticity. Use safe and removable makeup products to create artful smears on the skin or product and ensure they look realistic.
Tip 3: Reflective Surface
Use mirrors or shiny materials to add a touch of sophistication and elegance and enhance overall composition. You can also experiment with different angles to capture the product’s reflection and surrounding environment.
Tip 4: Shadow or Silhouette on One Side
Play with shadows and silhouettes to add drama and mystery to cosmetic product shoots. Utilize creative lighting techniques, like side lighting or backlighting, to evoke a sense of allure and elegance.
Tip 5: Ingredient-focused
Skincare photographers prefer to represent the product’s main ingredient. For this, you need to carefully arrange the ingredients and pay attention to the background and lighting to maintain a visual balance.
What are the Common Challenges in Skincare Product Photography?
The common challenges in skincare product photography are unprepared items, poor lighting, lack of scale, incorrect white balance, reflective surfaces, busy backgrounds, blurred images, and many others. Below, we’ve highlighted key cosmetic product photography challenges and solutions:
1. Unprepared Items
One of the most common product photography errors is improper product preparation. Poorly presented items in product photos translate into poor quality in customers’ minds and cost you sales. So, whenever you plan to shoot your skincare items, ensure they are clean and spot-free and the packaging is in perfect condition. The camera will always find and highlight these errors.
Solution:
- Ensure the product’s flawless packaging and container convey a sense of quality and professionalism in the final results.
- Use soft and lint-free cloths to clean fingerprints or smudges on the products.
- Thoroughly check, detect packaging, and consider minor imperfections in post-processing.
2. Poor Lighting
Proper lighting is key to showcasing products’ features and building consumer engagement. But poor lighting can result in negative effects, including:
- Overexposure and underexposure: Images with overexposure appear too bright, washing out details and colors. Afterward, underexposed images are too dark and hide important product features.
- Inconsistent lighting: Uneven illumination or lighting creates a disjoined look and inconsistency in each image.
- Harsh shadows: Direct, undiffused light that creates strong shadows distorts products’ appearance.
- Alter colors: Improper lighting can alter products’ true colors and confuse online shoppers.
- Lack of texture: Without proper lighting, the surface textures of the product may not be visible impacting the overall image quality.
Solution:
- Avoid mixing light sources (i.e., daylight & fluorescent lighting).
- Use a lightbox for small cosmetic items and shoot larger products in a studio setup.
- Maintain the right balance of lighting, shade, brightness, and highlights.
3. Incorrect White Balance
One of the popular camera settings is white balance which ensures your skincare items remain accurate and original in color. However, incorrect white balance results in artificial and unnatural images.
- Color cast: Photographs are turning out too “warm” (yellow/red) or too “cool” (blue).
- Distorted colors: Vibrant colors sometimes appear muted or washed out.
- Impact on artistic vision: A poor white balance setting can alter the artistic intent of cosmetic photography.
Solution:
- Use “auto” mode on your camera setting.
- Avoid mixing light sources, like fluorescent and LED light, which produces cooler images, and natural light and normal light bulbs produce warm tones in your images.
4. Reflective Surfaces
Imagine your cream jars and perfume bottles that have plenty of sparkle and gloss. All these reflective surfaces are challenges to capture and need mastery and extra attention to details during the shoot and post-processing. If you’re unable to manage it properly, it can create distracting glare and unwanted reflections that distract consumers.
Solution:
- Use diffusers like softboxes and umbrellas to create even and soft light that minimizes harsh reflections.
- Position the main light source at a 45-degree angle to avoid direct reflections to the product from the camera lens.
- Use side lighting to emphasize the product’s shape and texture of the reflective surface by minimizing glare.
5. Busy and Distracting Backgrounds
Cluttered, overly complex, and colors can distract consumers from the product. Also, how a model dresses to promote skincare products can make all the difference. So, choose simple colored dresses that help to highlight the main products’ actual glow in the best light. For example, Amazon insists on uploading the main product photograph only against a plain white background.
Solution:
- Use a plain white or light grey background.
- Remove distractions from the scene.
- Use simple props that add extra value to your product image.
- Maintain consistency in background choices for each product.
6. Blurred Images
Another common product photography challenge is blurred images due to camera shake, improper focus, and incorrect depth of field. In product photography, sharpness, and clarity ensure every product detail is visible perfectly and accurately. Blurred or soft images mislead customers and distract from the product’s perceived quality.
Solution:
- Use a tripod to remove the camera shake and maintain camera stability during the photoshoot.
- Use a remote shutter release or timer to minimize the camera movement.
- Take time to focus once you have the shot set up.
- Focus more on the most important element of the shoot and use a smaller aperture like f/8 to f/11.
7. Making Too Few Images
Amazon, eBay, and other popular e-commerce platforms use different images to show product details, specific features, variations, and more. If you take too few images, you can’t give consumers proper information like close-ups of key features or product’s texture, craftsmanship, and more.
Solution:
- Capture multiple angles of product photos, like front, back, side, and top-down views.
- Include close-ups to highlight intricate details, textures, and product features.
- Lifestyle and in-use images are best to demonstrate scale and context.
- Add different colors, sizes, or styles to showcase available product varieties.
8. Lack of Scale
Online buyers tend to feature-rich and detailed product photos that give them a physical store shopping experience. Here, contexts play an important role – show the product in use, like a model, use a serum or facewash. However, ignoring the product context can lead to disconnection between the product and the viewer and make it hard to imagine products used in their own lives.
Solution:
- Use lifestyle shots to showcase the product in use or within a relevant setting.
- Include props that help to convey specific moods or stories.
- Provide a clear scale of the product’s size, usage, and others.
9. Composition and Framing
Poor composition – placing the product too far off-center or cropping important parts doesn’t highlight the product effectively. When you shoot from improper angles, the product’s features and appearance are distorted.
Another reason is using incorrect space, either leaving too much empty space or crowding the product, which steals the product’s true form.
Solution:
- Apply the rule of thirds, which divides the frame into a grid of nine equal parts and places the product alone on these lines or at its intersections.
- Ensure the product is well-framed within the photoshoot with adequate spacing.
- Maintain consistent focal lengths and camera position to maintain the product’s size and shape.
10. Missing the Post-processing Step
Post-processing or retouching is a core part of making images professional and polished among consumers. Without proper color correction, sharpness, inconsistent editing styles, unwanted shadows, and other imperfections affect image quality. Improper editing distracts customers and gives them a hard time seeing product details.
Solution:
- Use advanced-level editing software like Adobe Photoshop, Adobe Lightroom, or others to ensure your editing brings the real glow of the product.
- Outsource editing services from a reputable photo editing agency to save time and get high-quality final images in time.
11. Overly Creative Angles and Positioning
Using extreme or unconventional angles can distort the product’s appearance and confuse customers about its true shape and features. Techniques like tilting the camera or using wide-angle lenses may not be suitable for all skincare products or cosmetics and can lead to misrepresentation.
Solution:
- Stick to standard angles like back, side, front, and 45-degree views to help make informed decisions.
- Focus on angles that showcase the product’s key features and design elements, such as skincare product shades, applying procedures, and more.
- Try to highlight unique aspects of the product and set a particular mood.
12. Inconsistency in Image
Consistency is key to presenting a collection of products or multiple images of the same skincare product attractively. For example, Chanel’s limited-edition holiday hydration skincare set. On the other hand, inconsistent images confuse customers, disrupt the visual flow of the product catalog or website, and reduce the perceived professionalism of your brand. It happens due to inconsistent lighting and color, changing backgrounds or props between shots, and different angles and compositions.
Solution:
- Try to avoid switching and stick to the same lighting setup for the collections of the same product shots.
- Use the same backgrounds and make the shot simple. Remember, a consistent background highlights a cohesive look and makes product listings appealing, organized, and professional.
- Maintain a consistent angle and composition.
- Use the same post-processing techniques and settings for all product images.
What is Skincare Product Photography?
Skincare product photography is a specialized form of e-commerce product photography that focuses on capturing images of beauty or skincare items. Its primary goal is to showcase these products in a way that is aesthetically pleasing, informative, and enticing to potential customers.
Why is Skincare Product Photography Important for Brands and Businesses in the Beauty Industry?
Skincare product photography is important for brands and businesses in the beauty industry to showcase product details, textures, and packaging. Also, it helps build brand identity and attract potential customers.
How Can You Make Skincare Product Photos More Appealing to Your Target Audience?
You can make skincare product photos more appealing to your target audience by focusing on image quality, highlighting the product’s texture, and benefits, resonate with brand identity and target demographic. Doing so, follow our 8 creative skincare product photography ideas.
Can You Use a Smartphone for Skincare Photography?
Yes, you can use a high-resolution camera for basic skincare photoshoots, like showcasing textures and details. Many modern smartphones have advanced camera systems, i.e., high-resolution sensors, multiple lenses, higher megapixels, and image processing software.
Is it Necessary to Use a Tripod for Smartphones and iPhones?
Yes, it is necessary to use tripods for smartphones and iPhones to get blur-free and professional product images. The 5 best-selling tripods for smartphones and iPhones are:
- Joby GorillaPod 1K Kit (best smartphone tripod)
- Manfrotto PIXI Mini tripod kit (best tabletop tripod)
- Joby GorillaPod 3K Kit (flexible leg option)
- Ulanzi ST-27 metal phone tripod mount clip (best smartphone tripod mount)
- Joby GripTight Pro Telepod (best overall tripod)
How Much Should You Charge for Skincare Photoshoots?
A professional product photographer may charge from $100 to $500 per hour for skincare photoshoots. Take a look at the table for in-depth pricing details:
| Pricing Factors | Estimated Price |
|---|---|
| Per image | $45 to $125 for 1-10 images |
| Per day | $1,000 to $1500 or more for a half-day or full-day |
| Per hour | $10-$30/hr (beginner) per hour, $25-$70/hr (amateurs), and $75-$145/hr (semi-professionals ) |
| Per project | $30 to $340 or more |
What are the Skincare Product Photography Pricing Factors?
Want to outsource photography services from a professional product photographer, agency, service, or a local freelance photographer? Address the following pricing factors to charge for skincare product photos:
- Photographers’ experience: Experienced or niche expertise might charge more than beginner-level photographers or freelancers.
- On-location or home-based: The photography rate depends on studio rentals, set preparation, travel expenses, and others. Home-based photography might cost less compared to studio or outdoor photography.
- Shoot complexity: Do you require white background shots or complex ones with a full-blown lifestyle product shoot? Image customized requests, deadlines, and other factors vary in photoshoot costs.
- Number of images delivered: Other important factors are image number and shot types. Sometimes, you can get a discount for a bulk amount of images.
- External market factors: Economic factors like inflation, supply, and demand will also impact photographers’ fees.
- Post-production: Image retouching charges are also added to your skincare photoshoots, like color correction to match the product, resizing for different platforms, removing backgrounds, and more.
- Reshoots: A reshoot is the best option if the final result doesn’t meet client requirements or as planned. In those cases, agencies, services, or freelancers offer reshooting services if an error happens on their side.
- Models: Adding a model to your photoshoot increases conversions, showcases how a product works in the use cases, and gives customers better perspectives. So, when hiring talent, expect to pay different fees.
How to Prepare Your Skincare Product Photos for Market?
You must touch up photos to prepare your skincare product photos for the market. As per SwiftERM, over 64% of product returns happen because the delivered item didn’t match what’s on the listing.
So, photo editing is a must-have thing to provide the exact product as displayed on the listings. Some important retouching techniques are:
- Background removal or transparent background guides the audience’s eye to the main product and gives images a professional, sharp, and more appealing outlook.
- Color accuracy with white balance adjustments enhances the product’s appearance.
- Resizing or cropping removes unnecessary elements and attracts the audience to the true beauty of the product.
- Remove imperfections, spots, or marks from skincare items that you might have missed during the shoot.
- Lighting adjusts, and shadows mask depth and dimension to enhance product visuals.
- E-commerce image editing speaks for your brand and boosts sales.
- Retouching exposure and contrast ensures skincare items are well-lit and highly visible.
Now that you’ve high-resolution and e-commerce-friendly product photos, creating a killer skincare marketing and brand strategy to boost sales is time. Successful marketing plans can include:
| Marketing Strategy | Platforms & Resources | Example |
|---|---|---|
| Social media marketing | Facebook, TikTok, Instagram, Twitter, and Snapchat | @Facialmasklab showcases how products work, using trending tags (#NationalCoffeeDay), creating polls or callouts, and more. |
| Influencer marketing | Nano, micro, mid-tier, macro, or mega influencer | L’Oréal Paris campaigns feature skincare or cosmetic products in glamorous settings. |
| Website marketing | Upload clean, high-resolution, and 360-degree product views | Sephora integrates hover-over zoom and video demos on product pages. |
| Advertising campaigns | Use hero shots, season, event-based themes, before & after photography, or others | Elf Beauty and other skincare brands offer new launching product features, highlight benefits, and more with a CTA. |
| E-Commerce platforms | Amazon, AliExpress, Etsy, eBay, and more | K-beauty brands, like Coréelle, provide infographic product images, lifestyle mockups, and more. |
| Google My Business Profile | Upload high-quality images, manufacturing processes, or packaging, promotional bundles, or limited-edition | Handmade skincare brands like True Botanicals include shots of artisans preparing products and add a personal touch. |
| Email marketing | Promotional, referrals, seasonal discounts, or other offerings | Upload high-quality images, manufacturing processes or packaging, promotional bundles, or limited-edition |
However, don’t forget to pay attention to skincare SEO, like image format (PNG, JPG, or others), image accurate size per marketing platforms, image SEO, and other key factors.
