
How to create a clipping mask in Photoshop – master the art of photo editing beauty, or outsource from professional clipping pros for layer control & blending.
A clipping mask in Photoshop is a versatile and powerful photo editing technique used to control the visibility of layers based on the shape of the bottom layer. With a clipping mask, you enhance layer manipulation and can apply adjustments to specific layers or alter the shape of an image. There are 5 types of clipping masks: Text clipping mask, shape clipping mask, layer clipping mask, adjustment layer clipping mask, and brush-based clipping effects.
However, to create a clipping mask, you must have at least two layers: the bottom layer or base layer to define the visible boundaries. Want to explore how to create a clipping mask in Photoshop? In this article, we’ve mentioned a step-by-step guide that will ease your clipping mask crafting process.
What you’ll learn in this article
- 1 What is a Clipping Mask in Photoshop?
- 2 What are the Different Types of Clipping Masks in Photoshop?
- 3 How to Create a Clipping Mask in Photoshop
- 4 How to Create a Clipping Mask with a Shape in Photoshop
- 5 How to Create a Clipping Mask for Text in Photoshop
- 6 How Do Clipping Mask Services Differ from Clipping Path Services?
- 7 How Do Photoshop Clipping Mask Services Improve Your E-commerce Product Photo?
- 8 FAQs about Photoshop Clipping Mask
- 9 Final Overview
What is a Clipping Mask in Photoshop?
A clipping mask in Photoshop is a non-destructive way to control (reveal or hide) the visibility of a layer based on the layer shape beneath it. That means the layer on the bottom controls the visibility. You can use the content of one layer (base layer) to control the visibility of the layers above it (clipped layers). For example, the image within a shape, text with an image background, a t-shirt mockup, etc.
There are two primary types of masks in Photoshop: clipping masks and layer masks. Layer masks use black and white to show and hide multiple layers parts. However, object or product photo masking relies on the bottom layer’s shape to define the connected layers’ visible area. However, clipping masks are useful to –
- Apply adjustments to specific layers or to alter the shape of the image.
- Create photo collages or add textured backgrounds to photos.
- Create a complex composition by merging layers.
- Add textures or patterns to design elements.
- Fit images or textures within shapes or text.
What Does a Clipping Mask Do in Photoshop?
A clipping mask in Photoshop controls the visibility of a layer by using the content and transparency of the layer beneath it.
How it works:
- Base layer (bottom): The layer that is used to create the mask (text, shape, or image).
- Clipped layer or top layer (above): The layers that the base layer will mask.
Key functions:
- Non-Destructive Editing: Clipping masks allow you to control visibility without permanently altering the layers, making them ideal for flexible and reversible designs.
- Creative Applications:
a. Embedding images within shapes or text (e.g., placing an image inside a circular frame or text).
b. Applying adjustments or effects to specific areas of an image by clipping adjustment layers.
c. Creating composites, such as adding photos to complex shapes like frames or patterns.
- Layer Dependency: The clipped layer must be directly above the base layer in the Layers panel, and multiple layers can be clipped to a single base layer.
Clipping masks are widely used in graphic design, photo editing, and digital art for their precision and versatility.
What are the Different Types of Clipping Masks in Photoshop?
There are 5 different types of clipping masks applied in Photoshop, such as –
1. Text Clipping Mask
A text clipping mask allows you to use text as a mask to display an image or texture within the text. It is commonly used in graphic design for creative typography, branding, photos, or designs. To do this, you can place an image layer above a text layer and create a clipping mask. After that, the image will appear only within the boundaries of the text.
2. Shape Clipping Mask
Shape clipping mask allows you to confine a layer’s content to the vector shape (i.e., rectangle, circle, custom path, etc.). It is an effective clipping mask technique to confine images or effects to a specific shape. Ideal for creating photo frames, logos, or custom design elements. Simply place an image or texture above a shape layer and create a clipping mask where the content will fit within the shape’s outline.
3. Layer Group Clipping Mask
Layer group clipping mask in Photoshop allows you to use the contents of one layer (base layer) to mask the layers above it, revealing only the portions within the boundaries of the base layer. It is best for complex designs where multiple elements are required to follow a single mask. You can group multiple layers (Ctrl+G/ Cmd+G) and then clip the group to the base layer.
4. Adjustment Layer Clipping Mask
Adjustment layer clipping mask is a non-destructive tonal and color adjustment (i.e., brightness, contrast, hue/saturation) to a specific layer or group of layers without affecting all layers below it. For example, brightening a model’s face without affecting the background.
5. Brush-Based Clipping Effects
In the Photoshop toolbar, you find brushes that are used in combination with clipping masks to create artistic effects or custom textures. It is ideal to paint on a base layer with brushes and then clip an image or texture above it. Most Photoshop experts use these clipping effects for digital art and custom illustrations.
How to Create a Clipping Mask in Photoshop
To create a Clipping Mask, you need to add a new layer and place it under the main layer. Then you need to create a shape with the Marquee Tool and then fill the area. Then you can select the main layer and click on Create Clipping Mask. Once it’s ready, place it wherever you need it.
Check out the complete process here –
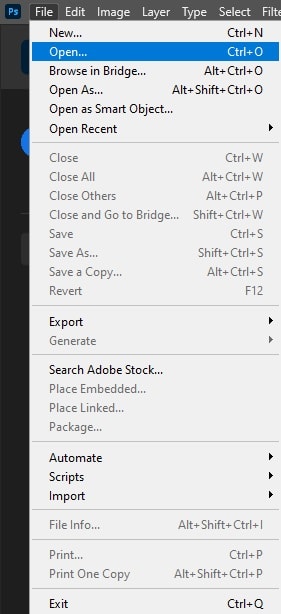
Step 1: Open the Image File
Go to File from the top left corner and click on Open to open the file in Photoshop.
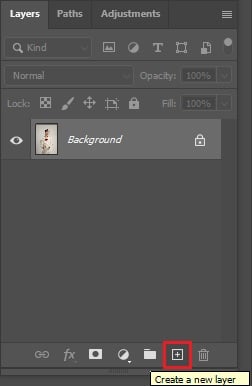
Step 2: Add a Layer
Click on the box with the ‘+’ sign icon from the Layer Panel to add a transparent layer.
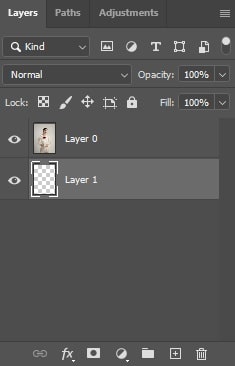
Drag the new Layer below the main Layer, hide the background layer, and select the new Layer to work on it.
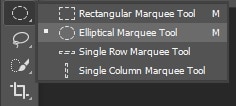
Step 3: Take a Tool
From the toolbar, take the Marquee Tool. You’ll find it in the second position of the toolbar. Choose any shape that you want.
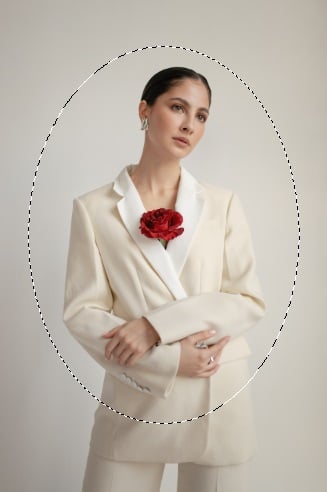
Step 4: Mark the Area
Now, mark the area on your image by drawing a shape.
Step 5: Fill
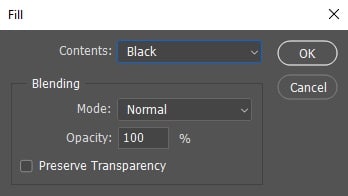
Go to Edit from the top menu and click on Fill.
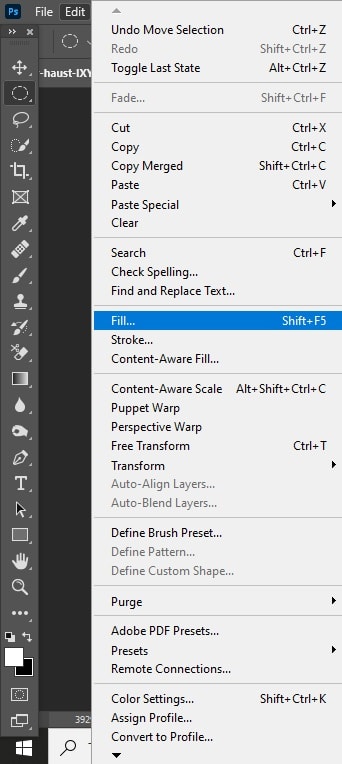
Now select Black and click on OK.
Wait! You won’t see the changes yet.
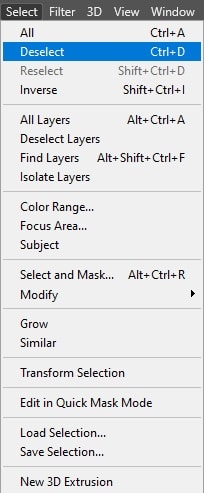
Step 6: Deselect
Go to Select and click on Deselect.
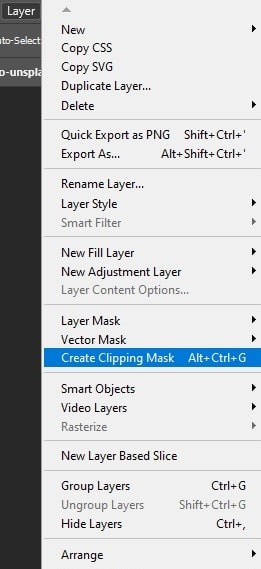
Step 7: Clipping Mask
Select the main Layer at first.

Then go to Layer from the top menu. Click on Create Clipping Mask.
Your image is ready!
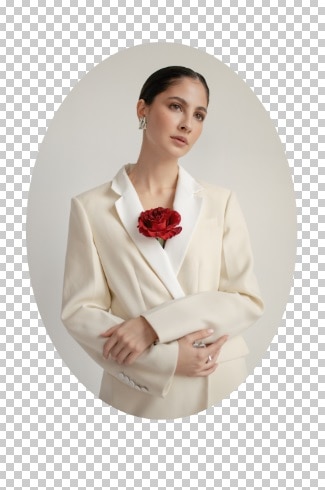
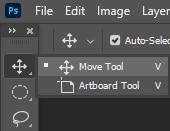
Now you can place the image if you need to. You just need to click on the Move Tool and place your image.
Step 8: Change Color (Optional)
You can change the background color if you want. Go to the Layer menu and click on New Fill Layer and select Solid Color.
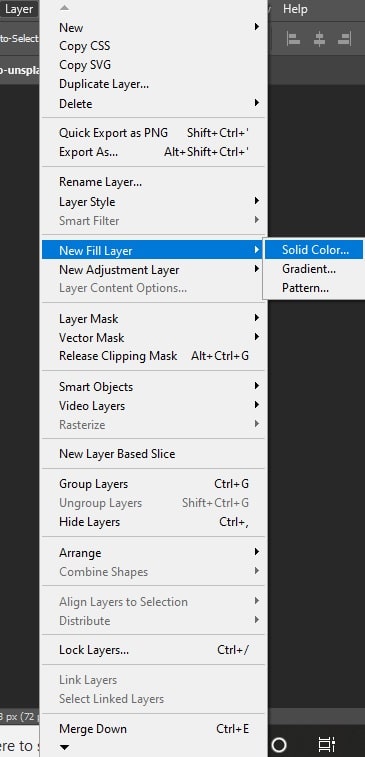
Now choose any color you want to use.
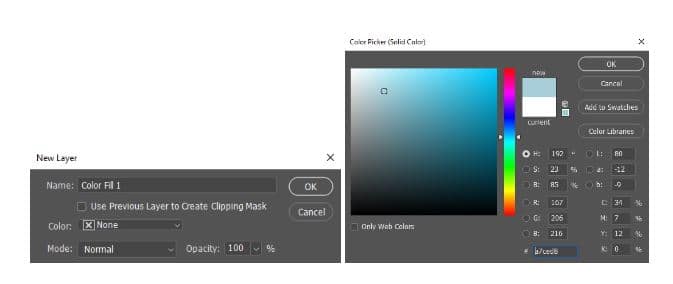
Place this Layer below all other Layers.
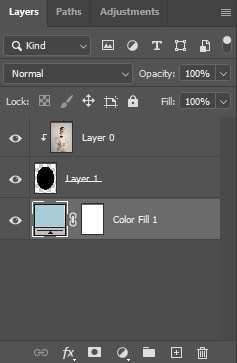
You can work on the inside image too. Just select the original Layer and make the changes you want.
Step 9: Save the Image File
Go to File and click on Save As to save the file. Don’t forget to keep the PSD file.

How to Create a Clipping Mask with a Shape in Photoshop
Here’s a step-by-step guide to creating a clipping mask with a shape in Photoshop:
Step 1: Open Your Edited Image
Open your edited image in Photoshop that you want to convert into a shape, and ensure you’ve at least two layers: the image you want to mask and a layer for the shape. Remember to unlock the background layer.

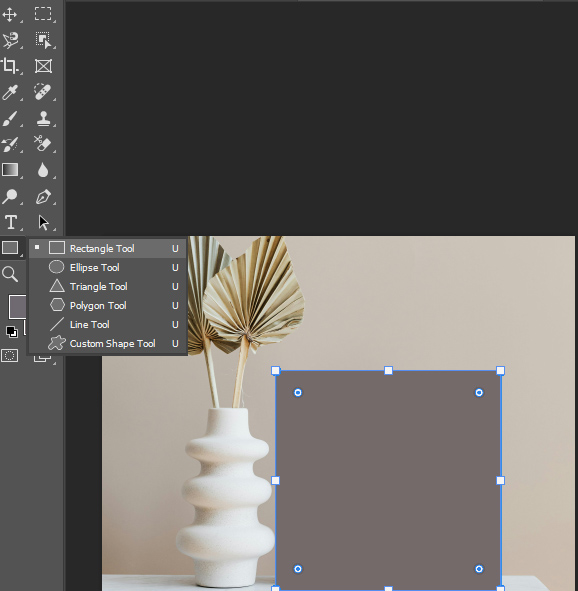
Step 2: Create a Shape
Select a Shape using the Photoshop Shape Tool (U), like a circle, rectangle, ellipse, or custom shape. Draw your shape on the canvas (Photoshop’s shape tool automatically creates a shape layer).
Step 3: Apply the Clipping Mask
Right-click on it in the Layers panel and choose the “Create Clipping Mask” option from the context menu (Alt+Ctrl+G). Or, hold Alt (Windows) or Option (Mac) and hover your cursor between the image layer and text layer until you see a downward-pointing arrow, then click.

Step 4: Adjust and Refine
Use the Move tool (V) to reposition the image within the text. If needed, resize the image using Free Transform (Ctrl+T on Windows, Cmd+T on Mac).
How to Create a Clipping Mask for Text in Photoshop
Here are 5 easy steps to using a clipping mask with text in Adobe Photoshop:
Step 1: Open a New Document
Open your Photoshop and create a new document: go to File, choose the option “New,” set your desired canvas size and resolution, and click “Create.”
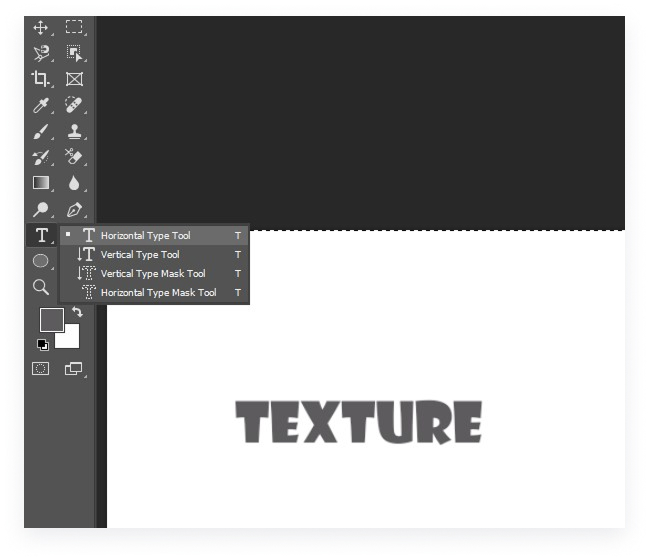
Step 2: Create Your Text
Select the Horizontal Type tool (T) from the toolbar. Choose your font, size, and color from the options bar at the top. Click on the canvas and type your desired text; as you noticed, I’ve created one “Texture.” Use the Move tool (V) to position the text as needed.
Step 3: Add Your Background
If you want a colored background, use the Paint Bucket tool to fill the background layer. But to upload an image background, drag and drop your desired image onto the canvas. Ensure this image layer is directly above your text layer in the Layers Panel, as in the image below.

Step 4: Create the Clipping Mask
With the image/texture layer selected, right-click on it in the Layers panel. Choose “Create Clipping Mask” from the context menu (Alt+Ctrl+G). Or, hold Alt (Windows) or Option (Mac) and hover your cursor between the image layer and text layer until you see a downward-pointing arrow, then click.

Step 5: Adjust and Refine
Use the Move tool (V) to reposition the image within the text. Resize the image using Free Transform (Ctrl+T on Windows, Cmd+T on Mac) if needed.

Like us, you can create a transparent background for further usage.
How Do Clipping Mask Services Differ from Clipping Path Services?
Clipping mask services and clipping path services are both used for image editing, but the difference is in their cutout approach and isolating elements within an image. Clipping masks use the layer’s shape or transparency of a base layer to control the visibility of another layer. This cutout method is best for complex layering, text effects, and design compositions (i.e., adding an image inside the text, making image collages or ads with layered effects, etc.).
Clipping paths involve manually creating vector-based paths around an object to isolate it from its background through the Photoshop Pen tool. This photo editing technique is best for e-commerce product image editing – background removal, precise object isolation, and so on. Below, we’ve highlighted a comparison table between clipping mask vs. clipping path:
| Feature | Clipping Mask | Clipping Path |
|---|---|---|
| Definition | Controlling layer visibility, creates the illusion. | A closed vector path is used to cutout a 2D image using the Photoshop Pen tool. |
| Mask type | Handle soft mask (layer visibility control) | Works best with a hard mask (transparent pixel), defined edges. |
| Purpose | Creating cutouts, and removing backgrounds. | Creating cutouts, removing backgrounds. |
| Complexity | Suitable for intricate details. | Best for simple geometries. |
| Tool used | Brush tool, layer properties. | Pen tool. |
| File types & output | PSD files for layered designs. | PNG or JPEG. |
What is the Difference Between a Clipping Mask and a Layer Mask?
The difference between a clipping mask and a layer mask includes layer interactions. A layer mask controls the entire layer’s visibility, while a clipping mask controls the visibility of other layers relative to a base layer.
Clipping mask: A clipping mask allows you to define the visible area of a layer by using the shape or content of another layer as a mask, effectively clipping the top layer to the shape of the bottom layer.
Layer mask: It allows you to selectively hide or reveal portions of a single layer, without permanently altering the pixels. It is useful for blending layers, creating soft edges, or masking specific areas of an image.
Below, we’ve highlighted some comparisons between clipping mask vs layer mask:
| Key Points | Clipping Mask | Layer Mask |
|---|---|---|
| Purpose | Restricts visibility of a layer based on the shape of another layer (base layer) | Controls the transparency of specific areas of a single layer using grayscale values |
| Number of layers | Multiple layers (base layer and clipped layer) | Single layer |
| Flexibility | Non-destructive, but it depends on the base layer’s shape | Fully editable |
| Best for | Texturing (i.e., gold foil on text), fitting images into shapes | Soft edges/transitions, complex compositing |
| Transparency | Follows the base layer’s opacity | Supports partial transparency |
What is the Difference Between Alpha Lock and Clipping Mask?
The key differences between alpha lock vs. clipping mask are their functionality, layer interaction, and flexibility in editing. An alpha lock, also known as a transparency lock, allows you to paint or edit within the boundaries of a shape or area that has already been filled on a layer. The clipping mask refers to using the contents of one layer (the base layer) to define the visible area of a layer above it (the clipped layer).
| Features | Alpha Lock | Clipping Mask |
|---|---|---|
| Functionality | Allow to paint, color, or apply effects onto the existing content without affecting transparency | Edits are applied on separate layers and constrained by the base layer’s boundaries |
| Layer dependency | Works on one layer where it is applied | Requires at least two layers – one base layer and the clipped layer |
| Flexibility | Permanent changes | Non-destructive and adjustments; edits can be adjusted, removed, or replaced without altering the base layer |
| Transparency control | Preserves transparency within a layer | Constrained by the base layer’s shape/transparency |
| Complexity | Simple workflow with fewer layers | More complex but versatile |
| Applications | Digital painting, illustration, instant color adjustments, or adding drop shadows. | Adding textures, creating intricate effects, multiple adjustments, etc. |
However, you can use alpha lock for quick edits on a single layer when you want simplicity and permanent changes (i.e., blending colors, shading, etc.). On the other hand, a clipping mask is ideal for you when you want to work with layered designs that require flexibility, non-destructive edits, and precise control over visibility (i.e., adding text to shapes). Both tools are effective for different creative workflows in Photoshop and graphic designs.
How Do Photoshop Clipping Mask Services Improve Your E-commerce Product Photo?
Photoshop clipping mask services improve your e-commerce products by enhancing their visual appeal and professionalism, increasing customer engagement, and sales. Here’s how clipping masks improve e-commerce product visuals:
Enhanced Product Presentation
Photoshop clipping mask services allow precision isolation of products from their backgrounds, ensuring the focus is on the product. This helps create cleaner, more professional-looking images highlighting product details and increasing customers’ trust.
Consistency Across Product Images
To build a brand identity, uniformity across product images is essential. With clipping mask services, your product images will get consistent backgrounds, lighting, and alignment, which enhances the overall shopping experience and boosts sales.
Versatility in Marketing
Well-organized product images can be repurposed for different marketing materials, like catalogs, social media posts, and advertisements. This flexibility ensures that you maintain a consistent visual identity across different digital platforms.
FAQs about Photoshop Clipping Mask
What is a clipping mask shortcut in Photoshop?
A clipping mask shortcut in Photoshop is Ctrl+Alt+G (Windows) or Cmd+Option+G (Mac), or select “Create Clipping Mask” from the Layer Menu.
Why is a clipping mask not working in Photoshop?
If a clipping mask in Photoshop isn’t working, ensure the masking layer is above the layer you want to mask, the masking layer is a filled object and not just a stroke, and that the layer you’re trying to mask is visible and not hidden.
What types of images benefit most from clipping mask services?
Product photography, fashion & apparel, logo & graphic design, advertising & marketing materials, food & beverage photography, jewelry, and real estate images benefit most from clipping mask services.
How do I know if my project needs a clipping mask or layer mask?
You can use a clipping mask to control which parts of an image or layer are visible within a specific shape or boundary. For example, presenting designs or graphics on various objects like apparel, packaging, or digital devices. However, you can use a layer mask when you want to blend multiple layers or adjust specific areas of an image non-destructively. For example, fin-tuning adjustments like exposure, color correction, or sharpening to specific portrait areas such as eyes, skin, or hair.
When Should I Use a Clipping Mask Instead of a Clipping Path?
You should use a clipping mask instead of a clipping path when you want to mask an image or shape to the shape of another layer.
Can clipping mask services handle images with hair or fur?
Yes, clipping mask services can handle images with hair or fur. Try our Free Trial now or contact us for in-depth photo editing service details.
How do you invert your mask selection?
You can invert a mask selection using a shortcut key, Cmd+I (Mac) or Ctrl+I (Windows), or a menu option (Image > Adjustments > Invert) to flip the visibility of the masked area.
How do I crop a clipping mask?
To crop a clipping mask in Photoshop, you need to adjust the shape layer that the clipping mask is based on using the transformation tools or editing the shape layer directly. To activate the transformation tool, press Ctrl/Cmd+T. Use the handles to resize and reposition the shape as needed. To edit the shape layer directly, click on the layer panel that defines the shape of your clipping mask and then use the pen tool, Selection tool, or other tools to modify.
How do you fill a path in Photoshop?
To fill a path in Photoshop, select the desired path using the Path Selection tool, access the Paths panel, and click the “Fill Path” button. Choose your fill type (color, pattern, or layer) and specify options like opacity and blending mode before clicking “OK” to fill the path.
How do I create a custom shape in Photoshop?
You can create a custom shape in Photoshop using the Pen tool to draw a path and ensure the “Path” option is selected in the tool options bar. After that, click and drag on the canvas to create anchor points and draw your desired shape. Then right-click on the Pen tool, select “Define Custom Shape,” name the shape, and click “OK.”
Final Overview
- A clipping mask is a non-destructive way to reveal or hide the layer’s visibility based on the layer shape beneath it.
- There are 5 types of clipping masks in Photoshop: text clipping mask, shape clipping mask, layer group clipping mask, adjustment layer clipping mask, and brush-based clipping effects.
- The clipping mask services differ from clipping path services in their cutout approach and isolating elements within an image.
- You can create a clipping mask by placing the layer you want to mask directly above the layer that will define the mask’s shape or boundaries. After that, select the top layer, and go to Layer > Create Clipping Mask. However, you can also use the keyboard shortcut Ctrl+Alt+G (Windows) or Cmd+Option+G (Mac).
