
Deselecting in Photoshop is a smart technique for removing the marching dotted outline that has been selected to make necessary adjustments. Hence, deselecting Photoshop indicates that you stop editing that specific item to maintain a smooth workflow and apply new changes.
The simple keyboard shortcut to deselect in Photoshop instantly is Ctrl+D (Windows) or Cmd+D (Mac). Another way to deselect in Photoshop is to right-click the selected area with your cursor and select the Menu-bar option “Select > Deselect” or hold Alt/Option+Click to remove the selected line.
What you’ll learn in this article
- 1 How to Deselect Part of an Active Selection in Photoshop?
- 1.1 Method 1: Keyboard Shortcut & Menu-Bar
- 1.2 Method 2: Deselect with the Lasso in Photoshop
- 1.3 Method 3: Deselect with the Marquee Tool in Photoshop
- 1.4 Method 4: Deselect Using the Object Selection Tool in Photoshop
- 1.5 Method 5: Deselect in Photoshop Using the Quick Selection Tool
- 1.6 Method 6: Deselect the Pen Tool in Photoshop
- 1.7 Method 7: Deselect Using the Move Tool in Photoshop
- 2 How Do You Deselect a Selected Area?
- 3 What is Deselecting in Photoshop?
- 4 When Do You Need to Deselect in Photoshop?
- 5 What are the Best Tips and Tricks for Deselecting in Photoshop?
How to Deselect Part of an Active Selection in Photoshop?
To deselect part of an active selection in Photoshop, you don’t need to start over or undo editing. Photoshop lets you subtract areas from an existing selection using simple modifier keys and selection tools like Lasso, Marquee, and Quick Selection. This keeps your workflow fast, precise, and flexible, especially when working with complex images. Below is a step-by-step method for deselecting part of an active selection.
Method 1: Keyboard Shortcut & Menu-Bar
Using Photoshop’s built-in keyboard shortcuts and menu-bar options is the quickest way to deselect part of an active selection. There are 3 simple shortcuts.
Let’s break them down below:
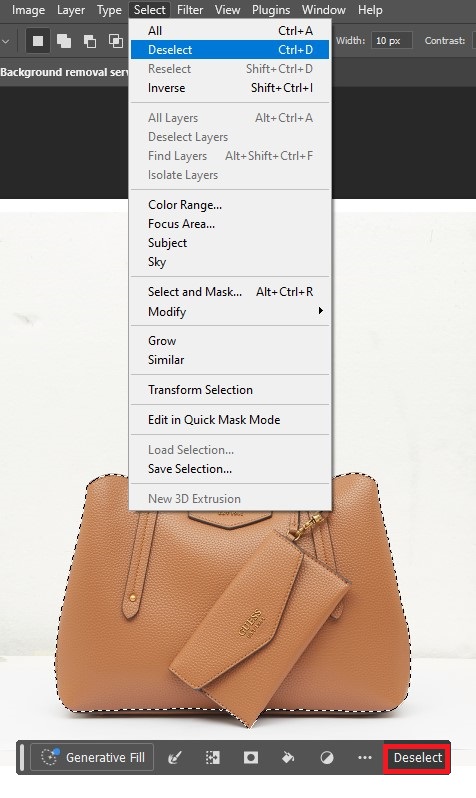
Step 1: Use the “Top Bar” Menu
The simplest way for active selection in Photoshop is by using the default setting in the top bar menu. Click “Select” in the menu, choose “Deselect” from the dropdown, and the active selection will be removed instantly.
Step 2: Keyboard Shortcut
Another quick and effective hack to remove active selection in Photoshop is to use keyboard shortcuts. Simply press Ctrl+D for Windows and Cmd+D for Mac.
Step 3: Right-Click the Cursor
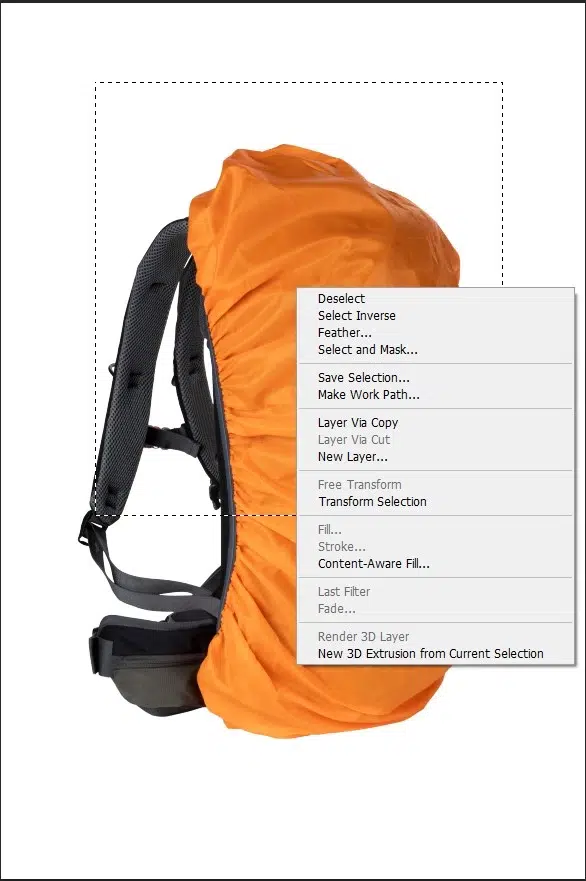
This option works best for those who are more comfortable working with a mouse, more than a keyboard. To remove the active selection, simply “Right-click” anywhere inside the selected area and choose Deselect from the dropdown menu.
Method 2: Deselect with the Lasso in Photoshop
To deselect the Lasso tool in Photoshop, just use the “deselect” option from the top menu bar, or use keyboard shortcut Ctrl + D for Windows users and Cmd + D for Mac users, or use the right click in the selected area and choose deselect.
Deselecting is the best way to remove part of a selection to fix a mistake. The steps below walk you through the process clearly.
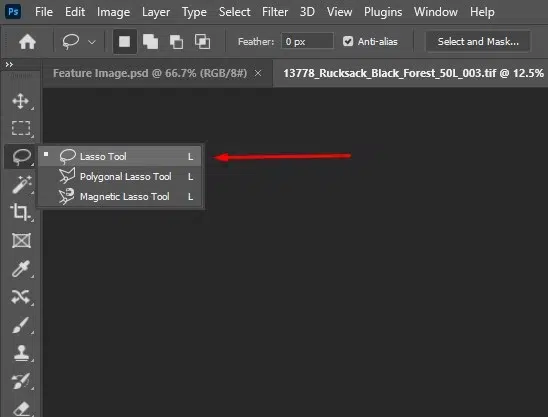
Step 1: Select the Lasso Tool in Photoshop
Open an image you want to edit using Photoshop. Just select the Lasso tool from the toolbar or use keyboard shortcut “L.” This tool allows you to manually choose areas or remove unwanted objects from your image.
Step 2: Create a Selection on Your Image
Click and drag around the object or area you want to select. Carefully trace the outline until the selection is complete. Always create a duplicate layer first so that you can edit a specific area without altering the original image.

Step 3: Deselect It
The simplest way to adjust your selection is to use the keyboard shortcut Ctrl+D for Windows and Cmd +D for Mac to remove it and start again, or click the “Deselect” from the top dropdown menu bar.

Method 3: Deselect with the Marquee Tool in Photoshop
The simplest way to remove a Marquee tool in Photoshop is by using a keyboard shortcut or by clicking the “Deselect” option from the top menu bar. Below, you’ll find a clear, step-by-step guide that walks you through the process in more detail.
Step 1: Tool Selection
Simply just press the “M” key on your keyboard to select the Marquee tool or select it from the toolbar on the left. Photoshop offers several Marquee options, each designed for a specific type of selection:

- Rectangular Marquee Tool for square or rectangular selections
- Elliptical Marquee Tool for circular or oval selections
- Single Row Marquee Tool for selecting one horizontal row of pixels
- Single Column Marquee Tool for selecting one vertical column of pixels
For example, from the option bar at the top, you can control how selections behave by choosing options like New Selection, Add to Selection, Subtract from Selection, or Intersect with Selection.
Step 2: Set the Marquee Tool to Other Settings
Set a feathering value to soften edges. And when using the Elliptical Marquee tool, you can also toggle anti-aliasing on or off to smooth the selection edges.
Step 3: Start with the New Selection
To start a new selection, press and hold “Shift” to add to an existing selection, or hold Alt for Windows or Option for Mac to remove selected areas. Hence, these shortcuts help you fine-tune your selection with precision.
Step 4: Deselect the Marquee Tool Selection
If you want to begin again, deselect the Marquee selection. Just press Ctrl + D, open the Select menu and choose Deselect, or right-click inside the selection and click Deselect.

Method 4: Deselect Using the Object Selection Tool in Photoshop
To deselect the object selection tool in Photoshop, there are a few simple ways to do so. Go to the Select menu and choose Deselect, use the shortcut Ctrl + D on Windows or Cmd + D on a Mac, or right-click on the selection and pick Deselect. The step-by-step guide below walks through each option so you can use whatever feels fastest in your workflow.
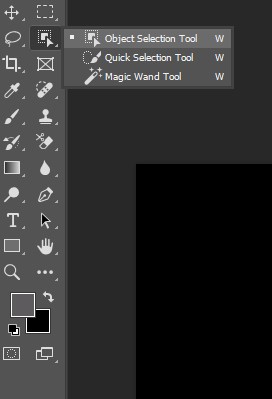
Step 1: Choose the Object Selection tool
Select and open an image you want to edit, and first press “W” or use the default system from the Photoshop menu toolbar.
Step 2: Create a Selection
To create a selection process, firstly, make sure the Object Finder is turned on in the upper-right corner. Then move your mouse over an object to detect its edges. Once selected, the object and its surrounding regions will be highlighted with an overlay color.

Step 3: Use the Deselect Option
As mentioned in earlier steps, you can easily remove the deselect using any of them.
Method 5: Deselect in Photoshop Using the Quick Selection Tool
To deselect in Photoshop using the Quick Selection tool, follow these steps.
Step 1: Access the Quick Selection Tool
To access the quick selection tool, press “W” on the keyboard or select it from the Photoshop toolbar.

Step 2: Make a Selection
It’s best to change the brush tip size just click on the “Brush pop-up menu” from the open toolbar, then enter the pixel size and adjust the slider. Then, paint over the selected area of the image.
Step 3: Deselect the Selection
Suppose the selection area isn’t perfect and needs some adjustment to get the best result. To fix it, either refine the selection using the methods we covered earlier or simply click Deselect from the toolbar menu.

Method 6: Deselect the Pen Tool in Photoshop
There are 3 simple and common ways to deselect the Pen tool in Photoshop.
1. Use the Contextual Task Bar that appears near the bottom of the image after making a selection.
2. Open the Select menu and choose Deselect.
3. Use right-click or Control-click inside the selection and then click Deselect.
Now, let’s walk through the process.
- Start by selecting the Pen Tool by pressing the “P” key and adjusting the required settings. If you need a more in-depth walkthrough, a dedicated Photoshop Pen Tool tutorial can help.
- Click on the canvas to place the first anchor point, then continue adding points to extend the path. Drag the handles to create smooth curves or straight lines until the shape is complete.
- If the path doesn’t turn out the way you want, you can easily deselect it using a shortcut or any of the deselection methods above and begin again.
Method 7: Deselect Using the Move Tool in Photoshop
To deselect the Move tool in Photoshop, just follow these few steps.
Step 1: Choose the Move Tool in Photoshop
Click the Move tool in the toolbar, or press V on your keyboard.
Step 2: Switch to Another Tool
Select any other tool, like the Brush tool “B”, Lasso tool “L”, or Crop tool “C”. The moment you do this, the Move tool is no longer active.
Step 3: Use a Neutral Shortcut
Press Ctrl for Windows and Command for Mac while another tool is active. This temporarily enables the Move tool, and releasing the key takes you right back to your previous tool.
How Do You Deselect a Selected Area?
While designing, several essential steps are involved when deselecting a selected area in Photoshop. Whether you’re working with layers, building a composition, or adding text to a poster, deselecting an active selection is often necessary to move forward with your design.
Now, let’s look at a few situations where these deselecting techniques come in handy.
How to Deselect a Path in Photoshop?
To deselect a Path panel in Adobe Photoshop, you have several options. You can click anywhere in an empty area of the Paths panel to remove the selection or use the keyboard shortcut, or use the top option bar to deselect a path in Photoshop. Below, you’ll find the step-by-step guide to deselecting the path in Photoshop:
- Click on an empty area in the Paths panel to deselect the path
- Press Ctrl + D on Windows or Command + D on macOS
- Go to Select > Deselect from the menu bar
- Right-click the selected path and choose Deselect
How to Deselect a Layer in Photoshop?
To deselect a layer in Photoshop by opening the “Select” from the menu and choose “Deselect layer”. This clears any active selection on a layer. If you’ve selected part of a layer and don’t need it anymore, you can remove the selection using the menu, right-clicking and choosing deselect, or pressing Ctrl + D.
To select an entire layer, go to the Layers panel, usually on the right side of the screen, and click the layer you want. If you need to select more than one layer, hold Ctrl while clicking additional layer names. To remove a single layer from that group, keep holding Ctrl and click the layer again.
1. How to Deselect Pixels in Photoshop?
To deselect pixels in Photoshop, press Ctrl + D on Windows or Command + D on a Mac, or choose Select > Deselect from the menu. Moreover, to remove the selected area, you need to deselect the pixel first so that you can edit other areas of the image without modifying what was previously selected.
2. How to Deselect Shape in Photoshop?
You can remove a selection in Photoshop using a couple of simple hacks:
- Press Ctrl + D on Windows or Cmd + D on Mac
- Deselect through the Select menu
- Right-clicking on the active selection
In Photoshop, shapes are vector-based elements commonly used for things like borders, buttons, and other interface or design components.
3. How to Deselect Lines in Photoshop?
In Photoshop, deselecting lines means clearing a selection or path made with the Line tool. If you’ve created a selection using the Line tool, you can remove it using a keyboard shortcut (Ctrl + D on Windows or Cmd + D on Mac), by choosing Select > Deselect from the menu, or by clicking outside the selected area. Deselecting lines helps prevent accidental edits, makes it easier to refine your work, and allows you to manage or combine multiple selections more accurately.
4. How to Deselect Part of a Selection in Photoshop?
To deselect part of a selection in Photoshop, you need to follow some steps:
- At first, choose your preferred selection tool, for example Lasso tool (L), Marquee Tool (M), Magic Wand tool (W)
- Secondly, press and hold down the Alt key on Windows or the Option key on a Mac. A small minus sign (–) will appear beside the cursor, indicating that you’re subtracting from the selection.
- Drag over the area you want to remove. To clear the selection completely, use Ctrl + D on Windows or Cmd + D on a Mac.
5. How to Deselect Objects in Photoshop?
To remove a selection in Photoshop, press Ctrl + D on Windows or Cmd + D on a Mac. Then, go to the Select menu at the top of the screen and choose Deselect. Right-click inside the selected area and pick Deselect from the menu.
6. How to Deselect Mask in Photoshop
To quickly deselect a mask in Photoshop, use the keyboard shortcut Ctrl + D on Windows or Command + D on macOS. Also, right-click inside the selected area with the cursor and choose Deselect from the menu.
7. How to Deselect All Layers in Photoshop
To deselect all layers in Photoshop using keyboard shortcuts: Ctrl + D on Windows or Cmd + D on a Mac. Another option is to right-click the active selection area and choose Deselect. You can also go to the Select menu in the top bar and click Deselect.
8. How Do You Deselect the Entire Selection in Photoshop
To deselect the entire selection in Photoshop, use Ctrl + D on Windows or Cmd + D on Mac. You can also do it from the menu bar by going to Select and clicking Deselect. No matter which one you’re using, the deselection shortcut works the same. Try these tools and the quick deselection trick mentioned earlier to move faster in your workflow.
Photoshop offers several ways to make selections.
- Marquee tools
- Lasso tools
- Object Selection tool
- Quick Selection tool
- Magic Wand tool
- Pen tool
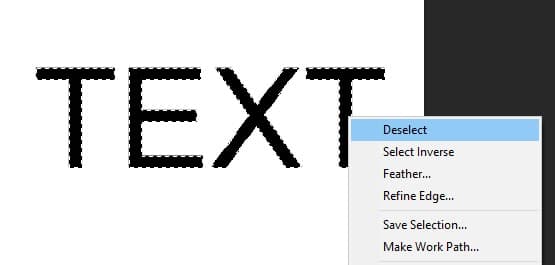
9. How to Deselect Text in Photoshop?
To deselect added text in your file in Photoshop, there are several ways to do that; either you can use any of the methods mentioned above, or right-click on the text, open the menu, and choose Deselect.
10. How to Deselect Transform in Photoshop?
To deselect “transform” mode in Photoshop, press the Escape (Esc) key or click the “cancel” button, which will stop the transformation and remove the bounding box from the layer. To enter transform mode, select a layer and press “Ctrl+T” on Windows or “Command+T” on Mac. Alternatively, you can right-click the layer in the Layers panel and choose “Reset Transform.”

The transform tool lets you adjust a layer’s size, shape, position, and orientation. It includes options like scaling, rotating, skewing, distorting, changing perspective, and warping, among others.
What is Deselecting in Photoshop?
Deselecting in Photoshop is removing any active selection from an image allowing users to create a new selection for refining edits, modifying selected areas, or switching tasks smoothly. The shortcut for deselecting is Ctrl + D on Windows and Command + D on Mac. Photoshop offers tools such as Marquee, Lasso, and Quick Selection tools are used for deselecting.
Deselecting does not mean delete. It simply means removing a selection you’ve made by mistake, letting you work on other areas of your image without impacting the rest of the canvas. To deselect from Ctrl+A by clicking anywhere outside the selected area. In Photoshop, pressing “Ctrl + R” is the keyboard shortcut to show or hide the rulers on your images. If you deselect your selection accidentally, just go to the top toolbar menu and click “select,” and click “Refine Selection” to undo the recent selection.
When Do You Need to Deselect in Photoshop?
You need to deselect in Photoshop when you need to clear the active selection, which prevents accidental edits to parts of the image you didn’t intend to change. Deselecting also lets you apply tools, filters, or adjustments to the entire image or start a fresh selection without interference. This deselection helps to ensure a smooth and efficient editing workflow without distraction from previous selection. The key purposes of deselection in Photoshop are as follows.
- Layer management: When you’re working across multiple layers, an active selection can limit what you’re able to edit. Deselecting in the Layers panel makes it easier to shift focus without accidentally editing the wrong layer.
- Making global edits: Some adjustments are meant for the whole image, not just a portion of it. Color correction, sharpening, or overall exposure tweaks won’t behave correctly if a selection is still active. Deselecting lets Photoshop apply those edits evenly across the entire image.
- Switching tools: Not all tools work the way you expect with an active selection. Hence, deselecting lets you switch to tools like the Brush or Clone Stamp without restrictions. This gives you full freedom to paint, duplicate elements, or remove unwanted objects.
- Starting anew: If a selection was made by mistake or no longer fits your goal, an old selection can interfere with the next step. Clearing it gives you a clean slate, making it easier to create a new selection or approach the image from a fresh angle.
- Improve workflow: Regularly deselecting helps maintain a smooth editing process. It allows quick transitions between tasks and improves accuracy, especially when working with detailed or complex edits.
What are the Best Tips and Tricks for Deselecting in Photoshop?
The best tips and tricks for deselecting in Photoshop are to use the keyboard shortcut Ctrl + D and Command +D on Mac. Below you’ll find some helpful tricks that will ease your workload and smooth the process.
Use “Quick Mask” Mode For Complex Selections
When working on something detailed selection, like jewelry retouching for e-commerce, Quick Mask mode gives you better control. Press Q to enter, refine the edges visually, then press Q again to exit and convert it back into a selection.
Use the “Escape Key” to deselect
With tools like the Crop tool, or by pressing the “Escape key” Esc instantly removes the active selection without extra steps.
Combine Selections Before Deselecting
When working with multiple selections, merge them first using modifier keys.
- Add to selection: Hold Shift
- Subtract from selection: Hold Alt on Windows or Option on Mac
- Intersect selections: Hold Shift + Alt on Windows or Shift + Option on Mac
- Deselect Before Switching Tools
Tools like the Brush or Eraser won’t work properly while a selection is active. Clearing the selection lets you work without interruptions.
Practice Non-Destructive Workflows
Layer masks, smart objects, and adjustment layers give you flexibility. Even after deselecting, you can go back and refine your edits without starting over.
What to Keep in Mind When Deselecting in Photoshop?
To keep in mind when deselecting in Photoshop, make sure your work is saved and that you’re on the correct layer. A few other things to keep in mind:
- Use keyboard shortcuts: It’s best to use a keyboard shortcut for deselection. Ctrl + D on Windows or Cmd + D on Mac lets you deselect instantly without digging through menus.
- Review your selection: Before deselecting, you need to review every selected area and any unwanted areas.
- Avoid Accidental Clicks: To avoid accidental clicks, watch your mouse clicks. Clicking outside an active selection will remove it, so zoom in to stay precise when working with layers, paths, or fine details.
- Use Guides And Grids: Rely on guides and grids to keep everything aligned. They make it much easier to reselect areas accurately after deselecting.
- Layer Masks: When working with complex selection, consider using layer masks instead of editing directly. Masks let you hide or reveal areas without permanently changing the image.
- Backup Copies: Make sure you keep backup copies of your original files. That way, you can quickly recover if something goes wrong.
- Feather And Refined Edges: If your selection uses feathering or refined edges, double-check those settings before deselecting to preserve edge quality.
