The Pen Tool in Photoshop isolates a portion of an image from its surroundings, removes a product from a busy background, or selects a portion of a product image to change its color. From modifying, storing, and reusing the paths, the Pen Tool is the go-to tool for designers.
You can use the Pen Tool by selecting the right types of Pen Tools available in Photoshop, and all of them use anchor points to determine the dimensions of lines and shapes. If you are a beginner and want to learn how to use the Pen Tool in Photoshop, then this article is for you. We have created a detailed guide to help you learn how to master using the Photoshop Pen Tool. This tutorial will also cover the Pen Tool’s benefits, features, and functionalities.
What you’ll learn in this article
- 1 What is the Pen Tool in Photoshop?
- 2 What Does the Pen Tool Do in Photoshop?
- 3 What are the Different Types of Pen Tools in Photoshop?
- 4 Where is the Pen Tool in Photoshop?
- 5 How to Use the Pen Tool in Photoshop to Create a Path
- 6 How to Create a Path to Inside a Path
- 7 How to Remove Objects from a Path in Photoshop
- 8 How to Make a Shape Using the Photoshop Pen Tool
- 9 How to Use the Convert Point Tool
- 10 Why Do You Need Professional Pen Tool Experts?
What is the Pen Tool in Photoshop?
The Pen Tool in Photoshop is a vector-based selection tool that allows users to draw paths and shapes by defining anchor points. It is a versatile and powerful tool ideal for creating complex selections, masks, and objects. Unlike the Brush and Pencil tools, the Pen Tool helps retouchers “draw” pixels onto an image. However, you can create multiple path segments within a path. These paths appear as either Work Paths or Shape Paths in the Path Panel.
Here are some ways you can use the tool:
- Draw lines and shapes: You can create straight lines by setting two anchor points, curved lines, and closed shapes for custom designs.
- Fill and stroke: Using the Pen Tool, you can create a closed path. This means you can create paths for selection and masking.
- Mask a layer: Do you want to give a creative touch, like hiding one portion of a layer and revealing the other layers below? Use the Pen Tool to Select and Mask the parts of the layer you want to hide.
- Make selections: You can trace the outline of one element of an image that you want to cut out or touch up separately using the Pen Tool.
What are the Differences Between Paths and Shapes in Photoshop?
A path in the Pen Tool is a line segment that can be straight or curved, allowing you to draw smooth-edged paths with anchor points and handles. On the other hand, the shape created by the Pen Tool is a vector shape that is a flexible, scalable object made up of lines and curves.
However, when you select the Standard Pen Tool, the Curvature Pen Tool, or the Freeform Pen tool, you get access to choose either Path or Shape from the Pen tool settings. When the Path is selected, you’ll create a New Path that appears in the Paths Panel. But by selecting the Shape, you’ll create a new Shape Path that appears in the Paths Panel and the Layers Panel. Also, you get different setting options, like stoke color, thickness, and fill color of the shape.
What is the Difference Between the Photoshop Pen Tool and Pencil Tool?
The differences between the Photoshop Pen tool and the Pencil tool are as follows:
- The pen tool creates precise, vector-based paths with anchor points. On the contrary, the pencil tool draws raster-based pixels on the canvas with hard edges and less precision.
- The pen tool uses anchor points and handles to create curves and straight lines. Afterward, the pencil tool produces free-hand lines suitable for pixel art.
- The pen tool in Photoshop offers multiple modes: path, shape, and pixels. On the other hand, the pencil tool is often combined with other painting or drawing tools for detailed raster art.
- Photoshop’s pen tool is ideal for photo retouching, vector art creation, and so on. The pencil tool is used in digital drawing, sketching, and pixel art.
What Does the Pen Tool Do in Photoshop?
The Pen Tool in Photoshop allows users to create smooth and precise paths using anchor points, draw complex shapes, make intricate selections around specific parts of an image, and cutout objects with clean edges. This tool is popular for providing a high level of control over lines and curves compared to other drawing tools. However, the key purposes of the Pen Tool are:
- Ideal for complex tasks, like isolating objects with clean edges, outlining intricate details, and designing vector-based graphics without losing quality.
- Easily manipulate individual anchor points and their handles after creating a path to refine the shape.
- Easy to modify the lines by moving the points and handles, allowing you to create paths.
- Ideal for professional tasks, like logos, detailed illustrations, clean cutouts for product or fashion photos, and graphic elements.
- Highly customizable tool, i.e., add, remove, or adjust anchor points.
- It is a multi-purpose tool, like selection, masking, shape creation, and text path.
What are the Different Types of Pen Tools in Photoshop?
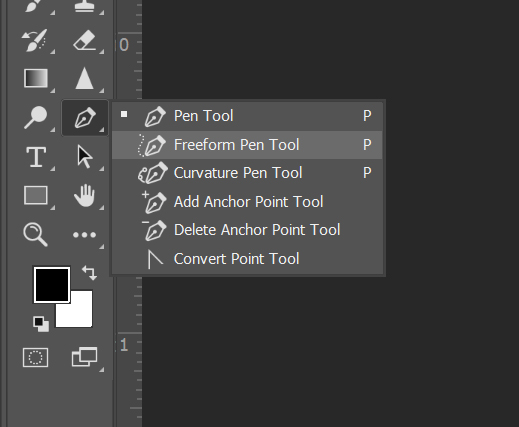
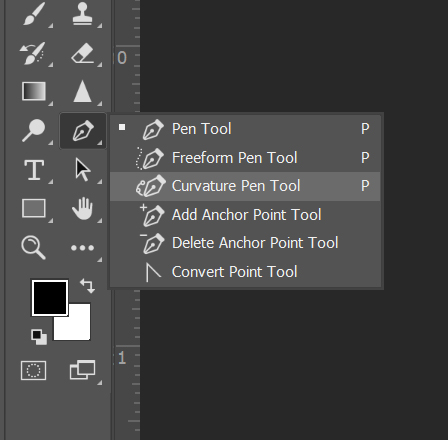
There are 4 different types of Pen Tools in Adobe Photoshop 2024 to create a new path, such as –
- Standard Pen Tool
The Standard Pen Tool is the basic Pen Tool for creating precise, vector-based shapes and paths using anchor points. You can draw straight lines or curves between multiple points. Unlike raster-based graphic tools, the Pen Tool creates scalable vector shapes maintaining quality when resized. This tool is ideal for creating logos, icons, precise selections, complex shapes with clean edges, clipping paths, and so on.

- Freeform Pen Tool
The Freeform Pen Tool in Photoshop allows you to draw vector shapes and paths freehand by automatically adding anchor points, similar to a pencil or pen on paper. This tool can be used to create quick selections.
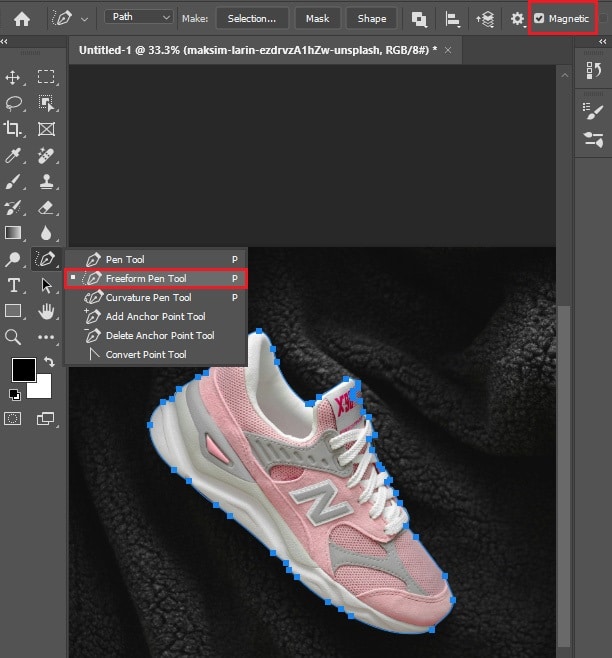
- Magnetic Pen Tool
It is an option of the Freeform Pen Tool that allows graphic designers to draw a path that snaps to the edges of defined areas on the drawing. To access the Magnetic Pen Tool, turn on the “Magnetic” option.
- Curvature Pen Tool
As the name suggests, this Pen Tool allows you to draw and modify curve paths (by clicking control points) and straight-line segments (by double-clicking). It gives you precise control over anchor points.
The Other Pen Tool Types That are Used to Modify an Existing Path
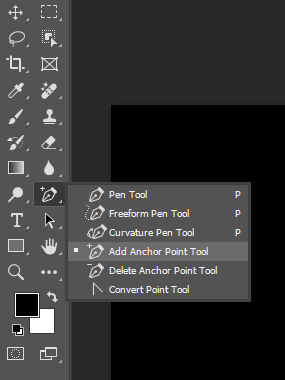
- Add Anchor Point Tool
The Add Anchor Point Tool allows you to add anchor points to paths in Adobe Photoshop and Illustrator. Simply, hover the tool over the part of the path where you want to add a new point and click the mouse to create the point.
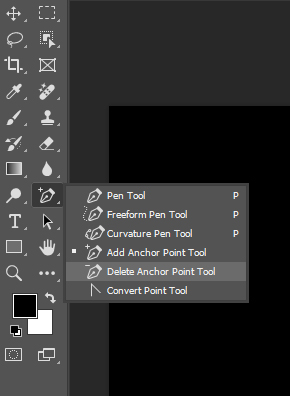
- Delete Anchor Point Tool
The Delete Anchor Point Tool removes anchor points from a path or shape, changing its appearance. It works the opposite of the Add Anchor Point tool. Expert photo retouchers use this tool to remove unnecessary anchor points.
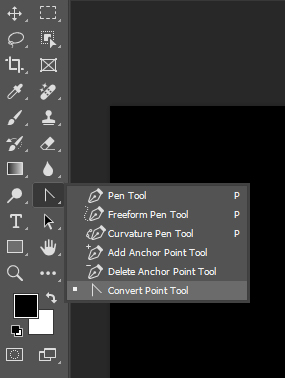
- Convert Point Tool
The Convert Point tool converts a smooth point to a corner point and vice versa. You can use this tool to edit vector shape masks and paths. For example, you can use it to convert a circle into a square shape.
Where is the Pen Tool in Photoshop?
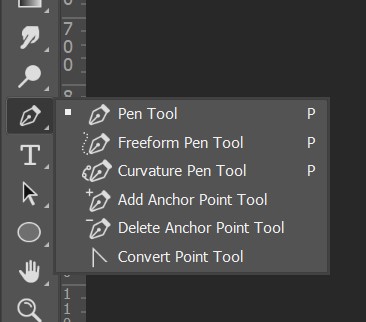
The Pen Tool in Photoshop is located in the toolbar, near the bottom on the left side, with the symbol of a fountain “Ink Pen” ✒️in the tools panel. You can also access the Pen Tool by pressing the P key on your keyboard.

Where is the Paths Panel in Photoshop?
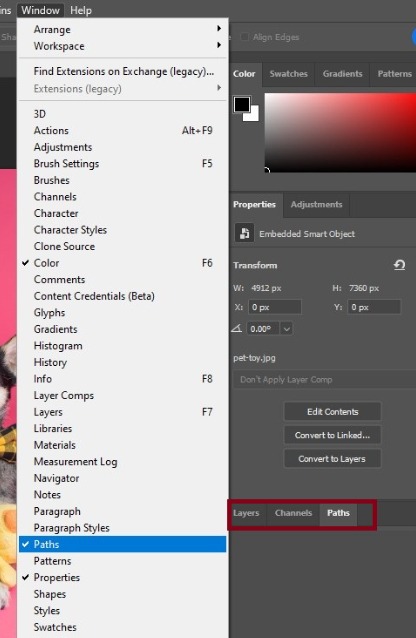
The Paths Panel in Photoshop is located in the default workspace. It will be visible when you use the Pen Tool. Click on the Paths tab, which is visible in the Layers Panel, as shown in the image. If you don’t see a Paths Panel in your workspace, click on the Windows dropdown menu and select Paths.
Why is the Photoshop Pen Tool Not Working?
The Photoshop Pen Tool isn’t working as expected for several reasons, including:
- Incorrect pen tool mode: You might use the wrong mode (e.g., Path or Shape). Check the top options bar to select the correct mode.
- Anchor points issues: You might accidentally create multiple anchor points, resulting in unexpected or broken paths. Use Ctrl (or Cmd on Mac) to delete unwanted points.
- Path or Shape Layer lock: Is the Layer locked, or are you working on a Background Layer? The Pen tool may not work as expected. Ensure the layer is unlocked or create a new layer to work on.
- Incorrect shape setting: If you’re using the Pen Tool in Shape mode, but your shape isn’t visible, ensure that the Fill and Stroke settings are not set to “None” or transparent.
- Incorrect layer settings: Ensure you’re selecting the correct path in the Paths panel.
How to Use the Pen Tool in Photoshop to Create a Path
Now that you know what the Pen Tool in Photoshop does and where you can find this tool in the Tools panel, let us take a look at the steps required to create a path using the Pen Tool:
- Activate Pen Tool: The first step is to select the tool from the Tools panel in Photoshop and activate it.
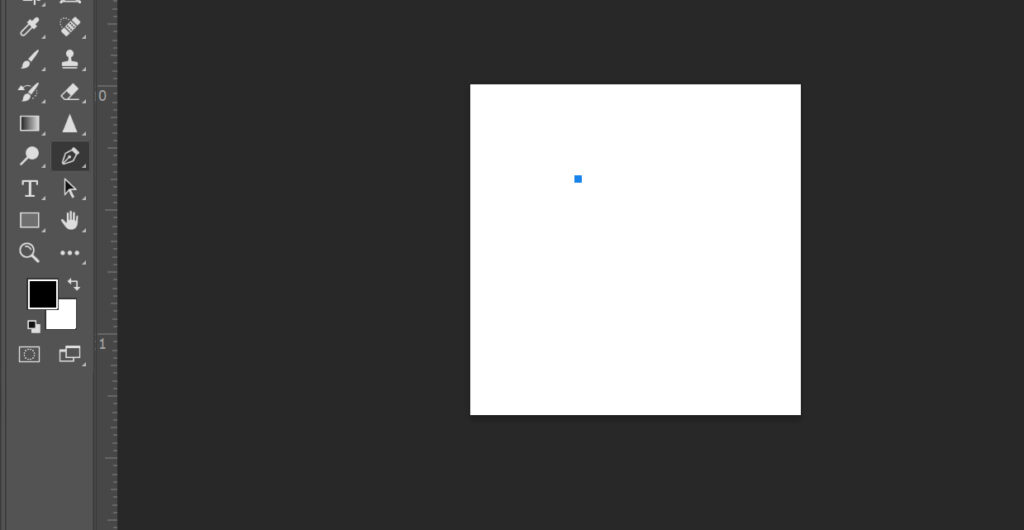
- Set the first anchor point: The second step is to set the first anchor point on the canvas by clicking on the canvas.
- Add more anchor points: Now add more anchor points to expand the path. Do not worry about perfecting the curve at this stage.
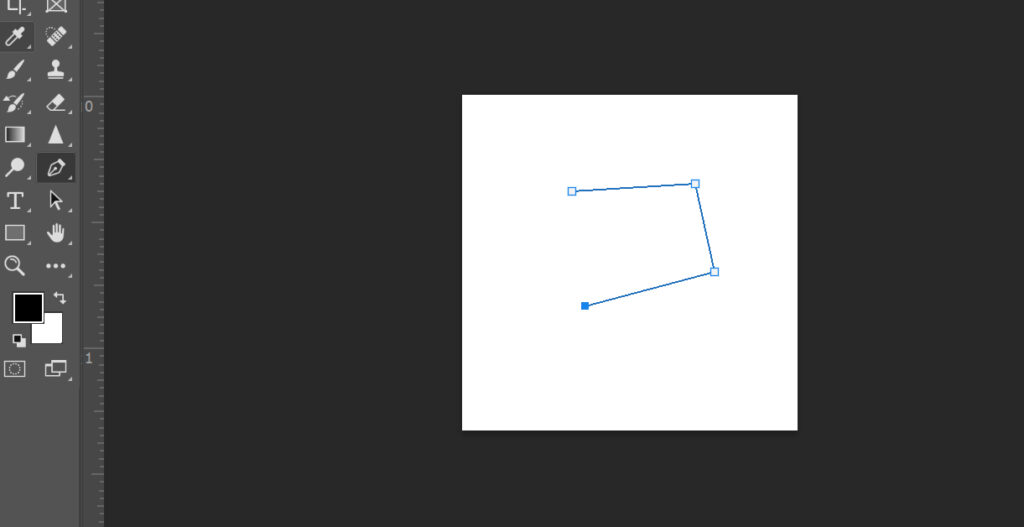
- Complete the path: Now that you have added the anchor points, you can use the Pen Tool to complete the path by dragging the curves and lines to make the desired shape.

Once you have completed the path with the Photoshop Pen Tool, you can use the selection to create a mask, cut it out, or fill it in to create a new design. This tool is extremely useful for designers who want to make designs that stand out.
How to Create a Path to Inside a Path
For expert designers, the Pen Tool is the perfect way of making complex shapes in Photoshop. You can use the Photoshop Pen Tool to do something pretty interesting. The Adobe Pen Tool allows you to create a path inside the path to cut out a hole from the image. Here is how you can do it:
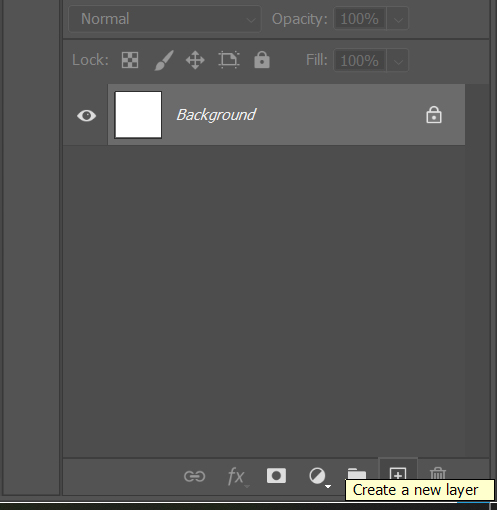
- Create a new layer: Add a new layer in Photoshop from the layers panel to start creating the path.
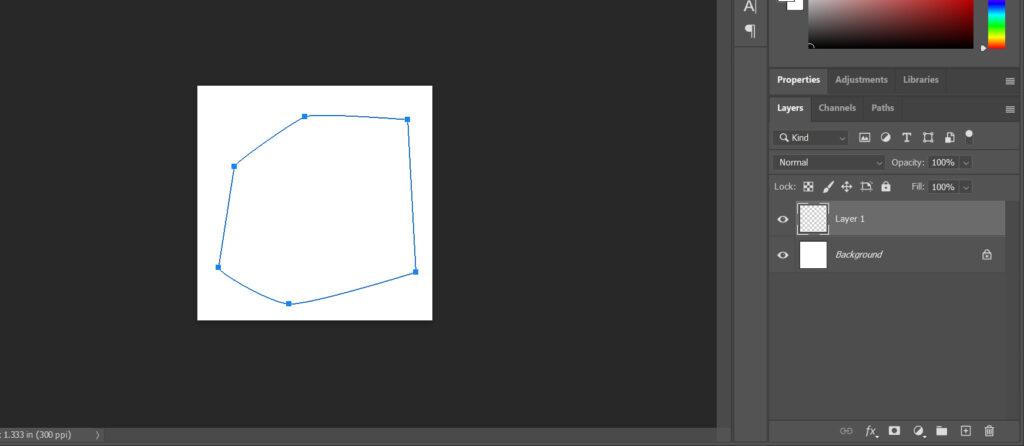
- Create the first path: Activate the Pen Tool and create a path on the canvas by adding anchor points and joining them.
- Convert to selection and fill it: In the Path menu, select the option that Make a Selection to convert the path into the selection and then fill it with any shade.

- Create another path in a new layer: Now create another layer and use the Pen Tool in Photoshop to draw another path with the anchor points on the new layer.
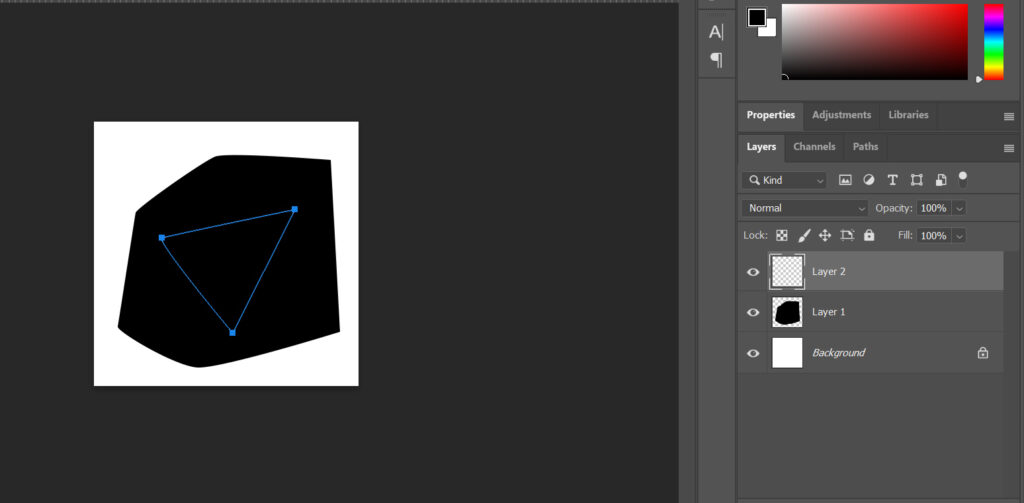
- Convert the second path into selection: Now convert the second path into a selection using the same process as above.

- Delete the selection from the first layer: Go to the original layer, and delete the selected second path by simply hitting delete on the keyboard.
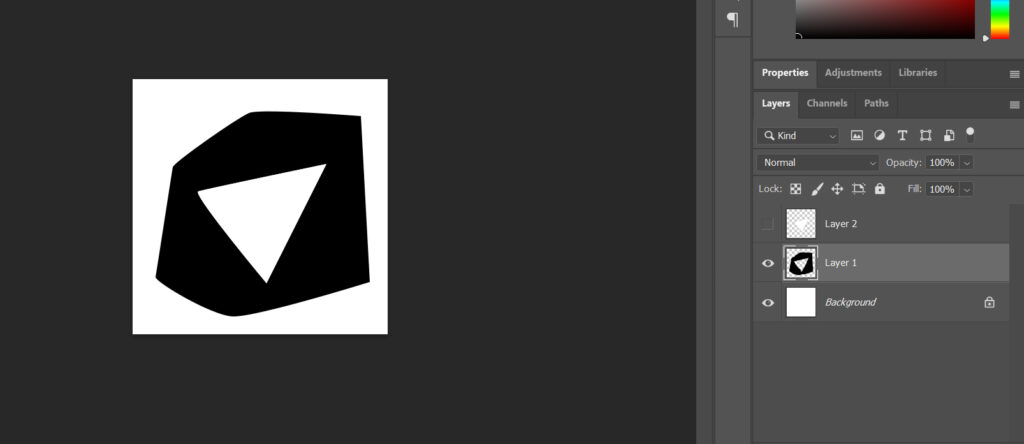
The new path will help you cut out a hole inside the shape. You can use this trick to make logos, create stunning designs on posters, and also make complicated shapes. This is a great way of making new designs.
How to Add a New Anchor Point in Photoshop
The trick to creating paths in Photoshop is knowing where to place the anchor points and joining them to make curves or lines. If you are creating a path in Photoshop, and you want to add a new anchor point, the process is relatively simple.
The first step is to select the Pen Tool from the menu in Photoshop. Then, make sure the path you want to modify is active. Once that is done, select the “Add Anchor Point” option by clicking on the Pen Tool in the menu. With this option selected, click on the path to add new anchor points wherever you need.

This option can be handy in drawing the paths more accurately in Photoshop. You can sketch any shape and create new masks. You can also delete or remove anchor points from the path.
How to Add a Delete Anchor Points in Photoshop
If you are drawing a path in Photoshop but accidentally added an anchor point at the wrong position, you can also delete it and keep working on your path. The process to achieve this is not very difficult.
Here is how you can delete an anchor point from a path drawn by the Pen Tool in Photoshop. Go to the menu and click on the Pen Tool to expand its menu. Select the option that says “ Delete Anchor Point”.

Now, find out the points you want to delete to refine the path and simply click on the anchor points you want to delete. You will now be able to make your path better and more precise.
How to Remove Objects from a Path in Photoshop
Once you start using the Adobe Pen Tool, you can achieve much more in your design. An interesting thing you can do with the Pen Tool in Photoshop is create paths around objects in images to separate them from the background.
For people who regularly work with images or have to enhance photographs, this is a cool trick to use. You can simply use the Pen Tool to draw a path around the object you want to cut out from the background and remove it. Here is how you can achieve this:
Create a Selection from a Path
The first step is to activate the Pen Tool from the menu and use it to outline the object you want to cut out from the image. Take your time and meticulously draw the path around the object. Make sure you close the path by connecting the anchor points.
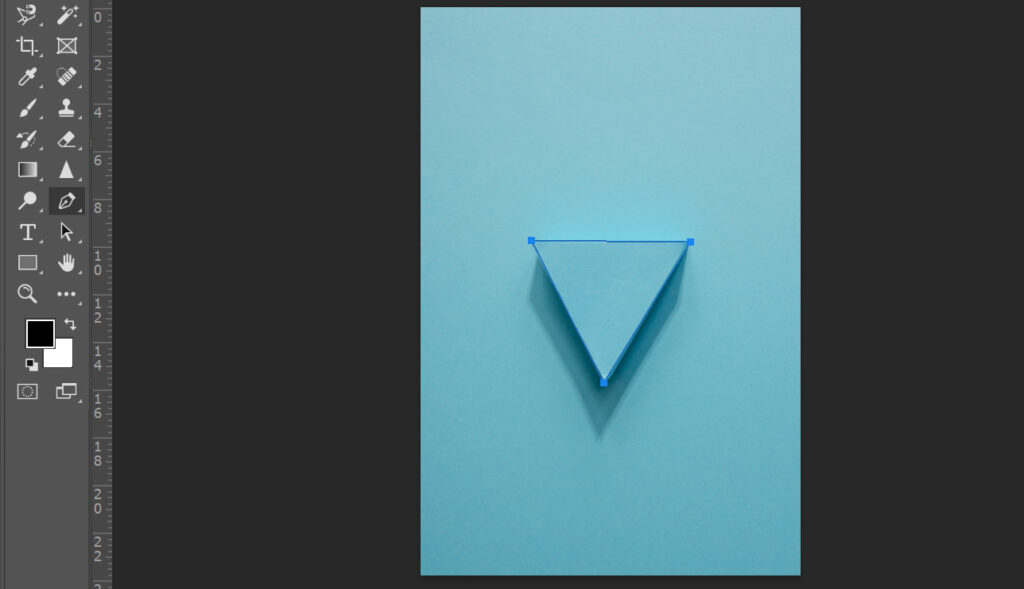
Once the path is complete, go to the Paths panel and right-click on the work path. Next, you need to select “Make a Selection” from the menu.
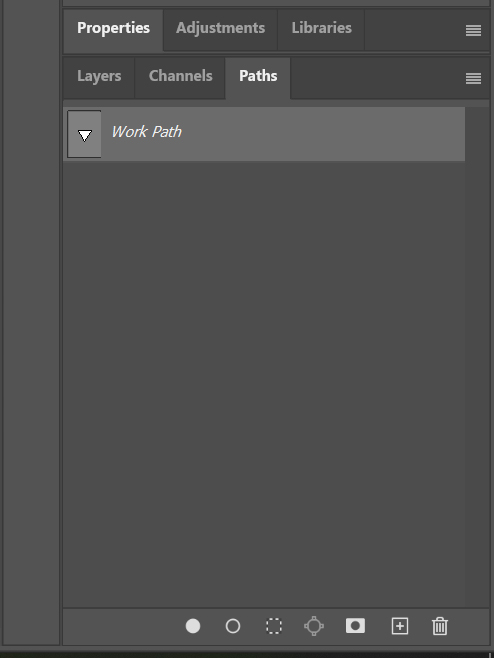
When the dialogue box appears, add ‘0’ as the value for Feather Radius. This will give your selection a sharper outline. Making a selection is essential when you are trying to remove any objects from an image, and the Pen Tool can help you achieve this.

Cut Out an Object from the Background
After you have used the Pen Tool to draw a path around the object you want to remove and have selected it, you are now ready to move it, transform it, or completely remove it from the image. There are two ways to achieve this. One way is to simply copy the selection and paste it on a new layer. This will remove the background of the image.
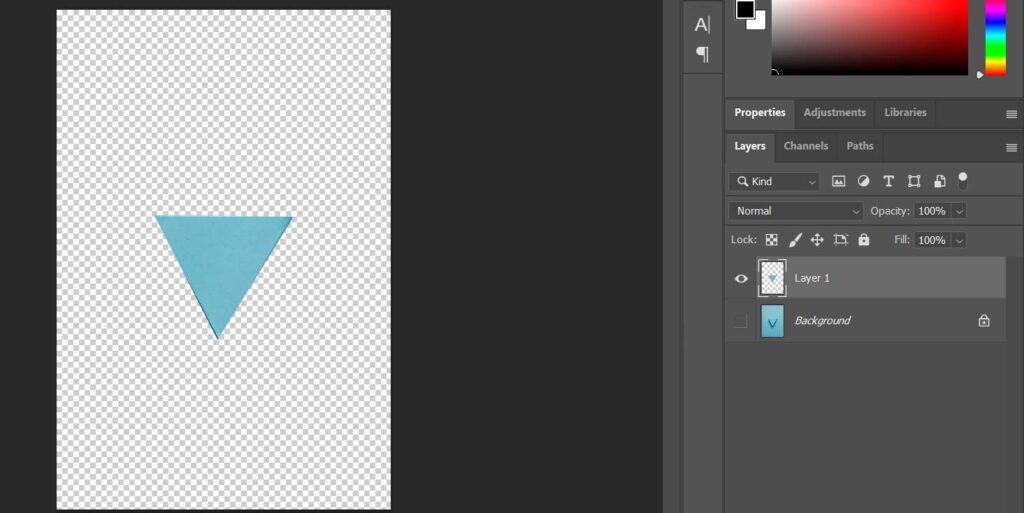
The second method is to create a layer mask. While your object is selected, navigate to the Layers panel and click on the “Add Layer Mask” option that you can find at the bottom of the panel. This action will hide the background and you will only be able to see the selected image.
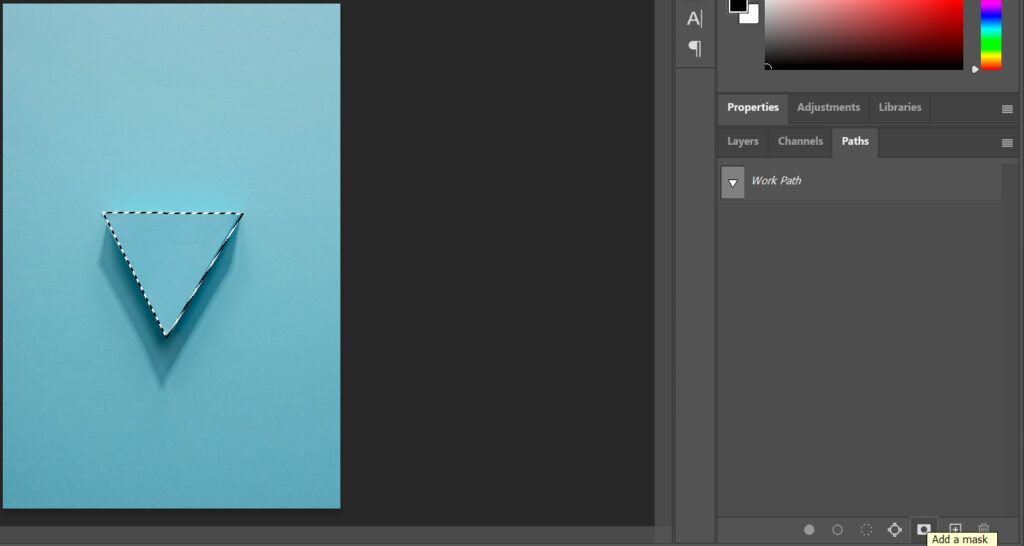
This was one of the best uses of the Pen Tool in Photoshop. There is so much more you can try with this tool. All you need is some practice and a little patience as drawing the right path can be a time-consuming process.
How to Make a Shape Using the Photoshop Pen Tool
Designers who work on logos, corporate designs, and other images, can use the Photoshop Pen Tool to create custom shapes. Here are the simple steps to achieve this goal in Photoshop.
- Activate the Pen Tool: Make sure you have the Pen Tool active by clicking on it in the tools panel.

- Draw a path: If you are trying to make a specific shape, add anchor points and draw a closed path to mimic this shape.
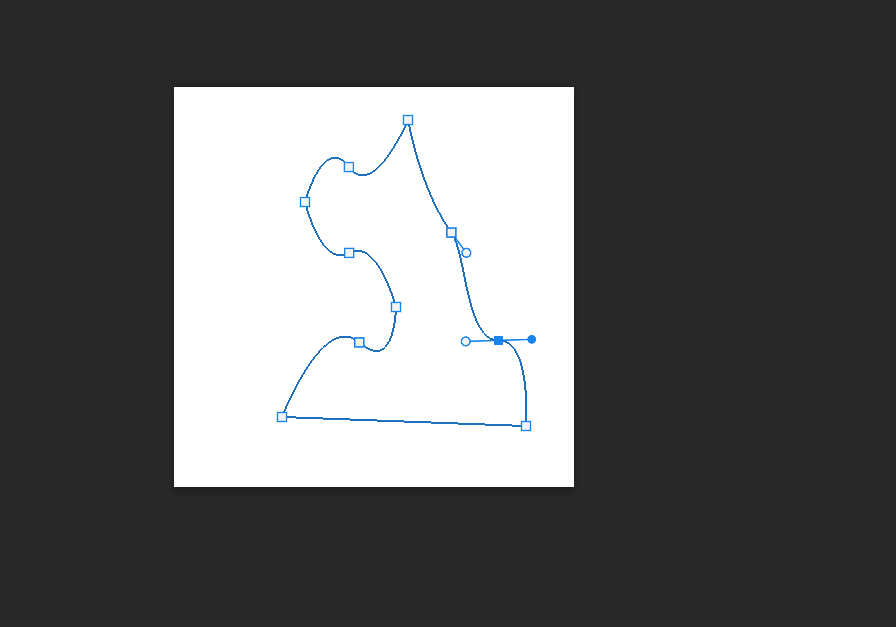
- Customize the appearance of the shape: Once the path is closed, you can adjust its appearance by tweaking the Fill and Stroke settings that you can find in the options bar.
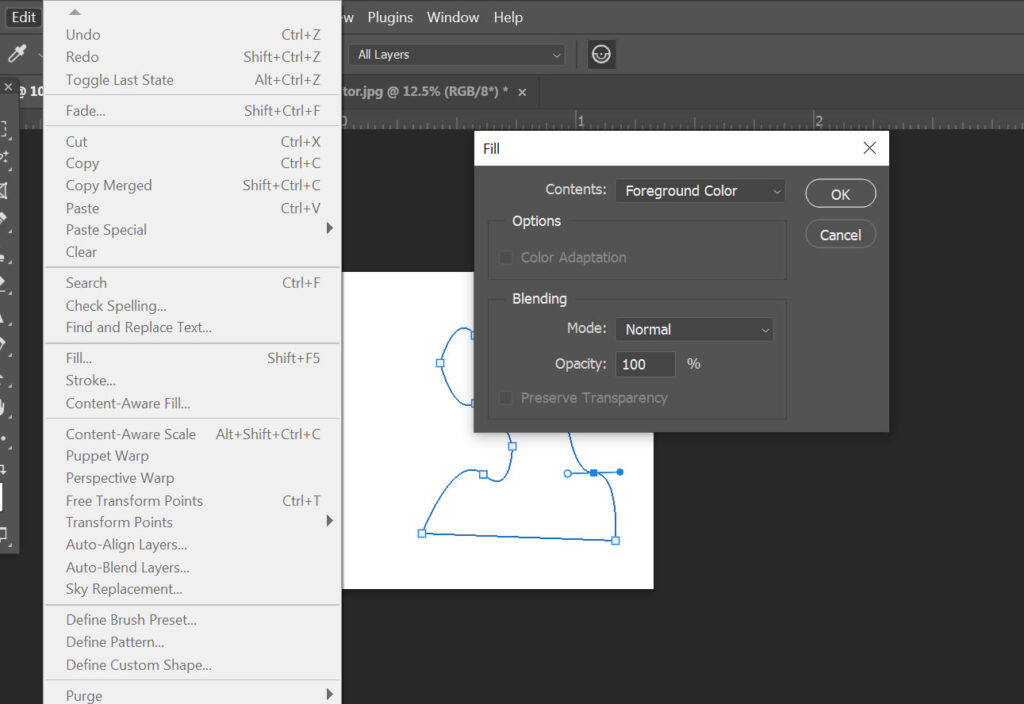
- Save your shape for future use: If you want to use this same shape again, you can click on Edit -> Define Custom Shape and reuse it in future projects.
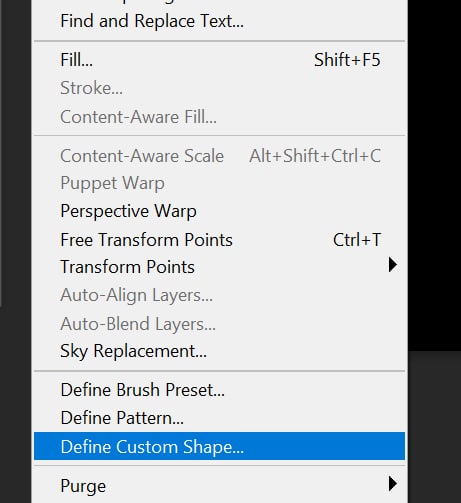
This is an interesting way to use the Adobe Pen Tool. You can design custom shapes that are completely reusable and can be used in different designs.
That’s a lot of information and techniques to remember. Feeling overwhelmed or searching for professionals who touch up your product photos by fulfilling other image-editing needs? You can get help from expert Photoshop experts.
How to Use the Convert Point Tool
The Convert Point Tool in Adobe Photoshop or Illustrator is used to change the type of anchor points on a path. You can:
- Click on a smooth (curved) anchor point to remove its direction handles and turn it into a corner point.
- Click and drag on a corner point to add direction handles and convert it into a smooth (curved) point.
- If you want to move anchor points, use the Direct Selection Tool instead.
Why Do You Need Professional Pen Tool Experts?
Professional pen tool experts provide precision, quality, and efficiency in image editing in different industries like e-commerce, fashion, advertising, and photography. Here are 7 reasons for collaborating with graphic designer experts:
- Precision & accuracy: Photo Clipping path experts handle intricate details like hair, fur, or complex edges with quality.
- Time-saver: Manual clipping paths can be daunting and time-consuming, especially for bulk projects or complex objects. Experts allow you to focus on other business works while they handle the editing.
- High-resolution images: Professionals use advanced tools and techniques and deliver top-notch results like color correction, edge refinement, and more.
- Consistency: Businesses like e-commerce stores, product catalogs, or others require consistency across multiple images. Professionals maintain quality and style simultaneously.
- Cost-effectiveness: Outsourcing professional clipping path service is budget-friendly, as opposed to investing time and resources in in-house training or expensive tools.
- Maintain industry standards: Professionals are experienced with the standard requirements for different platforms and industries, like Amazon, eBay, etc.
- Improved brand presentation: Professional graphic designers polished photos to attract customers, boost engagement, and increase conversions.
