
Removing background from an image, creating a transparent background for a logo, or transforming a messy jewelry image to e-commerce friendly – you can go with either manual (Photoshop options) or AI software. In this post, we’ll delve into everything about how to remove backgrounds in Photoshop:
- Using the Object Selection Tool for background removal
- Using the Quick Selection Tool for background removal
- The Quick Action Tool for background removal
- Using the Background Eraser Tool for background removal
- Pen Tool for background removal
- Magic Wand Tool for background removal
- Magic Eraser Tool for background removal
- Magnetic Lasso Tool for background removal and
- Photoshop Express for background removal
Also, you’ll get an idea about which business requires image background removal and the reason behind outsourcing image background removal services.
Adobe Photoshop offers different Tools to remove the background from an image, including:
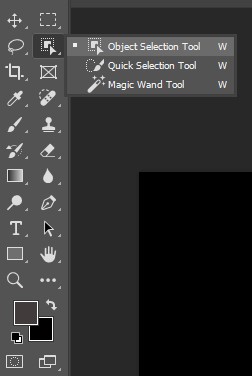
- Object Selection Tool (Automatic): Photoshop’s Object Selection Tool helps editors select objects or regions in an image. With this automatic Tool, you can detect objects and regions, or users can draw a selection around an object. However, underneath the “Object Selection Tool,” you’ll get 2 variations of the Tool:
a. Quick Selection Tool (Medium to more complex images): This Tool is ideal for medium to more complex images. You can precisely select and mask without any distractions.
b. Magic Wand Tool: Choose the magic wand Tool when your image background contains similar colors or similar tones everywhere. For instance, images with solid color backgrounds work best in this case.
- Eraser Tool: The Eraser Tool in Photoshop removes unwanted parts of an image by making pixels transparent or matching them to the background color. You can use it in logos, awkward figures, or other elements.
a. Background Eraser Tool: Adobe Photoshop removes parts of an image by erasing pixels to make it transparent. You can control the transparency range and the sharpness of the boundaries. If your subject has hair, the background eraser Tool will be ideal.
b. Magic Eraser Tool: The Magic Eraser Tool in Photoshop allows you to erase large areas of similar colors in an image smoothly. It also erases all nearby pixels that closely match that color.
- Quick Action Tool: The Tool allows users to make one-click edits to images. You can instantly edit simple to medium complex product images, blur or remove background, smooth skin, or more.
- Pen Tool: It is a great graphic design and photo editing Tool for creating shapes and paths. If your image has clearly defined edges, you can do it in a straight line or curve. Even if your image has inside areas, a pen Tool can handle that, too.
- Magnetic Lasso Tool: As a selection Tool, the Magnetic Lasso Tool automatically outlines and identifies anchor points. The Tool is useful for high-contrast images between subject and background.
Below we’ve showcased a table of different ways to remove background in Photoshop for a quick overview:
| Background Removal Tool | Edit Types | Complexity Level |
|---|---|---|
| Object Selection Tool | Best for well-defined objects with clear edges. | Medium |
| Quick Selection Tool | Effective for images with a distinct contrast between object and background. | Medium to more complex images |
| Quick Action Tool | Suitable for repetitive tasks and batch processing. | Simple to medium complex images |
| Background Eraser Tool | Useful for images with clear color contrast between foreground and background. | Medium |
| Pen Tool | Ideal for complex objects with intricate edges and detailed selections. | High |
| Magic Wand Tool | Effective for images with uniform backgrounds and distinct color contrast. | Simple to medium |
| Magic Eraser Tool | Remove unwanted objects or large areas of a specific color or texture from an image. | Simple to medium |
| Magnetic Lasso Tool | Suitable for objects with well-defined edges and moderate complexity. | Medium |
| Photoshop Express | Ideal for editing with minimal complexity; advanced editing like healing edits and Raw editing is available in a premium subscription. | Beginner-friendly; not for professional-level editing |
What you’ll learn in this article
- 1 1. How to Remove Background from an Image with the Object Selection Tool
- 2 2. How to Remove Background with the Quick Selection Tool
- 3 3. How to Remove Background with the Quick Action Tool
- 4 4. How to Remove Background with the Pen Tool
- 5 5. How to Erase Background on Photoshop with the Magic Wand Tool
- 6 6. How to Remove Background with the Background Eraser Tool
- 7 7. How to Use Photoshop to Remove Background with the Magic Eraser Tool
- 8 8. How to Remove Background with the Magnetic Lasso Tool
- 9 9. How to Instantly Remove Background with the Photoshop Express
- 10 How to Remove the Background from a Logo in Photoshop
- 10.1 How to Remove the Background from a Logo Using the Remove Background Tool
- 10.2 How Do You Remove the Background from a Logo Using the Background Eraser Tool
- 10.3 How to Remove the Background from a Logo Using the Quick Selection Tool
- 10.4 How Can You Remove the Background from a Logo Using the Magic Wand Tool
- 10.5 How to Remove the Background from a Logo Using the Pen Tool
- 11 What is Image Background Removal?
- 12 What is the Best Image Background Remover Software?
- 13 What are the Best Background Remover Mobile Apps?
- 14 What are the Differences Between Manual and Automated Background Removal Techniques?
- 15 How Do Professionals Remove Image Background?
- 16 How Much Does it Cost to Outsource Image Background Removal Services?
1. How to Remove Background from an Image with the Object Selection Tool
The Object Selection Tool in Photoshop is useful for automatically selecting objects or regions such as people, pets, sky, water, buildings, plants, and more in an image. Here’s a step-by-step instruction so that you can use the Object Selection Tool smoothly:
Step 1: Open Photoshop
Open your Photoshop and select the Object Selection Tool from the left Toolbar. You can press the shortcut key “W” on the keyboard.
Step 2: Select your subject
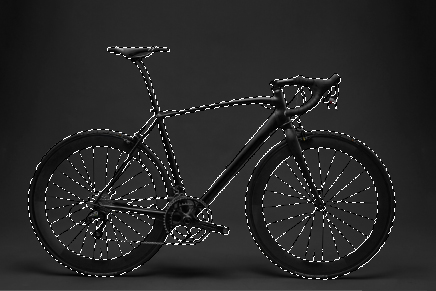
Hover your cursor over the object you want to keep; it might turn blue. Move your cursor in small circles over the object if it doesn’t turn blue. After that, click on the subject to create a selection around the subject. The Tool automatically detects and outlines it, as shown in the picture below.
Reminder: Don’t forget to unlock the layer (click the lock icon to unlock it) or create a duplicate layer so that you can get access to your original image.
Step 3: Refine your selection (if it is necessary)
If you want to include or exclude selection parts, hold down the Shift Key (hold Alt for Mac) to add more areas or subtract areas from your selection.
Step 4: Invert the selection
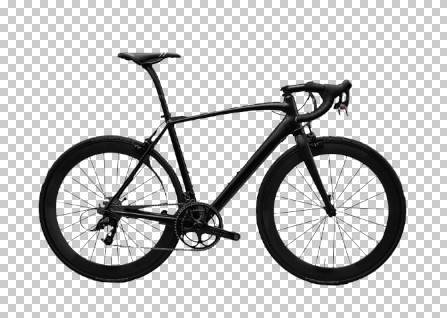
To remove the background instead of the subject, click the Select and choose Inverse option. This will select everything except the subject you want to remove from the background.
Step 5: Delete or Mash the background
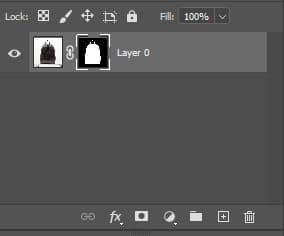
Press the Delete key on your keyboard to remove the selected background. You can also create a layer mask for non-destructive editing by clicking the Add Layer Mask button at the bottom of the Layers Panel. By doing so, you’ll be able to restore parts of the background if needed for further editing.
Step 6: Deselect your selection
Go to Select and select the Deselect option, or press Ctrl+D (Windows) / Cmd+D (Mac) to clear the selection. You can also find the Deselect option below your image if you use Photoshop 2024.
Note: The Object Selection tool uses algorithms to recognize an object’s edges and separate it from its surroundings. So, you might notice there are corrections on the bicycle wheel and other parts that require refining the selection by manually adjusting the edges to ensure a precise cut between the subject and background.
Step 7: Save your image
Save your work in a format that supports transparency, like PNG.
2. How to Remove Background with the Quick Selection Tool
The Quick Selection Tool is quite an easy Tool for removing background in Photoshop. It finds the edges and creates a line around the edges to separate the subject from the background. There is an option to modify the selection area too. As its name says, it really is a quick solution for difficult work.
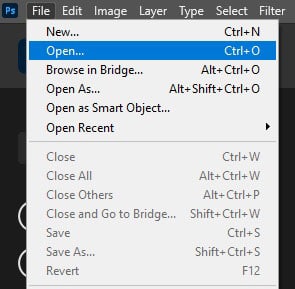
Step 1: Open the file
First, open the file in Photoshop. Go to the File option and click on Open and then choose the image you want to edit.
Step 2: Select the Quick Selection Tool
Pick the Quick Selection Tool from the Toolbar.
Step 3: Make a Selection
Now, start creating a selection around the image. Brush the round shape mark to make the selection. Don’t worry if you mark something mistakenly that you don’t want to remove. Just press the alt button on your keyboard; it’ll change the + sign inside the circle to the – sign. Now deselect the area that you don’t want to select by moving the circle around the area.
Step 4: Refine the Edge
Now, click on the Refine the edge option. If you can’t find it on the top menu, click on the Select button from the top. Then, you’ll find an option called Select and Mask.
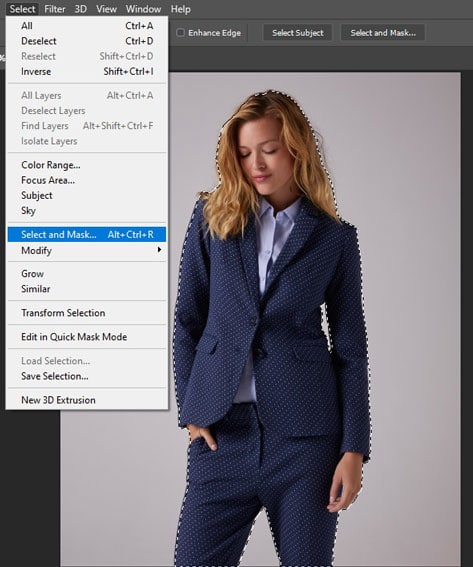
Now, press the shift button on your keyboard and click on the Select and Mask option at a time. A box like this will pop up. There are several options in this box.
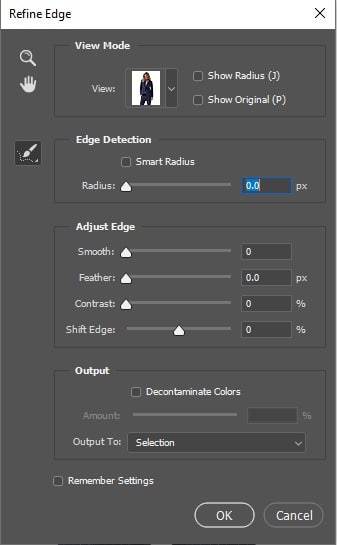
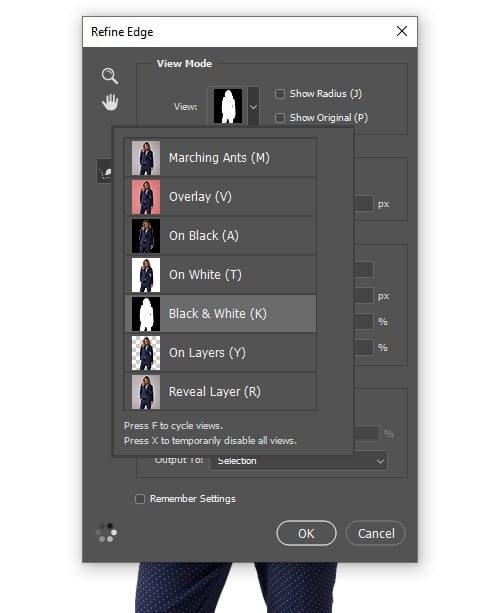
Step 5: Black & white view mode
From the view menu, you can choose any background option you want. Here, you can see several background options from where you can determine the way you want to see your selection. It’s best to use a solid color like black. Because that’ll give you a clearer look at your selection.
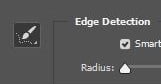
Step 6: Smart radius
Click on the smart radius box and shift the slider a little bit to make some areas more transparent. Like, for this image, we need to do that for the hair part. But while making the change, keep your eyes on the other parts of the image, too, because this will make a change in other parts too. So, don’t shift the slider too far.
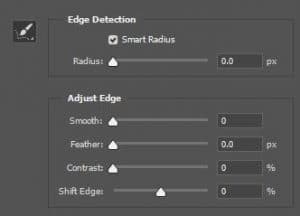
Just below that, there are some options under the name Adjust Edge. There you can find Smooth, Feather, Contrast, and Shift Edge. Shift the slides and check the changes in your image.
Step 7: Edge detection brush
Also, you can use a brush to get the transparency you want. Click on the brush icon from the left and brush around the area you want to make clear.
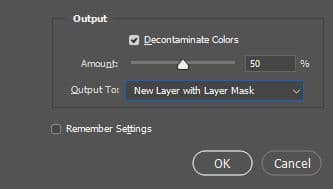
Step 8: New layer
When you’re satisfied with your adjustments, to finalize, click on the Decontaminate Colors option and put a small number. Finally, choose the output option to New Layer with Layer Mask.
Step 9: Save the file
Now that you’re done with your background removal, you can save your file. Go to File and select Save As and save your file to your desired folder.
3. How to Remove Background with the Quick Action Tool
Want to remove the background from an image in Photoshop quickly? The Quick Action Tool is useful for automatically removing the image background. This Tool is ideal for using simple subject background separation. Here is a detailed process to remove the background using the Quick Action Tool in Photoshop:
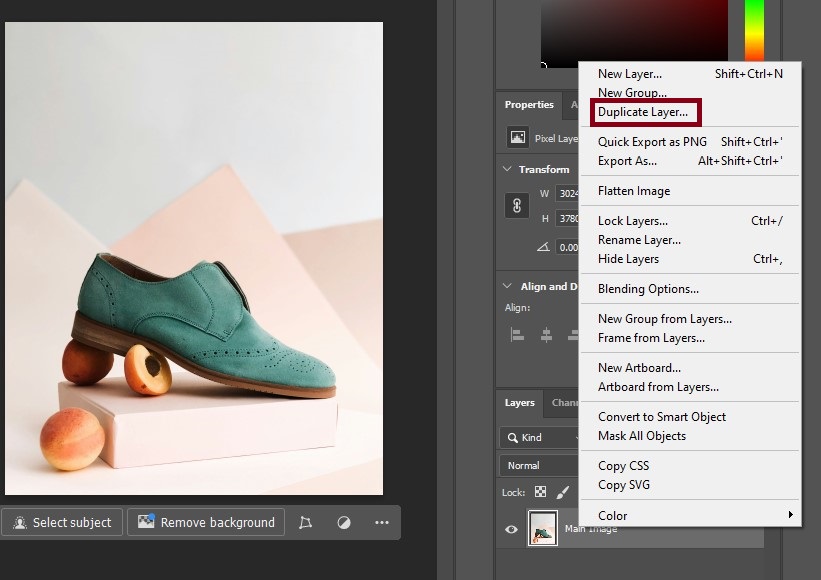
Step 1: Open your edited image
Run your Photoshop and open your desired image by accessing File > Open. Also, duplicate the current layer by pressing Ctrl+J (Windows) or Cmd+J (Mac) or selecting the option from the Layers Panel.
Step 2: Access the Quick Action Tool
The Tool is hidden underneath the Properties Quick Actions settings.
Step 3: Refine images
After clicking the Tool, you get a transparent background that you can use for different purposes. However, if you want to refine the edges for better precision, you can use Tools like “Refine Edge Brush” or adjust sliders like “Smooth” or “Feather” for cleaner edges.
Step 4: Save your image
Save your work in a format that supports transparency, like PNG.
4. How to Remove Background with the Pen Tool
The Pen Tool in Photoshop is useful for removing the background from images with sharp edges. Editing images with blurred edges can be frustrating sometimes. Pen Tool works by creating a path around a subject; as you draw the line, you can create it as you wish. The Pen Tool is useful for post-processing when working with curves or straight lines.
Step 1: Open the File
Open the image in Photoshop from which you want to remove the background. Go to File and click on Open and choose a file to edit. The pen tool is useful mostly for images that have sharp edges. So, it’s better if you choose an image with a sharp borderline.
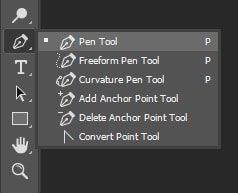
Step 2: Pick the Pen Tool
Select the pen tool from the toolbar options.
Step 3: Create Clipping Path
Now start making a clipping path. This is the main part of removing the background with the pen tool. Zoom your image as much as you need; 200% or 300% is a good size. Zooming is important to mark the edges perfectly.
Be careful while drawing the line; this will determine the part you want to remove. Create a curve where it is necessary to give your image a natural look.
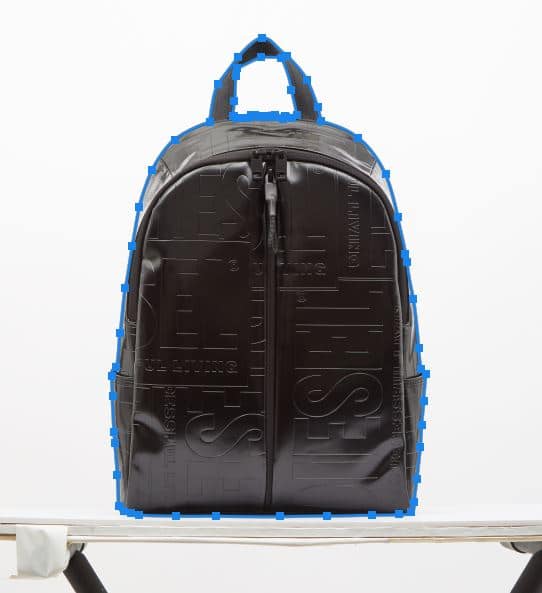
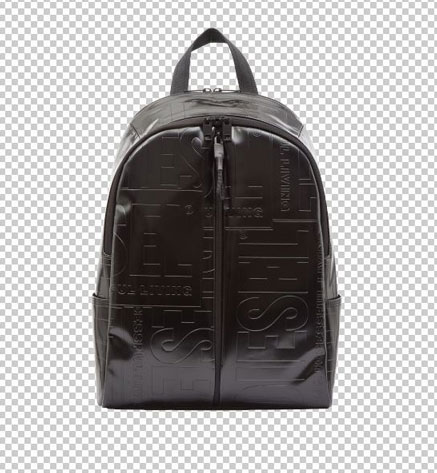
If your image contains an area inside your selection, you’ll have to make a separate selection for that area. Like, in this image, there is space inside the handle of the bag. So, I selected all the small areas as well.
You can do one after another, or you can create an inside selection along with the main selection.
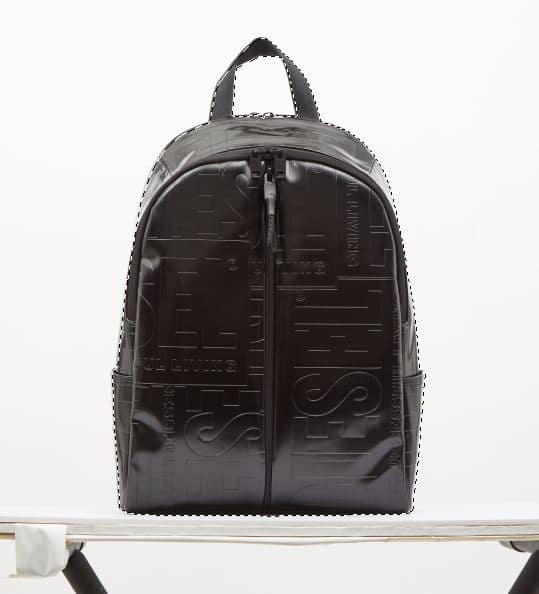
Step 4: Save Path
Save the path once your selection is done.
Step 5: Make Selection
When you are done with creating the clipping path, right-click on your mouse and click on Make Selection. Now your selection is ready.
Step 6: Create a Layer Mask
Go to the right side and create a new layer mask. Now, your background will disappear.
Step 7: Save the file
After removing the background, it’s time to save the file. Go to File, click on Save As, and save the file according to your wish.
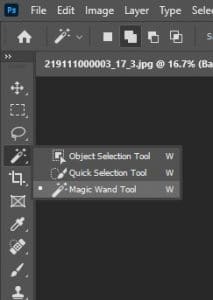
5. How to Erase Background on Photoshop with the Magic Wand Tool
Magic Wand Tool in Photoshop allows for the selective masking of image portions easily and quickly. Unlike other Tools that make selections based on pixel or edge, the Magic Wand Tool makes the selection based on tone and color without impacting others. That means it won’t read pixels; rather, it’ll look for a similar color tone and brightness or shadow level. Follow these steps to remove a background using the Magic Wand Tool:
Step 1: Open the edited image in Photoshop
Open the image in Photoshop, unlock the Background Layer, and choose Layer from Background to further edit. Or, Make a copy of the Background Layer. Right-click on the Background Layer and select Duplicate Layer. Or press Ctrl+J on the keyboard. This is for safety. Hide the Background Layer by clicking on the Eye icon beside the Background Layer.
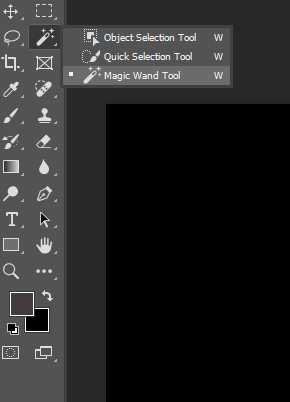
Step 2: Select the Magic Wand Tool
In the Photoshop Tools panel, select the Magic Wand Tool (Shortcut key: W). If it’s not visible, it may be grouped with the Quick Selection Tool.
Step 2: Adjust the Tool settings
Now, adjust the options so that you can get a better selection. You’ll find these options on the top menu.

- Tolerance
The tolerance level determines the range of colors that this Tool will select. The higher the tolerance level, the higher the range of selection. It’ll select the shades of color based on the tolerance number you set. So, choose a higher tolerance level if your subject and background have a similar color tone. If not, keep it lower.
- Contiguous
If it’s NOT marked, it will pick all the similar color tones that exist in the image with your first click. So, mark it only to select pixels that are connected to the first pixel.
- Anti-Alias
This option will make the edge smoother and give the image a more natural look by softening the edges and allowing semi-transparent pixels.
- Sample All Layers
If your image has multiple Layers, marking this option will apply the changes to all of them. Otherwise, changes will only be made to the current layer.
However, you can set the Tolerance (default is 32). Enable Anti-aliasing for smoother edges and check Contiguous to select only connected areas of similar color or uncheck to select all matching colors across the image.
Step 3: Hide the background layer
There is an eye icon with every layer. Click on the eye icon with the background layer and hide the layer.
Step 4: Select the Tool
Pick the Magic Wand Tool for the Toolbar. You will find it with the quick selection Tool.
Step 5: Configure the Magic Wand Tool
As you know, the magic wand Tool works based on tone or color reading, you’ll have to click anywhere on the background area, and this will select the area with the same tone.

You might need to select several areas. In that case, click on add to selection and start clicking on the area you need to include. Check the options below to adjust the options according to your needs.

See, in this image, we have several areas where the magic wand Tool couldn’t detect the same color. So we need to add those areas by clicking on those again.
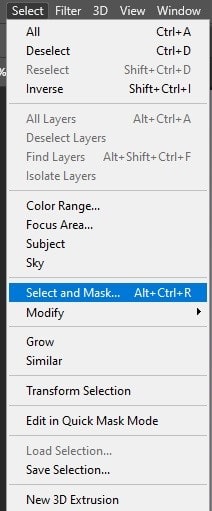
Step 6: Select and Mask
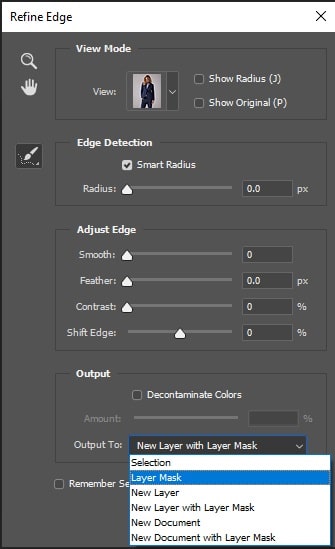
Once you’re done with the selection, go to the Select option. Under that, click on Select and Mask. Now you’ll see that your subject has disappeared. Don’t panic! Just press on alt + I. This will invert the selection. Now, it’s time to give the final touch.
Step 7: Refine Edges
Shift the sliders and see the changes happening in the image. Smooth the edge if you need it with the smooth slider. Try which suits best on your image and make the custom setting.

Step 8: Output
Go to output and click on Layer Mask.
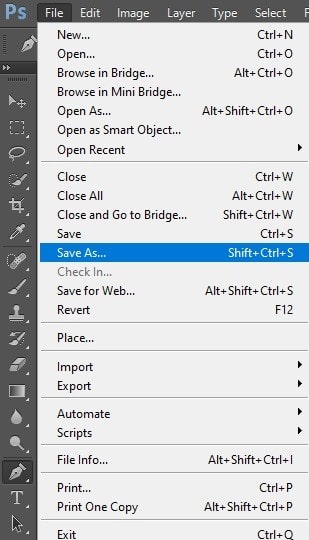
Step 9: Save the file
Save your file at your desired location. Click on File and go to Save As, and save as you want.
6. How to Remove Background with the Background Eraser Tool
The Background Eraser Tool targets and removes pixels matching a selected background color. This Tool is ideal for removing a specific background color by preserving details within the subject. This photo editing technique is best for a picture’s background that has multiple colors, or if you want quick and easy cutouts. Follow these step-by-step instructions to remove the background smoothly:
Step 1: Open the image in Photoshop
Drag, drop, or open the image in Photoshop and ensure the layer is unlocked. If it’s locked, click the lock icon beside the image file in the Layers Panel to unlock it.
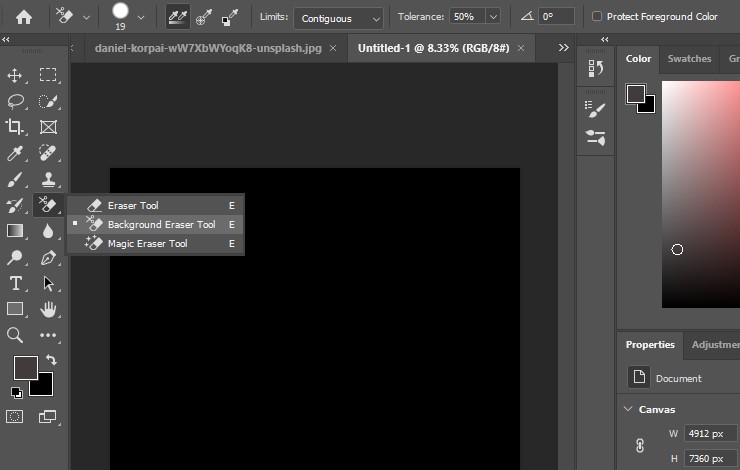
Step 2: Select the Background Eraser Tool
In the Tools Panel, right-click on the Eraser Tool and select the Background Eraser Tool from the dropdown menu. You can also click the “E” button on the keyboard.
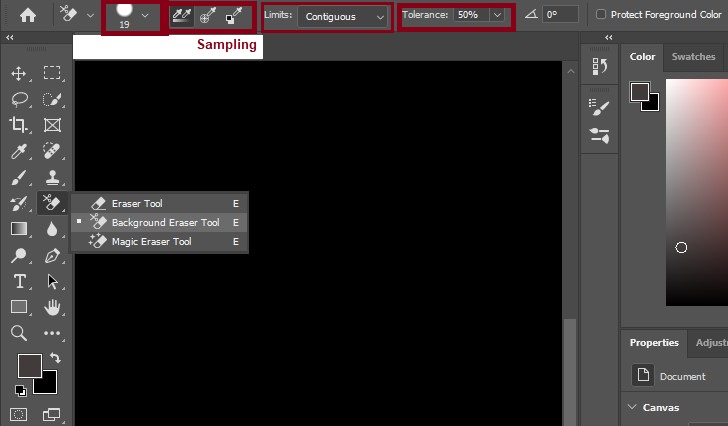
Step 3: Adjust the Tool settings
In the options bar at the top, customize the following settings:
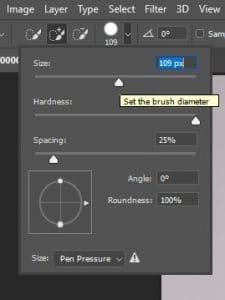
- Brush size, hardness, and spacing: Set an appropriate brush size for your image (use “]” to increase brush size or “[” to decrease brush size), hardness to 100% for precise edges, and spacing to 25%.
- Sampling: Choose “Continuous” for ongoing sampling or “Once” to sample only at the initial click.
a. Continuous: It’ll pick the sample every time you drag the brush.
b. Once: It’ll pick the color you click on first and remove only that color.
c. Background Swatch: This option erases only the background color. If you provide a sample of the color, this will remove that particular color only. - Limits: Choose the “Contiguous” option to erase only connected areas or the “Discontiguous” to erase all matching colors.
a. Contiguous: It’ll only pick the pixels that are touching the pixel under the + sign.
b. Discontiguous: This will erase everything that’s inside the big circle, and that matches the color you’re erasing.
c. Find Edges: This will find and separate the edges from the background. - Tolerance: Adjust the tolerance based on the subject’s background complexity (low for similar colors, high for varied colors).
Enable the Protect Foreground Color by checking if you want to preserve specific colors in your subject.
Step 4: Erase the background from the subject
Simply click and drag over the background you want to remove. The Tool samples the color and erases pixels matching that color within the brush area. Be mindful around the edges, and keep the crosshair (hotspot) on the background to avoid erasing parts of your subject.
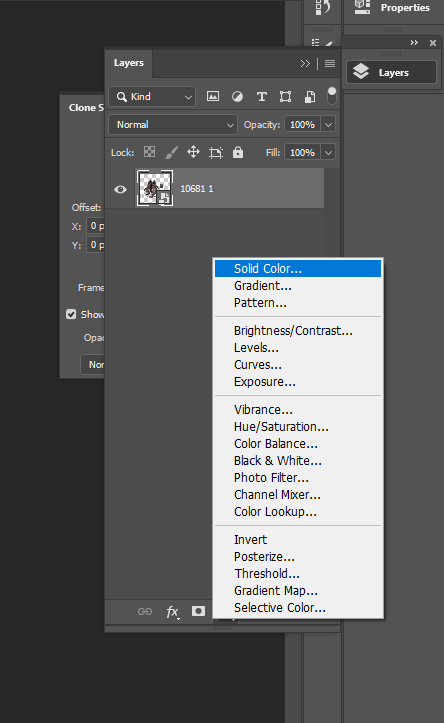
Step 5: Add a solid color fill to check your work
To recheck your work quality, add a solid color fill layer underneath your subject to identify any leftover areas that need to be cleaned. You can use a regular Eraser Tool or a Background Eraser Tool for further touch-ups.
Step 6: Refine edges
As we mentioned earlier, for intricate edges like hair or fur, or others, zoom in (Ctrl++ on Windows or Cmd++ on Mac). Must refine the edges on the original image, not the solid color layer. Also, you can switch between sampling modes or adjust tolerance levels for better results.
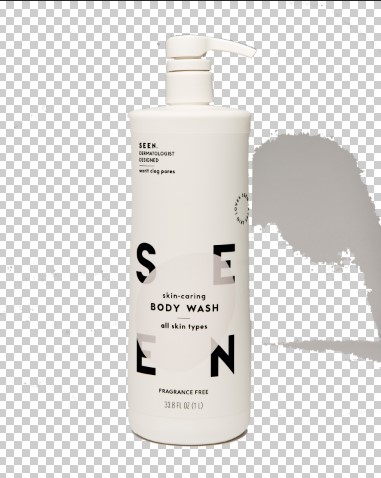
There are some imperfections, so use the Eraser Tool to give the subject a polished look. Once you are satisfied, save your file in a format that supports transparency, like PNG.
Yay! You get the final image after using the Background Eraser Tool to refine the edges perfectly.
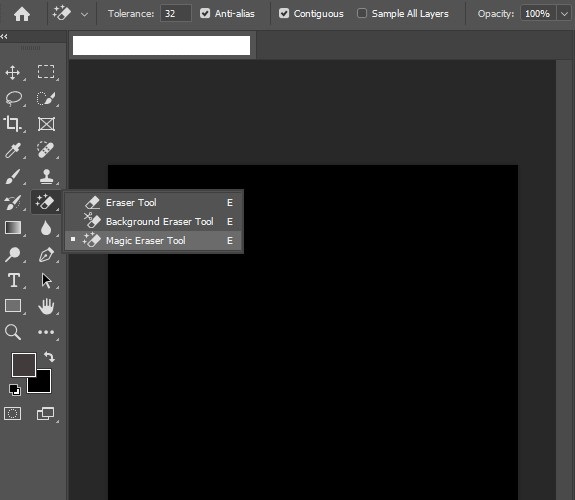
7. How to Use Photoshop to Remove Background with the Magic Eraser Tool
Magic Eraser Tool helps you remove large areas of similar colors with a single click and is best for simple backgrounds with distinct color separation. You can use this tool for a simple background with distinct colors. Here’s a step-by-step guide to removing background using the Magic Eraser Tool:
Step 1: Select the Magic Eraser Tool
Open the image in Photoshop and select the Magic Eraser Tool underneath the Eraser Tool. Simply click and hold the Tool Eraser Tool to reveal the dropdown menu, or press the shortcut key (E).
Step 2: Unlock the layer
Don’t forget to unlock the layer by clicking on the lock icon to release it and turn it into an editable layer. You can rename it as “Original Image” to anything. Or, you can make a new layer by duplicating the first and hiding it by clicking the eye icon.
Step 3: Adjust Tool settings
- Tolerance Level: This refers to how similar a color you want to erase. A lower value (i.e., 20-30) erases only colors very close to the one you click, while a larger value (i.e., 50-100) will erase a broader range of colors.
- Check Anti-aliased for smoother edges and Contiguous if you want to erase only pixels connected to the one you click.
- Opacity is 100%.
Step 4: Erase the background
Click on the area of the background you want to remove. The Tool converts similar colors to transparent pixels with one click.
However, you might notice there are parts of the background that remain; simply click on those areas again.
Step 5: Fine-tune the subject
Adjust the Tolerance and click again on areas for more precision if necessary. You can also use the regular Eraser Tool for manual adjustments if required. Remember, this Tool works best for simple backgrounds, not for complex ones with multiple colors.
Step 6: Save your work
Once you’re satisfied with the background remover, save your image in a format that supports transparency, like PNG.
8. How to Remove Background with the Magnetic Lasso Tool
This Tool is useful for the subject with complex edges and high contrast from the background. It not only saves time but also helps Photoshop detect the path for you. Below, we’ve highlighted detailed steps that ease your editing process:
Step 1: Launch Photoshop
Launch the latest version of Photoshop and open the image you want to remove from the background.
Step 2: Duplicate the background layer
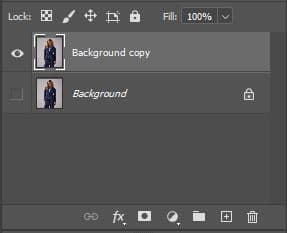
Right-click on the Background layer from the Layers Panel and select Duplicate Layer. By doing this, you get a backup of your original image, which allows you to revert if necessary. For testing purpose, turn off the visibility of the original layer by clicking the “eye” icon next to it.
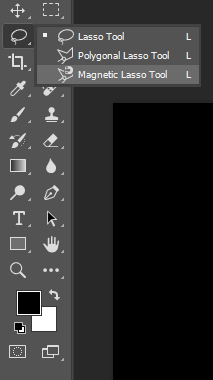
Step 3: Select the Magnetic Lasso Tool
Where do you find the Magnetic Lasso Tool? Choose the Magnetic Lasso Tool from the Toolbar on the left side of the screen. If it’s not visible, it may be nested underneath the Regular Lasso Tool. You can also get access by pressing L on your keyboard.
Step 4: Adjust the Tool settings from the top options bar
- Width: It sets how far from the edge the Tool will snap. Set width 5-10 pixels; mine is 10px.
- Frequency: It controls how many anchor points are placed (higher numbers for complex edges); mine is set to 57.
- Edge Contrast: It refers to how much contrast is needed to detect edges (regular range 5-10%).
Step 5: Trace around the subject
Carefully hover over the edge of your subject and click to start tracing. The benefit of using this Tool is it automatically detects edges as you move your cursor along them. Slow and steady for accurate edge selection.
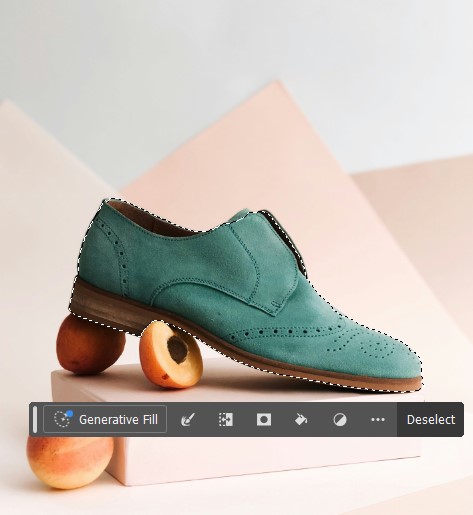
Click on the starting point to close the selection, which will appear as “marching ants” around the subject you want to remove from the background.
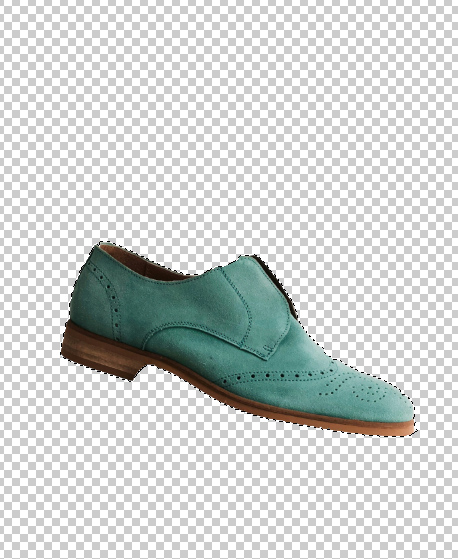
Step 6: Invert the selection and delete the background
Go to the Select option from the Photoshop top Toolbar and click the Inverse option. This changes your selection from your subject to everything else in the image. Now, press the Delete key on your keyboard to remove the background. Ta-da! You’ll see a transparent background by clicking on the eye icon of the real image.
Step 7: Refine your edges (optional)
If you notice any imperfection, use other Tools like Eraser or refine your selection with additional techniques to sharpen the images.
Step 8: Save your work
Hurray! You’ve removed the background successfully. But don’t forget to save your edits in your desired format.
9. How to Instantly Remove Background with the Photoshop Express
Want to use an AI-powered background remover Tool with high-quality and professional cutouts? Adobe Express, Photoshop AI Remove Background Tool is beginner-friendly and free to use. Here’s a step-by-step guide to removing BG using Adobe Photoshop Express:
Step 1: Sign in to Adobe Express
Go to Adobe Express’s official website page and sign in, or create an account using your email address if you don’t have one.

Step 2: Create a transparent or remove the background
After signing up, you’ll notice an amazing home page of Adobe Express with different photo editing features. There are 3 different options to remove the background using Adobe Express:
- Click the “Explore Quick Actions” from the top options.
- Select the “Remove Background” option from “More Ways to Start” or
- Click the “+” icon from the left top bar.
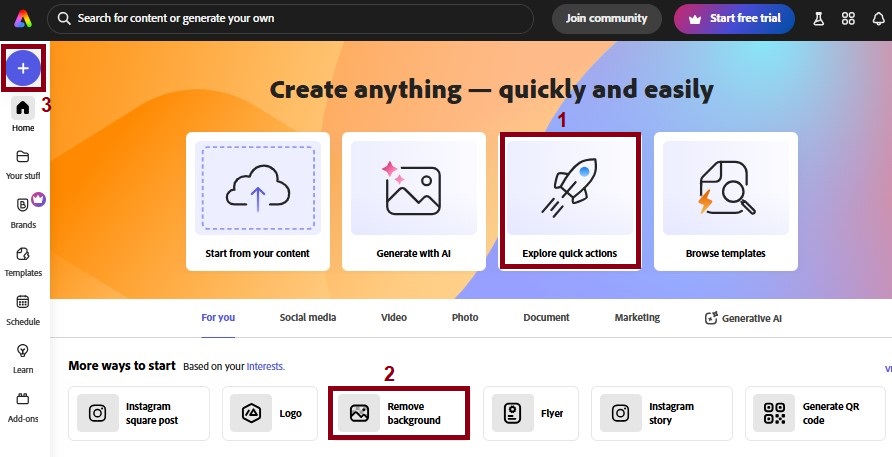
Process 1: If you choose the first option, click on “Quick Actions” and select the “Remove Background” option shown in the picture.
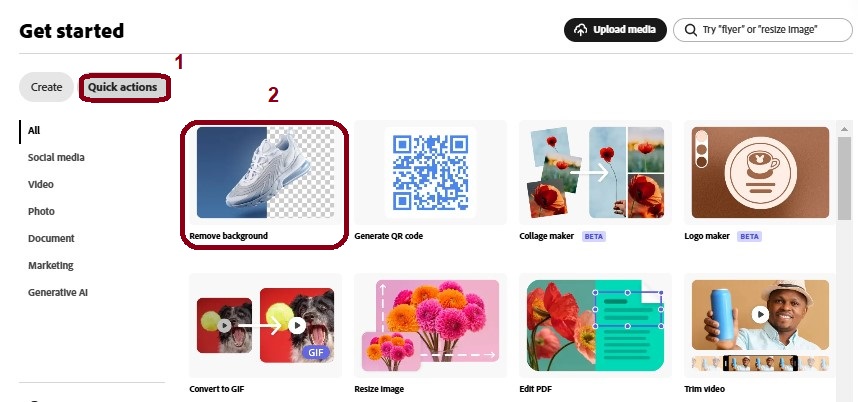
After that, simply drag and drop an image from your PC or browse the image to edit. The supported file formats include JPEG, JPG, PNG, or WEBP (up to 40 MB). Once your image is uploaded, Adobe Express will automatically remove the background, and you will get plenty of background options: transparent, custom color, and so on. The Tool uses AI to refine edges and create a transparent background.
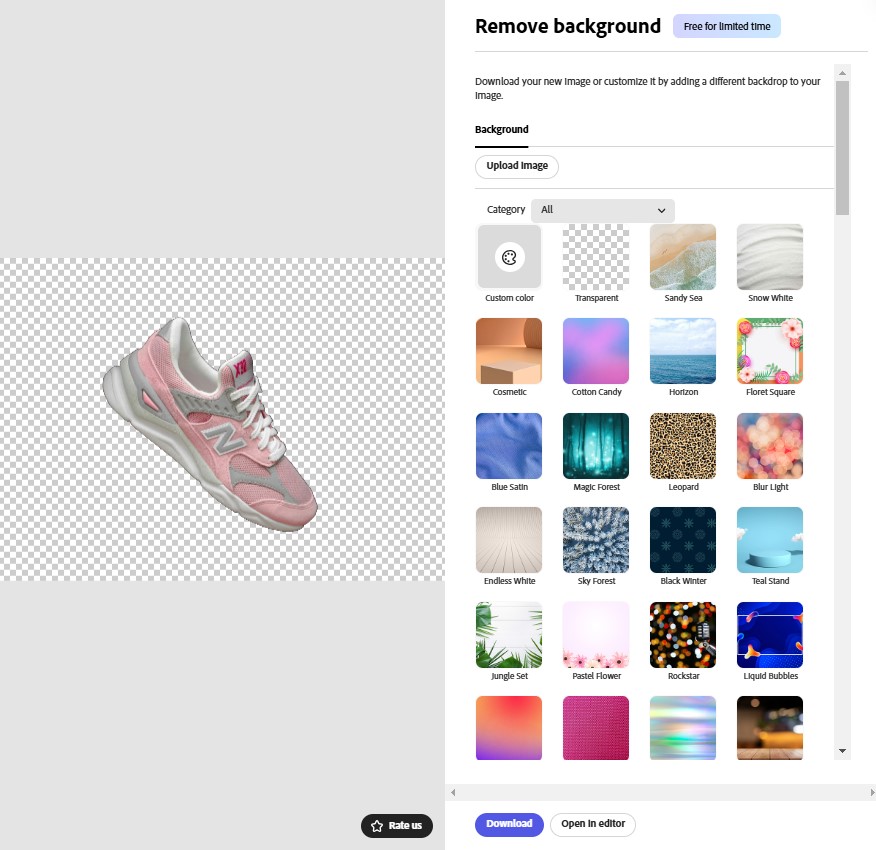
After removing the background, you can download it as a PNG file, which retains the transparent background.
- Process 2 & 3: If you select the other two options, the image background remover process is the same. Remember, for optimal results, choose images where the subject has clear edges and minimal overlapping with the background.
However, another effective Tool is the Remove Background Tool, ideal for simple backgrounds and clear foreground objects. Where is the Remove Background Tool in Photoshop? If you use Photoshop 2024 or press the keyboard shortcut Ctrl/Cmd+F, you can find the option underneath the image.
How to Remove the Background from a Logo in Photoshop
To remove the background from a logo in Photoshop, you can use different Tools, including:
- Remove Background Tool
- Background Eraser Tool
- Quick Selection Tool
- Magic Wand Tool, or
- Pen Tool.
How to Remove the Background from a Logo Using the Remove Background Tool
Step 1: Open Photoshop
Open your logo in Photoshop.
Step 2: Unlock the Background Layer
Make sure the Background Layer is unlocked (double-click and press OK if needed).
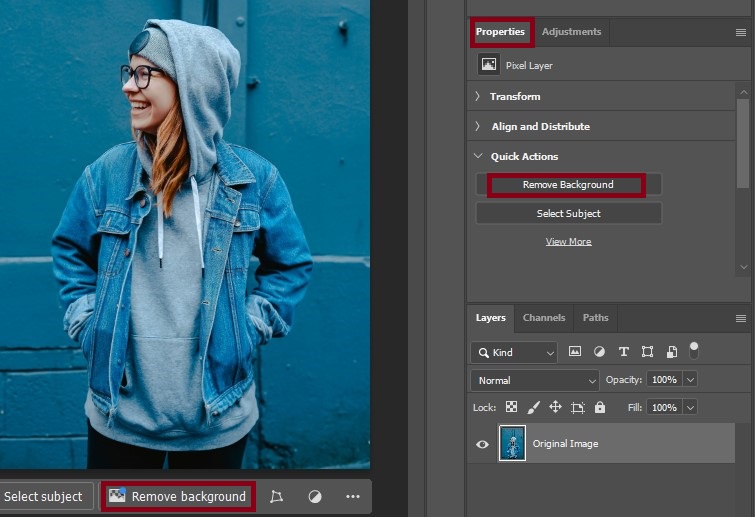
Step 3: Open the Properties Panel
Go to the Properties panel (Window > Properties).
Step 4: Click the Remove Background Button
Click Remove Background under the Quick Actions section.
Step 5: Review and Refine
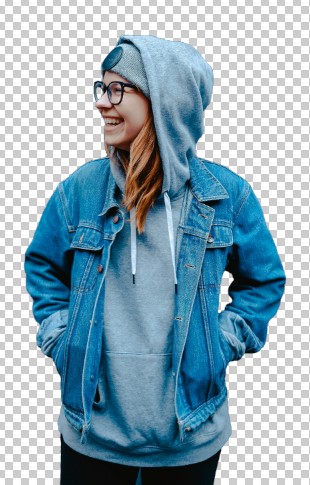
Photoshop will use AI to auto-detect and remove the background.
How Do You Remove the Background from a Logo Using the Background Eraser Tool
Step 1:Select the Background Eraser Tool
Select the Background Eraser Tool (under the Eraser tool – shortcut: E).
Step 2: Set Brush Size
Choose a soft brush and set the sampling to Once, limits to Discontiguous.
Step 3: Adjust the Tolerance
Adjust the tolerance depending on your background (start with 25%).
Step 4: Erase the Background
Erase around and behind the logo.
How to Remove the Background from a Logo Using the Quick Selection Tool
Step 1: Select the Quick Selection Tool
Select the Quick Selection Tool (also under the W shortcut).
Step 2: Brush Over the Logo
Brush over the logo to select it.
Step 3: Invert the Selection
Press Shift+Ctrl+I (Windows) or Shift+Cmd+I (Mac) to invert the selection.
Step 4: Delete the Background
Press Delete to remove the background.
Step 5: Refine Selection
Refine the selection with Select and Mask if needed (found in the top bar).
How Can You Remove the Background from a Logo Using the Magic Wand Tool
Step 1: Select the Magic Wand Tool
Select the Magic Wand Tool (shortcut: W).
Step 2: Click on the Background
Click on the background area.
Step 3: Adjust the Tolerance Setting
Adjust tolerance in the top menu if needed (e.g., 30–50 for more color range).
Step 4: Delete the Selected Background
Press Delete or Backspace to remove the selected background.
Step 5:Deselect the Selection
Deselect (Ctrl + D / Cmd + D) and save your logo as a PNG to retain transparency.
How to Remove the Background from a Logo Using the Pen Tool
Step 1: Select the Pen Tool
Select the Pen Tool (shortcut: P).
Step 2: Trace Around the Logo
Carefully trace around the edges of your logo to create a Path.
Step 3: Make Selection
Right-click and choose Make Selection.
Step 4: Invert the Selection
Invert the selection (Shift + Ctrl + I or Shift + Cmd + I).
Step 5: Delete the Background
Press Delete to remove the background.
What is Image Background Removal?
Image background removal is the process of separating the main subject of an image from its background. It makes the image transparent or provides a solid-colored background. This photo editing technique is used in graphic design, product photography, advertising, and more to enhance product visuals and attract audiences to the focus point. You can remove the image background using Adobe Photoshop or AI image background remover Tools.
The key purpose of Image Background Removal:
- Eliminate unwanted objects or busy backgrounds.
- Allows subjects to stand out, creates cleaner, and more professional visuals.
- Gives images a cleaner, sharper, and natural look.
- Helps to fulfill image size requirements on different marketing channels.
- Helps to maintain the consistency of images.
What Types of Images are Suitable for Background Removal?
Images with a clear contrast between the subject and background work best for background removal. For example, product photos, portraits, still objects, and so on.
When Do You Remove the Background from an Image?
When you want to add a graphic to an image, a busy background, an unwanted object, a transparent background, or a cutout for a design, all these factors indicate that you need to remove the background from an image.
What Challenges Do You Face in the Background Removal Process?
The main challenges you face in the background removal process include:
- Complex background textures
- Similar colors between the subject and background
- Poorly defined edges
- Low image quality
- Intricate details, like hair, and situations where the subject has fine or uneven outlines.
Who Needs Background Removal Services?
Professional photographers, studio owners, fashion brands, e-commerce sellers and online store owners, advertising agencies, online marketers, and many others require background removal services to enhance image quality, build trust, and increase potential traffic. Below, we’ve showcased the reason why all types of professionals use Adobe Photoshop to remove backgrounds or AI Tools:
Professional Photographers & Studio Owners
Background removal ensures clean and polished images and enables replacing backgrounds with custom designs, gradients, or branding elements. From photography portfolios to marketing materials or aligning with client expectations and industry standards, background removal is a must-have. A 2025 Business Research Insights report highlighted that the Background Removal Software Market was valued at approximately $0.6 billion in 2023 and is expected to reach $1.5 billion by 2032.
E-commerce Sellers and Online Store Owners
A 2023 Global Consumer Survey of MIRAKL reported that 51% of consumers did the majority of their shopping online and 75% of consumers moved more of tier spending online to find better value. That means selling across different marketplaces and introducing your products to a larger audience. Remove Photoshop distractions and swap them into a solid color or transparent background, which increases the chance of successful selling on giant e-commerce marketplaces like Amazon. For example, Pact, a sustainable clothing retailer, represents its product in a light beige background, but its Amazon listings all have a white background.
Advertising Agencies
High-resolution and busy background-free images look more engaging in print, digital, and social media ads. Impactful graphics without background clutter convey messages clearly and grab attention. It also enables seamless integration of products or models into different advertising layouts or creates composite images for brand storytelling.
Online Marketers and Influencers
Do you want to maintain a cohesive aesthetic across social media platforms and marketing materials? Consistent visuals help your brand/business recognition and engagement. Background removal enables marketers like you to stand out in crowded feeds with high-quality visuals: eye-catching thumbnails (essential for YouTube, Instagram, and TikTok), social media posts (promotional content, outfits, products, etc.), and more.
Fashion Brand
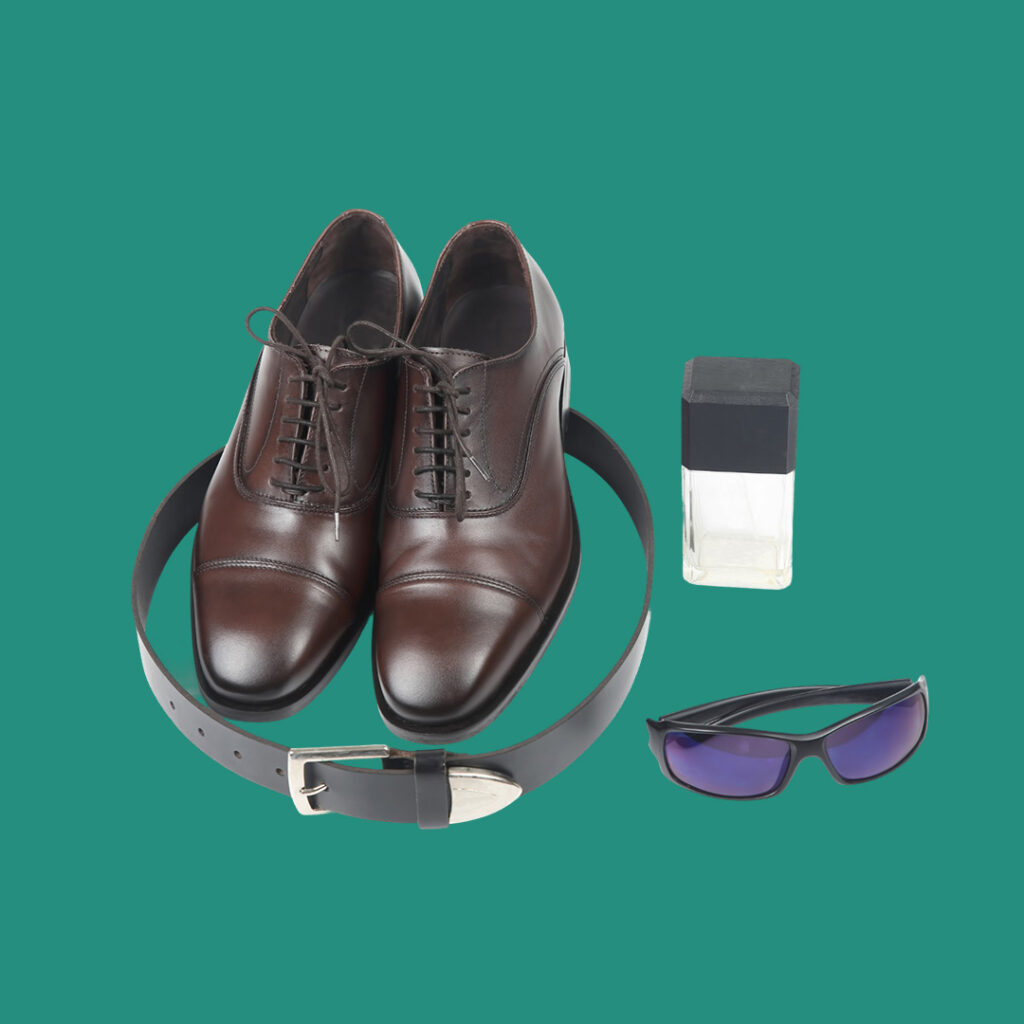
In the fashion industry, the presentation is key to impressing buyers and making them stick to your brand. Removing the background from the Image gives a clean and eye-soothing display of your products, including apparel, luxury items, jewelry, shoes, bags, sunglasses, and so on, which can lead to higher sales. Also, removing the background of your product image guides buyers to intricate details that build trust to rely on your fashion brand.
What is the Best Image Background Remover Software?
The 6 best image background remover software are Photoshop, InPixio, AutoClipping, Cutout.pro, PhotoScissors, and Clipping Magic for beginners, small businesses, freelancers, and individual users. Online automated background removal Tools separate the foreground from the background and provide polished visuals for social media, e-commerce, photographers, and others. For more details, let’s check out below:
1. Photoshop Software
Adobe Photoshop, trendy and effective image editing and design software – create stunning, lifelike images without distractions. We already highlighted different Photoshop Tool details to remove the background easily and smoothly. AI-powered remove background Tool in Photoshop nailed the process quickly with minimal effort. With this Tool, you can reveal or conceal with black and white brushes, refine edges, get transparent backgrounds, and generate backgrounds instantly with descriptive text prompts.
2. InPixio Remove Background
InPixio, AI-powered technology, is the best free software fo background remover online. It offers over 50 different image formats (PNG, JPG, RAW, etc) and is available on the web, mobile devices, and desktop users. Manual adjustments to batch processing (bulk image editing supports, saving time when working on multiple photos) and integration features are available.
AI might not detect complex backgrounds, and you must pay a yearly subscription to get access to advanced photo editing Tools.
3. AutoClipping
AutoClipping is a free online AI background remover Tool ideal for beginner photo editors who want to start their post-processing journey without messing around with complicated edits. With this background remover online Tool, anyone can do a transparent background, ensure your images have clearly defined subjects, convert photos into banners, make manual corrections, etc.
Limited to three background removals with a free version and might not deliver polished images.
4. Cutout.pro
An online image background remover, Cutout.pro is a versatile and automatic Tool for removing image and video backgrounds. It is suitable for social media, graphic design, and e-commerce. This Tool supports upscale images, batch processing, image enhancement (retouching), and various photo post-production processes. You can also change the background color and crop images to fit different social media needs.
Access to full features requires a subscription, which may not fit all budgets.
5. PhotoScissors
PhotoScissors is another free online BG remover Tool with presets for cropping images compatible with popular e-commerce sites (Amazon, eBay, etc.) and social media. You can upload unlimited files to precision cut-outs, resize them, remove AI backgrounds, and more.
Need to pay for photo credits and download high-resolution files.
6. Clipping Magic
AI technology-based online background remover Tool is Clipping Magic. With this Tool, you enjoy Auto-Clip AI, a Smart Editor, Auto Crop, Rotate/Straighten, resize, instant shadows, export optimizer, and many others. Also, you can remove bulk background with professional edits.
The free version leaves a watermark on edited images & a subscription is required to remove the watermark and download images.
What are the Best Background Remover Mobile Apps?
The 5 best free mobile apps for background removal are Pixelcut, Background Eraser Photo Editor, Photoroom AI Photo Editor, Magic Eraser, and Video Editor & Maker-Inshot. All these apps are beginner-friendly and do not require prior photo editing skills.
Pixelcut
Pixelcut is an AI-powered background eraser for iOS, Android, and the Web with various photo editing features: perfect cutouts, magic erasers, enhanced images, White backgrounds, batch editing, and hundreds of templates. You can also add drop shadows, borders, stickers, and text to your new background.
Background Eraser Photo Editor
Background Eraser Photo Editor is an auto cut-out and provides pixel-level accuracy. You can make high-quality transparent backgrounds without watermarks with this remove background AI Tool. Also, it supports Android, iOS, and the web so that you can access it easily.
Photoroom AI Photo Editor
Photoroom is another effective AI background remover app for Android, iOS, and the web. With this bg remover app, you can change the background color, add text to a photo, blur the background, batch edit, and more. Also, you can resize photos into the right format, sharpness, and so on.
Magic Eraser
The Magic Eraser background remover is a free and powerful app. It allows you to create a transparent background, add a new one, and use high-resolution zoom to ensure a smooth cut-out. This AI Tool can also remove unwanted objects, people, text, and blemishes from your real estate, photography, fashion, and other photos.
Video Editor & Maker- Inshot
InShot is a powerful all-in-one video editor and maker with advanced features: music, text, transition effects for videos, slow motion, video collage, blur background, and more. It is an easy-to-use editing app for Android and iOS that helps influencers create vlogs on YouTube, Instagram, TikTok, WhatsApp, Facebook, etc.
What are the Differences Between Manual and Automated Background Removal Techniques?
The difference between manual and automated background remover techniques lies in the efficiency, quality, and approach both techniques produce. Here is a detailed comparison of background removal by hand vs. AI background removal:
Manual Background Removal
Manual techniques give you flexibility for meticulous selection around intricate details, ensuring a clean, and natural-looking cutout. This is important for complex subjects like hair or fur.
Pros
- Ultimate control: Manual editing gives you control to edit every pixel professionally and ensures you refine even the smallest details smoothly.
- Pixel-perfect quality: If you edit by yourself or outsource, you’ll get professional-grade accuracy and highlight every tiny detail.
- Ability to make other edits: You get the flexibility to add retouch imperfections, add shadows, and other editings.
- Collaborate with humans to fix errors: Not sure how to best achieve the results, or get puzzled to fix errors? Working with a professional editor means you get help whenever you need it.
- No editing limitations or complexity: Whether you do it yourself or outsource, there are no limits. You receive the original source files and all layers so that you can make revert edits.
- No additional cost: If you already pay for Photoshop or similar software, there’s no extra expense involved.
Cons
- Professional-level skill: Manual removal requires a higher level of skill and experience to perform the pen Tool, quick selection Tool, eraser Tool, and many other advanced editing techniques.
Automated Background Removal
Do you want to remove the background online? Automated or AI background removal involves technology outside of Photoshop. The technology automatically detects the background and foreground and creates a cropped-out image on a transparent or white background.
Pros
- Faster & more efficient: Editing by AI can handle complex jobs quickly, but it requires a human touch for a professional look.
- No photo editing skills: You don’t need any photo editing skills to use AI photo editing software. Simply upload the photo, and the technology will retouch it.
- Free tools available: Many AI background remover software or apps are available free of charge.
Cons
- Deliver imperfections: AI technology isn’t quite perfect compared to manual; it provides images with serious imperfections and errors.
- Can’t combine with other edits: You can’t accomplish other required manipulations like retouching, drop shadow adding, and so on.
- Hidden cost: You might have to pay for advanced photo editing settings for better quality, though they advertise that you can use them for free.
- No one to give feedback to fix issues: You need to handle issues on your own.
- Degrades image quality: The AI background removals include image compression or other processes that degrade the quality of your product images.
- Unclear image usage rights: Before using an AI Tool, read the fine print.
How Do Professionals Remove Image Background?
Photoshop professionals remove image background by following four easy steps:
Step 1: Send sample images
Send your edited samples to professionals’ emails or click Free Trial if they offer any.
Step 2: Get the Quote
Professionals will review your images and send a unique custom quote (pricing details).
Step 3: Start working
When you agree on the pricing, professionals use manual techniques and feature-rich Photoshop to remove image backgrounds so that you get the highest quality.
Step 4: Receive edited images
The process is quite simple if you outsource a background remover service from clipping path specialists. As a business owner or entrepreneur, it’s complicated to adopt Photoshop skills and invest time, but you can invest your precious time in business growth. As per statistics, companies that outsource their background removal can save over 65% on operational expenses and maximize the productivity of their in-house teams.
Also, outsourcing photo editing, like background removal services, offers you immense benefits, including:
- Expertise and quality assurance: Expert graphic designers use advanced editing software, and expertise leads to higher quality results compared to in-house efforts.
- Cost-effectiveness: Outsourcing reduces extra costs, like hiring a full-time staff or investing in expensive software licenses. Also, you get discounts on bulk orders, making it a win-win option.
- Time efficiency: Professional services streamlined workflows that allow for quicker processing times.
- Consistency across images: Consistent image quality is vital for brand presentation. Outsourced services ensure the same aesthetic standards, which is essential for e-commerce platforms and many others.
How Much Does it Cost to Outsource Image Background Removal Services?
The cost to outsource image background removal services ranges between $0.41 to $7.00 or more, depending on image complexity and editing hours. For more details, check out the pricing structure below:
| Hours | Simple | Medium | Complex |
|---|---|---|---|
| 12 | $0.41 | $2.09 | $9.80 |
| 24 | $0.29 | $1.49 | $7 |
| 48 | $0.23 | $1.19 | $5.60 |
How Long Does it Take to Remove the Background From Product Photos?
Removing background from product photos takes a few seconds to a couple of minutes, depending on the image complexity, skill level, and software you use. But for better image enhancement and e-commerce-friendly, Photoshop experts might take around 10 minutes to refine the selection, adjust the color balance to match the new background, add a subtle drop shadow, image size adjustments, and more.
